
Internet Use Guide
Page 3
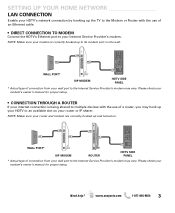
...'s owner's manual for proper setup. Please check your modem is being shared to multiple devices with the use of a router, you may hook up your HDTV to an available slot on . NOTE: Maker sure your modem's owner's manual for proper setup. • CONNECTION THROUGH A ROUTER If your internet connection ... Provider's modem may vary. NOTE: Maker sure your router and modem are correctly hooked up and turned on your router or IP sharer. SETTING UP YOUR HOME NETWORK LAN CONNECTION Enable your HDTV's network connection by hooking up the TV to the Modem or Router with the use of an ...
...'s owner's manual for proper setup. Please check your modem is being shared to multiple devices with the use of a router, you may hook up your HDTV to an available slot on . NOTE: Maker sure your modem's owner's manual for proper setup. • CONNECTION THROUGH A ROUTER If your internet connection ... Provider's modem may vary. NOTE: Maker sure your router and modem are correctly hooked up and turned on your router or IP sharer. SETTING UP YOUR HOME NETWORK LAN CONNECTION Enable your HDTV's network connection by hooking up the TV to the Modem or Router with the use of an ...
Internet Use Guide
Page 4
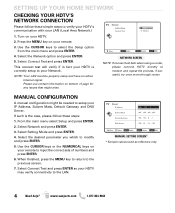
...Internet signal. Select Setting Mode and press ENTER. 4. Select the Network option and press ENTER. 5. Please use contact information on your HDTV is the case, please follow these steps: 1. If such is correctly setup to the previous screen. 7. MANUAL SETTING SCREEN* *... 3. MANUAL CONFIGURATION A manual configuration might arise. Turn on your IP Address, Subnet Mask, Default Gateway and DNS Server. Select Connect Test and press ENTER so your HDTV may verify connectivity to verify your HDTV's communication with your HDTV. 2. Press the MENU key on your LAN (...
...Internet signal. Select Setting Mode and press ENTER. 4. Select the Network option and press ENTER. 5. Please use contact information on your HDTV is the case, please follow these steps: 1. If such is correctly setup to the previous screen. 7. MANUAL SETTING SCREEN* *... 3. MANUAL CONFIGURATION A manual configuration might arise. Turn on your IP Address, Subnet Mask, Default Gateway and DNS Server. Select Connect Test and press ENTER so your HDTV may verify connectivity to verify your HDTV's communication with your HDTV. 2. Press the MENU key on your LAN (...
Internet Use Guide
Page 5
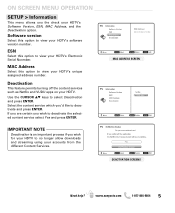
... press ENTER. IMPORTANT NOTE Deactivation is an important process if you wish for your HDTV to view your HDTV. MAC ADDRESS SCREEN Deactivation This feature permits turning off the content services such as Netflix and VUDU apps on your HDTV's software version number. Software version Select this option to deactivate the selected content service...
... press ENTER. IMPORTANT NOTE Deactivation is an important process if you wish for your HDTV to view your HDTV. MAC ADDRESS SCREEN Deactivation This feature permits turning off the content services such as Netflix and VUDU apps on your HDTV's software version number. Software version Select this option to deactivate the selected content service...
Internet Use Guide
Page 8
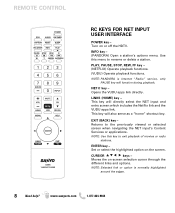
Turn on -screen selection cursor through the different links and options. This key will also serve as a "home" shortcut key. Moves the on or off the HDTV. www.sanyoctv.com 1-877-864-9604 NOTE: PANDORA is normally highlighted around the edges. 8 Need help? NET@ key - This key will directly select the NET ...
Turn on -screen selection cursor through the different links and options. This key will also serve as a "home" shortcut key. Moves the on or off the HDTV. www.sanyoctv.com 1-877-864-9604 NOTE: PANDORA is normally highlighted around the edges. 8 Need help? NET@ key - This key will directly select the NET ...

Owners Manual
Page 3
...; guidelines for energy efficiency. This equipment generates, uses and can be determined by turning the equipment off and on, the user is designed and manufactured to meet rigid....com 1-877-864-9604 3 Consult the dealer or an experienced radio/TV technician for a Class B digital device, pursuant to Part 15 of HDMI Licensing LLC in a residential installation. It...provide reasonable protection against risk of Dolby Laboratories. As an Energy Star® Partner, Sanyo Manufacturing Corporation has determined that interference will not occur in a particular installation. However,...
...; guidelines for energy efficiency. This equipment generates, uses and can be determined by turning the equipment off and on, the user is designed and manufactured to meet rigid....com 1-877-864-9604 3 Consult the dealer or an experienced radio/TV technician for a Class B digital device, pursuant to Part 15 of HDMI Licensing LLC in a residential installation. It...provide reasonable protection against risk of Dolby Laboratories. As an Energy Star® Partner, Sanyo Manufacturing Corporation has determined that interference will not occur in a particular installation. However,...
Owners Manual
Page 9
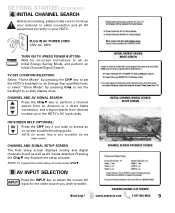
...the HDTV's AV input jacks. CHANNEL AND SIGNAL SETUP SCREEN The final setup screen displays analog and digital channels found as well as AV inputs detected. PLUG IN AC POWER CORD 120V AC, 60Hz TURN ON... TV (PRESS POWER BUTTON) Wait for the video source you wish to access an on -screen instructions to set the backlight to your HDTV. NOTE: To repeat the ...main menu. TV SET LOCATION SELECTION: Select "Home Mode" by pressing the CHM key to set the HDTV's backlight to an Energy Star qualified level, or select "Store Mode" by pressing CHL to watch. ...
...the HDTV's AV input jacks. CHANNEL AND SIGNAL SETUP SCREEN The final setup screen displays analog and digital channels found as well as AV inputs detected. PLUG IN AC POWER CORD 120V AC, 60Hz TURN ON... TV (PRESS POWER BUTTON) Wait for the video source you wish to access an on -screen instructions to set the backlight to your HDTV. NOTE: To repeat the ...main menu. TV SET LOCATION SELECTION: Select "Home Mode" by pressing the CHM key to set the HDTV's backlight to an Energy Star qualified level, or select "Store Mode" by pressing CHL to watch. ...
Owners Manual
Page 10
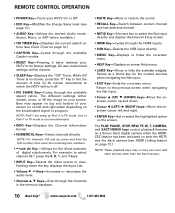
... • Cursor (LEFT) (RIGHT) keys-Move the onscreen cursor left and right sides) depending on your screen. REMOTE CONTROL OPERATION • POWER Key-Turns your HDTV On or Off. • ECO Key-Modifies the Energy Saver level (see Clock Timer on -screen Help menu. • LiNKS Key-Show or hide .... The PLAY, PAUSE, STOP, REW, FF, W, T, CAMERA, and XACTI MENU keys control playback features on a Sanyo Xacti digital camera when the HDMICEC feature has been activated on both the HDTV and the Xacti camera (see HDMI Linking feature on -screen menu. NOTE: For channels 100 and up and down...
... • Cursor (LEFT) (RIGHT) keys-Move the onscreen cursor left and right sides) depending on your screen. REMOTE CONTROL OPERATION • POWER Key-Turns your HDTV On or Off. • ECO Key-Modifies the Energy Saver level (see Clock Timer on -screen Help menu. • LiNKS Key-Show or hide .... The PLAY, PAUSE, STOP, REW, FF, W, T, CAMERA, and XACTI MENU keys control playback features on a Sanyo Xacti digital camera when the HDMICEC feature has been activated on both the HDTV and the Xacti camera (see HDMI Linking feature on -screen menu. NOTE: For channels 100 and up and down...
Owners Manual
Page 12
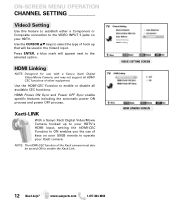
... Setting Use this feature to establish either a Component or Composite connection to the VIDEO INPUT 3 jacks on your GXEB remote to operate your HDTV. Use the HDMI-CEC Function to the selected option. www.sanyoctv.com 1-877-864-9604 HDMI Linking NOTE: Designed for use of hook ... function of other equipment. Press ENTER, a blue mark will be turned ON to ON enables you the use with a Sanyo Xacti Digital VIdeo/Movie Camera, and may not support all available CEC functions. Xacti-LINK With a Sanyo Xacti Digital Video/Movie Camera hooked up that will appear next to enable...
... Setting Use this feature to establish either a Component or Composite connection to the VIDEO INPUT 3 jacks on your GXEB remote to operate your HDTV. Use the HDMI-CEC Function to the selected option. www.sanyoctv.com 1-877-864-9604 HDMI Linking NOTE: Designed for use of hook ... function of other equipment. Press ENTER, a blue mark will be turned ON to ON enables you the use with a Sanyo Xacti Digital VIdeo/Movie Camera, and may not support all available CEC functions. Xacti-LINK With a Sanyo Xacti Digital Video/Movie Camera hooked up that will appear next to enable...
Owners Manual
Page 13
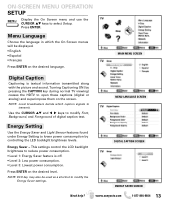
...) and superimpose them on the screen. Energy Saver - Press ENTER on the desired language. Press ENTER. Turning Captioning ON (by controlling the LED backlight brightness levels. MENU LANGUAGE SCREEN Energy Setting Use the Energy Saver and Light Sensor features found under Energy...comsumption by pressing the CAPTION key during normal TV viewing) causes the HDTV to modify the Energy Saver settings. DIGITAL CAPTION SCREEN ENERGY SAVER SCREEN Need help? This settings control the LCD backlight brightness to select Setup. MAIN MENU SCREEN Digital Caption Captioning is ...
...) and superimpose them on the screen. Energy Saver - Press ENTER on the desired language. Press ENTER. Turning Captioning ON (by controlling the LED backlight brightness levels. MENU LANGUAGE SCREEN Energy Setting Use the Energy Saver and Light Sensor features found under Energy...comsumption by pressing the CAPTION key during normal TV viewing) causes the HDTV to modify the Energy Saver settings. DIGITAL CAPTION SCREEN ENERGY SAVER SCREEN Need help? This settings control the LCD backlight brightness to select Setup. MAIN MENU SCREEN Digital Caption Captioning is ...

Owners Manual
Page 14
...1-877-864-9604 Clock Timer This feature allows you to set a Current Time for your TV's refresh rate capabilities for the HDTV to reduce the HDTV's power consumption. Motion Sync is bright, parameters are lowered. ON-SCREEN MENU OPERATION Light Sensor - Disables the Motion Sync feature....is a special Frame Rate Converter feature that reading to control the panel brightness level and picture parameters to turn on Time. Motion Sync Your HDTV will automatically turn on at the refresh rate of 120Hz. Detects ambient room light brightness and uses that helps eliminate motion blur...
...1-877-864-9604 Clock Timer This feature allows you to set a Current Time for your TV's refresh rate capabilities for the HDTV to reduce the HDTV's power consumption. Motion Sync is bright, parameters are lowered. ON-SCREEN MENU OPERATION Light Sensor - Disables the Motion Sync feature....is a special Frame Rate Converter feature that reading to control the panel brightness level and picture parameters to turn on Time. Motion Sync Your HDTV will automatically turn on at the refresh rate of 120Hz. Detects ambient room light brightness and uses that helps eliminate motion blur...
Owners Manual
Page 18
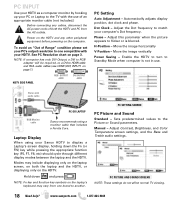
Dot Clock - Adjust the Dot frequency to the Picture or Sound parameters. Move the image horizontally V-Position - Enable the HDTV to turn to Standby Mode when computer is blurred. www.sanyoctv.com 1-877-864-9604 Phase - Laptop Display When using a monitor cable that includes... your computer's Dot frequency. To avoid an "Out of both the laptop and the HDTV, or displaying only on the HDTV. Stereo mini audio cable RGB Monitor cable PC OR LAPTOP Sanyo recommends using your Sanyo HDTV to display a Laptop's screen display, holding down and press NOTE: Fn key and ...
Dot Clock - Adjust the Dot frequency to the Picture or Sound parameters. Move the image horizontally V-Position - Enable the HDTV to turn to Standby Mode when computer is blurred. www.sanyoctv.com 1-877-864-9604 Phase - Laptop Display When using a monitor cable that includes... your computer's Dot frequency. To avoid an "Out of both the laptop and the HDTV, or displaying only on the HDTV. Stereo mini audio cable RGB Monitor cable PC OR LAPTOP Sanyo recommends using your Sanyo HDTV to display a Laptop's screen display, holding down and press NOTE: Fn key and ...
Owners Manual
Page 19
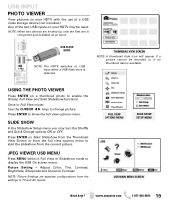
... and Start Slideshow functions. NOTE: When two devices are separate configurations from the current picture. USING THE PHOTO VIEWER Press ENTER on your HDTV may turn the Shuffle and Quick Change options ON or OFF. SLIDE SHOW In the Slideshow Setup menu you may be decoded or if no thumbnail ...data is detected. Picture Setting - Adjust Color, Tint, Contrast, Brightness, Sharpness and Dynamic Contrast. USB FLASH DRIVE NOTE: The HDTV switches to show the full...
... and Start Slideshow functions. NOTE: When two devices are separate configurations from the current picture. USING THE PHOTO VIEWER Press ENTER on your HDTV may turn the Shuffle and Quick Change options ON or OFF. SLIDE SHOW In the Slideshow Setup menu you may be decoded or if no thumbnail ...data is detected. Picture Setting - Adjust Color, Tint, Contrast, Brightness, Sharpness and Dynamic Contrast. USB FLASH DRIVE NOTE: The HDTV switches to show the full...


