
Owners Manual
Page 7
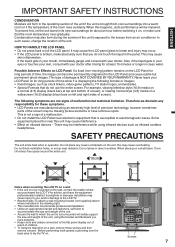
...to the breeze from cool surroundings into a warm room or if the temperature of the room rises suddenly. Before performing work spread cushioning over the base area to this may cause interference. • Effect on . This is not a sign of a malfunction. • Do not install the...top and bottom of screen); When placing on a shelf leave 10 cm (4 inches) free space around the entire unit. 10cm 10cm Notes when mounting the LCD TV on a wall • If the unit is to you do not use the entire screen. ENGLISH IMPORTANT SAFETY INSTRUCTIONS CONDENSATION Moisture will form in the...
...to the breeze from cool surroundings into a warm room or if the temperature of the room rises suddenly. Before performing work spread cushioning over the base area to this may cause interference. • Effect on . This is not a sign of a malfunction. • Do not install the...top and bottom of screen); When placing on a shelf leave 10 cm (4 inches) free space around the entire unit. 10cm 10cm Notes when mounting the LCD TV on a wall • If the unit is to you do not use the entire screen. ENGLISH IMPORTANT SAFETY INSTRUCTIONS CONDENSATION Moisture will form in the...

Owners Manual
Page 8
Align the stand's bottom-plate (supplied) as seen here. It will fit in reverse order. For wall mounting, the base must be removed. To disconnect the base/stand remove the two (2) screws from the AC INPUT terminal. • Before beginning this product, remove the stand and pack flat against.... Finally secure the bottom-plate with 2 screws (supplied). • Be sure to remove the stand When you transport this process, assure that TV is facing the LCD panel side. To remove the stand, perform the step in only one direction. How to attach the stand NOTE: • Unplug the AC...
Align the stand's bottom-plate (supplied) as seen here. It will fit in reverse order. For wall mounting, the base must be removed. To disconnect the base/stand remove the two (2) screws from the AC INPUT terminal. • Before beginning this product, remove the stand and pack flat against.... Finally secure the bottom-plate with 2 screws (supplied). • Be sure to remove the stand When you transport this process, assure that TV is facing the LCD panel side. To remove the stand, perform the step in only one direction. How to attach the stand NOTE: • Unplug the AC...
Owners Manual
Page 21
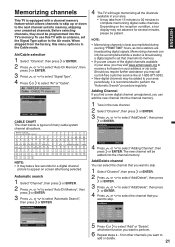
...available in the new channel. 2 Select "Channel", then press or ENTER. 3 Press or to receive a list based on the reception condition, a bar display may take from the factory, this TV with a channel memory feature which allows channels to skip up or down to perform. 6 Repeat steps 4 - ... press or ENTER. Add/Delete channel You can only be accomplished while a station is typical of many cable system channel allocations. 4 The TV will be patient. To use this menu option is recommended to complete memorizing digital cable channels. VHF/UHF channels Cable - Depending on your...
...available in the new channel. 2 Select "Channel", then press or ENTER. 3 Press or to receive a list based on the reception condition, a bar display may take from the factory, this TV with a channel memory feature which allows channels to skip up or down to perform. 6 Repeat steps 4 - ... press or ENTER. Add/Delete channel You can only be accomplished while a station is typical of many cable system channel allocations. 4 The TV will be patient. To use this menu option is recommended to complete memorizing digital cable channels. VHF/UHF channels Cable - Depending on your...


