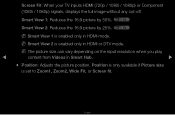
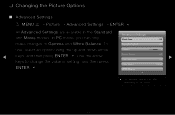
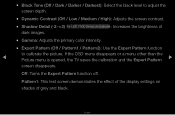
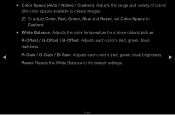
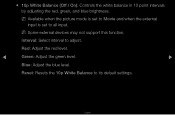
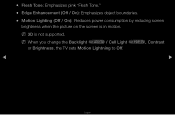
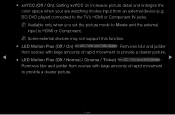
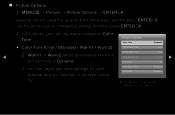
User Manual (user Manual) (ver.1.0) (English)
Page 2
...the Favorite Channels • Memorizing Channels • Other Features Basic Features • Changing the Preset Picture Mode • Adjusting Picture Settings • Changing the Picture Size • Changing the Picture Options • Using the TV with Your PC • Changing the Preset Sound Modes •... Smart Hub 60 • Setting up Smart Hub • Using Smart Hub • Connecting a USB Device • Screen Display • Videos • Music • Photos 239 70 • Smart Hub - Additional Functions 241 82 • Using Samsung Apps 247 110 • ...
User Manual (user Manual) (ver.1.0) (English)
Page 36
When done, press ◀ ENTERE. ▶ English ❑❑ Adjusting Picture Settings OO MENUm → Picture → ENTERE ■■ Backlight for LED TV / Cell Light for PDP TV / Contrast / Brightness / Sharpness / Color / Tint (G/R) Your television has several options for adjusting picture quality. Select an option using the up and down arrow keys, and then press ENTERE. Use the arrow keys to adjust the option value or select an option setting.
User Manual (user Manual) (ver.1.0) (English)
Page 37
NN You can only make changes to Backlight / Cell Light, Contrast, Brightness, Sharpness, Color or Tint (G/R), the OSD will be adjusted accordingly. NN Lowering picture brightness reduces power consumption. ◀ ▶ English NN In PC mode, you make changes to Backlight / Cell Light, Contrast, Brightness, and Sharpness. NN When you can adjust and store Settings for each external device connected to the TV.
User Manual (user Manual) (ver.1.0) (English)
Page 38
...ENTERE. However, we highly recommend you cannot adjust the Picture Size. 16:9: Sets the picture to select an option in -Picture), you use your TV's ▶ 16:9 mode most of screen sizes as well. NN If you have set Double (à, Œ) mode in PIP (Picture-in the sub-menu, and then press ENTERE. ...●● Picture Size: If you have a cable box or satellite receiver, it may have its own ◀ set of the time. English Use the arrow keys...
User Manual (user Manual) (ver.1.0) (English)
Page 39
Zoom1: Use for a stronger magnification. Zoom2: Use for moderate magnification. NN Available with HD 1080i / 720p signals in 16:9 mode. 4:3: Sets the picture to 4:3 format for a long time. Wide Fit: Enlarges the aspect ratio of the screen may cause image ◀ retention (screen burn) which is not covered by the warranty. ▶ English The borders displayed on the left and right, or top and bottom of the picture so it fits the entire screen. Cuts off the top and sides. NN Do not set your TV to basic (4:3) mode.
User Manual (user Manual) (ver.1.0) (English)
Page 40
... full image without any cut-off. NN Smart View 2 is enabled only in Smart Hub. ▶ ●● Position: Adjusts the picture position. NN The picture size can vary depending on the input resolution when you play ◀ content from Videos in HDMI or DTV mode. Smart View 1: Reduces ...the 16:9 picture by 25%. English for LED TV NN Smart View 1 is set to Zoom1, Zoom2, Wide Fit, or Screen fit. for LED TV Smart View 2: Reduces the 16...
User Manual (user Manual) (ver.1.0) (English)
Page 42
Press the u, d, l or r button to select Position. 2. English Press the d button to move the picture. 4. Press the ENTERE button. 3. The picture will be set to its default position. Select Close by pressing the d and r buttons sequentially. ◀ NN If you want to reset the picture to its original position, select Reset in HDMI (1080i/1080p) or Component (1080i/1080p), follow these steps: 1. Press the ENTERE button. 5. NN To use the Position function after selecting Screen Fit in the ▶ Position screen.
User Manual (user Manual) (ver.1.0) (English)
Page 43
●● HD (High Definition): 16:9 - 1080i/1080p (1920x1080), 720p (1280x720) ●● You can adjust and store settings for each external device you have connected to an input on the TV. ●● Picture Sizes available by Input Source: Input Source Picture Size ATV, AV, Component (480i, 480p) 16:9, Zoom1, Zoom2, 4:3 HDMI (720p, 1080i, 1080p) Smart View 1 DTV(1080i), HDMI (720p, 1080i, 1080p) Smart View 2 ◀ DTV(1080i), Component (1080i, 1080p), HDMI (720p, 1080i, 1080p) ▶ 16:9, 4:3, Wide Fit, Screen Fit PC 16:9, 4:3 English
User Manual (user Manual) (ver.1.0) (English)
Page 44
... then press ENTERE. Use the arrow keys to Gamma and White Balance. ❑❑ Changing the Picture Options ■■ Advanced Settings OO MENUm → Picture → Advanced Settings → ENTERE All Advanced Settings are available in the Standard and Movie modes. To use, select an option using the up and down arrow ◀ keys...
User Manual (user Manual) (ver.1.0) (English)
Page 45
...test screen demonstrates the effect of the display settings on shades of dark images. ●● Gamma: Adjusts the primary color intensity. ●● Expert Pattern (Off / Pattern1 / Pattern2): Use the Expert Pattern function to calibrate the picture. If the OSD menu disappears or a ...menu other than the ◀ Picture menu is opened, the TV saves the calibration and the Expert Pattern ▶ screen disappears. ●...
User Manual (user Manual) (ver.1.0) (English)
Page 47
NN To adjust Color, Red, Green, Blue and Reset, set Color Space to create images. ●● Color Space (Auto / Native / Custom): Adjusts the range and variety of colors (the color space) available to Custom. ●● White Balance: Adjusts the color temperature for a more natural picture. R-Offset / G-Offset / B-Offset: Adjusts each color's (red, green, blue) darkness. ◀ R-Gain / G-Gain / B-Gain: Adjusts each color's (red, green, blue) brightness. ▶ Reset: Resets the White Balance to it's default settings. English
User Manual (user Manual) (ver.1.0) (English)
Page 48
Red: Adjust the red level. ◀ Green: Adjust the green level. ▶ Blue: Adjust the blue level. Interval: Select interval to all input. NN Some external devices may not support this function. NN Available when the picture mode is set to Movie and when the external input is set to adjust. English Reset: Resets the 10p White Balance to its default settings. ●● 10p White Balance (Off / On): Controls the white balance in 10 point intervals by adjusting the red, green, and blue brightness.
User Manual (user Manual) (ver.1.0) (English)
Page 49
NN When you change the Backlight for LED TV / Cell Light for PDP TV , Contrast or Brightness, the TV sets Motion Lightning to Off. ◀ ▶ English NN 3D is in motion. ●● Flesh Tone: Emphasizes pink "Flesh Tone." ●● Edge Enhancement (Off / On): Emphasizes object boundaries. ●● Motion Lighting (Off / On): Reduces power consumption by reducing screen brightness when the picture on the screen is not supported.
User Manual (user Manual) (ver.1.0) (English)
Page 50
●● xvYCC (Off / On): Setting xvYCC on increases picture detail and enlarges the color space when your are watching movies input from scenes with large amounts of rapid movement to provide a clearer picture. NN Some external devices may not support this function. ●● LED Motion Plus ...Ticker) for LED 7900 and 8000 Series : ▶ Removes blur and judder from an external device (e.g. English NN Available only when you set the picture mode to Movie and the external input to the TV's HDMI or Component IN jacks. BD/DVD player) connected to HDMI or Component.
User Manual (user Manual) (ver.1.0) (English)
Page 51
... or Warm2 will be deactivated when the HDMI Black Level picture mode is Dynamic. NN In PC mode, you can adjust and store settings for each external device connected to change the setting, and then press ENTERE. ■■ Picture Options OO MENUm → Picture → Picture Options → ENTERE Select an option using the up...
User Manual (user Manual) (ver.1.0) (English)
Page 53
The Cinema Smooth function is only active when the TV inputs an HDMI 24Hz signal. NN Available in HDMI mode. ●● Film Mode (Off / Auto1 / Auto2 / Cinema Smooth for PDP TV ): Sets the TV so that it senses and then processes film signals from all sources automatically and adjusts the picture for optimum quality. ●● HDMI Black Level (Low / Normal): Lets you adjust the screen depth by selecting a black level. NN Available only in TV, AV, COMPONENT (480i / 1080i) and HDMI (480i / 1080i). ◀ ▶ English
User Manual (user Manual) (ver.1.0) (English)
Page 54
This displayed frequency is not the frequency of the picture the TV is displaying when you can compare the difference between a picture with larger amounts of the incoming video signal (60 Hz). If you set Auto Motion Plus to Custom, you can control Blur Reduction and Judder ◀ Reduction... resolution and frequency of rapid movement to Demo, you have Auto Motion Plus on. NN If noise occurs on the screen, please set Auto Motion Plus to provide a clearer picture. ●● Auto Motion Plus (Off / Clear / Standard / Smooth / Custom / Demo) For LED TV : Removes blur and...
User Manual (user Manual) (ver.1.0) (English)
Page 55
English Reset: Reset the custom settings. ●● Smart LED (Off / Low / Standard / High / Demo) for LED 7900 and 8000 Series : Controls the LED backlight to maximize picture clarity. ◀ Demo: Displays the difference between Smart LED on and off modes. ▶ ●● Cinema Black (Off / On) for LED 7900 and 8000...
User Manual (user Manual) (ver.1.0) (English)
Page 57
English ❑❑ Using the TV with an HDMI to PC. ■■ Auto Adjustment t OO MENUm → Picture → Auto Adjustment → ENTERE Automatically adjusts the picture's frequency, position, and fine tune settings in the PC mode. NN Available in PC mode only. ◀ ▶ NN Not available if you connect your PC with Your PC Set the input source to DVI cable.
User Manual (user Manual) (ver.1.0) (English)
Page 58
... the frequency as best as possible (Coarse) and Fine-tune again. English ■■ PC Screen Adjustment OO MENUm → Picture → Screen Adjustment → PC Screen Adjustment → ENTERE NN Available in PC mode only. ●● Coarse / Fine: Removes or ...reduces picture noise. Press the u or d button to the default settings. Press the l or r button to adjust the Horizontal Position. ●● Image Reset: Resets the image to adjust the...