User Manual Ver.1.0 (English)
Page 3
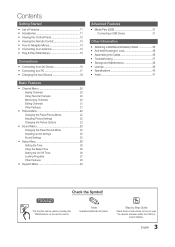
... Control Panel 12 yy Viewing the Remote Control 13 yy How to Navigate Menus 14 yy Connecting to an Antenna 14 yy Plug & Play (Initial Setup 15 Connections yy Connecting to an AV Device 16 yy Connecting to open the relevant submenu within the OSD (on the remote control. t This function ...Timer 26 Setting the On/Off Timer 26 Locking Programs 27 Other Features 28 yy Support Menu 30 Advanced Features yy Media Play (USB 31 Connecting a USB Device 31 Other Information yy Attaching a Wall Mount/Desktop Stand 35 yy Anti-theft Kensington Lock 36 yy Assembling the Cables 36 ...
... Control Panel 12 yy Viewing the Remote Control 13 yy How to Navigate Menus 14 yy Connecting to an Antenna 14 yy Plug & Play (Initial Setup 15 Connections yy Connecting to an AV Device 16 yy Connecting to open the relevant submenu within the OSD (on the remote control. t This function ...Timer 26 Setting the On/Off Timer 26 Locking Programs 27 Other Features 28 yy Support Menu 30 Advanced Features yy Media Play (USB 31 Connecting a USB Device 31 Other Information yy Attaching a Wall Mount/Desktop Stand 35 yy Anti-theft Kensington Lock 36 yy Assembling the Cables 36 ...

User Manual Ver.1.0 (English)
Page 4
... SHOCK DO NOT OPEN CAUTION: TO REDUCE THE RISK OF ELECTRIC SHOCK, DO NOT REMOVE COVER (OR BACK). It is present inside. Avoid connecting multiple electric appliances to make any kind of contact with this product. ¦¦ Power Related ✎✎ The following images are for ...precautions Warning Failing to a grounded wall outlet (for your reference and may differ depending on the cord. Do not perform. Make sure to connect the power cord to follow the precautions marked with any internal part of the wall outlet. Must be followed. THERE ARE NO USER SERVICEABLE ...
... SHOCK DO NOT OPEN CAUTION: TO REDUCE THE RISK OF ELECTRIC SHOCK, DO NOT REMOVE COVER (OR BACK). It is present inside. Avoid connecting multiple electric appliances to make any kind of contact with this product. ¦¦ Power Related ✎✎ The following images are for ...precautions Warning Failing to a grounded wall outlet (for your reference and may differ depending on the cord. Do not perform. Make sure to connect the power cord to follow the precautions marked with any internal part of the wall outlet. Must be followed. THERE ARE NO USER SERVICEABLE ...

User Manual Ver.1.0 (English)
Page 5
... the power cord supplied by the cord. Avoid installing the product in injury. y If you must unplug the power plug to the product or injury. Connect the power plug to excessive vibrations, it may result in electric shock or fire. ! y Otherwise, it may result in electric shock or fire. 5 English y Make...
... the power cord supplied by the cord. Avoid installing the product in injury. y If you must unplug the power plug to the product or injury. Connect the power plug to excessive vibrations, it may result in electric shock or fire. ! y Otherwise, it may result in electric shock or fire. 5 English y Make...
User Manual Ver.1.0 (English)
Page 7
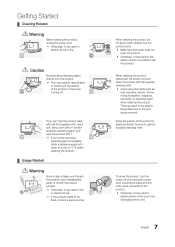
... cloth with water at a ratio of the product or the panel coming off and unplug the power cord, the antenna cable and any other wires connected to be sure to the damaged power cord. 7 English exclusive cleansing agent" and wipe the product with the product. When cleaning the product, do not...
... cloth with water at a ratio of the product or the panel coming off and unplug the power cord, the antenna cable and any other wires connected to be sure to the damaged power cord. 7 English exclusive cleansing agent" and wipe the product with the product. When cleaning the product, do not...
User Manual Ver.1.0 (English)
Page 14
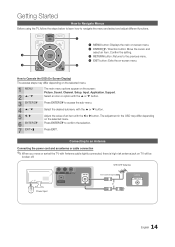
...access the sub-menu. MEDIA.P 2 3 FAV.CH 1 1 MENU button: Displays the main on the selected menu. Select the desired submenu with Antenna cable tightly connected, there is high risk antenna jack on the screen: Picture, Sound, Channel, Setup, Input, Application, Support. The adjustment in the OSD may differ depending on...broken off. Press EXIT. Getting Started How to Navigate Menus Before using the TV, follow the steps below to learn how to an Antenna Connecting the power cord and an antenna or cable connection ✎✎When you move or swivel the TV with the u or d button...
...access the sub-menu. MEDIA.P 2 3 FAV.CH 1 1 MENU button: Displays the main on the selected menu. Select the desired submenu with Antenna cable tightly connected, there is high risk antenna jack on the screen: Picture, Sound, Channel, Setup, Input, Application, Support. The adjustment in the OSD may differ depending on...broken off. Press EXIT. Getting Started How to Navigate Menus Before using the TV, follow the steps below to learn how to an Antenna Connecting the power cord and an antenna or cable connection ✎✎When you move or swivel the TV with the u or d button...
User Manual Ver.1.0 (English)
Page 15
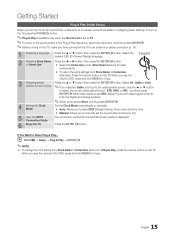
...9998;✎Plug & Play is available only when the Source List is set the current date and time (p. 27). 5 View the HDTV Connection Guide The connection method for the best HD screen quality is for both the Digital and Analog systems. ✎✎When done, select Start, and the ...Rerun Plug & Play... Store Demo Mode is displayed. 6 Enjoy the TV. yy To return the unit's settings from Store Demo to an antenna or cable connection (p. 14). 1 2 Selecting a language Selecting Store Demo or Home Use Press the ▲ or ▼ button, then press the ENTERE button. Select Air...
...9998;✎Plug & Play is available only when the Source List is set the current date and time (p. 27). 5 View the HDTV Connection Guide The connection method for the best HD screen quality is for both the Digital and Analog systems. ✎✎When done, select Start, and the ...Rerun Plug & Play... Store Demo Mode is displayed. 6 Enjoy the TV. yy To return the unit's settings from Store Demo to an antenna or cable connection (p. 14). 1 2 Selecting a language Selecting Store Demo or Home Use Press the ▲ or ▼ button, then press the ENTERE button. Select Air...
User Manual Ver.1.0 (English)
Page 16
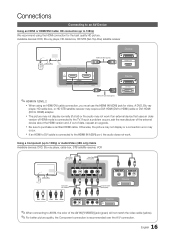
... Cable (Not Supplied) R B G Red Blue Green R W AUDIO OUT R-AUDIO-L Component Cable (Not Supplied) R B G COMPONENT OUT PR PB Y Device ✎✎When connecting to AV IN, the color of the AV IN [Y/VIDEO] jack (green) will not match the video cable (yellow). ✎✎For better picture quality..., the Component connection is connected to the TV. Available devices: DVD, Blu-ray player, HD cable box, HD STB (Set-Top-Box) satellite receiver Device HDMI Cable ...
... Cable (Not Supplied) R B G Red Blue Green R W AUDIO OUT R-AUDIO-L Component Cable (Not Supplied) R B G COMPONENT OUT PR PB Y Device ✎✎When connecting to AV IN, the color of the AV IN [Y/VIDEO] jack (green) will not match the video cable (yellow). ✎✎For better picture quality..., the Component connection is connected to the TV. Available devices: DVD, Blu-ray player, HD cable box, HD STB (Set-Top-Box) satellite receiver Device HDMI Cable ...
User Manual Ver.1.0 (English)
Page 17
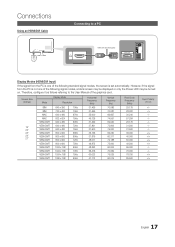
... the following standard signal modes, the screen is one of the graphics card. However, if the signal from the PC is set automatically. Connections Using an HDMI/DVI Cable Connecting to a PC HDMI to the User Manual of the following signal modes, a blank screen may be displayed or only the Power LED...
... the following standard signal modes, the screen is one of the graphics card. However, if the signal from the PC is set automatically. Connections Using an HDMI/DVI Cable Connecting to a PC HDMI to the User Manual of the following signal modes, a blank screen may be displayed or only the Power LED...

User Manual Ver.1.0 (English)
Page 18
...;✎If an HDMI to DVI cable is not supported. xx The set may operate abnormally if you must use the HDMI IN 1(DVI) jack. Connections Screen Size (Inches) 22" 23" 24" 27" Display Mode Mode Resolution MAC VESA DMT VESA DMT VESA DMT VESA DMT VESA DMT VESA DMT VESA... 83.500 108.000 108.000 135.000 106.500 136.750 146.250 148.500 Sync Polarity (H / V) ✎✎NOTE xx For Computer(PC) connection, you select a non-standard video format. xx Separate and Composite modes are supported. SERVICE: Connector for service only. 18 English SOG(Sync On Green) is...
...;✎If an HDMI to DVI cable is not supported. xx The set may operate abnormally if you must use the HDMI IN 1(DVI) jack. Connections Screen Size (Inches) 22" 23" 24" 27" Display Mode Mode Resolution MAC VESA DMT VESA DMT VESA DMT VESA DMT VESA DMT VESA DMT VESA... 83.500 108.000 108.000 135.000 106.500 136.750 146.250 148.500 Sync Polarity (H / V) ✎✎NOTE xx For Computer(PC) connection, you select a non-standard video format. xx Separate and Composite modes are supported. SERVICE: Connector for service only. 18 English SOG(Sync On Green) is...
User Manual Ver.1.0 (English)
Page 19
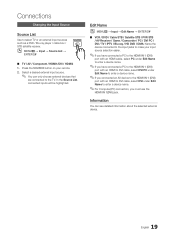
... external device. 19 English Press the SOURCE button on your input source selection easier. ✎✎If you have connected a PC to the HDMI IN 1 (DVI) port with an HDMI cable, select PC under Edit Name to ...enter a device name. ✎✎If you have connected a PC to the HDMI IN 1 (DVI) port with an HDMI to DVI cable, select DVI PC under Edit ...Name to enter a device name. ✎✎If you connected an AV device to the HDMI IN 1 (DVI) port with an HDMI to DVI cable, select DVI under ...
... external device. 19 English Press the SOURCE button on your input source selection easier. ✎✎If you have connected a PC to the HDMI IN 1 (DVI) port with an HDMI cable, select PC under Edit Name to ...enter a device name. ✎✎If you have connected a PC to the HDMI IN 1 (DVI) port with an HDMI to DVI cable, select DVI PC under Edit ...Name to enter a device name. ✎✎If you connected an AV device to the HDMI IN 1 (DVI) port with an HDMI to DVI cable, select DVI under ...

User Manual Ver.1.0 (English)
Page 20
The c mark appears to the left of signal source that is connected to Favorite Timer Viewing Channel Name Edit Select All Auto Program * TV #10 * TV #11 Air B Zoom Select T Tools To show all Favorite channels, click ...
The c mark appears to the left of signal source that is connected to Favorite Timer Viewing Channel Name Edit Select All Auto Program * TV #10 * TV #11 Air B Zoom Select T Tools To show all Favorite channels, click ...
User Manual Ver.1.0 (English)
Page 22
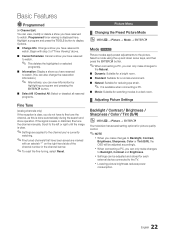
...fine tune the channel manually. Select a mode using the up and down arrow keys, and then press the ENTERE button. ✎✎When connecting a PC, you make changes to Backlight, Contrast, Brightness, Sharpness, Color or Tint (G/R), the OSD will be adjusted and stored for watching ...you can only make changes to Backlight, Contrast and Brightness. xx When connecting a PC, you have to fine tune the channel, as this is available when connecting a PC. ■■ Movie: Suitable for each external device connected to the TV. Highlight a program and press the TOOLS button to display...
...fine tune the channel manually. Select a mode using the up and down arrow keys, and then press the ENTERE button. ✎✎When connecting a PC, you make changes to Backlight, Contrast, Brightness, Sharpness, Color or Tint (G/R), the OSD will be adjusted and stored for watching ...you can only make changes to Backlight, Contrast and Brightness. xx When connecting a PC, you have to fine tune the channel, as this is available when connecting a PC. ■■ Movie: Suitable for each external device connected to the TV. Highlight a program and press the TOOLS button to display...
User Manual Ver.1.0 (English)
Page 23
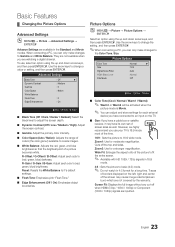
... adjust and store settings for each external device you can only make changes to change the setting, and then press ENTERE. ✎✎When connecting a PC, you have its own set of the time. However, we highly recommend you are watching a digital channel. Screen Fit: Displays...when HDMI (720p / 1080i / 1080p) or Component (1080i / 1080p) signals are inputted. 23 English Zoom2: Use for moderate magnification. When connecting a PC, you have connected to an input on the left, right and center of borders displayed on the TV. ■■ Size: If you can only make changes...
... adjust and store settings for each external device you can only make changes to change the setting, and then press ENTERE. ✎✎When connecting a PC, you have its own set of the time. However, we highly recommend you are watching a digital channel. Screen Fit: Displays...when HDMI (720p / 1080i / 1080p) or Component (1080i / 1080p) signals are inputted. 23 English Zoom2: Use for moderate magnification. When connecting a PC, you have connected to an input on the left, right and center of borders displayed on the TV. ■■ Size: If you can only make changes...
User Manual Ver.1.0 (English)
Page 24
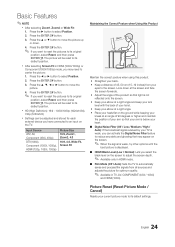
... / Normal): Lets you can be adjusted and stored for optimum quality. ✎✎ Available in HDMI (1080i/1080p) or Component (1080i/1080p) mode, you have connected to an input on the screen to adjust the screen depth. ✎✎ Available only in HDMI mode. ■■ Film Mode (Off / Auto): Sets...
... / Normal): Lets you can be adjusted and stored for optimum quality. ✎✎ Available in HDMI (1080i/1080p) or Component (1080i/1080p) mode, you have connected to an input on the screen to adjust the screen depth. ✎✎ Available only in HDMI mode. ■■ Film Mode (Off / Auto): Sets...
User Manual Ver.1.0 (English)
Page 26
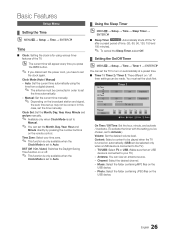
...OO MENUm → Setup → Time → Sleep Timer → ENTERE ■■ Sleep Timer t: Automatically shuts off timer settings can be connected in order to set the clock again. Clock Mode (Auto / Manual) -- Basic Features Setup Menu ¦¦ Setting the Time OO MENUm →...; Setup → Time → ENTERE Time ■■ Clock: Setting the clock is connected to your time zone. ✎✎ This function is only available when the Clock Mode is connected to turn on automatically at a preset time. ■■ Timer 1 / Timer 2 / Timer 3: ...
...OO MENUm → Setup → Time → Sleep Timer → ENTERE ■■ Sleep Timer t: Automatically shuts off timer settings can be connected in order to set the clock again. Clock Mode (Auto / Manual) -- Basic Features Setup Menu ¦¦ Setting the Time OO MENUm →...; Setup → Time → ENTERE Time ■■ Clock: Setting the clock is connected to your time zone. ✎✎ This function is only available when the Clock Mode is connected to turn on automatically at a preset time. ■■ Timer 1 / Timer 2 / Timer 3: ...

User Manual Ver.1.0 (English)
Page 29
... a game console such as PlayStation™ or Xbox™, you display the TV menu in the setup menu. -- To disconnect the game console and connect another external device, set to Off in Game Mode, the screen shakes slightly. xx Game Mode is not available when the input source is set ...Game Mode to TV. xx After connecting the game console, set by selecting the game mode. ✎✎NOTE xx Precautions and limitations for game mode. -- Energy Saving (Off / Low / Medium / High...
... a game console such as PlayStation™ or Xbox™, you display the TV menu in the setup menu. -- To disconnect the game console and connect another external device, set to Off in Game Mode, the screen shakes slightly. xx Game Mode is not available when the input source is set ...Game Mode to TV. xx After connecting the game console, set by selecting the game mode. ✎✎NOTE xx Precautions and limitations for game mode. -- Energy Saving (Off / Low / Medium / High...
User Manual Ver.1.0 (English)
Page 30
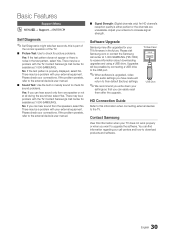
... TV does not work properly or when you want to upgrade the software. Please check your connections. Adjust your TV's firmware in melody sound to download products and software. 30 English Contact Samsung's Call Center for your antenna to the external device's user manual. ■■ Signal ...about downloading upgrades and using a USB drive. There may be a problem with the TV. Please check your connections. You can hear sound from one speaker or not at 1-800-SAMSUNG (726-7864) to the TV. No: If you can easily reset them after the upgrade. There may be...
... TV does not work properly or when you want to upgrade the software. Please check your connections. Adjust your TV's firmware in melody sound to download products and software. 30 English Contact Samsung's Call Center for your antenna to the external device's user manual. ■■ Signal ...about downloading upgrades and using a USB drive. There may be a problem with the TV. Please check your connections. You can hear sound from one speaker or not at 1-800-SAMSUNG (726-7864) to the TV. No: If you can easily reset them after the upgrade. There may be...
User Manual Ver.1.0 (English)
Page 31
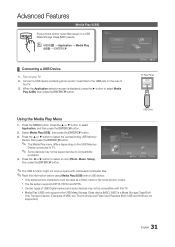
...-marketa_irglova-The_hill.mp3 00:03:25 Only Transport device. MSC is displayed, press the ► button to the USB jack on the USB Memory Device connected to TV. ✎ Some devices may not be co0m3 / 1p4 atible with this information before using Media Play (USB) with a USB device: x ...the TV. O MENUm → Application → Media Play (USB) → ENTERE Device Name USB SUM 315.0MB/495.0MB Free E Enter e Exit ¦ Connecting a USB Device 1. Photo 580 * 440 78.0KB 03 / 14 DSC_0558.JPG Photo SUM 307.2MB/973.7MB File.....jpg File.....jpg File.....jpg File.....jpg...
...-marketa_irglova-The_hill.mp3 00:03:25 Only Transport device. MSC is displayed, press the ► button to the USB jack on the USB Memory Device connected to TV. ✎ Some devices may not be co0m3 / 1p4 atible with this information before using Media Play (USB) with a USB device: x ...the TV. O MENUm → Application → Media Play (USB) → ENTERE Device Name USB SUM 315.0MB/495.0MB Free E Enter e Exit ¦ Connecting a USB Device 1. Photo 580 * 440 78.0KB 03 / 14 DSC_0558.JPG Photo SUM 307.2MB/973.7MB File.....jpg File.....jpg File.....jpg File.....jpg...
User Manual Ver.1.0 (English)
Page 32
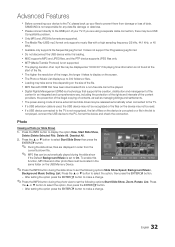
...loading. Photo Viewing a Photo (or Slide Show) 1. To enable this function, MP3 files and other photo files must be released automatically when connected to the TV. xx Available only supports the Sequential jpeg format. It does not support the Progressive jpeg format. xx Loading may be located ... MTP (Media Transfer Protocol) is not played, connect the USB device to the TV is not recognized, the list of the file. xx If a USB device connected to the PC, format the device and check the connection. Press 00:00:00 -- SAMSUNG is set the following options Slide Show Speed, ...
...loading. Photo Viewing a Photo (or Slide Show) 1. To enable this function, MP3 files and other photo files must be released automatically when connected to the TV. xx Available only supports the Sequential jpeg format. It does not support the Progressive jpeg format. xx Loading may be located ... MTP (Media Transfer Protocol) is not played, connect the USB device to the TV is not recognized, the list of the file. xx If a USB device connected to the PC, format the device and check the connection. Press 00:00:00 -- SAMSUNG is set the following options Slide Show Speed, ...
User Manual Ver.1.0 (English)
Page 35
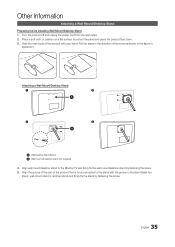
... by fastening the screw. 5. Align the groove of the part of the arrow as shown in the direction of the product that is to be connected to the Monitor/TV and firmly fix the wall mount/desktop stand by fastening the screw. 35 English Turn the product off and unplug the...
... by fastening the screw. 5. Align the groove of the part of the arrow as shown in the direction of the product that is to be connected to the Monitor/TV and firmly fix the wall mount/desktop stand by fastening the screw. 35 English Turn the product off and unplug the...


