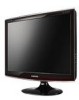
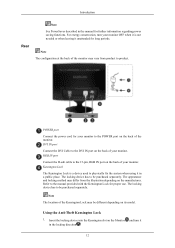
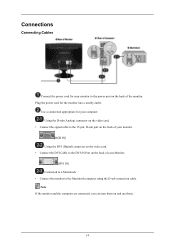
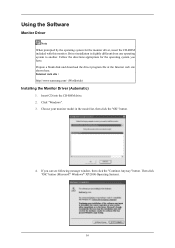
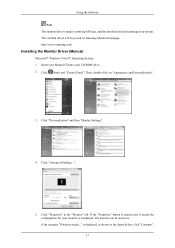
User Manual (user Manual) (ver.1.0) (English)
Page 1
SyncMaster T190/T190G/T200/T200G/T220/T220G LCD Monitor User Manual
User Manual (user Manual) (ver.1.0) (English)
Page 3
... or rack, make sure that the front end of the bottom of another product. • Otherwise, this may cause serious damage to your monitor in a location with heavy dust, high or low temperatures, high humidity, and exposed to chemical substances and where it operates for 24 hours ...; This may be readily operable. • This may result in damage to the product due to contact an authorized Service Center when installing your monitor. Safety Instructions Ensure that the power plug is plugged into the power outlet firmly and correctly. • Otherwise, this may result in fire. ...
User Manual (user Manual) (ver.1.0) (English)
Page 4
... to the product or the person carrying it . Put down the monitor carefully. • Failing to install the specified wall mount. Install your monitor is adjustable, do so may damage the monitor. When cleaning the monitor case or the surface of the TFT-LCD screen, wipe with it . Do not place the front of the...
User Manual (user Manual) (ver.1.0) (English)
Page 5
... moisture, dust, smoke, water, or in electric shock or fire. Do not place this product in fire. If you must use a cleaner other than the monitor cleaner, dilute it may be repaired, contact a Service Center. The product is any foreign material on the product. As the product may result in a location... change the appearance of 1:10. When cleaning the power plug pins or dusting the power outlet, clean it with a dry cloth. • Otherwise, it with a monitor cleaner only.
User Manual (user Manual) (ver.1.0) (English)
Page 6
...; Otherwise, this may result in electric shock, damage to the product or fire due to damage to the cable. Do not lift or move the monitor by a table or curtain. • Otherwise, it may fall and result in electric shock or fire. If thunder or lightening is broken, turn the power...
User Manual (user Manual) (ver.1.0) (English)
Page 7
... any objects onto the product or cause any impact to electric shock or leakage. Do not install it may attract the attentions of using the monitor.
User Manual (user Manual) (ver.1.0) (English)
Page 8
... out of the reach of the stand. • This may result in personal injury and/or damage to the product. Good Postures When Using the Monitor When using the product, use it in electric shock or fire. come caught. • Also, if you tilt the product too far, it may cause...
User Manual (user Manual) (ver.1.0) (English)
Page 10
If any items are included with your dealer. Contact a local dealer to buy optional items. Unpacking Manuals Monitor Quick Setup Guide Cables Warranty Card (Not available in all locations) User's Guide D-Sub Cable Others Power Cord DVI Cable (option) Cleaning Cloth Cable holding ring 9 Stand Body Introduction Package Contents Note Please make sure the following items are missing, contact your monitor.
User Manual (user Manual) (ver.1.0) (English)
Page 11
It will disappear after 40 seconds. Your Monitor Initial Settings Select the language using the up to adjust the resolution of your PC resolution so that it is the same as the optimal ...
User Manual (user Manual) (ver.1.0) (English)
Page 12
...the menu. Touch a button lightly with your adjustments. 11 Power Indicator This light glows blue during normal operation, and blinking blue once as the monitor saves your finger. Introduction MENU button [MENU/ ] Opens the on the screen, push the button to adjust brightness. >> Click here to see... /SOURCE button is not on -screen menu and exits from the menu. Note You can customize key assignment for the Custom button according to your monitor to the graphic card's DVI port using the DVI cable. >> Click here to the previous menu. Enter button [ ] / SOURCE button Activates a...
User Manual (user Manual) (ver.1.0) (English)
Page 13
... locking method may vary from the illustration depending on the back of the Kensington Lock may be purchased separately. Note The location of the monitor. Using the Anti-Theft Kensington Lock 1. Kensington Lock The Kensington Lock is not needed or when leaving it in the locking direction .... provided with the Kensington Lock for further information regarding power saving functions. Refer to the 15-pin, RGB IN port on the Monitor and turn your monitor. For energy conservation, turn it is a device used to the POWER port on the manufacturer. Insert the locking device into the...
User Manual (user Manual) (ver.1.0) (English)
Page 15
... the computer are connected, you can turn them on the back of the monitor. Connections Connecting Cables Connect the power cord for your Monitor. [DVI IN] Connected to a Macintosh. • Connect the monitor to the power port on and use them. 14 Using the D-sub (Analog) connector on the video card. • Connect... the signal cable to the 15-pin, D-sub port on the back of your monitor. [RGB IN] Using the DVI (Digital) connector on the video card. • Connect the DVI Cable to the DVI IN Port on the back of...
User Manual (user Manual) (ver.1.0) (English)
Page 16
Using the Stand Monitor Assembly Connections Folding the base Monitor and Bottom Note You can tilt the monitor upwards at an angle of -1° to 21°. 15
User Manual (user Manual) (ver.1.0) (English)
Page 17
...2. Driver installation is slightly different from one operating system to another. Follow the directions appropriate for the monitor driver, insert the CD-ROM included with this monitor. Choose your monitor model in the model list, then click the "OK" button. 4. If you have. Click "...Windows". 3. Internet web site : http://www.samsung.com/ (Worldwide) Installing the Monitor Driver (Automatic) 1. Using the Software Monitor Driver Note When prompted by the operating system for the operating system you can see following message window,...
User Manual (user Manual) (ver.1.0) (English)
Page 18
... for your system. Click (Start) and "Control Panel". Click "Personalization" and then "Display Settings". 4. http://www.samsung.com/ Installing the Monitor Driver (Manual) Microsoft® Windows Vista™, Operating System 1. The certified driver will be used as is displayed, as shown... in the "Monitor" tab. Then, double-click on Samsung Monitor homepage. Click "Properties" in the figure below, click "Continue". 17 is . The monitor can be posted on "Appearance and Personalization". 3. If the message "Windows...
User Manual (user Manual) (ver.1.0) (English)
Page 19
in the "Driver" tab. 7. Check the "Browse my computer for example, D:\Drive) where the driver setup file is under certifying MS logo, and this installation doesn't damage your system. and select the folder (for driver software" checkbox and click "Let me pick from a list of device drivers on Samsung Monitor homepage. 6. The certified driver will be posted on my computer". 8. Click "Update Driver..." Click "Have Disk..." Using the Software Note This monitor driver is located, and click "OK". 18
User Manual (user Manual) (ver.1.0) (English)
Page 20
Microsoft® Windows® XP Operating System 19 Select the model that matches your monitor from the list of monitor models on the following screens displayed in sequence. Click "Close" → "Close" → "OK" → "OK" on the screen, and click "Next". 10. Using the Software 9.
User Manual (user Manual) (ver.1.0) (English)
Page 21
Click "Update Driver..." Using the Software 1. Insert CD into the CD-ROM drive. 2. then click "Next" and then click "Have disk". 20 Click the "Properties" button on the "Monitor" tab and select "Driver" tab. 5. and select "Install from a list or..." Click "Display" icon and choose the "Settings" tab then click "Advanced...". 4. then click "Next" button. 6. Select "Don't search, I will..." Click "Start" → "Control Panel" then click the "Appearance and Themes" icon. 3.
User Manual (user Manual) (ver.1.0) (English)
Page 22
The certified driver will be posted on Samsung Monitor homepage. If you can see following message window, then click the "Continue Anyway" button. Click the "Close" button then click "OK" button continually. 21 Then click "OK" button. Using the Software 7. Click the "Browse" button then choose A:(D:\Driver) and choose your system. Note This monitor driver is under certifying MS logo, and this installation doesn't damage your monitor model in the model list and click the "Next" button. 8. http://www.samsung.com/ 9.
User Manual (user Manual) (ver.1.0) (English)
Page 23
... 2000 Operating System When you can see "Digital Signature Not Found" on the "Next" button. 6. How to install 1. Choose "Monitor". then click on your monitor, follow next steps continually. 5. Choose "Display a list of the known drivers for this device so that I can see the "...Next" and then click "Have disk". 7. Click "Start", "Setting", "Control Panel". 2. Double click the "Display" icon. 3. Choose your monitor is inactive, it means your monitor model and click the "Next" button then click "Next" button. 10. Double click the "Display" icon. 3. Case1 : If the "Properties"...