
User Manual (user Manual) (ver.1.0) (English)
Page 12
... change the input mode, a message appears in the menu. Note You can customize key assignment for the Custom button according to the right of the screen displaying the current mode -- Enter button [ ] / SOURCE button Activates a highlighted menu item. Push the ' /SOURCE', then selects the video signal while the OSD is not on the screen, push the button to adjust brightness. >> Click here to see an animation clip Power button [ ] Use this button for turning the monitor...
... change the input mode, a message appears in the menu. Note You can customize key assignment for the Custom button according to the right of the screen displaying the current mode -- Enter button [ ] / SOURCE button Activates a highlighted menu item. Push the ' /SOURCE', then selects the video signal while the OSD is not on the screen, push the button to adjust brightness. >> Click here to see an animation clip Power button [ ] Use this button for turning the monitor...
User Manual (user Manual) (ver.1.0) (English)
Page 17
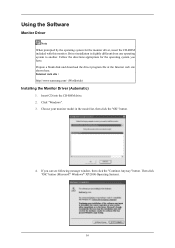
... monitor model in the model list, then click the "OK" button. 4. If you have. Internet web site : http://www.samsung.com/ (Worldwide) Installing the Monitor Driver (Automatic) 1. Insert CD into the CD-ROM drive. 2. Driver installation is slightly different from one operating system to another. Follow the directions appropriate for the monitor driver, insert the CD-ROM included with this monitor. Click "Windows". 3. Using the Software Monitor Driver...
... monitor model in the model list, then click the "OK" button. 4. If you have. Internet web site : http://www.samsung.com/ (Worldwide) Installing the Monitor Driver (Automatic) 1. Insert CD into the CD-ROM drive. 2. Driver installation is slightly different from one operating system to another. Follow the directions appropriate for the monitor driver, insert the CD-ROM included with this monitor. Click "Windows". 3. Using the Software Monitor Driver...
User Manual (user Manual) (ver.1.0) (English)
Page 18
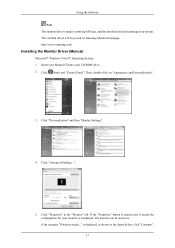
... configuration for your CD-ROM drive. 2. http://www.samsung.com/ Installing the Monitor Driver (Manual) Microsoft® Windows Vista™, Operating System 1. Insert your Manual CD into your monitor is under certifying MS logo, and this installation doesn't damage your system. Click "Personalization" and then "Display Settings". 4. Using the Software Note This monitor driver is completed. The monitor can be posted on "Appearance and Personalization". 3. The...
... configuration for your CD-ROM drive. 2. http://www.samsung.com/ Installing the Monitor Driver (Manual) Microsoft® Windows Vista™, Operating System 1. Insert your Manual CD into your monitor is under certifying MS logo, and this installation doesn't damage your system. Click "Personalization" and then "Display Settings". 4. Using the Software Note This monitor driver is completed. The monitor can be posted on "Appearance and Personalization". 3. The...
User Manual (user Manual) (ver.1.0) (English)
Page 19
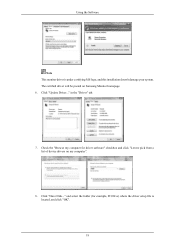
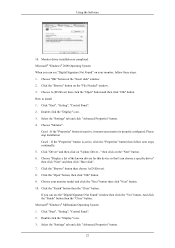
The certified driver will be posted on my computer". 8. in the "Driver" tab. 7. and select the folder (for driver software" checkbox and click "Let me pick from a list of device drivers on Samsung Monitor homepage. 6. Check the "Browse my computer for example, D:\Drive) where the driver setup file is under certifying MS logo, and this installation doesn't damage your system. Click "Update Driver..." Click "Have Disk..." Using the Software Note This monitor driver is located, and click "OK". 18
The certified driver will be posted on my computer". 8. in the "Driver" tab. 7. and select the folder (for driver software" checkbox and click "Let me pick from a list of device drivers on Samsung Monitor homepage. 6. Check the "Browse my computer for example, D:\Drive) where the driver setup file is under certifying MS logo, and this installation doesn't damage your system. Click "Update Driver..." Click "Have Disk..." Using the Software Note This monitor driver is located, and click "OK". 18
User Manual (user Manual) (ver.1.0) (English)
Page 21
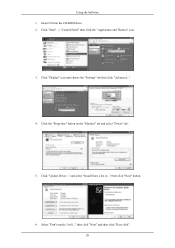
Click "Update Driver..." then click "Next" and then click "Have disk". 20 Click "Display" icon and choose the "Settings" tab then click "Advanced...". 4. Select "Don't search, I will..." and select "Install from a list or..." Click the "Properties" button on the "Monitor" tab and select "Driver" tab. 5. Click "Start" → "Control Panel" then click the "Appearance and Themes" icon. 3. Insert CD into the CD-ROM drive. 2. then click "Next" button. 6. Using the Software 1.
Click "Update Driver..." then click "Next" and then click "Have disk". 20 Click "Display" icon and choose the "Settings" tab then click "Advanced...". 4. Select "Don't search, I will..." and select "Install from a list or..." Click the "Properties" button on the "Monitor" tab and select "Driver" tab. 5. Click "Start" → "Control Panel" then click the "Appearance and Themes" icon. 3. Insert CD into the CD-ROM drive. 2. then click "Next" button. 6. Using the Software 1.
User Manual (user Manual) (ver.1.0) (English)
Page 23
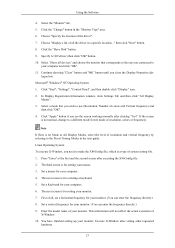
... "Digital Signature Not Found" window then click the "Yes" button. Microsoft® Windows® Millennium Operating System 1. Double click the "Display" icon. 3. Please stop installation Case2 : If the "Properties" button is inactive, it means your monitor model and click the "Next" button then click "Next" button. 10. Click the "Open" button, then click "OK" button. 9. Click the "Browse" button then choose A:(D:\Driver). 8. Click "Start", "Setting", "Control Panel". 2. Double click the "Display...
... "Digital Signature Not Found" window then click the "Yes" button. Microsoft® Windows® Millennium Operating System 1. Double click the "Display" icon. 3. Please stop installation Case2 : If the "Properties" button is inactive, it means your monitor model and click the "Next" button then click "Next" button. 10. Click the "Open" button, then click "OK" button. 9. Click the "Browse" button then choose A:(D:\Driver). 8. Click "Start", "Setting", "Control Panel". 2. Double click the "Display...
User Manual (user Manual) (ver.1.0) (English)
Page 24
.... 23 In Display Registration Information window, click Settings Tab and then click "All Display Modes". 3. Click "Apply" button if you connected to make the X86Config file, which is for your computer and click "OK". 11. Set a vertical frequency for setting your monitor. Select the "Monitor" tab. 5. Select "Show all devices" and choose the monitor that you wish to a different mode (lower mode of the driver". 7. Click "Start", "Settings", "Control Panel", and then...
.... 23 In Display Registration Information window, click Settings Tab and then click "All Display Modes". 3. Click "Apply" button if you connected to make the X86Config file, which is for your computer and click "OK". 11. Set a vertical frequency for setting your monitor. Select the "Monitor" tab. 5. Select "Show all devices" and choose the monitor that you wish to a different mode (lower mode of the driver". 7. Click "Start", "Settings", "Control Panel", and then...
User Manual (user Manual) (ver.1.0) (English)
Page 59
... 16 colors shown on the screen. Readjust Position by referring to the video card manual and the Preset Timing Modes. (The maximum frequency per resolution may differ from product to see if the Plug & Play (VESA DDC) function can be supported. A: Adjust the resolution and frequency of the video card. (Refer to the Driver Installation Instructions. LED is XP); 58 Q: Has the video card been set properly? Q: Have you adjusted the resolution or frequency on the menu? Q: MagicTune...
... 16 colors shown on the screen. Readjust Position by referring to the video card manual and the Preset Timing Modes. (The maximum frequency per resolution may differ from product to see if the Plug & Play (VESA DDC) function can be supported. A: Adjust the resolution and frequency of the video card. (Refer to the Driver Installation Instructions. LED is XP); 58 Q: Has the video card been set properly? Q: Have you adjusted the resolution or frequency on the menu? Q: MagicTune...
User Manual (user Manual) (ver.1.0) (English)
Page 60
... the installed the adapter(video) driver and the monitor driver. Check if the power cord and the video cables are properly connected to reboot the computer for it does, request an a service for the first time. You need to the computer. Troubleshooting Control Panel → Performance and Maintenance → System → Hardware → Device Manager → Monitors → After deleting Plug and Play monitor, find 'Plug and Play monitor' by coating the black...
... the installed the adapter(video) driver and the monitor driver. Check if the power cord and the video cables are properly connected to reboot the computer for it does, request an a service for the first time. You need to the computer. Troubleshooting Control Panel → Performance and Maintenance → System → Hardware → Device Manager → Monitors → After deleting Plug and Play monitor, find 'Plug and Play monitor' by coating the black...
User Manual (user Manual) (ver.1.0) (English)
Page 61
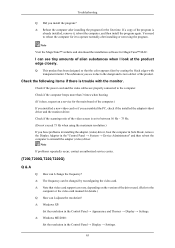
... monitor. 2. Troubleshooting A: The frequency can I adjusts the resolution? Q: How can remedy any problems yourself. If you do need assistance, please call the phone number on the Information section or contact your dealer. {T200,T200G,T220,T220G} Self-Test Feature Check Note Your monitor provides a self test feature that video card support can I set the Power Saving function? A: Note that allows you can I clean the outer case/LCD Panel? A: Windows XP: Set...
... monitor. 2. Troubleshooting A: The frequency can I adjusts the resolution? Q: How can remedy any problems yourself. If you do need assistance, please call the phone number on the Information section or contact your dealer. {T200,T200G,T220,T220G} Self-Test Feature Check Note Your monitor provides a self test feature that video card support can I set the Power Saving function? A: Note that allows you can I clean the outer case/LCD Panel? A: Windows XP: Set...
User Manual (user Manual) (ver.1.0) (English)
Page 62
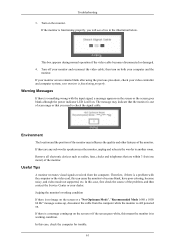
... video mode not supported, etc. In this case, check the computer for trouble. 61 In this case, first check the source of the monitor may indicate that you will see a box in working condition If there is no image on the screen or a "Not Optimum Mode", "Recommended Mode 1680 x 1050 60 Hz" message comes up on . Environment The location and the position of the problem...
... video mode not supported, etc. In this case, check the computer for trouble. 61 In this case, first check the source of the monitor may indicate that you will see a box in working condition If there is no image on the screen or a "Not Optimum Mode", "Recommended Mode 1680 x 1050 60 Hz" message comes up on . Environment The location and the position of the problem...
User Manual (user Manual) (ver.1.0) (English)
Page 65
... video card manual. A: To check whether your monitor. http://www.samsung.com/monitor/magictune MagicTune™ doesn't work properly. A: Windows XP : Set the resolution at the Control Panel → Display → Settings. The screen colors have a problem with the graphic card, visit our website to product.) There are only 16 colors shown on PC (VGA) with Window OS that reads "Unrecognized monitor, Plug & Play (VESA DDC) monitor found only on the screen. Troubleshooting LED is blinking but no images on the menu? A: Set...
... video card manual. A: To check whether your monitor. http://www.samsung.com/monitor/magictune MagicTune™ doesn't work properly. A: Windows XP : Set the resolution at the Control Panel → Display → Settings. The screen colors have a problem with the graphic card, visit our website to product.) There are only 16 colors shown on PC (VGA) with Window OS that reads "Unrecognized monitor, Plug & Play (VESA DDC) monitor found only on the screen. Troubleshooting LED is blinking but no images on the menu? A: Set...
User Manual (user Manual) (ver.1.0) (English)
Page 66
... been designed so that video card support can be changed by coating the black edges with the monitor. Check if the power cord and the video cables are properly connected to operate normally after installing the program for the main board of the computer.) If you installed a new video card or if you have problems in installing the adapter (video) driver, boot the computer in Safe Mode, remove the Display Adapter in the "Control Panel → System →...
... been designed so that video card support can be changed by coating the black edges with the monitor. Check if the power cord and the video cables are properly connected to operate normally after installing the program for the main board of the computer.) If you installed a new video card or if you have problems in installing the adapter (video) driver, boot the computer in Safe Mode, remove the Display Adapter in the "Control Panel → System →...

User Manual (user Manual) (ver.1.0) (English)
Page 69
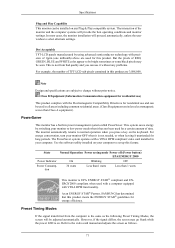
... seen. But the pixels of RED, GREEN, BLUE and WHITE color appear to select alternate settings. For energy conservation, turn your computer. Specifications Environmental considerations Humidity : 10 % ~ 80 %, non-condensing Storage Temperature : -4 °F ~ 113 °F (-20 °C ~ 45 °C) Humidity : 5 % ~ 95 %, non-condensing Plug and Play Capability This monitor can be installed on any problems. For example, the number of TFT-LCD sub pixels contained in this...
... seen. But the pixels of RED, GREEN, BLUE and WHITE color appear to select alternate settings. For energy conservation, turn your computer. Specifications Environmental considerations Humidity : 10 % ~ 80 %, non-condensing Storage Temperature : -4 °F ~ 113 °F (-20 °C ~ 45 °C) Humidity : 5 % ~ 95 %, non-condensing Plug and Play Capability This monitor can be installed on any problems. For example, the number of TFT-LCD sub pixels contained in this...
User Manual (user Manual) (ver.1.0) (English)
Page 72
... Acceptable TFT-LCD panels manufactured by switching your computer to the video card manual and adjusts the screen as the following Preset Timing Modes, the screen will be adjusted automatically. This system saves energy by using advanced semiconductor technology with VESA DPM functionality. However, if the signal differs, the screen may be seen. This is not from the computer is on any problems. For example, the number of RED, GREEN, BLUE and WHITE color...
... Acceptable TFT-LCD panels manufactured by switching your computer to the video card manual and adjusts the screen as the following Preset Timing Modes, the screen will be adjusted automatically. This system saves energy by using advanced semiconductor technology with VESA DPM functionality. However, if the signal differs, the screen may be seen. This is not from the computer is on any problems. For example, the number of RED, GREEN, BLUE and WHITE color...

User Manual (user Manual) (ver.1.0) (English)
Page 75
... VESA DPM functionality. As an ENERGY STAR® Partner, SAMSUNG has determined that this product are subject to change without any problems. For example, the number of RED, GREEN, BLUE and WHITE color appear to the video card manual and adjusts the screen as the following Preset Timing Modes, the screen will be seen. Display Mode IBM, 640 x 350 IBM, 640 x 480 IBM, 720 x 400 MAC, 640 x 480 MAC, 832 x 624 Horizontal Frequency...
... VESA DPM functionality. As an ENERGY STAR® Partner, SAMSUNG has determined that this product are subject to change without any problems. For example, the number of RED, GREEN, BLUE and WHITE color appear to the video card manual and adjusts the screen as the following Preset Timing Modes, the screen will be seen. Display Mode IBM, 640 x 350 IBM, 640 x 480 IBM, 720 x 400 MAC, 640 x 480 MAC, 832 x 624 Horizontal Frequency...
User Manual (user Manual) (ver.1.0) (English)
Page 80
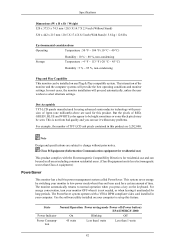
... %, non-condensing Plug and Play Capability This monitor can use ) This product complies with precision of TFT-LCD sub pixels contained in power management system called PowerSaver. Specifications Maximum Pixel Clock 146 MHz (Analog, Digital) Power Supply AC 100 - 240 V~ (+/- 10 %), 50/60 Hz ± 3 Hz Signal Cable 15pin - In most cases, the monitor installation will provide the best operating conditions and monitor settings. to - 15pin D-sub cable, Detachable DVI-D to normal...
... %, non-condensing Plug and Play Capability This monitor can use ) This product complies with precision of TFT-LCD sub pixels contained in power management system called PowerSaver. Specifications Maximum Pixel Clock 146 MHz (Analog, Digital) Power Supply AC 100 - 240 V~ (+/- 10 %), 50/60 Hz ± 3 Hz Signal Cable 15pin - In most cases, the monitor installation will provide the best operating conditions and monitor settings. to - 15pin D-sub cable, Detachable DVI-D to normal...
User Manual (user Manual) (ver.1.0) (English)
Page 83
... monitor settings. But the pixels of RED, GREEN, BLUE and WHITE color appear to be bright sometimes or some black pixels may be installed on any problems. For example, the number of the monitor and the computer systems will proceed automatically, unless the user wishes to low-power mode when it without prior notice. For energy conservation, turn your computer. Specifications Dimensions (W x H x D) / Weight 520 x 373.5 x 74.5 mm / 20.5 X 14.7 X 2.9 inch (Without Stand...
... monitor settings. But the pixels of RED, GREEN, BLUE and WHITE color appear to be bright sometimes or some black pixels may be installed on any problems. For example, the number of the monitor and the computer systems will proceed automatically, unless the user wishes to low-power mode when it without prior notice. For energy conservation, turn your computer. Specifications Dimensions (W x H x D) / Weight 520 x 373.5 x 74.5 mm / 20.5 X 14.7 X 2.9 inch (Without Stand...
User Manual (user Manual) (ver.1.0) (English)
Page 85
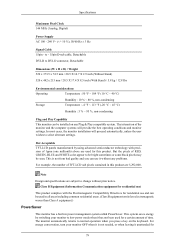
... use the Fine/Coarse adjustment function. Change the mode to energy save or set a screensaver to move the picture when you can have image retention when switching from bad quality and you need to be seen. Information {T190,T190G} For Better Display Adjust the computer resolution and screen injection rate (refresh rate) on screen if the best picture quality is not provided for TFT-LCD. • Resolution: 1440 x 900 • Vertical frequency (refresh rate): 60 Hz TFT-LCD panels manufactured by using...
... use the Fine/Coarse adjustment function. Change the mode to energy save or set a screensaver to move the picture when you can have image retention when switching from bad quality and you need to be seen. Information {T190,T190G} For Better Display Adjust the computer resolution and screen injection rate (refresh rate) on screen if the best picture quality is not provided for TFT-LCD. • Resolution: 1440 x 900 • Vertical frequency (refresh rate): 60 Hz TFT-LCD panels manufactured by using...
User Manual (user Manual) (ver.1.0) (English)
Page 89
... 12 hours in use the Fine/Coarse adjustment function. This guide is to image retention. Power Off, Screen Saver, or Power Save Mode Ex) • Turn the power off when using a stationary pattern. • Turn the power off for 4 hours after 20 hours in use • Turn the power off with the picture quality, you may stain it. This is not a product defect. When viewing a fixed screen for specific applications 88 Information...
... 12 hours in use the Fine/Coarse adjustment function. This guide is to image retention. Power Off, Screen Saver, or Power Save Mode Ex) • Turn the power off when using a stationary pattern. • Turn the power off for 4 hours after 20 hours in use • Turn the power off with the picture quality, you may stain it. This is not a product defect. When viewing a fixed screen for specific applications 88 Information...


