
User Manual Ver.1.1 (English)
Page 1
ST66/ST68 This user manual includes detailed usage instructions for your camera. Please read this manual thoroughly. Click a topic Basic troubleshooting Quick reference Contents Basic functions Extended functions Shooting options Playback/Editing Settings Appendixes Index
ST66/ST68 This user manual includes detailed usage instructions for your camera. Please read this manual thoroughly. Click a topic Basic troubleshooting Quick reference Contents Basic functions Extended functions Shooting options Playback/Editing Settings Appendixes Index
User Manual Ver.1.1 (English)
Page 2
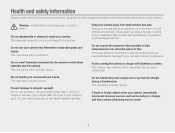
... children and pets. Do not insert flammable materials into the camera or store these materials near the charger during a thunderstorm. Do not expose the camera to your camera. This may present physical dangers as the battery or charger, and then contact a Samsung service center. 1 Health and safety information Always comply with blankets or...
... children and pets. Do not insert flammable materials into the camera or store these materials near the charger during a thunderstorm. Do not expose the camera to your camera. This may present physical dangers as the battery or charger, and then contact a Samsung service center. 1 Health and safety information Always comply with blankets or...
User Manual Ver.1.1 (English)
Page 3
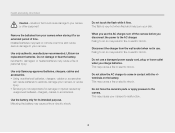
... batteries, chargers, cables and accessories. • Using unauthorized batteries, chargers, cables or accessories can cause batteries to explode, damage your camera, or cause injury. • Samsung is very hot when fired and may burn your skin. The flash is not responsible for damage or injuries caused by unapproved batteries, ...
... batteries, chargers, cables and accessories. • Using unauthorized batteries, chargers, cables or accessories can cause batteries to explode, damage your camera, or cause injury. • Samsung is very hot when fired and may burn your skin. The flash is not responsible for damage or injuries caused by unapproved batteries, ...
User Manual Ver.1.1 (English)
Page 4
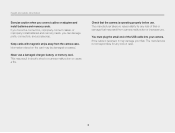
... responsibility for any loss of files or damage that the camera is reversed, it may result from the camera case. Information stored on the card may result in electric shock or camera malfunction or cause a fire. Check that may damage your camera. If you force the connectors, improperly connect cables, or improperly... any loss of the USB cable into your files. You must plug the small end of data. 3 Keep cards with magnetic strips away from camera malfunction or improper use.
... responsibility for any loss of files or damage that the camera is reversed, it may result from the camera case. Information stored on the card may result in electric shock or camera malfunction or cause a fire. Check that may damage your camera. If you force the connectors, improperly connect cables, or improperly... any loss of the USB cable into your files. You must plug the small end of data. 3 Keep cards with magnetic strips away from camera malfunction or improper use.
User Manual Ver.1.1 (English)
Page 5
... learn how to connect your computer, photo printer, or TV. Appendixes 103 Get information about your camera's settings. Settings 97 Refer to options to reuse or distribute any part of this camera responsibly and adhere to all laws and regulations concerning its use. • You are not allowed to... configure your camera's layout, icons, and basic functions for shooting. Copyright information • Microsoft Windows and the Windows logo are registered trademarks of the Microsoft ...
... learn how to connect your computer, photo printer, or TV. Appendixes 103 Get information about your camera's settings. Settings 97 Refer to options to reuse or distribute any part of this camera responsibly and adhere to all laws and regulations concerning its use. • You are not allowed to... configure your camera's layout, icons, and basic functions for shooting. Copyright information • Microsoft Windows and the Windows logo are registered trademarks of the Microsoft ...

User Manual Ver.1.1 (English)
Page 6
... S p N d s v Shooting mode icons These icons appear in the text when a function is available in this manual Icon [] () “ * Function Additional information Safety warnings and precautions Camera buttons.
... S p N d s v Shooting mode icons These icons appear in the text when a function is available in this manual Icon [] () “ * Function Additional information Safety warnings and precautions Camera buttons.

User Manual Ver.1.1 (English)
Page 7
... will be darker or lighter. You can alter the exposure by changing the shutter speed, aperture value, or ISO sensitivity. By altering the exposure, your camera determines the exposure.
... will be darker or lighter. You can alter the exposure by changing the shutter speed, aperture value, or ISO sensitivity. By altering the exposure, your camera determines the exposure.
User Manual Ver.1.1 (English)
Page 8
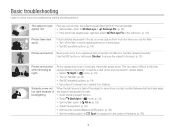
...;ash or avoid capturing photos in a dusty place. • Set ISO sensitivity options. (p. 54) Photos are blurred when shooting at night. As the camera tries to solve common problems by setting shooting options. Use the DIS function or half-press [Shutter] to Spot if a subject is focused. (p. 30)... s mode. (p. 39) • Turn on the flash. (p. 52) • Set ISO sensitivity options. (p. 54) • Use a tripod to prevent your camera from the camera flash. • Set the flash option to Red-eye or Red-eye Fix. (p. 52) • If the photo has already been captured...
...;ash or avoid capturing photos in a dusty place. • Set ISO sensitivity options. (p. 54) Photos are blurred when shooting at night. As the camera tries to solve common problems by setting shooting options. Use the DIS function or half-press [Shutter] to Spot if a subject is focused. (p. 30)... s mode. (p. 39) • Turn on the flash. (p. 52) • Set ISO sensitivity options. (p. 54) • Use a tripod to prevent your camera from the camera flash. • Set the flash option to Red-eye or Red-eye Fix. (p. 52) • If the photo has already been captured...
User Manual Ver.1.1 (English)
Page 9
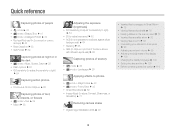
... • s mode > Funny Face f 43 • Smart Filter effects f 69 • Image Adjust (to adjust Contrast, Sharpness, or Saturation) f 71 Reducing camera shake • Digital Image Stabilization (DIS) f 29 • Viewing files by category in Smart Album f 75 • Viewing files as thumbnails f ... card f 78 • Viewing files as a slide show f 80 • Viewing files on a TV f 89 • Connecting your camera to a computer f 90 • Adjusting sound and volume f 99 • Adjusting the brightness of the display f 100 • Changing the display language ...
... • s mode > Funny Face f 43 • Smart Filter effects f 69 • Image Adjust (to adjust Contrast, Sharpness, or Saturation) f 71 Reducing camera shake • Digital Image Stabilization (DIS) f 29 • Viewing files by category in Smart Album f 75 • Viewing files as thumbnails f ... card f 78 • Viewing files as a slide show f 80 • Viewing files on a TV f 89 • Connecting your camera to a computer f 90 • Adjusting sound and volume f 99 • Adjusting the brightness of the display f 100 • Changing the display language ...
User Manual Ver.1.1 (English)
Page 10
... 14 Inserting the battery and memory card 17 Charging the battery and turning on your camera ...... 18 Charging the battery 18 Turning on your camera 18 Performing the initial setup 19 Learning icons 21 Selecting options or menus 22 Using [MENU 22 Using [Fn 24 Setting the display and sound ...25 Setting the display type 25 Setting the sound 25 Capturing photos 26 Zooming 27 Reducing camera shake (DIS 29 Tips for getting a clearer photo 30 Extended functions 32 Using the Smart Auto mode 33 Using the Program mode 35 Using the...
... 14 Inserting the battery and memory card 17 Charging the battery and turning on your camera ...... 18 Charging the battery 18 Turning on your camera 18 Performing the initial setup 19 Learning icons 21 Selecting options or menus 22 Using [MENU 22 Using [Fn 24 Setting the display and sound ...25 Setting the display type 25 Setting the sound 25 Capturing photos 26 Zooming 27 Reducing camera shake (DIS 29 Tips for getting a clearer photo 30 Extended functions 32 Using the Smart Auto mode 33 Using the Program mode 35 Using the...
User Manual Ver.1.1 (English)
Page 11
... Using the timer 51 Shooting in the dark 52 Preventing red-eye 52 Using the flash 52 Adjusting the ISO sensitivity 54 Changing the camera's focus 55 Using macro 55 Using auto focus 55 Using tracking auto focus 56 Adjusting the focus area 57 Using Face Detection 58 Detecting faces...
... Using the timer 51 Shooting in the dark 52 Preventing red-eye 52 Using the flash 52 Adjusting the ISO sensitivity 54 Changing the camera's focus 55 Using macro 55 Using auto focus 55 Using tracking auto focus 56 Adjusting the focus area 57 Using Face Detection 58 Detecting faces...
User Manual Ver.1.1 (English)
Page 12
...;les to your Windows computer 90 Transferring files with Intelli-studio 91 Transferring files by connecting the camera as a removable disk 93 Disconnecting the camera (for Windows XP 94 Transferring files to your Mac computer 95 Printing photos with a PictBridge photo printer ...99 Display 99 Settings 100 Appendixes 103 Error messages 104 Camera maintenance 105 Cleaning your camera 105 Using or storing the camera 106 About memory cards 107 About the battery 110 Before contacting a service center 114 Camera specifications 117 Glossary 121 FCC notice 126 ...
...;les to your Windows computer 90 Transferring files with Intelli-studio 91 Transferring files by connecting the camera as a removable disk 93 Disconnecting the camera (for Windows XP 94 Transferring files to your Mac computer 95 Printing photos with a PictBridge photo printer ...99 Display 99 Settings 100 Appendixes 103 Error messages 104 Camera maintenance 105 Cleaning your camera 105 Using or storing the camera 106 About memory cards 107 About the battery 110 Before contacting a service center 114 Camera specifications 117 Glossary 121 FCC notice 126 ...

User Manual Ver.1.1 (English)
Page 13
Basic functions Learn about your camera 18 Performing the initial setup 19 Learning icons 21 Selecting options or menus 22 Using [MENU 22 Using [Fn 24 Setting the display and sound 25 Setting the display type 25 Setting the sound 25 Capturing photos 26 Zooming 27 Reducing camera shake (DIS 29 Tips for shooting. Unpacking 13 Camera layout 14 Inserting the battery and memory card ... 17 Charging the battery and turning on your camera 18 Charging the battery 18 Turning on your camera's layout, icons, and basic functions for getting a clearer photo 30
Basic functions Learn about your camera 18 Performing the initial setup 19 Learning icons 21 Selecting options or menus 22 Using [MENU 22 Using [Fn 24 Setting the display and sound 25 Setting the display type 25 Setting the sound 25 Capturing photos 26 Zooming 27 Reducing camera shake (DIS 29 Tips for shooting. Unpacking 13 Camera layout 14 Inserting the battery and memory card ... 17 Charging the battery and turning on your camera 18 Charging the battery 18 Turning on your camera's layout, icons, and basic functions for getting a clearer photo 30
User Manual Ver.1.1 (English)
Page 14
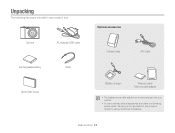
Basic functions 13 Samsung is not responsible for any problems caused by using unauthorized accessories. Unpacking The following items are included in your product. • You can purchase optional accessories at a retailer or a Samsung service center. Camera AC adapter/USB cable Optional accessories Camera case A/V cable Rechargeable battery Strap Quick Start Guide Battery charger Memory card/ Memory card adapter • The illustrations may differ slightly from the items shipped with your product box.
Basic functions 13 Samsung is not responsible for any problems caused by using unauthorized accessories. Unpacking The following items are included in your product. • You can purchase optional accessories at a retailer or a Samsung service center. Camera AC adapter/USB cable Optional accessories Camera case A/V cable Rechargeable battery Strap Quick Start Guide Battery charger Memory card/ Memory card adapter • The illustrations may differ slightly from the items shipped with your product box.
User Manual Ver.1.1 (English)
Page 15
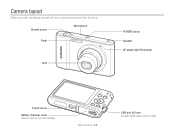
Camera layout Before you start, familiarize yourself with your camera's parts and their functions. Shutter button Microphone Flash Lens POWER button Speaker AF-assist light/Timer lamp Tripod mount Battery chamber cover Insert a memory card and battery Basic functions 14 USB and A/V port Accepts USB cable and A/V cable
Camera layout Before you start, familiarize yourself with your camera's parts and their functions. Shutter button Microphone Flash Lens POWER button Speaker AF-assist light/Timer lamp Tripod mount Battery chamber cover Insert a memory card and battery Basic functions 14 USB and A/V port Accepts USB cable and A/V cable
User Manual Ver.1.1 (English)
Page 16
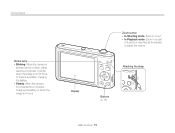
Camera layout Status lamp • Blinking: When the camera is saving a photo or video, being read by a computer or printer, when the image is out of focus, or there is a problem charging the battery • Steady: When the camera is connected to a computer, charging the battery, or when the image is in focus Display Zoom button • In Shooting mode: Zoom in or out • In Playback mode: Zoom in on part of a photo or view files as thumbnails, or adjust the volume Buttons (p. 16) Attaching the strap x y Basic functions 15
Camera layout Status lamp • Blinking: When the camera is saving a photo or video, being read by a computer or printer, when the image is out of focus, or there is a problem charging the battery • Steady: When the camera is connected to a computer, charging the battery, or when the image is in focus Display Zoom button • In Shooting mode: Zoom in or out • In Playback mode: Zoom in on part of a photo or view files as thumbnails, or adjust the volume Buttons (p. 16) Attaching the strap x y Basic functions 15

User Manual Ver.1.1 (English)
Page 17
... c F t Basic functions Change the display option. Change the timer option. Select a shooting mode. Change the flash option. Camera layout Buttons Button Description Access options or menus. Enter Playback mode. • Access options in Shooting mode. • Delete files... up Move down Move left Move right Confirm the highlighted option or menu. Scene: Capture a photo with a scene mode selected automatically by the camera. Mode S p N d s v Description Smart Auto: Capture a photo with options preset for a specific scene. Program: Capture a photo with ...
... c F t Basic functions Change the display option. Change the timer option. Select a shooting mode. Change the flash option. Camera layout Buttons Button Description Access options or menus. Enter Playback mode. • Access options in Shooting mode. • Delete files... up Move down Move left Move right Confirm the highlighted option or menu. Scene: Capture a photo with a scene mode selected automatically by the camera. Mode S p N d s v Description Smart Auto: Capture a photo with options preset for a specific scene. Program: Capture a photo with ...
User Manual Ver.1.1 (English)
Page 18
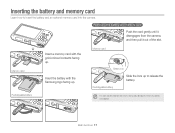
... the Samsung logo facing up. Memory card Battery lock Slide the lock up . Rechargeable battery You can use the internal memory for temporary storage if a memory card is not inserted. Basic functions 17 Removing the battery and memory card Push the card gently until it disengages from the camera, and... then pull it out of the slot. Inserting the battery and memory card Learn how to release the battery. Insert the battery with the gold-colored contacts facing up to insert the battery and an optional memory card into the camera.
... the Samsung logo facing up. Memory card Battery lock Slide the lock up . Rechargeable battery You can use the internal memory for temporary storage if a memory card is not inserted. Basic functions 17 Removing the battery and memory card Push the card gently until it disengages from the camera, and... then pull it out of the slot. Inserting the battery and memory card Learn how to release the battery. Insert the battery with the gold-colored contacts facing up to insert the battery and an optional memory card into the camera.
User Manual Ver.1.1 (English)
Page 19
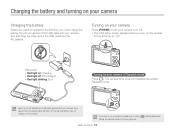
...screen appears when you turn on the camera for the first time, you must charge the battery. Plug the small end of the USB cable into your camera. The camera turns on your camera by pressing and holding [P] until the status lamp blinks, the camera does not emit any sounds. If you... turn your camera on or off : Fully charged • Red light blinking: Error Turning ...
...screen appears when you turn on the camera for the first time, you must charge the battery. Plug the small end of the USB cable into your camera. The camera turns on your camera by pressing and holding [P] until the status lamp blinks, the camera does not emit any sounds. If you... turn your camera on or off : Fully charged • Red light blinking: Error Turning ...

User Manual Ver.1.1 (English)
Page 20
London Time Zone 2 Press [D/c] to select a language, and then press [o]. 3 Press [D/c] to select a time zone, and then press [o]. • To set daylight-savings time, press [D]. Follow the steps below to configure the camera's basic settings. 1 Press [t] to select Language, and then press [t] or [o]. 4 Press [F/t] to select Time Zone, and then press [t] or [o]. Performing the initial setup When you turn on your camera for the first time, the initial setup screen appears.
London Time Zone 2 Press [D/c] to select a language, and then press [o]. 3 Press [D/c] to select a time zone, and then press [o]. • To set daylight-savings time, press [D]. Follow the steps below to configure the camera's basic settings. 1 Press [t] to select Language, and then press [t] or [o]. 4 Press [F/t] to select Time Zone, and then press [t] or [o]. Performing the initial setup When you turn on your camera for the first time, the initial setup screen appears.


