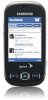
User Manual (user Manual) (ver.f7) (English)
Page 102
Memory Status The Samsung Seek allows you to review the memory allocation of both your phone's internal storage and that of the phone. (Wait for the connection to be completed. You can find additional ... the microSD card. 1. Press and touch Main ( Main ) > Settings > General > Memory status. Ⅲ The Memory Status page is divided into the phone before connecting the Samsung Seek to the Troubleshooting USB Connection section (page 93). 1. microSD Card When connected, your computer will automatically detect your phone.) Your phone's screen will display...
User Manual (user Manual) (ver.f7) (English)
Page 111
... Messaging 1. Camera 101 Press and touch Fun ( Fun ) > My Photos and touch a folder. 2. Press and touch Main ( Main ) > Messaging. 2. Press and touch Fun ( Fun ) > Camera > (Review). - Select the location Phone or Memory card. Touch to send by touching it. (You can select multiple pictures which are automatically stored within the phone...
User Manual (user Manual) (ver.f7) (English)
Page 112
... recipient's email address. From the Messaging screen, select additional options. Ⅲ Touch Subject: and enter a subject for the message. When you have finished adding content, review your Contacts (qualifying Contacts entries must be either : ● Enter phone number to use the keyboard to manually enter a recipient by touching and repeating step...
User Manual (user Manual) (ver.f7) (English)
Page 113
... in blue.) Ⅲ To "deselect" a file, touch it again until it is no longer highlighted. 4. Select the contact entry method you have finished adding content, review your images to continue using this feature. 6. Select a picture to send by choosing either a mobile number or email address to the new message. 5. Touch Done...
User Manual (user Manual) (ver.f7) (English)
Page 116
... Devices Paired Devices The Bluetooth pairing process allows you to other devices. 1. Note: To pair Bluetooth devices with your Samsung Seek, make sure your phone is shared between your phone and touch Done or press . See "Using the Bluetooth ...any available devices. 1. Press to return to delete the default "Samsung Seek" name. 3. Bluetooth Press and touch Main ( Main ) > Settings > Bluetooth > Trusted devices. 2. Viewing Information for Available Devices You can now also review detailed information for fast, secure connections while bypassing the discovery and ...
User Manual (user Manual) (ver.f7) (English)
Page 124
...and sender information) for the message. Using One-Touch Message Access 1. Tip: When you call entry. Sprint recommends that you have been reviewed, will dial your Using Another Phone to the message, press 4 during the header. Your phone accepts messages even when it is turned ...off. Retrieving Your Voicemail Messages You can review your messages directly from your phone or from your phone, either speed dial your ten-digit wireless phone number. Dial your voicemail answers...
User Manual (user Manual) (ver.f7) (English)
Page 125
... message, it will hear an announcement tone and a icon is displayed at the top of recently sent messages. Ⅲ Contacts to enter a wireless phone number. Review your wireless phone and another messaging-ready phone. Touch Done to enter the recipient's email address. Press and touch Main ( Main ) > Messaging. Use the keyboard...
User Manual (user Manual) (ver.f7) (English)
Page 126
... message is open , touch additional options. Press and touch Main ( Main ) > Messaging. 2. Touch to open the Delete menu. 3. Selected messages are then highlighted in blue. 4. Review your keyboard to an SMS Text message: 1. Touch ana available option: Ⅲ Call to call the number associated with the current message. Ⅲ Send Message...
User Manual (user Manual) (ver.f7) (English)
Page 144
... other user-created calendars. ⅷ Browse Files allows you to search for files from one of the following sources: Ⅲ Recent Files allows you to review a list of recently viewed or saved email attachments, choose the file, and then re-attach it to a new email. Ⅲ Pictures allows you to select...
User Manual (user Manual) (ver.f7) (English)
Page 157
Note: Go to > Main > Settings > General > Phone Information to view the applications on your location to find movie locations and showtimes, read reviews, or launch a browser to buy tickets online, on-the-go (not available for is as easy as Fandango™, etc.) or utilize the phone's own ...
User Manual (user Manual) (ver.f7) (English)
Page 161
... like to hear together. From the ADD SONGS page, touch each song that you can Rename or Reorder songs from your computer. Ⅲ Playlist to review a list of your recently added songs and create a custom playlist of your keyboard to view the file information for this playlist. (See "Entering Text" on...
User Manual (user Manual) (ver.f7) (English)
Page 163
... display the folders and files available on page 92. 2. Creating your Music Folder To create your Music folder: 1. Create a new music folder. From your computer. Review the procedures to physically connect your phone to your Desktop, double-click My Computer > [device drive letter] entry to continue onto the site. 3C. and...
User Manual (user Manual) (ver.f7) (English)
Page 173
... be substantially less than 120 scientists, engineers and physicians from your battery properly. In 1993, the Federal Communications Commission (FCC) adopted this updated standard after reviewing the available body of Electrical and Electronics Engineers (IEEE) and the American National Standards Institute (ANSI) joined in a regulation. Special Note: Be sure to RF...
User Manual (user Manual) (ver.f5) (English)
Page 9
... Shot (off/4/9/16) 3: Fun Tools... 1: Fun Frames 2: Color Tones 4: Controls... 1: Brightness 3: Night Shot 5: Settings.. 2: White Balance 4: Metering 1: Resolution 3: Shutter Sound 5: Storage 6: Launch 2: Quality 4: Status Bar 1: Review Pictures 2: Camcorder 3
User Manual (user Manual) (ver.f5) (English)
Page 10
... right softkey to view the following options: 1: Selftimer 1: Off 3: 10 sec 2: 5 sec 2: Fun Tools.. 1: Color Tones 3: Controls.. 1: White Balance 4: Settings.. 1: Quality 3: Video Length 2: Storage 5: Launch 1: Review Pictures 2: Camera 3: Media Mail 1: Inbox 3: Saved Mail 2: Sent Mail 4: Pending 4: My Albums 1: In Phone 3: Online Albums 2: Memory Card 4 5: Settings and Info 1: Auto Save to 1: Phone...
User Manual (user Manual) (ver.f5) (English)
Page 11
... 2: Scheduler 4: Countdown 1: Connect to PC 2: File Manager 3: Format Memory Card 4: Memory Info. 6: Memo Pad 7: World Time 8: Update Phone 1: Update Firmware 2: Update PRL 9: Voice Memo 1: Record 2: Review 5
User Manual (user Manual) (ver.f5) (English)
Page 104
...At the "Delete all voice memos: 1. Highlight and press Tools > Voice Memo. > Settings/Tools > 2. Deleting Voice Memos To delete an individual memo: 1. Highlight Review and press . (The phone displays a list of saved memos.) 3. Highlight the desired memo and press . - Press the number corresponding to the memo you want to...phone number used during the recording process. Highlight Yes and press . or - Highlight and press > Settings/Tools > Tools > Voice Memo > Review. 2. prompt, highlight Yes and press . 98 Section 2G. To delete all voice memos?" Playing Voice Memos 1.
User Manual (user Manual) (ver.f5) (English)
Page 113
... taking a picture, assign it as a Wallpaper or as a Picture ID, Wallpaper, or Incoming/Outgoing Calls. Ⅲ Erase to delete the picture you just took. Ⅲ Review Album to go to the My Albums folder where you 've taken your settings, you may be prompted to accept a data connection. Ⅲ Assign to...
User Manual (user Manual) (ver.f5) (English)
Page 114
... are asked to connect, follow the onscreen procedures to Connect, turn data On and press . (Follow any registration prompts and complete your navigation key to review your 10-digit phone number. Ⅲ Your 4-digit service password (default) is an easy process. To activate via the Online Albums connection process: 1. To activate...
User Manual (user Manual) (ver.f5) (English)
Page 115
... variety of color tones for the picture. (The default setting is in a secure place. Ⅲ Visit the Media Mail website via your personal computer to review your computer's browser and go to this Web address: https://mediamail.boostmobile.com. 2. to select an option from the following: Ⅲ Series Shot to take...