
User Manual (user Manual) (ver.f12) (English)
Page 4
... 58 Using Call Guard 59 Using Data Roam Guard 60 2E. Contacts 65 Adding a New Contacts Entry 65 Finding Contacts Entries 66 Contacts Entry Options 68 Adding a Phone Number to a Contacts Entry. . 68 Editing a Contacts Entry's Phone Number . . . . 69 Erasing a Contact 69 Assigning Speed Dial Numbers 69 Editing a Contacts Entry 70 Selecting a Ringer Type for an Entry 71 Dialing...
... 58 Using Call Guard 59 Using Data Roam Guard 60 2E. Contacts 65 Adding a New Contacts Entry 65 Finding Contacts Entries 66 Contacts Entry Options 68 Adding a Phone Number to a Contacts Entry. . 68 Editing a Contacts Entry's Phone Number . . . . 69 Erasing a Contact 69 Assigning Speed Dial Numbers 69 Editing a Contacts Entry 70 Selecting a Ringer Type for an Entry 71 Dialing...
User Manual (user Manual) (ver.f12) (English)
Page 13
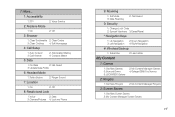
...Browser 1: Clear Bookmarks 2: Clear Cache 3: Clear Cookies 4: Edit Homepage 4: Call Setup 1: Auto Answer 3: Call Answer 2: Abbreviated Dialing 4: Contacts Match 5: Data 1: On Data 2: Net Guard 3: Update Data Profile 6: Headset Mode 1: Turbo Button 2: Ringer Sound 7: Location 1: On 2: Off...4: Lock my Phone 9: Roaming 1: Set Mode 3: Data Roaming 2: Call Guard 0: Security 1: Change Lock Code 2: Special Numbers 3: Erase/Reset *: Navigation Keys 1: Up Navigation 2: Down Navigation 3: Left Navigation 4: Right Navigation #: Wireless Backup 1: Subscribe My Content 2: Learn...
...Browser 1: Clear Bookmarks 2: Clear Cache 3: Clear Cookies 4: Edit Homepage 4: Call Setup 1: Auto Answer 3: Call Answer 2: Abbreviated Dialing 4: Contacts Match 5: Data 1: On Data 2: Net Guard 3: Update Data Profile 6: Headset Mode 1: Turbo Button 2: Ringer Sound 7: Location 1: On 2: Off...4: Lock my Phone 9: Roaming 1: Set Mode 3: Data Roaming 2: Call Guard 0: Security 1: Change Lock Code 2: Special Numbers 3: Erase/Reset *: Navigation Keys 1: Up Navigation 2: Down Navigation 3: Left Navigation 4: Right Navigation #: Wireless Backup 1: Subscribe My Content 2: Learn...

User Manual (user Manual) (ver.f12) (English)
Page 34
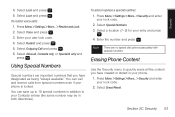
... calls. 1. Press to the number, press Send Msg (left softkey). - You can also place calls from your phone by using Speed dialing numbers from your Contacts (page 29), using Voice Dial (page 81), and using 11 digits (1 + area code + phone number). See "Using Call Guard" on . 2. Enter a phone...on the phone's screen. Phone Basics To send a message to dial the speed dial number. (See "Assigning Speed Dial Numbers" on your way to erase the numbers.) 3. Dialing Options When you enter numbers in the speed dial location you 're on page 69.) 20 Section 2A. To initiate a ...
... calls. 1. Press to the number, press Send Msg (left softkey). - You can also place calls from your phone by using Speed dialing numbers from your Contacts (page 29), using Voice Dial (page 81), and using 11 digits (1 + area code + phone number). See "Using Call Guard" on . 2. Enter a phone...on the phone's screen. Phone Basics To send a message to dial the speed dial number. (See "Assigning Speed Dial Numbers" on your way to erase the numbers.) 3. Dialing Options When you enter numbers in the speed dial location you 're on page 69.) 20 Section 2A. To initiate a ...

User Manual (user Manual) (ver.f12) (English)
Page 39
... the call log for Recent calls. Press Next (right softkey) to a phone number that is already in your Contacts, the phone number and the duration of the main display screen. You can also erase the logs from your conversation. (For more information, see "Making a Three-Way Call" on the upper-left softkey...
... the call log for Recent calls. Press Next (right softkey) to a phone number that is already in your Contacts, the phone number and the duration of the main display screen. You can also erase the logs from your conversation. (For more information, see "Making a Three-Way Call" on the upper-left softkey...
User Manual (user Manual) (ver.f12) (English)
Page 67
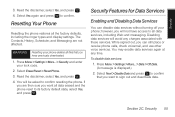
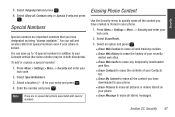
... > More...> Security and enter your user lock code. 4. Note There are important numbers that you have designated as being "always available." Erasing Phone Content Use the Security menu to your Contacts entries (the same number may be in your phone is locked. Select Lock and press . Press Menu > Settings > More... > Restrict ... 1. Select Allow all the content you have created or stored in both directories). You can save up to 10 special numbers in addition to quickly erase all , Contacts only, or Special # only and press . To restrict voice calls: 1. Security 4.
... > More...> Security and enter your user lock code. 4. Note There are important numbers that you have designated as being "always available." Erasing Phone Content Use the Security menu to your Contacts entries (the same number may be in your phone is locked. Select Lock and press . Press Menu > Settings > More... > Restrict ... 1. Select Allow all the content you have created or stored in both directories). You can save up to 10 special numbers in addition to quickly erase all , Contacts only, or Special # only and press . To restrict voice calls: 1. Security 4.

User Manual (user Manual) (ver.f12) (English)
Page 68
... an option and press . Ⅲ Erase Web Cookies to erase all web tracking cookies. Ⅲ Erase Web History to erase the history of your recently visited web sites. Ⅲ Erase Web Cache to erase any temporarily downloaded web files. Ⅲ Erase Contacts to erase the contents of your Contacts list. Ⅲ Erase My Content to erase all the content you have entered...
... an option and press . Ⅲ Erase Web Cookies to erase all web tracking cookies. Ⅲ Erase Web History to erase the history of your recently visited web sites. Ⅲ Erase Web Cache to erase any temporarily downloaded web files. Ⅲ Erase Contacts to erase the contents of your Contacts list. Ⅲ Erase My Content to erase all the content you have entered...
User Manual (user Manual) (ver.f12) (English)
Page 69
Read the disclaimer, select Yes, and press . 4. Resetting Your Phone Resetting the phone restores all data erased and the phone reset to its factory default state, select Yes, and press . The Contacts, History, Scheduler, and Messaging are then sure you have access to sign out and deactivate data. Press ...code. 2. Select Next > Disable Data and press to confirm that you want to all data services, including Web and messaging. Select Erase/Reset > Reset Phone. 3. You may enable data services again at any charges associated with these services. Select Yes again and press to...
Read the disclaimer, select Yes, and press . 4. Resetting Your Phone Resetting the phone restores all data erased and the phone reset to its factory default state, select Yes, and press . The Contacts, History, Scheduler, and Messaging are then sure you have access to sign out and deactivate data. Press ...code. 2. Select Next > Disable Data and press to confirm that you want to all data services, including Web and messaging. Select Erase/Reset > Reset Phone. 3. You may enable data services again at any charges associated with these services. Select Yes again and press to...

User Manual (user Manual) (ver.f12) (English)
Page 75
This section guides you through accessing and making the most of your Contacts). Each entry contains the phone number (if it is available) and Contacts entry name (if the phone number is in the phone's history. If a call is received while your phone's history. Call History ...Phone Number From Call History (page 63) ࡗ Prepending a Phone Number From Call History (page 63) ࡗ Erasing Call History (page 64) Call History keeps track of the last 150 phone numbers (or Contacts entries) for calls you return a call ) may only appear once on . If you placed, accepted, or missed....
This section guides you through accessing and making the most of your Contacts). Each entry contains the phone number (if it is available) and Contacts entry name (if the phone number is in the phone's history. If a call is received while your phone's history. Call History ...Phone Number From Call History (page 63) ࡗ Prepending a Phone Number From Call History (page 63) ࡗ Erasing Call History (page 64) Call History keeps track of the last 150 phone numbers (or Contacts entries) for calls you return a call ) may only appear once on . If you placed, accepted, or missed....
User Manual (user Manual) (ver.f12) (English)
Page 79
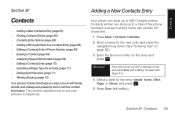
Contacts Section 2F Contacts ࡗ Adding a New Contacts Entry (page 65) ࡗ Finding Contacts Entries (page 66) ࡗ Contacts Entry Options (page 68) ࡗ Adding a Phone Number to a Contacts Entry (page 68) ࡗ Editing a Contacts Entry's Phone Number (page 69) ࡗ Erasing a Contact (page 69) ࡗ Assigning Speed Dial Numbers (page 69) ࡗ Editing a Contacts Entry (page 70) ࡗ Selecting a Ringer...
Contacts Section 2F Contacts ࡗ Adding a New Contacts Entry (page 65) ࡗ Finding Contacts Entries (page 66) ࡗ Contacts Entry Options (page 68) ࡗ Adding a Phone Number to a Contacts Entry (page 68) ࡗ Editing a Contacts Entry's Phone Number (page 69) ࡗ Erasing a Contact (page 69) ࡗ Assigning Speed Dial Numbers (page 69) ࡗ Editing a Contacts Entry (page 70) ࡗ Selecting a Ringer...

User Manual (user Manual) (ver.f12) (English)
Page 83
... existing number, and then press . 3. Assigning Speed Dial Numbers Your phone can assign speed dial numbers when you add a new Contacts entry, when you add a new phone number to a new phone number: 1. Erasing a Contact 1. After editing the number, press Options (right softkey) > Set # Type. 6. Select Yes and press . Select an available (unassigned) speed...
... existing number, and then press . 3. Assigning Speed Dial Numbers Your phone can assign speed dial numbers when you add a new Contacts entry, when you add a new phone number to a new phone number: 1. Erasing a Contact 1. After editing the number, press Options (right softkey) > Set # Type. 6. Select Yes and press . Select an available (unassigned) speed...

User Manual (user Manual) (ver.f12) (English)
Page 103
... picture will automatically be prompted to accept a data connection. Ⅲ Assign to assign the picture as a Picture ID, Screen Saver, or Incoming Call. Ⅲ Erase to delete the picture you just took . Ⅲ Camera Mode to return to the camera to take additional pictures. Ⅲ Review Pictures to go to...camera button. 4. Depending on your picture, press Next (right softkey) for more options: Ⅲ Send Pic to send the picture to up to 10 contacts at one time. (See page 97 for details.) Ⅲ Upload to upload the picture you just took to the Sprint Picture Mail Web site (www...
... picture will automatically be prompted to accept a data connection. Ⅲ Assign to assign the picture as a Picture ID, Screen Saver, or Incoming Call. Ⅲ Erase to delete the picture you just took . Ⅲ Camera Mode to return to the camera to take additional pictures. Ⅲ Review Pictures to go to...camera button. 4. Depending on your picture, press Next (right softkey) for more options: Ⅲ Send Pic to send the picture to up to 10 contacts at one time. (See page 97 for details.) Ⅲ Upload to upload the picture you just took to the Sprint Picture Mail Web site (www...
User Manual (user Manual) (ver.f12) (English)
Page 109
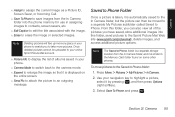
... In Camera folder into this folder, you can also view all of albums saved in assigning images to contacts, screen savers, etc. ⅷ Edit Caption to edit the title associated with the image. ⅷ Erase to Phone folder: 1. Section 2I. From this folder, send pictures to take more pictures. Use your phone... to the Sprint Picture Mail Web site (www.sprint.com/picturemail), delete images, and access additional picture options. To move pictures to the Saved to erase the image or selected images. Select Save To Phone and press .
... In Camera folder into this folder, you can also view all of albums saved in assigning images to contacts, screen savers, etc. ⅷ Edit Caption to edit the title associated with the image. ⅷ Erase to Phone folder: 1. Section 2I. From this folder, send pictures to take more pictures. Use your phone... to the Sprint Picture Mail Web site (www.sprint.com/picturemail), delete images, and access additional picture options. To move pictures to the Saved to erase the image or selected images. Select Save To Phone and press .

User Manual (user Manual) (ver.f12) (English)
Page 167
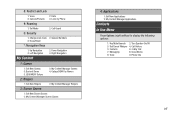
See also Pictures 88-103 Options 91 Self Timer 92 Settings 93 Zoom 92 Car-Kit/Headset 49 Clear Envelope 84 Clock Display 43 Contacts 65-73 Adding a Phone Number 68 Adding an Entry 65 Assigning Speed Dial Numbers 69 Editing an Entry 70 Entry Options 68 Index 153 Index ... (DUN) 107 Pairing 106 Profiles 105 Settings 105 C Calculator 78 Calendar 74-76 Adding Events 74 Editing Events 75 Erasing Events 76 Call Forwarding 118 Call Guard 59 Call History 61-64 Erasing 64 Making a Call 62 Options 62 Prepending a Number 63 Saving a Number 63 Viewing 61 Call Voicemail 84 Call Waiting...
See also Pictures 88-103 Options 91 Self Timer 92 Settings 93 Zoom 92 Car-Kit/Headset 49 Clear Envelope 84 Clock Display 43 Contacts 65-73 Adding a Phone Number 68 Adding an Entry 65 Assigning Speed Dial Numbers 69 Editing an Entry 70 Entry Options 68 Index 153 Index ... (DUN) 107 Pairing 106 Profiles 105 Settings 105 C Calculator 78 Calendar 74-76 Adding Events 74 Editing Events 75 Erasing Events 76 Call Forwarding 118 Call Guard 59 Call History 61-64 Erasing 64 Making a Call 62 Options 62 Prepending a Number 63 Saving a Number 63 Viewing 61 Call Voicemail 84 Call Waiting...

User Manual (user Manual) (ver.f12) (English)
Page 168
Erasing 69 Finding Entries 66 Selecting a Ringer 71 Contacts Match 28 D Data Disable 55 Enable 56 Data Roam Guard 60 Data Services 119-134 Applications 119 Chat 126 Downloading Content 127 FAQs 134 Home ... 33 Numbers 33 Preset Messages 33 Recent Messages 33 Selecting Mode 30 154 Index Smileys 33 Symbols 33 T9 Text Input 31 T9(English) 31 Erasing Contacts 54 Messages 54 My Content 54 Phone Content 53 Pictures 54 Web Cache 54 Web Cookies 54 Web History 54 Event Adding 74 Alert Menu...
Erasing 69 Finding Entries 66 Selecting a Ringer 71 Contacts Match 28 D Data Disable 55 Enable 56 Data Roam Guard 60 Data Services 119-134 Applications 119 Chat 126 Downloading Content 127 FAQs 134 Home ... 33 Numbers 33 Preset Messages 33 Recent Messages 33 Selecting Mode 30 154 Index Smileys 33 Symbols 33 T9 Text Input 31 T9(English) 31 Erasing Contacts 54 Messages 54 My Content 54 Phone Content 53 Pictures 54 Web Cache 54 Web Cookies 54 Web History 54 Event Adding 74 Alert Menu...

User Manual (user Manual) (ver.f6) (English)
Page 4
... Time 68 Self-Service 69 Updating Phone Software 69 Updating the PRL 69 2H. Contacts 57 Adding a New Contacts Entry 57 Contacts Entry Options 58 Editing a Contacts Entry 58 Adding a Phone Number to a Contacts Entry 59 Editing a Contacts Entry's Phone Number 59 Erasing a Contact 59 Assigning Speed Dial Numbers 60 Selecting a Ringer Type for an Entry 61 Finding...
... Time 68 Self-Service 69 Updating Phone Software 69 Updating the PRL 69 2H. Contacts 57 Adding a New Contacts Entry 57 Contacts Entry Options 58 Editing a Contacts Entry 58 Adding a Phone Number to a Contacts Entry 59 Editing a Contacts Entry's Phone Number 59 Erasing a Contact 59 Assigning Speed Dial Numbers 60 Selecting a Ringer Type for an Entry 61 Finding...
User Manual (user Manual) (ver.f6) (English)
Page 13
...Voice 2: Data 3: Camera/Pictures 4: Lock my Phone 9: Roaming 1: Set Mode 2: Call Guard 0: Security 1: Change Lock Code 2: Special Numbers 3: Erase/Reset *: Navigation Keys 1: Up Navigation 3: Left Navigation My Content 2: Down Navigation 4: Right Navigation 1: Games 1: Get New Games 3: Burnout Demo ...Savers 1: Get New Screen Savers 2: My Content Manager Screen Savers 4: Applications 1: Get New Applications 2: My Content Manager Applications Contacts In Use Menu Press Options (right softkey) to display the following options: 1: Key Mute/Unmute 2: Turn Speaker On/Off 3: Set...
...Voice 2: Data 3: Camera/Pictures 4: Lock my Phone 9: Roaming 1: Set Mode 2: Call Guard 0: Security 1: Change Lock Code 2: Special Numbers 3: Erase/Reset *: Navigation Keys 1: Up Navigation 3: Left Navigation My Content 2: Down Navigation 4: Right Navigation 1: Games 1: Get New Games 3: Burnout Demo ...Savers 1: Get New Screen Savers 2: My Content Manager Screen Savers 4: Applications 1: Get New Applications 2: My Content Manager Applications Contacts In Use Menu Press Options (right softkey) to display the following options: 1: Key Mute/Unmute 2: Turn Speaker On/Off 3: Set...
User Manual (user Manual) (ver.f6) (English)
Page 32
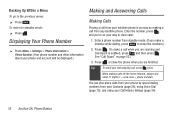
... standby mode. (If you are roaming and Call Guard is as easy as making calls off the home network, always dial using your way to erase the numbers.) 2. When making a call , press twice. Press . (To make a mistake while dialing, press to clear calls. 1. See "Call Guard" on your ...). 18 Section 2A. Enter the number, press , and you are finished. You can also place calls from your phone by speed dialing numbers from your Contacts (page 26), using Voice Dial (page 70), and using 11 digits (1 + area code + phone number). Phone Basics To return to the previous menu: ...
... standby mode. (If you are roaming and Call Guard is as easy as making calls off the home network, always dial using your way to erase the numbers.) 2. When making a call , press twice. Press . (To make a mistake while dialing, press to clear calls. 1. See "Call Guard" on your ...). 18 Section 2A. Enter the number, press , and you are finished. You can also place calls from your phone by speed dialing numbers from your Contacts (page 26), using Voice Dial (page 70), and using 11 digits (1 + area code + phone number). Phone Basics To return to the previous menu: ...

User Manual (user Manual) (ver.f6) (English)
Page 36
You can also erase the logs from this menu. ⅷ Contacts accesses the Contacts menu. ⅷ 3-Way Call allows you to talk to two different people at the same time. (For more information, see "Making a Three-Way Call" on ...
You can also erase the logs from this menu. ⅷ Contacts accesses the Contacts menu. ⅷ 3-Way Call allows you to talk to two different people at the same time. (For more information, see "Making a Three-Way Call" on ...
User Manual (user Manual) (ver.f6) (English)
Page 61
... an option and press . Ⅲ Erase Web Cookies to erase all web tracking cookies. Ⅲ Erase Web History to erase the history of your recently visited web sites. Ⅲ Erase Web Cache to erase any temporarily downloaded web files. Ⅲ Erase Contacts to erase the contents of your Contacts list. Ⅲ Erase My Content to erase all the content you have downloaded...
... an option and press . Ⅲ Erase Web Cookies to erase all web tracking cookies. Ⅲ Erase Web History to erase the history of your recently visited web sites. Ⅲ Erase Web Cache to erase any temporarily downloaded web files. Ⅲ Erase Contacts to erase the contents of your Contacts list. Ⅲ Erase My Content to erase all the content you have downloaded...

User Manual (user Manual) (ver.f6) (English)
Page 144
...Adding a Phone Number 58 Adding an Entry 57 Assigning Speed Dial Numbers 60 Editing an Entry 58 Entry Options 58 Erasing 59 Finding Entries 61 Selecting a Ringer 61 Sending Via Bluetooth 91 Contacts Match 25 D Data Disable 49 Enable 49 Data Services 102-111 Applications 102 Downloading Content 107 Security Features 49...Numbers 29 Preset Messages 29, 30 Recent Messages 29 Selecting Mode 27 130 Index Smileys 29 Symbols 29 T9 Text Input 28 T9(English) 28 Erasing Contacts 47 Messages 47 My Content 47 Phone Content 47 Pictures 47 Web Cache 47 Web Cookies 47 Web History 47 Event Adding 63 Alert Menu...
...Adding a Phone Number 58 Adding an Entry 57 Assigning Speed Dial Numbers 60 Editing an Entry 58 Entry Options 58 Erasing 59 Finding Entries 61 Selecting a Ringer 61 Sending Via Bluetooth 91 Contacts Match 25 D Data Disable 49 Enable 49 Data Services 102-111 Applications 102 Downloading Content 107 Security Features 49...Numbers 29 Preset Messages 29, 30 Recent Messages 29 Selecting Mode 27 130 Index Smileys 29 Symbols 29 T9 Text Input 28 T9(English) 28 Erasing Contacts 47 Messages 47 My Content 47 Phone Content 47 Pictures 47 Web Cache 47 Web Cookies 47 Web History 47 Event Adding 63 Alert Menu...


