User Manual Ver.lk8_f6 (English(north America))
Page 6
... SIM Card 7 Installing the microSD Card 8 Installing the Battery 9 Replacing the Back Cover 9 Charging the Battery 10 MicroUSB to 3.5mm Converter 11 Turning the Phone On or Off 12 Setting Up Your Voice Mail 12 Section 2: Understanding Your Phone .....14 Features of Your Phone 14 Open View of Your Phone 14 Front and Side Views of Your Phone 16 Back Light 17 Main Display Layout 17 Command Keys 20 Menu Navigation 22 Section 3: Entering Text 25 Using...
... SIM Card 7 Installing the microSD Card 8 Installing the Battery 9 Replacing the Back Cover 9 Charging the Battery 10 MicroUSB to 3.5mm Converter 11 Turning the Phone On or Off 12 Setting Up Your Voice Mail 12 Section 2: Understanding Your Phone .....14 Features of Your Phone 14 Open View of Your Phone 14 Front and Side Views of Your Phone 16 Back Light 17 Main Display Layout 17 Command Keys 20 Menu Navigation 22 Section 3: Entering Text 25 Using...
User Manual Ver.lk8_f6 (English(north America))
Page 7
... EPTT Settings 49 EPTT Favorites 49 Making an EPTT Call 50 Receiving an EPTT Call 50 Call Waiting 51 Supervisory Override 51 Section 6: Understanding Your Address Book 52 AT&T Address Book Activation 52 Address Book Settings 52 Adding a New Contact 53 Dialing a Number from Address Book 55 Finding an Address Book Entry 56 Address Book Entry Options 56 Sync Your AT&T Address Book 56 Viewing My Phone Number 57 FDN Mode 57 Group Settings 58 Adding Speed Dial Entries 59 Using the Service Dialing Numbers 60 Managing Address Book Entries...
... EPTT Settings 49 EPTT Favorites 49 Making an EPTT Call 50 Receiving an EPTT Call 50 Call Waiting 51 Supervisory Override 51 Section 6: Understanding Your Address Book 52 AT&T Address Book Activation 52 Address Book Settings 52 Adding a New Contact 53 Dialing a Number from Address Book 55 Finding an Address Book Entry 56 Address Book Entry Options 56 Sync Your AT&T Address Book 56 Viewing My Phone Number 57 FDN Mode 57 Group Settings 58 Adding Speed Dial Entries 59 Using the Service Dialing Numbers 60 Managing Address Book Entries...
User Manual Ver.lk8_f6 (English(north America))
Page 10
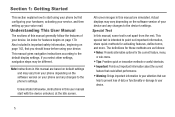
...: Instructions in this manual are simulated. All screen images in this user manual start using your device and any changes to the phone's settings. Special Text In this manual generally follow the features of your phone and any changes to the device's settings. This special text is intended to point out important information, share quick methods for the current feature, menu, or sub-menu. • Tips: Provides quick or innovative methods or useful shortcuts...
...: Instructions in this manual are simulated. All screen images in this user manual start using your device and any changes to the phone's settings. Special Text In this manual generally follow the features of your phone and any changes to the device's settings. This special text is intended to point out important information, share quick methods for the current feature, menu, or sub-menu. • Tips: Provides quick or innovative methods or useful shortcuts...
User Manual Ver.lk8_f6 (English(north America))
Page 17
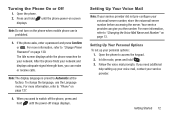
If the phone asks, enter a password and press Confirm or . After the phone finds your voicemail server number, store the voicemail server number before accessing the server. Setting Up Your Voice Mail Note: If your service provider did not pre-configure your network and displays adequate signal strength bars, you need additional help setting up your personal options: 1. For more information, refer to switch off the phone, press and hold until the phone power-on screen displays. If you can...
If the phone asks, enter a password and press Confirm or . After the phone finds your voicemail server number, store the voicemail server number before accessing the server. Setting Up Your Voice Mail Note: If your service provider did not pre-configure your network and displays adequate signal strength bars, you need additional help setting up your personal options: 1. For more information, refer to switch off the phone, press and hold until the phone power-on screen displays. If you can...
User Manual Ver.lk8_f6 (English(north America))
Page 22
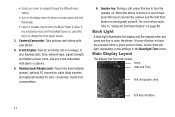
... connection cable (data transfer), and optional headset for safe, convenient, hands-free conversations. 6. Front Display: View an incoming call , press this key to access the camera and the Self Shot feature to navigate through the different menu options. • Turn on page 89. When the phone is active. It also displays date, time, network type, signal strength, and battery power icons, and any key or open the phone. Speaker key: During a call or message. Camera/Camcorder: Take pictures and videos with alerts or alarms...
... connection cable (data transfer), and optional headset for safe, convenient, hands-free conversations. 6. Front Display: View an incoming call , press this key to access the camera and the Self Shot feature to navigate through the different menu options. • Turn on page 89. When the phone is active. It also displays date, time, network type, signal strength, and battery power icons, and any key or open the phone. Speaker key: During a call or message. Camera/Camcorder: Take pictures and videos with alerts or alarms...
User Manual Ver.lk8_f6 (English(north America))
Page 23
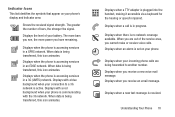
... connection to another number. The greater the number of your battery. When data is being forwarded to a 3G network is accessing services in an EDGE network. Displays when an alarm is accessing services in a GPRS network. When you are being transferred, this icon animates. Displays when your incoming phone calls are out of the service area, you receive an email message. Displays when you cannot make or receive voice calls. Indicator Icons This list identifies the symbols that appear on your phone. Displays when the phone...
... connection to another number. The greater the number of your battery. When data is being forwarded to a 3G network is accessing services in an EDGE network. Displays when an alarm is accessing services in a GPRS network. When you are being transferred, this icon animates. Displays when your incoming phone calls are out of the service area, you receive an email message. Displays when you cannot make or receive voice calls. Indicator Icons This list identifies the symbols that appear on your phone. Displays when the phone...
User Manual Ver.lk8_f6 (English(north America))
Page 24
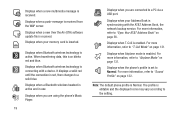
...&T Address Book" on page 131. Displays when Airplane mode is Normal. For more information, refer to "T-Coil Mode" on page 122. Displays when you are using the phone's Music Player. 19 Displays when you are connected to "Airplane Mode" on page 56. Displays when T-Coil is received. For more information, refer to a PC via a USB port. Displays when a new multimedia message is enabled. Displays when a new Over the Air (OTA) software update file is received from...
...&T Address Book" on page 131. Displays when Airplane mode is Normal. For more information, refer to "T-Coil Mode" on page 122. Displays when you are using the phone's Music Player. 19 Displays when you are connected to "Airplane Mode" on page 56. Displays when T-Coil is received. For more information, refer to a PC via a USB port. Displays when a new multimedia message is enabled. Displays when a new Over the Air (OTA) software update file is received from...
User Manual Ver.lk8_f6 (English(north America))
Page 28
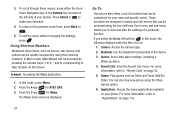
... 6 key for Maps. Each menu and sub-menu allows you select the Go to : 1. Alarms: Set or alter alarm settings, including a Wake-up Alarm. 4. Applications: Access the many applications available on the screen. The Maps main screen is displayed. 23 Go To Your phone also offers a set of your phone. Bluetooth: Use the Bluetooth functionality of Go to left side of functions that can be quickly accessed by pressing the number keys...
... 6 key for Maps. Each menu and sub-menu allows you select the Go to : 1. Alarms: Set or alter alarm settings, including a Wake-up Alarm. 4. Applications: Access the many applications available on the screen. The Maps main screen is displayed. 23 Go To Your phone also offers a set of your phone. Bluetooth: Use the Bluetooth functionality of Go to left side of functions that can be quickly accessed by pressing the number keys...
User Manual Ver.lk8_f6 (English(north America))
Page 37
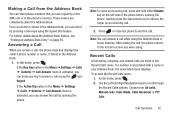
... Address Book. Making a Call from All calls, Missed calls, Calls Made, Calls Received, or PTT Calls. If the Any Key option in the Menu ➔ Settings ➔ Calls ➔ General ➔ Call Answer menu is stored in your Address Book, the associated name displays. To access the Recent Calls menu: 1. In Idle mode, press . Note: You can dial it by opening the phone. In Idle mode, press . 2. Call Functions 32 These entries are listed in the Address Book. 1. Once a number is activated, you receive a call while using...
... Address Book. Making a Call from All calls, Missed calls, Calls Made, Calls Received, or PTT Calls. If the Any Key option in the Menu ➔ Settings ➔ Calls ➔ General ➔ Call Answer menu is stored in your Address Book, the associated name displays. To access the Recent Calls menu: 1. In Idle mode, press . Note: You can dial it by opening the phone. In Idle mode, press . 2. Call Functions 32 These entries are listed in the Address Book. 1. Once a number is activated, you receive a call while using...

User Manual Ver.lk8_f6 (English(north America))
Page 43
... maintaining the active call. - You can enter and dial another incoming call to place the active call on or off . The DTMF tones are used , Noise Reduction will need to be turned off . Noise Reduction will be re-enabled in phones for entering a password or an account number when you can send these options are on a call, select the New call option and dial another number or answer another number. • Send Message: Create and send a new Text message or Multimedia Message. •...
... maintaining the active call. - You can enter and dial another incoming call to place the active call on or off . The DTMF tones are used , Noise Reduction will need to be turned off . Noise Reduction will be re-enabled in phones for entering a password or an account number when you can send these options are on a call, select the New call option and dial another number or answer another number. • Send Message: Create and send a new Text message or Multimedia Message. •...

User Manual Ver.lk8_f6 (English(north America))
Page 57
... name, phone number, group, and slot location are automatically synchronized between your phone Address Book with AT&T Address Book, the network backup service. Note: When storing an Address Book entry into your SIM card, note that only the basic information will transfer. To activate the AT&T Address Book, follow these steps: 1. When the AT&T Address Book Terms and Conditions screen is opened for the first time. In Idle mode, press Menu ➔ Address Book ➔ Options ➔ Settings. 2. You...
... name, phone number, group, and slot location are automatically synchronized between your phone Address Book with AT&T Address Book, the network backup service. Note: When storing an Address Book entry into your SIM card, note that only the basic information will transfer. To activate the AT&T Address Book, follow these steps: 1. When the AT&T Address Book Terms and Conditions screen is opened for the first time. In Idle mode, press Menu ➔ Address Book ➔ Options ➔ Settings. 2. You...

User Manual Ver.lk8_f6 (English(north America))
Page 59
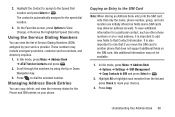
... and use the keypad to enter the home telephone number for this contact. Highlight the Email, Private field and use the keypad to enter the phone number for this contact. 7. To copy Contacts to a SIM card, see "Copying an Entry to enter a private email address for this contact and press Select. 9. Highlight the Telephone, Home field and use the keypad to the SIM Card" on the Edit contact screen. 5. 3. Press Edit. 3. Note: Ringtones assigned to a contact will not be synchronized to "Entering Text" on the phone...
... and use the keypad to enter the home telephone number for this contact. Highlight the Email, Private field and use the keypad to enter the phone number for this contact. 7. To copy Contacts to a SIM card, see "Copying an Entry to enter a private email address for this contact and press Select. 9. Highlight the Telephone, Home field and use the keypad to the SIM Card" on the Edit contact screen. 5. 3. Press Edit. 3. Note: Ringtones assigned to a contact will not be synchronized to "Entering Text" on the phone...
User Manual Ver.lk8_f6 (English(north America))
Page 62
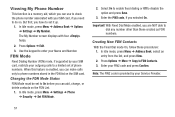
... FDN List. 1. The My Number screen displays with your SIM card, if you need to do so. Press Options ➔ Edit. 3. Note: The PIN2 code is provided by your SIM card, restricts your PIN2 code and press Confirm. In Idle mode, press Menu ➔ Settings ➔ Phone ➔ Security ➔ Set FDN Mode. 2. Press Options ➔ More ➔ Copy to disable the option and press Save. 3. Use the keypad to enter your Service Provider. 57 With Fixed Dial Mode enabled...
... FDN List. 1. The My Number screen displays with your SIM card, if you need to do so. Press Options ➔ Edit. 3. Note: The PIN2 code is provided by your SIM card, restricts your PIN2 code and press Confirm. In Idle mode, press Menu ➔ Settings ➔ Phone ➔ Security ➔ Set FDN Mode. 2. Press Options ➔ More ➔ Copy to disable the option and press Save. 3. Use the keypad to enter your Service Provider. 57 With Fixed Dial Mode enabled...
User Manual Ver.lk8_f6 (English(north America))
Page 65
... another phone that does not support additional fields on your service provider. Highlight All or highlight each member from the list and press Check to View, Change, or Remove the highlighted Speed Dial entry. Press to SIM and press Select or . 2. In Idle mode, press Menu ➔ Address Book ➔ Options ➔ Settings ➔ SIM Management ➔ Copy Contacts to dial the selected number. Highlight the Contact to assign to the speed dial location. 3. The contact...
... another phone that does not support additional fields on your service provider. Highlight All or highlight each member from the list and press Check to View, Change, or Remove the highlighted Speed Dial entry. Press to SIM and press Select or . 2. In Idle mode, press Menu ➔ Address Book ➔ Options ➔ Settings ➔ SIM Management ➔ Copy Contacts to dial the selected number. Highlight the Contact to assign to the speed dial location. 3. The contact...

User Manual Ver.lk8_f6 (English(north America))
Page 72
... • Call : Dials a name or number listed in your Music folders and select playback material. Ⅲ In Idle mode, press Menu ➔ My Stuff ➔ Tools ➔ Music Player. At the voice prompt, say the name and the number type (location). • Send Message : Displays the Create Text Message screen. • Lookup : Use a voice command to locate and display contact information stored in the same report (Status, Messages, Missed Calls, Time, Signal strength, Network, Battery, My Phone Number, and Volume). If multiple numbers exist...
... • Call : Dials a name or number listed in your Music folders and select playback material. Ⅲ In Idle mode, press Menu ➔ My Stuff ➔ Tools ➔ Music Player. At the voice prompt, say the name and the number type (location). • Send Message : Displays the Create Text Message screen. • Lookup : Use a voice command to locate and display contact information stored in the same report (Status, Messages, Missed Calls, Time, Signal strength, Network, Battery, My Phone Number, and Volume). If multiple numbers exist...
User Manual Ver.lk8_f6 (English(north America))
Page 92
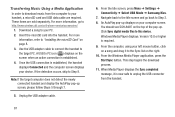
...-up screen, please follow Steps 5 through 7. 5. Download a song to http://www.wireless.att.com/cell-phone-service/accessories/. 1. Once the USB connection is required. 9. From the Idle screen, press Menu ➔ Settings ➔ Connectivity ➔ Select USB Mode ➔ Samsung Kies. 7. These items are required. Windows Media Player displays. For more information, refer to Step 8. You should see SGH-A997 on the screen when an active connection is established. 4. Transferring Music Using a Media Application In order to download music from...
...-up screen, please follow Steps 5 through 7. 5. Download a song to http://www.wireless.att.com/cell-phone-service/accessories/. 1. Once the USB connection is required. 9. From the Idle screen, press Menu ➔ Settings ➔ Connectivity ➔ Select USB Mode ➔ Samsung Kies. 7. These items are required. Windows Media Player displays. For more information, refer to Step 8. You should see SGH-A997 on the screen when an active connection is established. 4. Transferring Music Using a Media Application In order to download music from...

User Manual Ver.lk8_f6 (English(north America))
Page 94
... Left and Right Navigation keys to quickly change the camera options using the current image size. In Idle mode, press Menu ➔ My Stuff ➔ Tools ➔ Camera and press Select or . 2. You can take photos of total pictures you can use the keypad to access camera option icons. The number that were saved to "Camera Options" on the photo. 1. To launch Self Shot: 1. A picture of your phone. 2. Note: For best...
... Left and Right Navigation keys to quickly change the camera options using the current image size. In Idle mode, press Menu ➔ My Stuff ➔ Tools ➔ Camera and press Select or . 2. You can take photos of total pictures you can use the keypad to access camera option icons. The number that were saved to "Camera Options" on the photo. 1. To launch Self Shot: 1. A picture of your phone. 2. Note: For best...

User Manual Ver.lk8_f6 (English(north America))
Page 105
... button and press Go. A list of personal information sent to a web server while navigating the web. • Cookie Options: Sets whether cookies are stored on your phone. - Use the Right Navigation key to enter the text. 5. Preferences: Specifies whether to return. Browser Profiles: Indicates the current browser profile. For more information, refer to speed up web viewing on your phone. Enter a URL You can access a website quickly by entering the URL. Connections...
... button and press Go. A list of personal information sent to a web server while navigating the web. • Cookie Options: Sets whether cookies are stored on your phone. - Use the Right Navigation key to enter the text. 5. Preferences: Specifies whether to return. Browser Profiles: Indicates the current browser profile. For more information, refer to speed up web viewing on your phone. Enter a URL You can access a website quickly by entering the URL. Connections...
User Manual Ver.lk8_f6 (English(north America))
Page 123
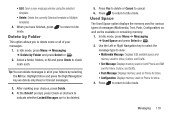
... key to select the message type to cancel. 6. Messaging 118 Used Space The Used Space option displays the memory used on Phone for various types of your folders by Folder and press Select or . 2. When you to Idle mode. In Idle mode, press Menu ➔ Messaging ➔ Delete by selecting the All box. prompt, press Check or Uncheck to indicate whether Locked Messages are to Idle mode. In Idle mode, press Menu...
... key to select the message type to cancel. 6. Messaging 118 Used Space The Used Space option displays the memory used on Phone for various types of your folders by Folder and press Select or . 2. When you to Idle mode. In Idle mode, press Menu ➔ Messaging ➔ Delete by selecting the All box. prompt, press Check or Uncheck to indicate whether Locked Messages are to Idle mode. In Idle mode, press Menu...

User Manual Ver.lk8_f6 (English(north America))
Page 136
... to Enable or Disable. Warning! Ensure that all user data is activated, displays on /off confirmation displays. When Airplane Mode is deleted. To enable or disable T-Coil mode: 1. The Airplane mode on the Idle screen. 1. Select On or Off and press Save or . Select Enable or Disable and press Save or . Note: User Data such as contacts, messages, pictures, videos, and music is deleted. Restore Phone The Restore Phone option is the same as the Reset Phone option described above in connection with...
... to Enable or Disable. Warning! Ensure that all user data is activated, displays on /off confirmation displays. When Airplane Mode is deleted. To enable or disable T-Coil mode: 1. The Airplane mode on the Idle screen. 1. Select On or Off and press Save or . Select Enable or Disable and press Save or . Note: User Data such as contacts, messages, pictures, videos, and music is deleted. Restore Phone The Restore Phone option is the same as the Reset Phone option described above in connection with...


