User Manual (ENGLISH)
Page 2
... 1.5 Control Panel Functions 1.6 SCX-5312F 1.6 SCX-5112 1.9 Making Connections 1.11 Installing Drum and Toner Cartridges 1.14 Turning the Product On 1.17 Loading Paper 1.17 Setting the Paper Size 1.20 Changing the Display Language 1.20 Using Save Mode 1.21 Toner Save 1.21 Paper Save 1.21 Power Save 1.22 Chapter 2: INSTALLING SOFTWARE About Samsung Software 2.2 MFP Driver 2.2 SmarThru...
... 1.5 Control Panel Functions 1.6 SCX-5312F 1.6 SCX-5112 1.9 Making Connections 1.11 Installing Drum and Toner Cartridges 1.14 Turning the Product On 1.17 Loading Paper 1.17 Setting the Paper Size 1.20 Changing the Display Language 1.20 Using Save Mode 1.21 Toner Save 1.21 Paper Save 1.21 Power Save 1.22 Chapter 2: INSTALLING SOFTWARE About Samsung Software 2.2 MFP Driver 2.2 SmarThru...
User Manual (ENGLISH)
Page 4
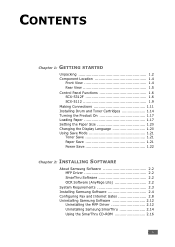
Chapter 7: MAINTENANCE Cleaning the Scan Unit 7.2 Expected Cartridge Life 7.3 Replacing the Toner Cartridge 7.3 Setting to Notify Toner Low 7.7 Cleaning the Drum 7.8 Replacing the Drum Cartridge 7.8 Consumables and Replacement Parts 7.11 Chapter 8: TROUBLESHOOTING Document Jams 8.2 Input Misfeed 8.2 Exit Misfeed 8.3 Roller Misfeed 8.3 Paper Jams 8.4 ...
Chapter 7: MAINTENANCE Cleaning the Scan Unit 7.2 Expected Cartridge Life 7.3 Replacing the Toner Cartridge 7.3 Setting to Notify Toner Low 7.7 Cleaning the Drum 7.8 Replacing the Drum Cartridge 7.8 Consumables and Replacement Parts 7.11 Chapter 8: TROUBLESHOOTING Document Jams 8.2 Input Misfeed 8.2 Exit Misfeed 8.3 Roller Misfeed 8.3 Paper Jams 8.4 ...
User Manual (ENGLISH)
Page 14
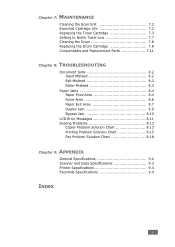
This chapter provides step-by-step instructions on setting up the product, and installing the software. This chapter includes: • Unpacking • Component Location • Control Panel Functions • Making Connections • Installing Drum and Toner Cartridges • Turning the Product On • Loading Paper • Setting the Paper Size • Changing the Display Language • Using Save Mode This product provides printing, copying, scanning, and faxing (SCX-5312F only) functions! 1 GETTING STARTED Thank you for purchasing Samsung multifunctional product.
This chapter provides step-by-step instructions on setting up the product, and installing the software. This chapter includes: • Unpacking • Component Location • Control Panel Functions • Making Connections • Installing Drum and Toner Cartridges • Turning the Product On • Loading Paper • Setting the Paper Size • Changing the Display Language • Using Save Mode This product provides printing, copying, scanning, and faxing (SCX-5312F only) functions! 1 GETTING STARTED Thank you for purchasing Samsung multifunctional product.
User Manual (ENGLISH)
Page 16
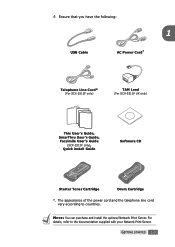
GETTING STARTED 1.3 The appearance of the power cord and the telephone line cord vary according to the documentation supplied with your Network Print Server. NOTE: You can purchase and install the optional Network Print Server. For details, refer to countries. 4 Ensure that you have the following: 1 USB Cable AC Power Cord* Telephone Line Cord* (For SCX-5312F only) TAM Lead (For SCX-5312F UK only) This User's Guide, SmarThru User's Guide, Facsimile User's Guide (SCX-5312F only), Quick install Guide Software CD Starter Toner Cartridge Drum Cartridge *.
GETTING STARTED 1.3 The appearance of the power cord and the telephone line cord vary according to the documentation supplied with your Network Print Server. NOTE: You can purchase and install the optional Network Print Server. For details, refer to countries. 4 Ensure that you have the following: 1 USB Cable AC Power Cord* Telephone Line Cord* (For SCX-5312F only) TAM Lead (For SCX-5312F UK only) This User's Guide, SmarThru User's Guide, Facsimile User's Guide (SCX-5312F only), Quick install Guide Software CD Starter Toner Cartridge Drum Cartridge *.

User Manual (ENGLISH)
Page 20
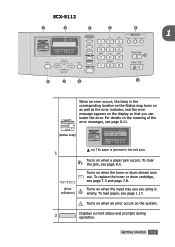
.... 3 Turns on when a paper jam occurs. For details on the meaning of the documents for the current copy 5 job or fax job. To replace the toner or drum cartridge, see page 8.11. (status map) ex) The paper is empty. To load paper, see page 8.4. GETTING STARTED 1.7 When an error occurs, the... to print the current copy job on the display so that you can locate the error. Turns on when an error occurs on when the toner or drum almost runs out. P Y Use to use in O the Fax or the Copy mode.
.... 3 Turns on when a paper jam occurs. For details on the meaning of the documents for the current copy 5 job or fax job. To replace the toner or drum cartridge, see page 8.11. (status map) ex) The paper is empty. To load paper, see page 8.4. GETTING STARTED 1.7 When an error occurs, the... to print the current copy job on the display so that you can locate the error. Turns on when an error occurs on when the toner or drum almost runs out. P Y Use to use in O the Fax or the Copy mode.

User Manual (ENGLISH)
Page 21
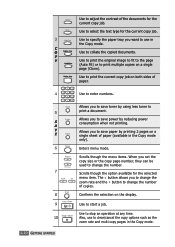
...in the Copy mode only). Use to stop an operation at any time. 13 Also, use to 7 print a document. Allows you to save toner by using less toner to clear/cancel the copy options such as the zoom rate and multi copy pages in the Copy mode. * Navigation key 1.8 GETTING STARTED Scrolls...for the selected menu item. Also backs you to change the zoom rate and to change the number of paper (available in conjunction with 8 the one-touch buttons. In the Copy mode, allows you up to save paper by reducing power S consumption when not printing. Allows you to save power ...
...in the Copy mode only). Use to stop an operation at any time. 13 Also, use to 7 print a document. Allows you to save toner by using less toner to clear/cancel the copy options such as the zoom rate and multi copy pages in the Copy mode. * Navigation key 1.8 GETTING STARTED Scrolls...for the selected menu item. Also backs you to change the zoom rate and to change the number of paper (available in conjunction with 8 the one-touch buttons. In the Copy mode, allows you up to save paper by reducing power S consumption when not printing. Allows you to save power ...
User Manual (ENGLISH)
Page 22
.... GETTING STARTED 1.9 To clear the jam, see page 1.17. To load paper, see page 8.4. Turns on when an error occurs on when a paper jam occurs. SCX-5112 1 2 3 4 5 1 10 6 7 8 9 When an error occurs, the lamp in the corresponding location on the Status map turns on as well as the error indicator, ...and the error message appears on the display so that you are using is jammed in the exit area. To replace the toner or drum cartridge, see page 8.11. (status map) 1 (Error indicators) ex) The paper is empty. Turns on when the input tray you can locate ...
.... GETTING STARTED 1.9 To clear the jam, see page 1.17. To load paper, see page 8.4. Turns on when an error occurs on when a paper jam occurs. SCX-5112 1 2 3 4 5 1 10 6 7 8 9 When an error occurs, the lamp in the corresponding location on the Status map turns on as well as the error indicator, ...and the error message appears on the display so that you are using is jammed in the exit area. To replace the toner or drum cartridge, see page 8.11. (status map) 1 (Error indicators) ex) The paper is empty. Turns on when the input tray you can locate ...
User Manual (ENGLISH)
Page 23
... to enter numbers. Use to specify the paper tray you set the copy size or the copy page number, they can be used to save toner by reducing power consumption when not printing. Use to use to stop an operation at any time. The button allows you to save power by... using less toner to print the current copy job on the display. Also, use in the Copy mode. Use to print a document. Enters menu mode. Use to clear...
... to enter numbers. Use to specify the paper tray you set the copy size or the copy page number, they can be used to save toner by reducing power consumption when not printing. Use to use to stop an operation at any time. The button allows you to save power by... using less toner to print the current copy job on the display. Also, use in the Copy mode. Use to print a document. Enters menu mode. Use to clear...

User Manual (ENGLISH)
Page 27
Installing Drum and Toner Cartridges 1 Pull the release lever to open before opening the front cover. 2 Open the front cover. 3 If the cartridge locking lever is on the lower position, turn the lever upward until it locks into place. 1.14 GETTING STARTED CAUTION: Ensure that the side cover is always open the side cover.
Installing Drum and Toner Cartridges 1 Pull the release lever to open before opening the front cover. 2 Open the front cover. 3 If the cartridge locking lever is on the lower position, turn the lever upward until it locks into place. 1.14 GETTING STARTED CAUTION: Ensure that the side cover is always open the side cover.

User Manual (ENGLISH)
Page 28
Gently shake the cartridge to the left of the slot until it locks into place completely. 1 5 Remove the starter toner cartridge from its bag and slide it into the product firmly until it locks into place completely. Thoroughly shaking the cartridge will assure maximum copies per cartridge. 6 Slide the toner cartridge into the product aligning the cartridge to loosen the toner. GETTING STARTED 1.15 4 Remove the drum cartridge from its bag.
Gently shake the cartridge to the left of the slot until it locks into place completely. 1 5 Remove the starter toner cartridge from its bag and slide it into the product firmly until it locks into place completely. Thoroughly shaking the cartridge will assure maximum copies per cartridge. 6 Slide the toner cartridge into the product aligning the cartridge to loosen the toner. GETTING STARTED 1.15 4 Remove the drum cartridge from its bag.
User Manual (ENGLISH)
Page 29
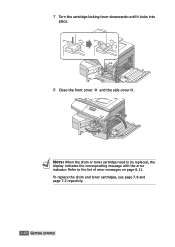
7 Turn the cartridge locking lever downwards until it locks into place. 8 Close the front cover 1 and the side cover 2 . 2 1 NOTE: When the drum or toner cartridge need to the list of error messages on page 8.11. Refer to be replaced, the display indicates the corresponding message with the error indicator. To replace the drum and toner cartridges, see page 7.8 and page 7.3 repectivly. 1.16 GETTING STARTED
7 Turn the cartridge locking lever downwards until it locks into place. 8 Close the front cover 1 and the side cover 2 . 2 1 NOTE: When the drum or toner cartridge need to the list of error messages on page 8.11. Refer to be replaced, the display indicates the corresponding message with the error indicator. To replace the drum and toner cartridges, see page 7.8 and page 7.3 repectivly. 1.16 GETTING STARTED
User Manual (ENGLISH)
Page 34
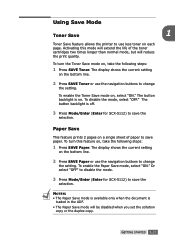
...available only when the document is off. 3 Press Mode/Enter (Enter for SCX-5112) to save the selection. To turn this mode will extend the life of paper to use less toner on , take the following steps: 1 Press SAVE Toner. To enable the Paper Save mode, select "ON." The button backlight ... the print quality. Or select "OFF" to disable the mode. 3 Press Mode/Enter (Enter for SCX-5112) to save the selection. Paper Save This feature prints 2 pages on a single sheet of the toner cartridges two times longer than normal mode, but will be disabled when you set the collation copy...
...available only when the document is off. 3 Press Mode/Enter (Enter for SCX-5112) to save the selection. To turn this mode will extend the life of paper to use less toner on , take the following steps: 1 Press SAVE Toner. To enable the Paper Save mode, select "ON." The button backlight ... the print quality. Or select "OFF" to disable the mode. 3 Press Mode/Enter (Enter for SCX-5112) to save the selection. Paper Save This feature prints 2 pages on a single sheet of the toner cartridges two times longer than normal mode, but will be disabled when you set the collation copy...
User Manual (ENGLISH)
Page 66
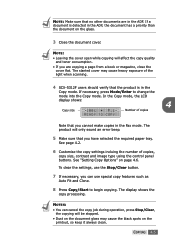
...close the cover flat. The product will be stopped. • Dust on the document glass may cause heavy exposure of the light when scanning. 4 SCX-5312F users should verify that the product is detected in the Copy mode. If a document is in the ADF, the document has a priority than the ... Press Copy/Start to change the mode into the Copy mode. NOTE: • Leaving the cover open while copying will affect the copy quality and toner consumption. • If you cannot make copies in the ADF. The slanted cover may cause the black spots on the glass. 3 Close the document...
...close the cover flat. The product will be stopped. • Dust on the document glass may cause heavy exposure of the light when scanning. 4 SCX-5312F users should verify that the product is detected in the Copy mode. If a document is in the ADF, the document has a priority than the ... Press Copy/Start to change the mode into the Copy mode. NOTE: • Leaving the cover open while copying will affect the copy quality and toner consumption. • If you cannot make copies in the ADF. The slanted cover may cause the black spots on the glass. 3 Close the document...

User Manual (ENGLISH)
Page 79
...and images appear smoother. • Printer Default - With this setting to use less toner on the angles and curves of your 4 toner cartridge and reduce your document will reduce print quality. Using this Samsung Resolution enhancement Technology (SRT) option to improve the print quality of gray. Click ... printed characters or images can occur on each character. • Image Enhance - Choose to refine the print quality of printed image. Toner Save Mode allows the printer to use SRT that can appear they have jagged or uneven edges. The higher setting, 1 the sharpen ...
...and images appear smoother. • Printer Default - With this setting to use less toner on the angles and curves of your 4 toner cartridge and reduce your document will reduce print quality. Using this Samsung Resolution enhancement Technology (SRT) option to improve the print quality of gray. Click ... printed characters or images can occur on each character. • Image Enhance - Choose to refine the print quality of printed image. Toner Save Mode allows the printer to use SRT that can appear they have jagged or uneven edges. The higher setting, 1 the sharpen ...
User Manual (ENGLISH)
Page 90
7 MAINTENANCE This chapter provides information for maintaining the cartridge and your product. This chapter includes: • Cleaning the Scan Unit • Expected Cartridge Life • Replacing the Toner Cartridge • Setting to Notify Toner Low (Available in SCX-5312F only) • Cleaning the Drum • Replacing the Drum Cartridge • Consumables and Replacement Parts
7 MAINTENANCE This chapter provides information for maintaining the cartridge and your product. This chapter includes: • Cleaning the Scan Unit • Expected Cartridge Life • Replacing the Toner Cartridge • Setting to Notify Toner Low (Available in SCX-5312F only) • Cleaning the Drum • Replacing the Drum Cartridge • Consumables and Replacement Parts
User Manual (ENGLISH)
Page 92
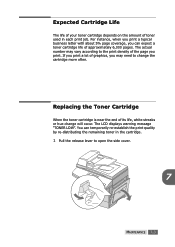
... depends on the amount of its life, white streaks or hue change the cartridge more often. Replacing the Toner Cartridge When the toner cartridge is near the end of toner used in the cartridge. 1 Pull the release lever to the print density of approximately 6,000 pages. The actual ...number may need to change will occur. You can expect a toner cartridge life of the page you print. For instance, when you print a typical business letter with about 5% page coverage, you may vary according ...
... depends on the amount of its life, white streaks or hue change the cartridge more often. Replacing the Toner Cartridge When the toner cartridge is near the end of toner used in the cartridge. 1 Pull the release lever to the print density of approximately 6,000 pages. The actual ...number may need to change will occur. You can expect a toner cartridge life of the page you print. For instance, when you print a typical business letter with about 5% page coverage, you may vary according ...
User Manual (ENGLISH)
Page 93
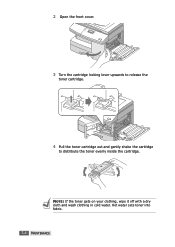
Hot water sets toner into fabric. 7.4 MAINTENANCE NOTE: If the toner gets on your clothing, wipe it off with a dry cloth and wash clothing in cold water. 2 Open the front cover. 3 Turn the cartridge locking lever upwards to release the toner cartridge. 4 Pull the toner cartridge out and gently shake the cartridge to distribute the toner evenly inside the cartridge.
Hot water sets toner into fabric. 7.4 MAINTENANCE NOTE: If the toner gets on your clothing, wipe it off with a dry cloth and wash clothing in cold water. 2 Open the front cover. 3 Turn the cartridge locking lever upwards to release the toner cartridge. 4 Pull the toner cartridge out and gently shake the cartridge to distribute the toner evenly inside the cartridge.
User Manual (ENGLISH)
Page 94
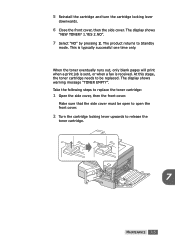
... will print when a print job is sent, or when a fax is typically successful one time only. At this stage, the toner cartridge needs to be open to open the front cover. 2 Turn the cartridge locking lever upwards to release the toner cartridge. 7 MAINTENANCE 7.5 Take the following steps to Standby mode. Make sure that... replaced. 5 Reinstall the cartridge and turn the cartridge locking lever downwards. 6 Close the front cover, then the side cover. The product returns to replace the toner cartridge: 1 Open the side cover, then the front cover. The display shows warning message...
... will print when a print job is sent, or when a fax is typically successful one time only. At this stage, the toner cartridge needs to be open to open the front cover. 2 Turn the cartridge locking lever upwards to release the toner cartridge. 7 MAINTENANCE 7.5 Take the following steps to Standby mode. Make sure that... replaced. 5 Reinstall the cartridge and turn the cartridge locking lever downwards. 6 Close the front cover, then the side cover. The product returns to replace the toner cartridge: 1 Open the side cover, then the front cover. The display shows warning message...
User Manual (ENGLISH)
Page 95
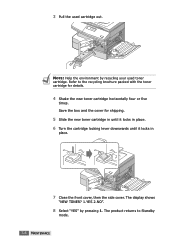
Refer to Standby mode. 7.6 MAINTENANCE The product returns to the recycling brochure packed with the toner cartridge for shipping. 5 Slide the new toner cartridge in until it locks in place. 6 Turn the cartridge locking lever downwards until it locks in place. 7 Close the front cover, then the side... cover. Save the box and the cover for details. 4 Shake the new toner cartridge horizontally four or five times. The display shows "NEW TONER? 1.YES 2.NO". 8 Select "YES" by recycling your used cartridge out. 3 Pull the used...
Refer to Standby mode. 7.6 MAINTENANCE The product returns to the recycling brochure packed with the toner cartridge for shipping. 5 Slide the new toner cartridge in until it locks in place. 6 Turn the cartridge locking lever downwards until it locks in place. 7 Close the front cover, then the side... cover. Save the box and the cover for details. 4 Shake the new toner cartridge horizontally four or five times. The display shows "NEW TONER? 1.YES 2.NO". 8 Select "YES" by recycling your used cartridge out. 3 Pull the used...
User Manual (ENGLISH)
Page 96
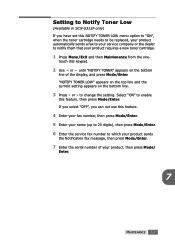
...bottom line of your product requires a new toner cartridge. 1 Press Menu/Exit and then Maintenance from the one- If you select "OFF", you have set this NOTIFY TONER LOW menu option to "ON", when the toner cartridge needs to be replaced, your product ...automatically sends a fax to your service company or the dealer to notify them that your product, then press Mode/ Enter. 7 MAINTENANCE 7.7 Setting to Notify Toner Low (Available in SCX-5312F...
...bottom line of your product requires a new toner cartridge. 1 Press Menu/Exit and then Maintenance from the one- If you select "OFF", you have set this NOTIFY TONER LOW menu option to "ON", when the toner cartridge needs to be replaced, your product ...automatically sends a fax to your service company or the dealer to notify them that your product, then press Mode/ Enter. 7 MAINTENANCE 7.7 Setting to Notify Toner Low (Available in SCX-5312F...


