User Manual (ENGLISH)
Page 1
Visit us at: Home www.samsungelectronics.com/mfp P/N: JC68-00851A Rev. 2.00 User's Guide SCX-5312F/5112
Visit us at: Home www.samsungelectronics.com/mfp P/N: JC68-00851A Rev. 2.00 User's Guide SCX-5312F/5112
User Manual (ENGLISH)
Page 2
...GETTING STARTED Unpacking 1.2 Component Location 1.4 Front View 1.4 Rear View 1.5 Control Panel Functions 1.6 SCX-5312F 1.6 SCX-5112 1.9 Making Connections 1.11 Installing Drum and Toner Cartridges 1.14 Turning the Product On 1.... 1.22 Chapter 2: INSTALLING SOFTWARE About Samsung Software 2.2 MFP Driver 2.2 SmarThru Software 2.2 OCR Software (AnyPage Lite 2.2 System Requirements 2.3 Installing Samsung Software 2.4 Configuring Fax and Internet Gates 2.8 Uninstalling Samsung Software 2.12 Uninstalling the MFP Driver 2.12 Uninstalling Samsung SmarThru 2.14 Using the SmarThru CD...
...GETTING STARTED Unpacking 1.2 Component Location 1.4 Front View 1.4 Rear View 1.5 Control Panel Functions 1.6 SCX-5312F 1.6 SCX-5112 1.9 Making Connections 1.11 Installing Drum and Toner Cartridges 1.14 Turning the Product On 1.... 1.22 Chapter 2: INSTALLING SOFTWARE About Samsung Software 2.2 MFP Driver 2.2 SmarThru Software 2.2 OCR Software (AnyPage Lite 2.2 System Requirements 2.3 Installing Samsung Software 2.4 Configuring Fax and Internet Gates 2.8 Uninstalling Samsung Software 2.12 Uninstalling the MFP Driver 2.12 Uninstalling Samsung SmarThru 2.14 Using the SmarThru CD...
User Manual (ENGLISH)
Page 14
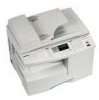
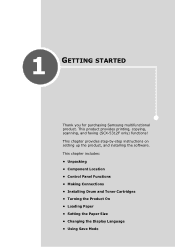
This chapter includes: • Unpacking • Component Location • Control Panel Functions • Making Connections • Installing Drum and Toner Cartridges • Turning the Product On • Loading Paper • Setting the Paper Size • Changing the Display Language • Using Save Mode 1 GETTING STARTED Thank you for purchasing Samsung multifunctional product. This product provides printing, copying, scanning, and faxing (SCX-5312F only) functions! This chapter provides step-by-step instructions on setting up the product, and installing the software.
This chapter includes: • Unpacking • Component Location • Control Panel Functions • Making Connections • Installing Drum and Toner Cartridges • Turning the Product On • Loading Paper • Setting the Paper Size • Changing the Display Language • Using Save Mode 1 GETTING STARTED Thank you for purchasing Samsung multifunctional product. This product provides printing, copying, scanning, and faxing (SCX-5312F only) functions! This chapter provides step-by-step instructions on setting up the product, and installing the software.
User Manual (ENGLISH)
Page 16
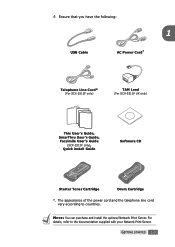
NOTE: You can purchase and install the optional Network Print Server. GETTING STARTED 1.3 4 Ensure that you have the following: 1 USB Cable AC Power Cord* Telephone Line Cord* (For SCX-5312F only) TAM Lead (For SCX-5312F UK only) This User's Guide, SmarThru User's Guide, Facsimile User's Guide (SCX-5312F only), Quick install Guide Software CD Starter Toner Cartridge Drum Cartridge *. For details, refer to countries. The appearance of the power cord and the telephone line cord vary according to the documentation supplied with your Network Print Server.
NOTE: You can purchase and install the optional Network Print Server. GETTING STARTED 1.3 4 Ensure that you have the following: 1 USB Cable AC Power Cord* Telephone Line Cord* (For SCX-5312F only) TAM Lead (For SCX-5312F UK only) This User's Guide, SmarThru User's Guide, Facsimile User's Guide (SCX-5312F only), Quick install Guide Software CD Starter Toner Cartridge Drum Cartridge *. For details, refer to countries. The appearance of the power cord and the telephone line cord vary according to the documentation supplied with your Network Print Server.
User Manual (ENGLISH)
Page 17
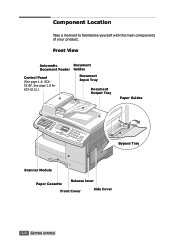
SCX5312F. See page 1.9 for SCX-5112.) Document Input Tray Document Output Tray Paper Guides Bypass Tray Scanner Module Paper Cassette Release lever Front Cover Side Cover 1.4 GETTING STARTED Component Location Take a moment to familiarise yourself with the main components of your product. Front View Automatic Document Document Feeder Guides Control Panel (See page 1.6.
SCX5312F. See page 1.9 for SCX-5112.) Document Input Tray Document Output Tray Paper Guides Bypass Tray Scanner Module Paper Cassette Release lever Front Cover Side Cover 1.4 GETTING STARTED Component Location Take a moment to familiarise yourself with the main components of your product. Front View Automatic Document Document Feeder Guides Control Panel (See page 1.6.
User Manual (ENGLISH)
Page 18
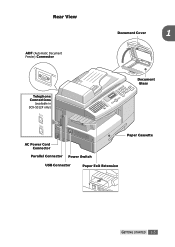
Rear View ADF (Automatic Document Feeder) Connector Telephone Connections (available in SCX-5312F only) Document Cover 1 Document Glass AC Power Cord Connector Parallel Connector Power Switch USB Connector Paper Exit Extension Paper Cassette GETTING STARTED 1.5
Rear View ADF (Automatic Document Feeder) Connector Telephone Connections (available in SCX-5312F only) Document Cover 1 Document Glass AC Power Cord Connector Parallel Connector Power Switch USB Connector Paper Exit Extension Paper Cassette GETTING STARTED 1.5
User Manual (ENGLISH)
Page 19
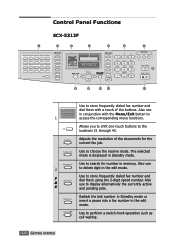
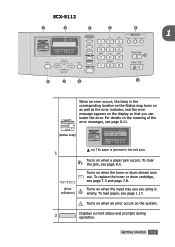
... mode or insert a pause into a fax number in memory. Adjusts the resolution of the buttons. Use to the locations 21 through 40. Control Panel Functions SCX-5312F 1 2 3 4 5 6 7 13 8 9 10 11 12 1 01 02 21 22 System Data System ID 03 23 Date & Time 04 05 24 25 System Setup ...frequently dialed fax number and dial them using the 2-digit speed number. Use to search for the current fax job. Allows you to shift one-touch buttons to choose the receive mode. Use to store frequently dialed fax number and F dial them with the Menu/Exit button to delete...
... mode or insert a pause into a fax number in memory. Adjusts the resolution of the buttons. Use to the locations 21 through 40. Control Panel Functions SCX-5312F 1 2 3 4 5 6 7 13 8 9 10 11 12 1 01 02 21 22 System Data System ID 03 23 Date & Time 04 05 24 25 System Setup ...frequently dialed fax number and dial them using the 2-digit speed number. Use to search for the current fax job. Allows you to shift one-touch buttons to choose the receive mode. Use to store frequently dialed fax number and F dial them with the Menu/Exit button to delete...
User Manual (ENGLISH)
Page 22
SCX-5112 1 2 3 4 5 1 10 6 7 8 9 When an error occurs, the lamp in the corresponding location on the Status map turns on as well as the error indicator, and ...
SCX-5112 1 2 3 4 5 1 10 6 7 8 9 When an error occurs, the lamp in the corresponding location on the Status map turns on as well as the error indicator, and ...
User Manual (ENGLISH)
Page 24
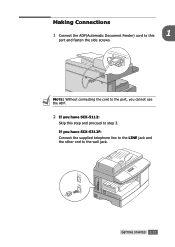
If you have SCX-5312F: Connect the supplied telephone line to the LINE jack and the other end to step 3. Making Connections 1 Connect the ADF(Automatic Document Feeder) cord to this step and proceed to the wall jack. NOTE: Without connecting the cord to the port, you cannot use the ADF. 2 If you have SCX-5112: Skip this 1 port and fasten the side screws. GETTING STARTED 1.11
If you have SCX-5312F: Connect the supplied telephone line to the LINE jack and the other end to step 3. Making Connections 1 Connect the ADF(Automatic Document Feeder) cord to this step and proceed to the wall jack. NOTE: Without connecting the cord to the port, you cannot use the ADF. 2 If you have SCX-5112: Skip this 1 port and fasten the side screws. GETTING STARTED 1.11
User Manual (ENGLISH)
Page 33
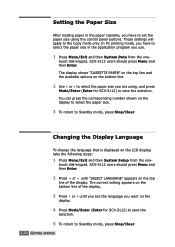
... or to select the paper size you want on the LCD display, take the following steps: 1 Press Menu/Exit and then System Setup from the one - These settings will apply to Standby mode, press Stop/Clear. Changing the Display Language To change the language that is displayed on the display. 4 Press.... Setting the Paper Size After loading paper in the application program you have to set the paper size using , and press Mode/Enter (Enter for SCX-5112) to Standby mode, press Stop/Clear. 1.20 GETTING STARTED In PC printing mode, you have to select the paper size in the paper cassette...
... or to select the paper size you want on the LCD display, take the following steps: 1 Press Menu/Exit and then System Setup from the one - These settings will apply to Standby mode, press Stop/Clear. Changing the Display Language To change the language that is displayed on the display. 4 Press.... Setting the Paper Size After loading paper in the application program you have to set the paper size using , and press Mode/Enter (Enter for SCX-5112) to Standby mode, press Stop/Clear. 1.20 GETTING STARTED In PC printing mode, you have to select the paper size in the paper cassette...
User Manual (ENGLISH)
Page 34
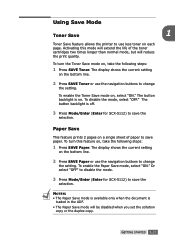
... will be disabled when you set the collation copy or the duplex copy. Or select "OFF" to disable the mode. 3 Press Mode/Enter (Enter for SCX-5112) to save the selection. NOTES: • The Paper Save mode is available only when the document is off. 3 Press Mode/Enter (Enter for... SCX-5112) to save paper. To disable the mode, select "OFF." To turn the Toner Save mode on , take the following steps: 1 Press SAVE Paper. The ...
... will be disabled when you set the collation copy or the duplex copy. Or select "OFF" to disable the mode. 3 Press Mode/Enter (Enter for SCX-5112) to save the selection. NOTES: • The Paper Save mode is available only when the document is off. 3 Press Mode/Enter (Enter for... SCX-5112) to save paper. To disable the mode, select "OFF." To turn the Toner Save mode on , take the following steps: 1 Press SAVE Paper. The ...
User Manual (ENGLISH)
Page 35
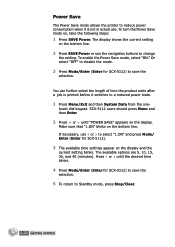
...Power or use or to select "1.ON" and press Mode/ Enter (Enter for SCX-5112). 3 The available time settings appear on the display. If necessary, use the navigation buttons to change the ... and then Enter. 2 Press or until the desired time blinks. 4 Press Mode/Enter (Enter for SCX-5112) to save the selection. 5 To return to Standby mode, press Stop/Clear. 1.22 GETTING ...and the current setting blinks. Or select "OFF" to disable the mode. 3 Press Mode/Enter (Enter for SCX-5112) to save the selection. Power Save The Power Save mode allows the printer to reduce power consumption when ...
...Power or use or to select "1.ON" and press Mode/ Enter (Enter for SCX-5112). 3 The available time settings appear on the display. If necessary, use the navigation buttons to change the ... and then Enter. 2 Press or until the desired time blinks. 4 Press Mode/Enter (Enter for SCX-5112) to save the selection. 5 To return to Standby mode, press Stop/Clear. 1.22 GETTING ...and the current setting blinks. Or select "OFF" to disable the mode. 3 Press Mode/Enter (Enter for SCX-5112) to save the selection. Power Save The Power Save mode allows the printer to reduce power consumption when ...
User Manual (ENGLISH)
Page 47
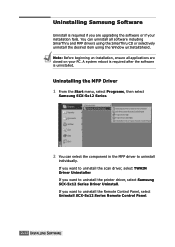
Uninstalling the MFP Driver 1 From the Start menu, select Programs, then select Samsung SCX-5x12 Series. 2 You can uninstall all applications are upgrading the software or if your PC. A system reboot is required after the software ... installation fails. If you want to uninstall individually. If you want to uninstall the Remote Control Panel, select Uninstall SCX-5x12 Series Remote Control Panel. 2.12 INSTALLING SOFTWARE Uninstalling Samsung Software Uninstall is uninstalled. Note: Before beginning un-installation, ensure all software including SmarThru and MFP drivers using the...
Uninstalling the MFP Driver 1 From the Start menu, select Programs, then select Samsung SCX-5x12 Series. 2 You can uninstall all applications are upgrading the software or if your PC. A system reboot is required after the software ... installation fails. If you want to uninstall individually. If you want to uninstall the Remote Control Panel, select Uninstall SCX-5x12 Series Remote Control Panel. 2.12 INSTALLING SOFTWARE Uninstalling Samsung Software Uninstall is uninstalled. Note: Before beginning un-installation, ensure all software including SmarThru and MFP drivers using the...
User Manual (ENGLISH)
Page 60
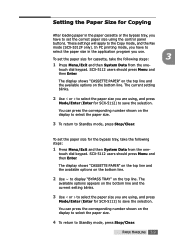
...Menu and then Enter. You can press the corresponding number shown on the bottom line. 2 Use to the Copy mode, and the Fax mode (SCX-5312F only). PAPER HANDLING 3.9 In PC printing mode, you have to select the paper size in the paper cassette or the bypass tray, you have to...paper size. 3 To return to set the paper size for cassette, take the following steps: 3 1 Press Menu/Exit and then System Data from the one - SCX-5112 users should press Menu and then Enter. The current setting blinks. 2 Use or to save the selection. touch dial keypad. The display shows "...
...Menu and then Enter. You can press the corresponding number shown on the bottom line. 2 Use to the Copy mode, and the Fax mode (SCX-5312F only). PAPER HANDLING 3.9 In PC printing mode, you have to select the paper size in the paper cassette or the bypass tray, you have to...paper size. 3 To return to set the paper size for cassette, take the following steps: 3 1 Press Menu/Exit and then System Data from the one - SCX-5112 users should press Menu and then Enter. The current setting blinks. 2 Use or to save the selection. touch dial keypad. The display shows "...
User Manual (ENGLISH)
Page 63
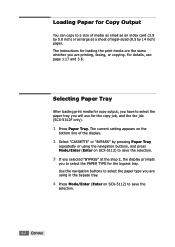
Use the navigation buttons to select the paper type you are using the navigation buttons, and press Mode/Enter (Enter on SCX-5112) to save the selection. 3 If you selected "BYPASS" at the step 2, the display prompts you have to save the selection. 4.2 COPYING For details, see ...) to select the paper tray you are the same whether you will use for the copy job, and the fax job (SCX-5312F only). 1 Press Paper Tray. Loading Paper for Copy Output You can copy to select the PAPER TYPE for the bypass tray. The instructions for loading ...
Use the navigation buttons to select the paper type you are using the navigation buttons, and press Mode/Enter (Enter on SCX-5112) to save the selection. 3 If you selected "BYPASS" at the step 2, the display prompts you have to save the selection. 4.2 COPYING For details, see ...) to select the paper tray you are the same whether you will use for the copy job, and the fax job (SCX-5312F only). 1 Press Paper Tray. Loading Paper for Copy Output You can copy to select the PAPER TYPE for the bypass tray. The instructions for loading ...

User Manual (ENGLISH)
Page 64
... tray. To clear the settings, use special copy features such as collation and duplex copy. COPYING 4.3 See "Setting Copy Options" on the ADF. 4 Document guides 2 SCX-5312F users should verify that you can load up into the Copy mode. The product will only sound an error beep. 3 Make sure that the product... is in one job. If necessary, press Mode/Enter to change the mode into the ADF and adjust the document guides to 30 documents (20lb, 75 g/m2) in...
... tray. To clear the settings, use special copy features such as collation and duplex copy. COPYING 4.3 See "Setting Copy Options" on the ADF. 4 Document guides 2 SCX-5312F users should verify that you can load up into the Copy mode. The product will only sound an error beep. 3 Make sure that the product... is in one job. If necessary, press Mode/Enter to change the mode into the ADF and adjust the document guides to 30 documents (20lb, 75 g/m2) in...
User Manual (ENGLISH)
Page 66
The slanted cover may cause the black spots on the document glass may cause heavy exposure of the light when scanning. 4 SCX-5312F users should verify that you have selected the required paper tray. If necessary, press Mode/Enter to begin copying. The product will only sound an ...
The slanted cover may cause the black spots on the document glass may cause heavy exposure of the light when scanning. 4 SCX-5312F users should verify that you have selected the required paper tray. If necessary, press Mode/Enter to begin copying. The product will only sound an ...
User Manual (ENGLISH)
Page 67
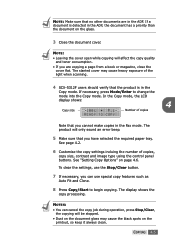
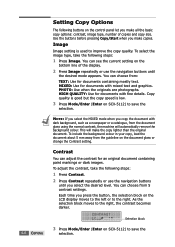
... the original document. This will automatically remove the background colour. You can see the current setting on SCX-5112) to improve the copy quality. Each time you press the button, the selection block on SCX-5112) to the right, the contrast becomes darker. As the selection block moves to save the selection...
... the original document. This will automatically remove the background colour. You can see the current setting on SCX-5112) to improve the copy quality. Each time you press the button, the selection block on SCX-5112) to the right, the contrast becomes darker. As the selection block moves to save the selection...
User Manual (ENGLISH)
Page 68
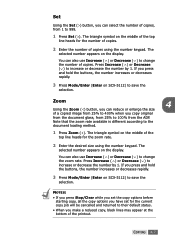
...or Decrease ( ) to 999. 1 Press Set ( ). If you press and hold the buttons, the number increases or decreases rapidly. 3 Press Mode/Enter (Enter on SCX-5112) to change the number of copies. The selected number appears on the middle of the top line heads for the zoom rate. 2 Enter the... selection. The triangle symbol on the display. If you press and hold the buttons, the number increases or decreases rapidly. 3 Press Mode/Enter (Enter on SCX-5112) to the document loading method. 1 Press Zoom ( ). Zoom 4 Using the Zoom ( ) button, you can reduce or enlarge the size of a ...
...or Decrease ( ) to 999. 1 Press Set ( ). If you press and hold the buttons, the number increases or decreases rapidly. 3 Press Mode/Enter (Enter on SCX-5112) to change the number of copies. The selected number appears on the middle of the top line heads for the zoom rate. 2 Enter the... selection. The triangle symbol on the display. If you press and hold the buttons, the number increases or decreases rapidly. 3 Press Mode/Enter (Enter on SCX-5112) to the document loading method. 1 Press Zoom ( ). Zoom 4 Using the Zoom ( ) button, you can reduce or enlarge the size of a ...
User Manual (ENGLISH)
Page 69
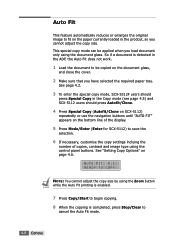
... press Stop/Clear to cancel the Auto Fit mode. 4.8 COPYING See page 4.2. 3 To enter the special copy mode, SCX-5312F users should press Autofit/Clone. 4 Press Special Copy (Autofit/Clone on SCX-5112) repeatedly or use the navigation buttons until "AUTO FIT" appears on the bottom line of the display. 5 Press ...Mode/Enter (Enter for SCX-5112) to save the selection. 6 If necessary, customise the copy settings incluing the number of copies, contrast and image type using the control panel...
... press Stop/Clear to cancel the Auto Fit mode. 4.8 COPYING See page 4.2. 3 To enter the special copy mode, SCX-5312F users should press Autofit/Clone. 4 Press Special Copy (Autofit/Clone on SCX-5112) repeatedly or use the navigation buttons until "AUTO FIT" appears on the bottom line of the display. 5 Press ...Mode/Enter (Enter for SCX-5112) to save the selection. 6 If necessary, customise the copy settings incluing the number of copies, contrast and image type using the control panel...


