
User Manual (ENGLISH)
Page 17
Scanner module NOTE: To scan or copy a document, the switch must be on that position. When you are moving the machine or do not intend to use it straight out, away from the scanner module by pulling it for a long time, push the switch to the unlock position ( ). Tape 2 Remove the label completely from the unit. The scan unlock switch automatically moves to the lock position ( ). 3 Pull open the paper Tray and remove the packing material from the front, back, and sides of the machine. Unpacking 1 Remove the shipping tape from the paper Tray. 1.2 GETTING STARTED
Scanner module NOTE: To scan or copy a document, the switch must be on that position. When you are moving the machine or do not intend to use it straight out, away from the scanner module by pulling it for a long time, push the switch to the unlock position ( ). Tape 2 Remove the label completely from the unit. The scan unlock switch automatically moves to the lock position ( ). 3 Pull open the paper Tray and remove the packing material from the front, back, and sides of the machine. Unpacking 1 Remove the shipping tape from the paper Tray. 1.2 GETTING STARTED
User Manual (ENGLISH)
Page 29
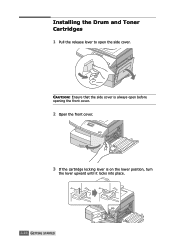
Installing the Drum and Toner Cartridges 1 Pull the release lever to open before opening the front cover. 2 Open the front cover. 3 If the cartridge locking lever is on the lower position, turn the lever upward until it locks into place. 1.14 GETTING STARTED CAUTION: Ensure that the side cover is always open the side cover.
Installing the Drum and Toner Cartridges 1 Pull the release lever to open before opening the front cover. 2 Open the front cover. 3 If the cartridge locking lever is on the lower position, turn the lever upward until it locks into place. 1.14 GETTING STARTED CAUTION: Ensure that the side cover is always open the side cover.
User Manual (ENGLISH)
Page 30
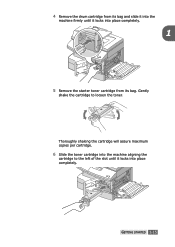
Thoroughly shaking the cartridge will assure maximum copies per cartridge. 6 Slide the toner cartridge into the machine aligning the cartridge to loosen the toner. GETTING STARTED 1.15 Gently shake the cartridge to the left of the slot until it locks into place completely. 1 5 Remove the starter toner cartridge from its bag. 4 Remove the drum cartridge from its bag and slide it into the machine firmly until it locks into place completely.
Thoroughly shaking the cartridge will assure maximum copies per cartridge. 6 Slide the toner cartridge into the machine aligning the cartridge to loosen the toner. GETTING STARTED 1.15 Gently shake the cartridge to the left of the slot until it locks into place completely. 1 5 Remove the starter toner cartridge from its bag. 4 Remove the drum cartridge from its bag and slide it into the machine firmly until it locks into place completely.
User Manual (ENGLISH)
Page 31
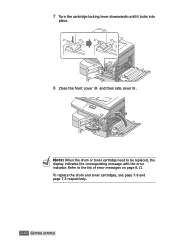
Refer to be replaced, the display indicates the corresponding message with the error indicator. To replace the drum and toner cartridges, see page 7.8 and page 7.3 respectively. 1.16 GETTING STARTED 7 Turn the cartridge locking lever downwards until it locks into place. 8 Close the front cover 1 and then side cover 2 . 2 1 NOTE: When the drum or toner cartridge need to the list of error messages on page 8.11.
Refer to be replaced, the display indicates the corresponding message with the error indicator. To replace the drum and toner cartridges, see page 7.8 and page 7.3 respectively. 1.16 GETTING STARTED 7 Turn the cartridge locking lever downwards until it locks into place. 8 Close the front cover 1 and then side cover 2 . 2 1 NOTE: When the drum or toner cartridge need to the list of error messages on page 8.11.

User Manual (ENGLISH)
Page 33
2 Push down on the pressure plate until it into the corresponding position. Rear guide LGL FOLIO A4 LTR 4 Fan the paper and insert it locks in position. 3 Adjust the rear paper guide to Letter or A4 size depending on the country. It is preset to the desired paper length. To load another size, lift and insert the rear guide into the Tray. 1.18 GETTING STARTED
2 Push down on the pressure plate until it into the corresponding position. Rear guide LGL FOLIO A4 LTR 4 Fan the paper and insert it locks in position. 3 Adjust the rear paper guide to Letter or A4 size depending on the country. It is preset to the desired paper length. To load another size, lift and insert the rear guide into the Tray. 1.18 GETTING STARTED
User Manual (ENGLISH)
Page 95
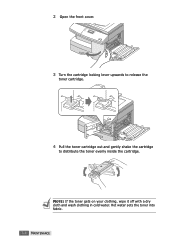
NOTE: If the toner gets on your clothing, wipe it off with a dry cloth and wash clothing in cold water. 2 Open the front cover. 3 Turn the cartridge locking lever upwards to release the toner cartridge. 4 Pull the toner cartridge out and gently shake the cartridge to distribute the toner evenly inside the cartridge. Hot water sets the toner into fabric. 7.4 MAINTENANCE
NOTE: If the toner gets on your clothing, wipe it off with a dry cloth and wash clothing in cold water. 2 Open the front cover. 3 Turn the cartridge locking lever upwards to release the toner cartridge. 4 Pull the toner cartridge out and gently shake the cartridge to distribute the toner evenly inside the cartridge. Hot water sets the toner into fabric. 7.4 MAINTENANCE
User Manual (ENGLISH)
Page 96
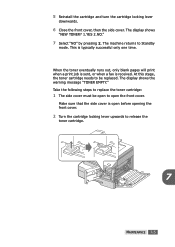
...1.YES 2.NO." 7 Select "NO" by pressing 2. The display shows the warning message "TONER EMPTY." 5 Reinstall the cartridge and turn the cartridge locking lever downwards. 6 Close the front cover, then the side cover. The machine returns to replace the toner cartridge: 1 The side cover must be replaced.... This is typically successful only one time. At this stage, the toner cartridge needs to be open to open before opening the front cover. 2 Turn the cartridge locking lever upwards to release the toner cartridge. 7 MAINTENANCE 7.5 Take the following...
...1.YES 2.NO." 7 Select "NO" by pressing 2. The display shows the warning message "TONER EMPTY." 5 Reinstall the cartridge and turn the cartridge locking lever downwards. 6 Close the front cover, then the side cover. The machine returns to replace the toner cartridge: 1 The side cover must be replaced.... This is typically successful only one time. At this stage, the toner cartridge needs to be open to open before opening the front cover. 2 Turn the cartridge locking lever upwards to release the toner cartridge. 7 MAINTENANCE 7.5 Take the following...
User Manual (ENGLISH)
Page 97
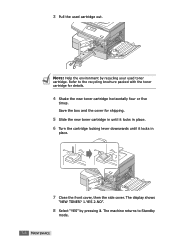
... machine returns to the recycling brochure packed with the toner cartridge for shipping. 5 Slide the new toner cartridge in until it locks in place. 6 Turn the cartridge locking lever downwards until it locks in place. 7 Close the front cover, then the side cover. 3 Pull the used toner cartridge. Save the box and the...
... machine returns to the recycling brochure packed with the toner cartridge for shipping. 5 Slide the new toner cartridge in until it locks in place. 6 Turn the cartridge locking lever downwards until it locks in place. 7 Close the front cover, then the side cover. 3 Pull the used toner cartridge. Save the box and the...
User Manual (ENGLISH)
Page 100
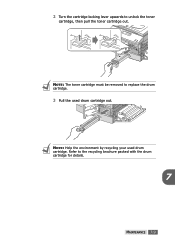
NOTE: Help the environment by recycling your used drum cartridge out. Refer to unlock the toner cartridge, then pull the toner cartridge out. 2 Turn the cartridge locking lever upwards to the recycling brochure packed with the drum cartridge for details. 7 MAINTENANCE 7.9 NOTE: The toner cartridge must be removed to replace the drum cartridge. 3 Pull the used drum cartridge.
NOTE: Help the environment by recycling your used drum cartridge out. Refer to unlock the toner cartridge, then pull the toner cartridge out. 2 Turn the cartridge locking lever upwards to the recycling brochure packed with the drum cartridge for details. 7 MAINTENANCE 7.9 NOTE: The toner cartridge must be removed to replace the drum cartridge. 3 Pull the used drum cartridge.
User Manual (ENGLISH)
Page 101
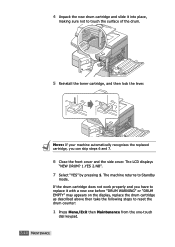
...into place, making sure not to touch the surface of the drum. 5 Reinstall the toner cartridge, and then lock the lever. 4 Unpack the new drum cartridge and slide it with a new one before "DRUM WARNING" or "DRUM EMPTY" may appears on the display, replace the drum cartridge as described above... then take the following steps to reset the drum counter: 1 Press Menu/Exit then Maintenance from the one-touch dial keypad. 7.10 MAINTENANCE
...into place, making sure not to touch the surface of the drum. 5 Reinstall the toner cartridge, and then lock the lever. 4 Unpack the new drum cartridge and slide it with a new one before "DRUM WARNING" or "DRUM EMPTY" may appears on the display, replace the drum cartridge as described above... then take the following steps to reset the drum counter: 1 Press Menu/Exit then Maintenance from the one-touch dial keypad. 7.10 MAINTENANCE
User Manual (ENGLISH)
Page 114
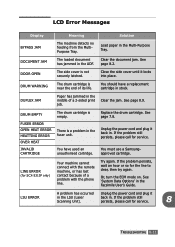
...and plug it back in the fuser unit. Clear the jam. See page 8.9. There is empty. If the problem still persists, please call for SCX-5315F only) Your machine cannot connect with the remote machine, or has lost contact because of a 2-sided print job. If the problem persists, ...wait an hour or so for service. LSU ERROR A problem has occurred Unplug the power cord and plug it locks into place. See 'System Data Options' in the LSU (Laser Scanning Unit). You must use a Samsungapproved cartridge. If the problem still persists, please call for the line to clear,...
...and plug it back in the fuser unit. Clear the jam. See page 8.9. There is empty. If the problem still persists, please call for SCX-5315F only) Your machine cannot connect with the remote machine, or has lost contact because of a 2-sided print job. If the problem persists, ...wait an hour or so for service. LSU ERROR A problem has occurred Unplug the power cord and plug it locks into place. See 'System Data Options' in the LSU (Laser Scanning Unit). You must use a Samsungapproved cartridge. If the problem still persists, please call for the line to clear,...
User Manual (ENGLISH)
Page 115
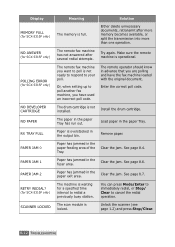
... to respond to poll another fax machine, you want to poll is waiting for SCX-5315F only) SCANNER LOCKED Meaning Solution The memory is locked. Display MEMORY FULL (for SCX-5315F only) NO ANSWER (for SCX-5315F only) POLLING ERROR (for SCX-5315F only) NO DEVELOPER CARTRIDGE NO PAPER RX TRAY FULL PAPER JAM 0 PAPER JAM... has jammed in the fuser area. The remote fax machine has not answered after more memory becomes available, or split the transmission into more than one operation.
... to respond to poll another fax machine, you want to poll is waiting for SCX-5315F only) SCANNER LOCKED Meaning Solution The memory is locked. Display MEMORY FULL (for SCX-5315F only) NO ANSWER (for SCX-5315F only) POLLING ERROR (for SCX-5315F only) NO DEVELOPER CARTRIDGE NO PAPER RX TRAY FULL PAPER JAM 0 PAPER JAM... has jammed in the fuser area. The remote fax machine has not answered after more memory becomes available, or split the transmission into more than one operation.
User Manual (ENGLISH)
Page 143
INDEX A ADF load 4.3 B booklet print 5.8 C cartridge locking lever 1.16 clone in copy mode 4.10 in print mode 5.7 collation for copying 4.12 consumables 7.11 contrast for copying 4.7 copy size 4.8 D default printer 5.2 display language 1....
INDEX A ADF load 4.3 B booklet print 5.8 C cartridge locking lever 1.16 clone in copy mode 4.10 in print mode 5.7 collation for copying 4.12 consumables 7.11 contrast for copying 4.7 copy size 4.8 D default printer 5.2 display language 1....
User Manual (ENGLISH)
Page 144
in print mode 5.5 paper source in copy mode 4.2 in print mode 5.5 paper type 3.2 parallel, connect 1.13 poster print 5.9 power save 1.22 printer driver install 2.4 uninstall 2.8 printer driver window 5.3 R resolution, print 5.6 S scan driver install 2.4 uninstall 2.8 scanner lock 1.2 SmarThru install 2.4 uninstall 2.10 software install 2.4 uninstall 2.12 T tel line, connect 1.11 toner cartridge install 1.14 life 7.3 replace 7.5 toner save 1.21 two-sided print in copy mode 4.11 in print mode 5.10 U USB, connect 1.13 Using the Multi-Purpose Tray 3.1 W watermark, print 5.11
in print mode 5.5 paper source in copy mode 4.2 in print mode 5.5 paper type 3.2 parallel, connect 1.13 poster print 5.9 power save 1.22 printer driver install 2.4 uninstall 2.8 printer driver window 5.3 R resolution, print 5.6 S scan driver install 2.4 uninstall 2.8 scanner lock 1.2 SmarThru install 2.4 uninstall 2.10 software install 2.4 uninstall 2.12 T tel line, connect 1.11 toner cartridge install 1.14 life 7.3 replace 7.5 toner save 1.21 two-sided print in copy mode 4.11 in print mode 5.10 U USB, connect 1.13 Using the Multi-Purpose Tray 3.1 W watermark, print 5.11


