User Manual (ENGLISH)
Page 11
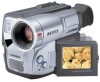
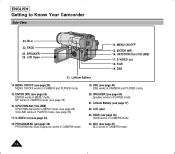
...ère (voir page 17) 28. PLAYER: mode magnétoscope, permet la lecture. 32. Compartiment du bloc batterie (voir page 19) 36. Éjection du bloc batterie 37. ZOOM 26. Battery Pack Compartment (see page 61) 25. CAMERA: permet de filmer. - CASSETTE Compartment 37. POWER Switch (see page ...;scope. (SCL901, voir page 32) 38. ZOOM (see page 18) - PLAYER : Select to turn off the camcorder. - External MIC (see page 16) 31. Hand Strap (see page 68) (SCL906/L907 only) 34. Hand Strap 33. SNAP SHOT/D.ZOOM SNAP SHOT works in CAMERA mode. (SCL903/L906/L907 only,...
...ère (voir page 17) 28. PLAYER: mode magnétoscope, permet la lecture. 32. Compartiment du bloc batterie (voir page 19) 36. Éjection du bloc batterie 37. ZOOM 26. Battery Pack Compartment (see page 61) 25. CAMERA: permet de filmer. - CASSETTE Compartment 37. POWER Switch (see page ...;scope. (SCL901, voir page 32) 38. ZOOM (see page 18) - PLAYER : Select to turn off the camcorder. - External MIC (see page 16) 31. Hand Strap (see page 68) (SCL906/L907 only) 34. Hand Strap 33. SNAP SHOT/D.ZOOM SNAP SHOT works in CAMERA mode. (SCL903/L906/L907 only,...
User Manual (ENGLISH)
Page 14
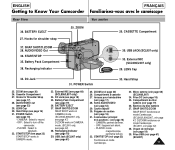
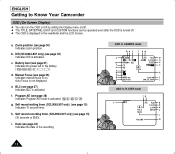
...226;ble S-VIDEO. (voir page 54) Note: Optional accessories may be included with your camcorder. Basic Accessories 1. AC Power Adapter 1. Lithium Battery for Remote Control. (SCL906/L907 only, see page 15) Lithium Battery for Clock. (TYPE: CR2025, see page 17) 4. AC cord 5. Lens Cover ... 9. Couvre-objectif Optional Accessory 13. Battery Pack 6. Bloc batterie. (voir page 19) 4. Remote Control. (SCL906/L907 only, see page 18) 2. Câble USB AUDIO (SCL907) 12. ENGLISH FRANÇAIS Getting to Know Your Camcorder Familiarisez-vous avec le caméscope...
...226;ble S-VIDEO. (voir page 54) Note: Optional accessories may be included with your camcorder. Basic Accessories 1. AC Power Adapter 1. Lithium Battery for Remote Control. (SCL906/L907 only, see page 15) Lithium Battery for Clock. (TYPE: CR2025, see page 17) 4. AC cord 5. Lens Cover ... 9. Couvre-objectif Optional Accessory 13. Battery Pack 6. Bloc batterie. (voir page 19) 4. Remote Control. (SCL906/L907 only, see page 18) 2. Câble USB AUDIO (SCL907) 12. ENGLISH FRANÇAIS Getting to Know Your Camcorder Familiarisez-vous avec le caméscope...
User Manual (ENGLISH)
Page 18
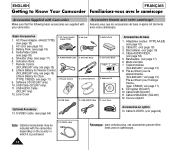
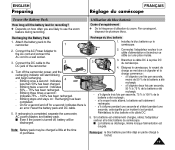
... the Power Source ✤ There are two ways to a wall socket. Using the Battery Pack: used for outdoor recording. Branchez le câble DC sur l'adaptateur secteur. 2. Connect the AC cord to connect power source. - To set the camcorder to the CAMERA mode. b. Make sure that the image appears in the LCD...
... the Power Source ✤ There are two ways to a wall socket. Using the Battery Pack: used for outdoor recording. Branchez le câble DC sur l'adaptateur secteur. 2. Connect the AC cord to connect power source. - To set the camcorder to the CAMERA mode. b. Make sure that the image appears in the LCD...
User Manual (ENGLISH)
Page 19
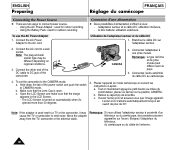
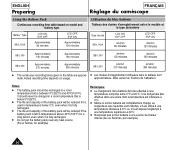
... Power Adapter to the AC cord and connect the AC cord to the camcorder. 1 2. Connect the DC cable to use the Battery Pack How long will the battery last for a second: Indicates there is completed, separate the camcorder, AC power adapter, and battery pack. Blinking three times a second : Indicates 75% ~ 100% has been recharged. - Connectez...
... Power Adapter to the AC cord and connect the AC cord to the camcorder. 1 2. Connect the DC cable to use the Battery Pack How long will the battery last for a second: Indicates there is completed, separate the camcorder, AC power adapter, and battery pack. Blinking three times a second : Indicates 75% ~ 100% has been recharged. - Connectez...
User Manual (ENGLISH)
Page 20
...tre effectué dans une pièce dont la température est inférieure à 0°C. ✤ Même si le bloc batterie est complètement chargé, sa longévité et ses capacités sont réduites, s'il est utilisé à une ... à 0°C ou s'il est exposé longtemps à une température supérieure à 40°C. ✤ N'exposez pas le bloc batterie à une source de chaleur intense (feu ou flammes, par exemple). 20 approximatives. Elles varient en fonction de l'utilisation. Remarques: ✤ Le chargement de la...
...tre effectué dans une pièce dont la température est inférieure à 0°C. ✤ Même si le bloc batterie est complètement chargé, sa longévité et ses capacités sont réduites, s'il est utilisé à une ... à 0°C ou s'il est exposé longtemps à une température supérieure à 40°C. ✤ N'exposez pas le bloc batterie à une source de chaleur intense (feu ou flammes, par exemple). 20 approximatives. Elles varient en fonction de l'utilisation. Remarques: ✤ Le chargement de la...
User Manual (ENGLISH)
Page 24
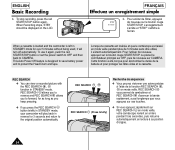
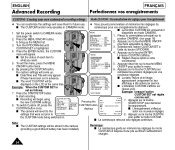
...back to protect the Head Drum and tape. Cette fonction a été conçue pour économiser la durée de la batterie et pour protèger les têtes vides et la cassette. REC SEARCH vous permet de rembobiner et REC SEARCH d'avancer la bande rapidement..." s'affiche à l'écran. ENGLISH Basic Recording b. When Recording stops, STBY should be displayed on the LCD. When a cassette is loaded and the camcorder is designed to save battery power and to CAMERA. REC SEARCH ✤ You can view a recorded picture with the REC SEARCH , function in STANDBY mode, your...
...back to protect the Head Drum and tape. Cette fonction a été conçue pour économiser la durée de la batterie et pour protèger les têtes vides et la cassette. REC SEARCH vous permet de rembobiner et REC SEARCH d'avancer la bande rapidement..." s'affiche à l'écran. ENGLISH Basic Recording b. When Recording stops, STBY should be displayed on the LCD. When a cassette is loaded and the camcorder is designed to save battery power and to CAMERA. REC SEARCH ✤ You can view a recorded picture with the REC SEARCH , function in STANDBY mode, your...
User Manual (ENGLISH)
Page 26
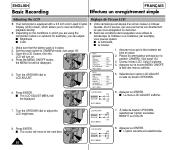
... (see page 18) 3. Turn the UP/DOWN dial to view recording or playback directly. ✤ Depending on . 4. Assurez-vous que le bloc batterie est bien en place. 2. Celui-ci s'allume. 4. I Color 1. Press the MENU ON/OFF button, the MENU list will be displayed. Ouvrez l'&#... le commutateur principal sur la position CAMERA. (Voir page 18.) 3. Make sure that the battery pack is equipped with a 2.5 inch color Liquid Crystal Display (LCD) screen, which you are using the camcorder (indoors or outdoors for example), you to LCD ADJUST. Press ENTER. I la couleur. LCD...
... (see page 18) 3. Turn the UP/DOWN dial to view recording or playback directly. ✤ Depending on . 4. Assurez-vous que le bloc batterie est bien en place. 2. Celui-ci s'allume. 4. I Color 1. Press the MENU ON/OFF button, the MENU list will be displayed. Ouvrez l'&#... le commutateur principal sur la position CAMERA. (Voir page 18.) 3. Make sure that the battery pack is equipped with a 2.5 inch color Liquid Crystal Display (LCD) screen, which you are using the camcorder (indoors or outdoors for example), you to LCD ADJUST. Press ENTER. I la couleur. LCD...
User Manual (ENGLISH)
Page 34
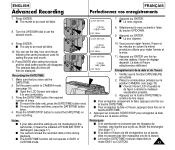
...;tre le menu. 3. Sélectionnez l'option CUSTOM SET à l'aide du bouton UP/DOWN. 4. if these have been set in the camera (providing a good lithium battery has been installed). I L'indication CUSTOM s'affiche sur l'écran LCD. I Recording will begin using the new CUSTOM settings. 8. Appuyez sur la touche START/STOP pour...
...;tre le menu. 3. Sélectionnez l'option CUSTOM SET à l'aide du bouton UP/DOWN. 4. if these have been set in the camera (providing a good lithium battery has been installed). I L'indication CUSTOM s'affiche sur l'écran LCD. I Recording will begin using the new CUSTOM settings. 8. Appuyez sur la touche START/STOP pour...
User Manual (ENGLISH)
Page 43
... button once. Press ENTER. Set the power switch to CAMERA mode. (see page 18) I Open the LCD Screen and adjust it means the installed LITHIUM BATTERY is discharged. (see comfortably. 3. I Le jour clignote. 9. La date et l'heure sélectionnées s'affichent. Appuyez sur la touche DATE/TIME ... after setting the minute and the clock setting screen will blink. The selected date and time will then be reset will not operate in the camcorder, it to see page 17) I If your recording. Press the DATE/TIME button the required number of times. Press the START/STOP button...
... button once. Press ENTER. Set the power switch to CAMERA mode. (see page 18) I Open the LCD Screen and adjust it means the installed LITHIUM BATTERY is discharged. (see comfortably. 3. I Le jour clignote. 9. La date et l'heure sélectionnées s'affichent. Appuyez sur la touche DATE/TIME ... after setting the minute and the clock setting screen will blink. The selected date and time will then be reset will not operate in the camcorder, it to see page 17) I If your recording. Press the DATE/TIME button the required number of times. Press the START/STOP button...
User Manual (ENGLISH)
Page 69
...- D - ABROAD 63 AC POWER ADAPTER........18 ADJUSTING 26 AF 36 AUDIO 53 AUTO FOCUSING 36 AUTO MODE 38 AUTO POWER OFF 24 - E - BATTERY 19 BATTERY LEVEL 21 BATTERY PACK 19 BLC 37 BRIGHTNESS 26 - CAMERA 18 CASSETTE 22 CASSETTE HOLDER ..........11 CLEANING 62 COLOR 26 CONTENTS 2 COUNTER 55 CUSTOM 34 - N - ... OUVERTURE..46 - M - E EASY 33 EJECT 22 EJECTION D'UNE CASSETTE 22 ENREGISTREMENT AUTOMATIQUE 15 ENTER 26 - HAND STRAP 16 Hi8 54 - H HAUT-PARLEUR 56 HEURE 42 Hi 8 54 HUMIDITE 67 - F - MIRROR 40 MOISTURE 67 MOSAIC 40 MULTY PLAYBACK 57 -
...- D - ABROAD 63 AC POWER ADAPTER........18 ADJUSTING 26 AF 36 AUDIO 53 AUTO FOCUSING 36 AUTO MODE 38 AUTO POWER OFF 24 - E - BATTERY 19 BATTERY LEVEL 21 BATTERY PACK 19 BLC 37 BRIGHTNESS 26 - CAMERA 18 CASSETTE 22 CASSETTE HOLDER ..........11 CLEANING 62 COLOR 26 CONTENTS 2 COUNTER 55 CUSTOM 34 - N - ... OUVERTURE..46 - M - E EASY 33 EJECT 22 EJECTION D'UNE CASSETTE 22 ENREGISTREMENT AUTOMATIQUE 15 ENTER 26 - HAND STRAP 16 Hi8 54 - H HAUT-PARLEUR 56 HEURE 42 Hi 8 54 HUMIDITE 67 - F - MIRROR 40 MOISTURE 67 MOSAIC 40 MULTY PLAYBACK 57 -
User Manual (ENGLISH)
Page 70
... 38 MODE DE FONCTIONNEMENT 13 MODE PORTRAIT 38 MODE SAND/SNOW...........38 MODE SPORTS 38 MODE SPOTLIGHT 38 MOSAIC 40 LECTURE MULTIPLE..........57 - R - RECHARGE BLOC BATTERIE ..19 REC SEARCH 24 REGLAGE ÉCRAN 26 REMISE À ZERO 55 REW(REMBOBINAGE) .......55 - ENGLISH Index Index FRANÇAIS - R - WAIT-10S 15 WEIGHT... SNAP SHOT 47 SOMMAIRE 2 SPECIFICATIONS TECHNIQUES 68 STANDBY 18 START/STOP 23 STOP 54 STROBE 40 S-VIDEO 54 SYSTEME 68 - O - NEG 40 NIVEAU DE LA BATTERIE .21 NTSC 63 - P-
... 38 MODE DE FONCTIONNEMENT 13 MODE PORTRAIT 38 MODE SAND/SNOW...........38 MODE SPORTS 38 MODE SPOTLIGHT 38 MOSAIC 40 LECTURE MULTIPLE..........57 - R - RECHARGE BLOC BATTERIE ..19 REC SEARCH 24 REGLAGE ÉCRAN 26 REMISE À ZERO 55 REW(REMBOBINAGE) .......55 - ENGLISH Index Index FRANÇAIS - R - WAIT-10S 15 WEIGHT... SNAP SHOT 47 SOMMAIRE 2 SPECIFICATIONS TECHNIQUES 68 STANDBY 18 START/STOP 23 STOP 54 STROBE 40 S-VIDEO 54 SYSTEME 68 - O - NEG 40 NIVEAU DE LA BATTERIE .21 NTSC 63 - P-
User Manual (ENGLISH)
Page 3
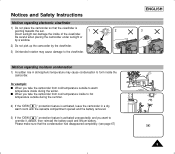
... to grounding electrodes and requirements for ventilation to the operating instructions. 11. Do not defeat the safety purpose of the CAMCORDER and to protect it from battery power, or other sources, refer to ensure reliable operation of the polarized plug. 12. OUTDOOR ANTENNA GROUNDING: If an...adhered to insert the plug fully into the outlet, try reversing the plug. Notices and Safety Instructions ENGLISH 9. GROUNDING OR POLARIZATION: This CAMCORDER may be placed in a built-in the cabinet are not likely to cords or plugs, convenient receptacles, and the point where they...
... to grounding electrodes and requirements for ventilation to the operating instructions. 11. Do not defeat the safety purpose of the CAMCORDER and to protect it from battery power, or other sources, refer to ensure reliable operation of the polarized plug. 12. OUTDOOR ANTENNA GROUNDING: If an...adhered to insert the plug fully into the outlet, try reversing the plug. Notices and Safety Instructions ENGLISH 9. GROUNDING OR POLARIZATION: This CAMCORDER may be placed in a built-in the cabinet are not likely to cords or plugs, convenient receptacles, and the point where they...
User Manual (ENGLISH)
Page 6
... View...9, 10, 11 s OSD (On Screen Display) ...12 Accessories Supplied with the Camcorder...14 Remote Control (SCL906/L907 only) ...15 s Self Timer Recording...15 Preparing Adjusting the Hand Strap and Shoulder Strap ...16 Attaching the Lens Cover ...17 Lithium Battery Installation ...17 Connecting the Power Source...18 s To use the AC Power Adapter...
... View...9, 10, 11 s OSD (On Screen Display) ...12 Accessories Supplied with the Camcorder...14 Remote Control (SCL906/L907 only) ...15 s Self Timer Recording...15 Preparing Adjusting the Hand Strap and Shoulder Strap ...16 Attaching the Lens Cover ...17 Lithium Battery Installation ...17 Connecting the Power Source...18 s To use the AC Power Adapter...
User Manual (ENGLISH)
Page 9
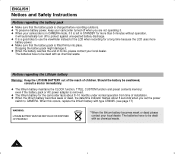
...during the summer. 2) If the "DEW( )" protection feature is activated, leave the camcorder in atmospheric temperature may cause damage to override it, detach, then reinstall the battery pack and lithium battery. Notices and Safety Instructions Notices regarding moisture condensation 1) A sudden rise in a dry..., warm room with the cassette compartment opened and the battery removed. 3) If the "DEW( )" protection feature is activated unexpectedly, and you take the camcorder from cold temperature outside during the winter. for example: s When you want to the...
...during the summer. 2) If the "DEW( )" protection feature is activated, leave the camcorder in atmospheric temperature may cause damage to override it, detach, then reinstall the battery pack and lithium battery. Notices and Safety Instructions Notices regarding moisture condensation 1) A sudden rise in a dry..., warm room with the cassette compartment opened and the battery removed. 3) If the "DEW( )" protection feature is activated unexpectedly, and you take the camcorder from cold temperature outside during the winter. for example: s When you want to the...
User Manual (ENGLISH)
Page 10
..., CUSTOM function and preset contents memory; even if the battery pack or AC power adapter is removed. ✤ The lithium battery for the camcorder lasts about 8~10 months under normal operation from time of installation. ✤ When the lithium battery becomes weak or dead, the date/time indicator flashes about... 5 seconds when you are not operating it. ✤ When your camcorder is in CAMERA mode, if it is left in STANDBY for a long time...
..., CUSTOM function and preset contents memory; even if the battery pack or AC power adapter is removed. ✤ The lithium battery for the camcorder lasts about 8~10 months under normal operation from time of installation. ✤ When the lithium battery becomes weak or dead, the date/time indicator flashes about... 5 seconds when you are not operating it. ✤ When your camcorder is in CAMERA mode, if it is left in STANDBY for a long time...
User Manual (ENGLISH)
Page 14
... 37) BLC works in CAMERA mode. (see page 26) VOLUME works in CAMERA and PLAYER mode. 20. SPEAKER 22. LCD Open 14. P.AE 19. Lithium Battery 14. MF works in CAMERA mode. 10 LCD open 23. S-VIDEO out 18. UP/DOWN dial (VOLUME) UP/DOWN dial works in MENU mode. (see...) ENTER works in CAMERA and PLAYER mode. 15. SPEAKER (see page 46) FADE works in CAMERA mode. 24. DSE 21. ENGLISH Getting to Know Your Camcorder Side View 24. BLC 23. FADE 20. UP/DOWN Dial (VOLUME) 17. FADE (see page 56) Speaker works in CAMERA mode. 19.
... 37) BLC works in CAMERA mode. (see page 26) VOLUME works in CAMERA and PLAYER mode. 20. SPEAKER 22. LCD Open 14. P.AE 19. Lithium Battery 14. MF works in CAMERA mode. 10 LCD open 23. S-VIDEO out 18. UP/DOWN dial (VOLUME) UP/DOWN dial works in MENU mode. (see...) ENTER works in CAMERA and PLAYER mode. 15. SPEAKER (see page 46) FADE works in CAMERA mode. 24. DSE 21. ENGLISH Getting to Know Your Camcorder Side View 24. BLC 23. FADE 20. UP/DOWN Dial (VOLUME) 17. FADE (see page 56) Speaker works in CAMERA mode. 19.
User Manual (ENGLISH)
Page 15
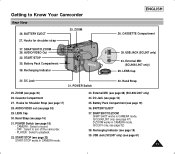
START/STOP 35. Battery Pack Compartment 38. DC Jack 31. AUDIO/VIDEO out (see page 19) 39. SNAP SHOT/D.ZOOM SNAP SHOT works in CAMERA mode. (SCL906/L907 only, see page 32) 38. AUDIO/VIDEO Out 32. External MIC (SCL906/L907 only) 29. LENS Cap 34. Hand Strap 25. ...Hand Strap (see page 68) (SCL906/L907 only) 34. BATTERY EJECT 25. LENS Cap 30. External MIC (see page 16) 31. Battery Pack Compartment (see page 17) 28. Hooks for Shoulder Strap (see page 19) 36. Cassette Compartment 27. OFF : Select to Know Your Camcorder Rear View 36. ZOOM 27. ...
START/STOP 35. Battery Pack Compartment 38. DC Jack 31. AUDIO/VIDEO out (see page 19) 39. SNAP SHOT/D.ZOOM SNAP SHOT works in CAMERA mode. (SCL906/L907 only, see page 32) 38. AUDIO/VIDEO Out 32. External MIC (SCL906/L907 only) 29. LENS Cap 34. Hand Strap 25. ...Hand Strap (see page 68) (SCL906/L907 only) 34. BATTERY EJECT 25. LENS Cap 30. External MIC (see page 16) 31. Battery Pack Compartment (see page 17) 28. Hooks for Shoulder Strap (see page 19) 36. Cassette Compartment 27. OFF : Select to Know Your Camcorder Rear View 36. ZOOM 27. ...
User Manual (ENGLISH)
Page 16
... 12 OSD in CAMERA mode ba t r sq c Hi8 REC p W T 880 x 0:00:00 o m CINEMA XX EASY x f OFF z n e BLC TITLE d k y g WAIT-10S 12:00 AM j h SELF-30S JAN. 29, 2004 i OSD in the battery. ( ) d. b. e. ENGLISH Getting to Know Your Camcorder OSD (On Screen Display) ✤ You can turn the... OSD on/off by setting the Display menu on . Self record waiting timer. (SCL906/L907 only) (see page 21) Indicates the power...
... 12 OSD in CAMERA mode ba t r sq c Hi8 REC p W T 880 x 0:00:00 o m CINEMA XX EASY x f OFF z n e BLC TITLE d k y g WAIT-10S 12:00 AM j h SELF-30S JAN. 29, 2004 i OSD in the battery. ( ) d. b. e. ENGLISH Getting to Know Your Camcorder OSD (On Screen Display) ✤ You can turn the... OSD on/off by setting the Display menu on . Self record waiting timer. (SCL906/L907 only) (see page 21) Indicates the power...
User Manual (ENGLISH)
Page 18
...) 12. Lens Cover AD39-00073A Note: Optional accessories may be included with your camcorder. AC Power Adapter. (AA-E8 TYPE) (see page 15) (SCL906/L907 only) 8. USB Cable (SCL907 only) 11. Lens Cover Optional Accessory 13...SCL906/L907 only) Lithium Battery for Clock. (TYPE: CR2025, see page 17) 6. Lithium Batteries 9. USB AUDIO Cable AD46-00060A 12. Basic Accessories 1. Battery Pack. (see page 18) 3. AC cord 3. Software CD AD59-00062A 10. Instruction Book. 7. AC cord. (see page 19) 4. ENGLISH Getting to Know Your Camcorder Accessories Supplied with Camcorder...
...) 12. Lens Cover AD39-00073A Note: Optional accessories may be included with your camcorder. AC Power Adapter. (AA-E8 TYPE) (see page 15) (SCL906/L907 only) 8. USB Cable (SCL907 only) 11. Lens Cover Optional Accessory 13...SCL906/L907 only) Lithium Battery for Clock. (TYPE: CR2025, see page 17) 6. Lithium Batteries 9. USB AUDIO Cable AD46-00060A 12. Basic Accessories 1. Battery Pack. (see page 18) 3. AC cord 3. Software CD AD59-00062A 10. Instruction Book. 7. AC cord. (see page 19) 4. ENGLISH Getting to Know Your Camcorder Accessories Supplied with Camcorder...

User Manual (ENGLISH)
Page 19
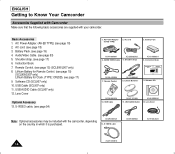
...4 2 TIMER STILL RETURN 5 8 TELE 12 9 7 10 Remote Control Battery Installation ✤ You must insert or replace this battery when: - markings. ✤ Be careful not to Know Your Camcorder Remote Control (SCL906/L907 only) Description of Buttons 1. Zero Return (see page 30) 6. WAIT...available - WIDE (see page 55) 4. You purchase the camcorder. - Still (see page 30) 5. The remote control doesn't work. ✤ Insert Lithium Battery, following the + and - Getting to reverse the polarity of the battery. WAIT-10S/SELF-END: wait 10 seconds, followed by 30...
...4 2 TIMER STILL RETURN 5 8 TELE 12 9 7 10 Remote Control Battery Installation ✤ You must insert or replace this battery when: - markings. ✤ Be careful not to Know Your Camcorder Remote Control (SCL906/L907 only) Description of Buttons 1. Zero Return (see page 30) 6. WAIT...available - WIDE (see page 55) 4. You purchase the camcorder. - Still (see page 30) 5. The remote control doesn't work. ✤ Insert Lithium Battery, following the + and - Getting to reverse the polarity of the battery. WAIT-10S/SELF-END: wait 10 seconds, followed by 30...


