
User Manual (ENGLISH)
Page 4
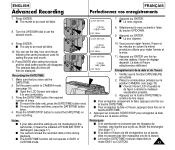
... vers le soleil. Direct sunlight can damage the CCD (Charge Coupled Device). La lumière solaire directe peut endommager le dispositif électronique à transfert de charge (CCD). 4 Notices regarding rotation of the hinge that connects the LCD screen to the inside of LCD screen Please rotate the LCD screen carefully as illustrated. Unintended rotation may cause damage to the Camcorder. 1) LCD screen closed . 5) ➔ 90...
... vers le soleil. Direct sunlight can damage the CCD (Charge Coupled Device). La lumière solaire directe peut endommager le dispositif électronique à transfert de charge (CCD). 4 Notices regarding rotation of the hinge that connects the LCD screen to the inside of LCD screen Please rotate the LCD screen carefully as illustrated. Unintended rotation may cause damage to the Camcorder. 1) LCD screen closed . 5) ➔ 90...
User Manual (ENGLISH)
Page 9
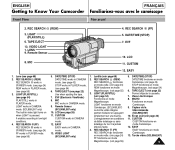
... cassette. 7. Viseur électronique 8. EASY EASY fonctionne en mode Caméscope. 13. REC SEARCH (REW) 3. Remote Sensor 8. EVF 10. Remote Sensor (SCL906/L907 only) 10. VIDEO LIGHT (SCL906/L907 only) 1. DATE/TIME (STOP) DATE/TIME fonctionne en mode Caméscope. (voir page 42) STOP fonctionne en mode Magnétoscope. (voir page 54) 6. VIDEO LIGHT 1. LIGHT (PLAY/STILL) (see page 22) Use when ejecting the tape. 7. It enables recording in CAMERA mode. 12. CUSTOM CUSTOM works in low-light...
... cassette. 7. Viseur électronique 8. EASY EASY fonctionne en mode Caméscope. 13. REC SEARCH (REW) 3. Remote Sensor 8. EVF 10. Remote Sensor (SCL906/L907 only) 10. VIDEO LIGHT (SCL906/L907 only) 1. DATE/TIME (STOP) DATE/TIME fonctionne en mode Caméscope. (voir page 42) STOP fonctionne en mode Magnétoscope. (voir page 54) 6. VIDEO LIGHT 1. LIGHT (PLAY/STILL) (see page 22) Use when ejecting the tape. 7. It enables recording in CAMERA mode. 12. CUSTOM CUSTOM works in low-light...
User Manual (ENGLISH)
Page 14
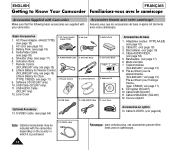
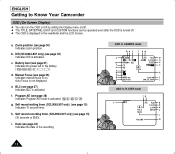
... Power Adapter 1. USB Cable (SCL907 only) SSTTOAPRT/ TIMSEERLF DISPLAY STILL RETZUERRNO CROESUENTTER WIDE 11. USB Cable 11. Câble DC. (voir page 18) 3. Mode d'emploi. 7. Câble S-VIDEO. (voir page 54) Note: Optional accessories may be included with your camcorder. Shoulder strap. (see page 18) 2. Remote Control 9. USB AUDIO Cable TELE (SCL907 only) 12. Câble USB AUDIO (SCL907) 12. S-VIDEO cable. (see page 17) 7. Basic Accessories 1. Lithium Battery for Remote Control. (SCL906...
... Power Adapter 1. USB Cable (SCL907 only) SSTTOAPRT/ TIMSEERLF DISPLAY STILL RETZUERRNO CROESUENTTER WIDE 11. USB Cable 11. Câble DC. (voir page 18) 3. Mode d'emploi. 7. Câble S-VIDEO. (voir page 54) Note: Optional accessories may be included with your camcorder. Shoulder strap. (see page 18) 2. Remote Control 9. USB AUDIO Cable TELE (SCL907 only) 12. Câble USB AUDIO (SCL907) 12. S-VIDEO cable. (see page 17) 7. Basic Accessories 1. Lithium Battery for Remote Control. (SCL906...
User Manual (ENGLISH)
Page 32
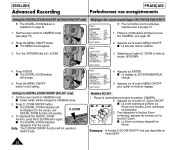
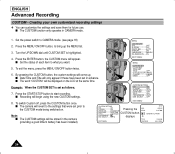
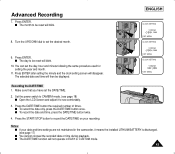
...; The DIGITAL ZOOM feature is explained on the screen, and D.ZOOM DIGITAL ZOOM function will operate. 3. Set the power switch to end setting. Press the MENU ON/OFF button. ZOOM. Placez le commutateur principal en position CAMERA. (voir page 18) NEXT: MENU MENU 2. Press ENTER. ZOOM ON/OFF button. Placez le commutateur principal en position CAMERA. 2. Réglage du zoom numérique (SCL903/L906/L907) MENU LCD ADJUST DIS OFF D.ZOOM OFF WHITE BAL ..........AUTO DISPLAY ON LANGUAGE..........ENGLISH WL...
...; The DIGITAL ZOOM feature is explained on the screen, and D.ZOOM DIGITAL ZOOM function will operate. 3. Set the power switch to end setting. Press the MENU ON/OFF button. ZOOM. Placez le commutateur principal en position CAMERA. (voir page 18) NEXT: MENU MENU 2. Press ENTER. ZOOM ON/OFF button. Placez le commutateur principal en position CAMERA. 2. Réglage du zoom numérique (SCL903/L906/L907) MENU LCD ADJUST DIS OFF D.ZOOM OFF WHITE BAL ..........AUTO DISPLAY ON LANGUAGE..........ENGLISH WL...
User Manual (ENGLISH)
Page 43
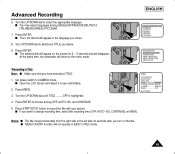
... fonction DATE/TIME n'est pas disponible en mode EASY ou CUSTOM. 43 Press ENTER. I To record the date only, press the DATE/TIME button once. La date et l'heure sélectionnées s'affichent. I The DATE/TIME function will blink. Press ENTER after setting the minute and the clock setting screen will then be displayed. Set the power switch to be reset will blink. 10. I Open the LCD Screen and adjust it means the installed LITHIUM BATTERY is...
... fonction DATE/TIME n'est pas disponible en mode EASY ou CUSTOM. 43 Press ENTER. I To record the date only, press the DATE/TIME button once. La date et l'heure sélectionnées s'affichent. I The DATE/TIME function will blink. Press ENTER after setting the minute and the clock setting screen will then be displayed. Set the power switch to be reset will blink. 10. I Open the LCD Screen and adjust it means the installed LITHIUM BATTERY is...

User Manual (ENGLISH)
Page 53
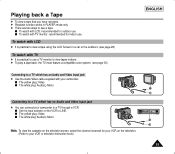
... ways to a TV through a VCR. I Set the input selector on the television screen, select the channel reserved for outdoor use a TV monitor to view tapes indoors. ✤ To play a tape back, the TV must feature a compatible color system. (see a tape; Connecting to a TV which has an Audio and Video input jack ✤ Use the Audio/Video cable supplied with your VCR or television instruction book) Remarque: pour visionner la cassette sur l'écran du...
... ways to a TV through a VCR. I Set the input selector on the television screen, select the channel reserved for outdoor use a TV monitor to view tapes indoors. ✤ To play a tape back, the TV must feature a compatible color system. (see a tape; Connecting to a TV which has an Audio and Video input jack ✤ Use the Audio/Video cable supplied with your VCR or television instruction book) Remarque: pour visionner la cassette sur l'écran du...
User Manual (ENGLISH)
Page 60
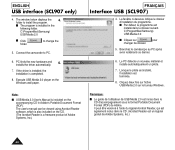
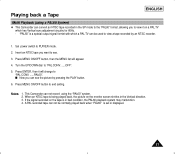
...;riel et installe automatiquement un pilote. 7. The window below displays the 4. Il peut être visionné à l'aide du logiciel Acrobat Reader, qui est également inclus dans le CD. (Acrobat Reader est un logiciel gratuit de Adobe Systems, Inc.) 60 Connect the camcorder to install the program. The user's manual can be viewed using Acrobat Reader software, which is...
...;riel et installe automatiquement un pilote. 7. The window below displays the 4. Il peut être visionné à l'aide du logiciel Acrobat Reader, qui est également inclus dans le CD. (Acrobat Reader est un logiciel gratuit de Adobe Systems, Inc.) 60 Connect the camcorder to install the program. The user's manual can be viewed using Acrobat Reader software, which is...

User Manual (ENGLISH)
Page 45
... SET CLOCK SET TITLE SET TITLE CONTINUE 1. C.RESET 0:00:00 DEMO OFF I Open the LCD Screen and adjust it to the left side 10 seconds after you desire. 9. Gire el dial UP/DOWN hasta gue TITLE ...... Pulse ENTER para elegir entre OFF, AUTO-10S y CONTINUE. 5. ENGLISH Advanced Recording Filmación avanzada ESPAÑOL 6. At the same time, the camcorder will not operate in the language you...
... SET CLOCK SET TITLE SET TITLE CONTINUE 1. C.RESET 0:00:00 DEMO OFF I Open the LCD Screen and adjust it to the left side 10 seconds after you desire. 9. Gire el dial UP/DOWN hasta gue TITLE ...... Pulse ENTER para elegir entre OFF, AUTO-10S y CONTINUE. 5. ENGLISH Advanced Recording Filmación avanzada ESPAÑOL 6. At the same time, the camcorder will not operate in the language you...
User Manual (ENGLISH)
Page 3
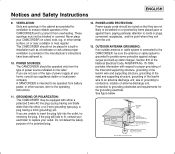
... the mast and supporting structure, grounding of power supply at your home, consult your outlet. These openings must not be operated from the unit. 13. Notices and Safety Instructions ENGLISH 9. OUTDOOR ANTENNA GROUNDING: If an outside antenna or cable system is intended to insert the plug fully into the outlet, try reversing the plug. A CAMCORDER is connected to the CAMCORDER, be equipped...
... the mast and supporting structure, grounding of power supply at your home, consult your outlet. These openings must not be operated from the unit. 13. Notices and Safety Instructions ENGLISH 9. OUTDOOR ANTENNA GROUNDING: If an outside antenna or cable system is intended to insert the plug fully into the outlet, try reversing the plug. A CAMCORDER is connected to the CAMCORDER, be equipped...
User Manual (ENGLISH)
Page 6
... Lens Cover ...17 Lithium Battery Installation ...17 Connecting the Power Source...18 s To use the AC Power Adapter ...18 s To use the Battery Pack ...19 Using the Battery Pack...20 s Continuous Recording time table ...20 s Battery Level Display...21 Inserting and Ejecting a Cassette ...22 Basic Recording Making your First Recording ...23 Hints for Stable Image Recording ...25 s Recording with LCD Screen...25 s Recording with Viewfinder...25 Adjusting the LCD...26 Adjusting Focus of the VIEWFINDER ...27 Playing back a tape on the LCD ...28 s Adjusting the LCD...
... Lens Cover ...17 Lithium Battery Installation ...17 Connecting the Power Source...18 s To use the AC Power Adapter ...18 s To use the Battery Pack ...19 Using the Battery Pack...20 s Continuous Recording time table ...20 s Battery Level Display...21 Inserting and Ejecting a Cassette ...22 Basic Recording Making your First Recording ...23 Hints for Stable Image Recording ...25 s Recording with LCD Screen...25 s Recording with Viewfinder...25 Adjusting the LCD...26 Adjusting Focus of the VIEWFINDER ...27 Playing back a tape on the LCD ...28 s Adjusting the LCD...
User Manual (ENGLISH)
Page 10
... with as chemical waste. The batteries have to use the viewfinder instead of the LCD when recording for the camcorder lasts about 8~10 months under normal operation from time of installation. ✤ When the lithium battery becomes weak or dead, the date/time indicator flashes about 5 seconds when you are not operating it. ✤ When your camcorder is in CAMERA mode, if it is left in...
... with as chemical waste. The batteries have to use the viewfinder instead of the LCD when recording for the camcorder lasts about 8~10 months under normal operation from time of installation. ✤ When the lithium battery becomes weak or dead, the date/time indicator flashes about 5 seconds when you are not operating it. ✤ When your camcorder is in CAMERA mode, if it is left in...
User Manual (ENGLISH)
Page 13
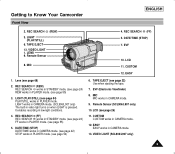
... Your Camcorder Front View ENGLISH 2. VIDEO LIGHT 1. DATE/TIME (STOP) DATE/TIME works in CAMERA mode. (see page 42) STOP works in PLAYER mode. (see page 54) PLAY/STILL works in PLAYER mode. (see page 22) Use when ejecting the tape. 7. EVF (Electronic Viewfinder) 8. MIC 1. LIGHT (PLAY/STILL) (see page 54) 4. It enables recording in CAMERA mode. 9. REC SEARCH (FF) 5. Remote Sensor (SCL906/L907 only) 10. Lens (see page 26) 11. MIC MIC works in low-light conditions. 4. EVF 10. LCD (see page 68) 2. DATE/TIME (STOP) 7. VIDEO LIGHT (SCL906/L907 only...
... Your Camcorder Front View ENGLISH 2. VIDEO LIGHT 1. DATE/TIME (STOP) DATE/TIME works in CAMERA mode. (see page 42) STOP works in PLAYER mode. (see page 54) PLAY/STILL works in PLAYER mode. (see page 22) Use when ejecting the tape. 7. EVF (Electronic Viewfinder) 8. MIC 1. LIGHT (PLAY/STILL) (see page 54) 4. It enables recording in CAMERA mode. 9. REC SEARCH (FF) 5. Remote Sensor (SCL906/L907 only) 10. Lens (see page 26) 11. MIC MIC works in low-light conditions. 4. EVF 10. LCD (see page 68) 2. DATE/TIME (STOP) 7. VIDEO LIGHT (SCL906/L907 only...
User Manual (ENGLISH)
Page 16
... battery. ( ) d. ENGLISH Getting to Know Your Camcorder OSD (On Screen Display) ✤ You can be operated even after the OSD is turned off by setting the Display menu on . Battery level (see page 42) Indicates the date of the recording. Manual Focus (see page 36) Indicates manual focus is on /off. ✤ The TITLE, DATE/TIME, EASY and CUSTOM functions can turn the OSD on/off . ✤ The OSD is displayed in PLAYER mode r q c Hi8 PLAY...
... battery. ( ) d. ENGLISH Getting to Know Your Camcorder OSD (On Screen Display) ✤ You can be operated even after the OSD is turned off by setting the Display menu on . Battery level (see page 42) Indicates the date of the recording. Manual Focus (see page 36) Indicates manual focus is on /off. ✤ The TITLE, DATE/TIME, EASY and CUSTOM functions can turn the OSD on/off . ✤ The OSD is displayed in PLAYER mode r q c Hi8 PLAY...
User Manual (ENGLISH)
Page 38
... function only operates in advance. s The word "CUSTOM" will be stored in the camera (providing a good lithium battery has been installed). MENU LCD ADJUST DIS OFF D.ZOOM OFF WHITE BAL ..........AUTO DISPLAY ON LANGUAGE..........ENGLISH WL REMOCON ....ON NEXT: MENU MENU CUSTOM SET CLOCK SET TITLE SET TITLE OFF D/TITLE COLOR..WHITE C.RESET 0:00:00 DEMO OFF Example: When the CUSTOM SET is highlighted. 4. To switch Custom off, press the CUSTOM button once. Note: s The CUSTOM settings...
... function only operates in advance. s The word "CUSTOM" will be stored in the camera (providing a good lithium battery has been installed). MENU LCD ADJUST DIS OFF D.ZOOM OFF WHITE BAL ..........AUTO DISPLAY ON LANGUAGE..........ENGLISH WL REMOCON ....ON NEXT: MENU MENU CUSTOM SET CLOCK SET TITLE SET TITLE OFF D/TITLE COLOR..WHITE C.RESET 0:00:00 DEMO OFF Example: When the CUSTOM SET is highlighted. 4. To switch Custom off, press the CUSTOM button once. Note: s The CUSTOM settings...
User Manual (ENGLISH)
Page 47
... page 17) s You cannot conceal the recorded date or time during playback. You can set the desired month. 9. The selected date and time will then be reset will not operate in the camcorder, it to be displayed. s To record the date only, press the DATE/TIME button once. Press the START/STOP button to CAMERA mode. (see page 18) s Open the LCD Screen and adjust it means the installed LITHIUM BATTERY is discharged. (see comfortably. 3. Advanced...
... page 17) s You cannot conceal the recorded date or time during playback. You can set the desired month. 9. The selected date and time will then be reset will not operate in the camcorder, it to be displayed. s To record the date only, press the DATE/TIME button once. Press the START/STOP button to CAMERA mode. (see page 18) s Open the LCD Screen and adjust it means the installed LITHIUM BATTERY is discharged. (see comfortably. 3. Advanced...
User Manual (ENGLISH)
Page 49
... START/STOP button to CAMERA mode. s The selected title will appear on the screen for 2 ~ 3 seconds and will not operate in the language you want to change recording time, select title recording time (OFF, AUTO-10S, CONTINUE) on the title. Press ENTER to the left side 10 seconds after you turn on MENU. s MENU ON/OFF function will disappear. MENU CUSTOM SET CLOCK SET TITLE SET TITLE CONTINUE D/TITLE COLOR ..WHITE C.RESET 0:00:00 DEMO...
... START/STOP button to CAMERA mode. s The selected title will appear on the screen for 2 ~ 3 seconds and will not operate in the language you want to change recording time, select title recording time (OFF, AUTO-10S, CONTINUE) on the title. Press ENTER to the left side 10 seconds after you turn on MENU. s MENU ON/OFF function will disappear. MENU CUSTOM SET CLOCK SET TITLE SET TITLE CONTINUE D/TITLE COLOR ..WHITE C.RESET 0:00:00 DEMO...
User Manual (ENGLISH)
Page 57
...; To play a tape back, the TV must feature a compatible color system. (see a tape; s The yellow plug: Video s The white plug: Audio(L)-Mono Note: To view the cassette on the television screen, select the channel reserved for your VCR on the VCR to LINE. s Set the input selector on the television. (Refer to your camcorder. s The yellow plug: Video s The white plug: Audio(L)-Mono ENGLISH Connecting to a TV which has an Audio and Video input jack ✤ Use the Audio/Video cable supplied...
...; To play a tape back, the TV must feature a compatible color system. (see a tape; s The yellow plug: Video s The white plug: Audio(L)-Mono Note: To view the cassette on the television screen, select the channel reserved for your VCR on the VCR to LINE. s Set the input selector on the television. (Refer to your camcorder. s The yellow plug: Video s The white plug: Audio(L)-Mono ENGLISH Connecting to a TV which has an Audio and Video input jack ✤ Use the Audio/Video cable supplied...
User Manual (ENGLISH)
Page 61
... set or displayed. 57 When an NTSC tape is being played back, the picture on the tape is a special output signal format with which has Vertical sync adjustment circuitry for 60Hz. - A PAL recorded tape can convert an NTSC tape recorded in bad condition, the PAL60 playback system may malfunction. 4. s Now you to view a tape recorded by pressing the PLAY button. 6. "PAL60" is in the SP mode to see the picture by an NTSC recorder. 1. This Camcorder...
... set or displayed. 57 When an NTSC tape is being played back, the picture on the tape is a special output signal format with which has Vertical sync adjustment circuitry for 60Hz. - A PAL recorded tape can convert an NTSC tape recorded in bad condition, the PAL60 playback system may malfunction. 4. s Now you to view a tape recorded by pressing the PLAY button. 6. "PAL60" is in the SP mode to see the picture by an NTSC recorder. 1. This Camcorder...
User Manual (ENGLISH)
Page 69
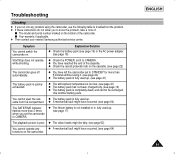
... operate any problem using it to solve the problem, take a note of: s The model and serial number marked on the bottom of the cassette. x The battery pack is poor. x A mechanical fault might have occurred. (see page 64) The DATE/TIME indicator flashes more than 2 times when you set the camcorder to CAMERA. Troubleshooting Checking ✤ If you run into any x A mechanical fault might have occurred. (see page 64) functions...
... operate any problem using it to solve the problem, take a note of: s The model and serial number marked on the bottom of the cassette. x The battery pack is poor. x A mechanical fault might have occurred. (see page 64) The DATE/TIME indicator flashes more than 2 times when you set the camcorder to CAMERA. Troubleshooting Checking ✤ If you run into any x A mechanical fault might have occurred. (see page 64) functions...
User Manual (ENGLISH)
Page 72
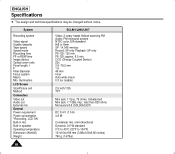
... Video signal Usable cassette Tape speed Speed mode Recording time FF or REW time Image device Optical zoom ratio Focal length: f F Filter diameter Focus system Macro Min. P6-120: approx. 6.5 min. CCD (Charge Coupled Device) 22x 3.6~79.2 mm 1.6 46 mm Inner Auto wide macro 0.3 lux (visible) 2.5 inch/112k TFT Mini jack, 1 Vp-p, 75 ohms, Unbalanced Mini jack, 7.7 dBs, imp.: less than 820 ohms Monaural ø3.5 (SCL906/L907) DC 8.4 V (1.5 A) 4.8 W Condenser mic, omni-directional...
... Video signal Usable cassette Tape speed Speed mode Recording time FF or REW time Image device Optical zoom ratio Focal length: f F Filter diameter Focus system Macro Min. P6-120: approx. 6.5 min. CCD (Charge Coupled Device) 22x 3.6~79.2 mm 1.6 46 mm Inner Auto wide macro 0.3 lux (visible) 2.5 inch/112k TFT Mini jack, 1 Vp-p, 75 ohms, Unbalanced Mini jack, 7.7 dBs, imp.: less than 820 ohms Monaural ø3.5 (SCL906/L907) DC 8.4 V (1.5 A) 4.8 W Condenser mic, omni-directional...


