
User Manual (user Manual) (ver.1.0) (English)
Page 9
... (grounding) pin. Do not defeat the safety purpose of power source indicated on the label. Never place your electrician to . 10. POWER SOURCES: The CAMCORDER should be operated only from overheating. POWER-CORD PROTECTION: Power-supply cords should not be routed so that they are unable to cords or plugs, convenient receptacles, and the point where they...
... (grounding) pin. Do not defeat the safety purpose of power source indicated on the label. Never place your electrician to . 10. POWER SOURCES: The CAMCORDER should be operated only from overheating. POWER-CORD PROTECTION: Power-supply cords should not be routed so that they are unable to cords or plugs, convenient receptacles, and the point where they...
User Manual (user Manual) (ver.1.0) (English)
Page 10
... where it can result in a fire or electric shock. Refer all servicing to rain or water. When the power-supply cord or plug is left unattended and unused for service. 20. If the CAMCORDER has been exposed to qualified service personnel. 19. e. SAFETY ...used replacement parts specified by a technician before use. 18. Opening or removing covers may expose you to this CAMCORDER yourself. Improper adjustment of overhead power lines or other hazards. 21. d. DAMAGE REQUIRING SERVICE: Unplug this indicates a need for long periods of this can fall into the CAMCORDER. If...
... where it can result in a fire or electric shock. Refer all servicing to rain or water. When the power-supply cord or plug is left unattended and unused for service. 20. If the CAMCORDER has been exposed to qualified service personnel. 19. e. SAFETY ...used replacement parts specified by a technician before use. 18. Opening or removing covers may expose you to this CAMCORDER yourself. Improper adjustment of overhead power lines or other hazards. 21. d. DAMAGE REQUIRING SERVICE: Unplug this indicates a need for long periods of this can fall into the CAMCORDER. If...

User Manual (user Manual) (ver.1.0) (English)
Page 18
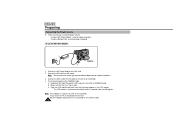
... Battery Pack. (see page 21) 9. Instruction Book Video Camcorder 8mm COLOR LCD AD39-40200A 7. USB Cable AD43-10130H 11. AC Power Adapter. (see page 57) 5. Audio/Video Cable. (see page 22) 2. S-VIDEO cable AD39-00074A AC39-42001Z 18 Remote Control....to Know Your Camcorder Accessories Supplied with Camcorder Make sure that the following basic accessories are supplied with your camcorder. 1. AC cord 3. Instruction Book. 7. AC Power Adapter 2. Battery Pack Basic Accessories 1. Software CD (SCL770 only) 10. USB Cable (SCL770 only) 11. Shoulder Strap ...
... Battery Pack. (see page 21) 9. Instruction Book Video Camcorder 8mm COLOR LCD AD39-40200A 7. USB Cable AD43-10130H 11. AC Power Adapter. (see page 57) 5. Audio/Video Cable. (see page 22) 2. S-VIDEO cable AD39-00074A AC39-42001Z 18 Remote Control....to Know Your Camcorder Accessories Supplied with Camcorder Make sure that the following basic accessories are supplied with your camcorder. 1. AC cord 3. Instruction Book. 7. AC Power Adapter 2. Battery Pack Basic Accessories 1. Software CD (SCL770 only) 10. USB Cable (SCL770 only) 11. Shoulder Strap ...
User Manual (user Manual) (ver.1.0) (English)
Page 22
.... - Hold down the tab of the DC cable to the AC cord. 2. ENGLISH Preparing Connecting the Power Source 1 There are two ways to CAMERA mode. To use the AC Power Adapter 1 2 CAMERA 3 1. Connect the AC cord to emit noise. Note: The plug and wall socket type may be different depending on automatically when it... Lens Cap is turned on regional conditions. 3. Make sure that the image appears in the LCD monitor. - The LCD monitor is open. a. Using the AC Power Adapter : used for indoor recording. -
.... - Hold down the tab of the DC cable to the AC cord. 2. ENGLISH Preparing Connecting the Power Source 1 There are two ways to CAMERA mode. To use the AC Power Adapter 1 2 CAMERA 3 1. Connect the AC cord to emit noise. Note: The plug and wall socket type may be different depending on automatically when it... Lens Cap is turned on regional conditions. 3. Make sure that the image appears in the LCD monitor. - The LCD monitor is open. a. Using the AC Power Adapter : used for indoor recording. -

User Manual (user Manual) (ver.1.0) (English)
Page 23
... : Indicates 50% ~ 75% has been recharged. - On for a second and off the camcorder power, and the recharging indicator will start blinking and begin recharging. 4 - s Even if the power is used in recording. Preparing To use the Battery Pack How long will the battery last for a ...: Indicates there is completed, separate the camcorder, AC power adapter, and battery pack. Reset the battery pack and DC cable. 5. Prepare as many battery packs as possible. Connect the AC Power Adapter to the AC cord 2 3 and connect the AC cord to a wall socket. 3. Blinking once a second...
... : Indicates 50% ~ 75% has been recharged. - On for a second and off the camcorder power, and the recharging indicator will start blinking and begin recharging. 4 - s Even if the power is used in recording. Preparing To use the Battery Pack How long will the battery last for a ...: Indicates there is completed, separate the camcorder, AC power adapter, and battery pack. Reset the battery pack and DC cable. 5. Prepare as many battery packs as possible. Connect the AC Power Adapter to the AC cord 2 3 and connect the AC cord to a wall socket. 3. Blinking once a second...


