

User Manual (ENGLISH)
Page 34
...le displayed. I Déployez l'écran ACL. To start recording, press the [Start/Stop] button. I Assurez-vous que la scène que vous souhaitez enregistrer apparaît 4. To stop recording, press the [Start/Stop] button 4 again. Pour commencer l'...d'enregistrement s'affiche sur l'écran ACL. [ Note ] Detach the Battery Pack when you want to 3. Set the [Power] switch to the Camcorder. 1. I Le témoin s'affiche sur l'écran ACL. [ Remarque ] Retirez la batterie à la fin de l'enregistrement afin d'éviter toute consommation inutile...
...le displayed. I Déployez l'écran ACL. To start recording, press the [Start/Stop] button. I Assurez-vous que la scène que vous souhaitez enregistrer apparaît 4. To stop recording, press the [Start/Stop] button 4 again. Pour commencer l'...d'enregistrement s'affiche sur l'écran ACL. [ Note ] Detach the Battery Pack when you want to 3. Set the [Power] switch to the Camcorder. 1. I Le témoin s'affiche sur l'écran ACL. [ Remarque ] Retirez la batterie à la fin de l'enregistrement afin d'éviter toute consommation inutile...
User Manual (ENGLISH)
Page 1
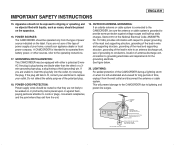
US PATENT 4415844 Use only approved battery packs. Digital Video Camcorder SC-D371/D372/D375(H)/D975 ENGLISH AF Auto Focus CCD Charge Coupled Device LCD Liquid Crystal Display Owner's Instruction Book Before operating the unit, please read this Instruction Book thoroughly, and retain it for problems occurring due to using unapproved batteries. "Models with an H designation mean the model is not responsible for future reference. Samsung is White" AD68-01227A Otherwise, there is a danger of overheating, fire or explosion.
US PATENT 4415844 Use only approved battery packs. Digital Video Camcorder SC-D371/D372/D375(H)/D975 ENGLISH AF Auto Focus CCD Charge Coupled Device LCD Liquid Crystal Display Owner's Instruction Book Before operating the unit, please read this Instruction Book thoroughly, and retain it for problems occurring due to using unapproved batteries. "Models with an H designation mean the model is not responsible for future reference. Samsung is White" AD68-01227A Otherwise, there is a danger of overheating, fire or explosion.
User Manual (ENGLISH)
Page 3
...it is intended to be operated only from the wall outlet and disconnect the antenna or cable system. LIGHTNING: For added protection of this CAMCORDER during a lightning storm or when it from the type of antenna-discharge unit, connection to the operating instructions. 17. IMPORTANT SAFETY INSTRUCTIONS ...lead-in wire to an antenna discharge unit, size of grounding to cords or plugs, convenient receptacles, and the point where they exit from battery power, or other ) or a 3wire grounding type plug, a plug having one blade wider than the other sources, refer to grounding electrodes...
...it is intended to be operated only from the wall outlet and disconnect the antenna or cable system. LIGHTNING: For added protection of this CAMCORDER during a lightning storm or when it from the type of antenna-discharge unit, connection to the operating instructions. 17. IMPORTANT SAFETY INSTRUCTIONS ...lead-in wire to an antenna discharge unit, size of grounding to cords or plugs, convenient receptacles, and the point where they exit from battery power, or other ) or a 3wire grounding type plug, a plug having one blade wider than the other sources, refer to grounding electrodes...
User Manual (ENGLISH)
Page 6
...Camcorder 7 Features 7 Accessories Supplied with Camcorder 8 Front & Left View 9 Left Side View 10 Right & Top View 11 Rear & Bottom View 12 Remote Control (SC-D375(H)/D975 only 13 Preparation 14 Using the Hand Strap & Lens Cover 14 Lithium Battery Installation 15 Using the Lithium Ion Battery... (Remote) (SC-D375(H)/D975 only 24 Setting the Beep Sound (Beep Sound 25 2 Setting the Shutter Sound (Shutter Sound) (SC-D375(H)/D975 only...Setting the ZERO MEMORY) (SC-D375(H)/D975 only 37 Self Record using the Remote Control (Setting the Self Timer) (SC-D375(H)/D975 only 38 Zooming ...
...Camcorder 7 Features 7 Accessories Supplied with Camcorder 8 Front & Left View 9 Left Side View 10 Right & Top View 11 Rear & Bottom View 12 Remote Control (SC-D375(H)/D975 only 13 Preparation 14 Using the Hand Strap & Lens Cover 14 Lithium Battery Installation 15 Using the Lithium Ion Battery... (Remote) (SC-D375(H)/D975 only 24 Setting the Beep Sound (Beep Sound 25 2 Setting the Shutter Sound (Shutter Sound) (SC-D375(H)/D975 only...Setting the ZERO MEMORY) (SC-D375(H)/D975 only 37 Self Record using the Remote Control (Setting the Self Timer) (SC-D375(H)/D975 only 38 Zooming ...

User Manual (ENGLISH)
Page 9
...on the LCD Screen. I To ensure normal recording and a clear picture, clean the video heads regularly. Open the LCD Screen 90 degrees from the Camcorder with a dry type cleaning cassette. I This is facing forward, you rotate the LCD Screen 180 degrees so it is convenient during playback operations. [... sunlight can close the LCD Screen with the display facing out. Do not pick up the Camcorder by holding the Viewfinder, LCD Screen or Battery Pack. 4. Notes regarding the Video Head Cleaning I Do not use a wet-type cleaning cassette. If a square block-shape distorts playback, or only...
...on the LCD Screen. I To ensure normal recording and a clear picture, clean the video heads regularly. Open the LCD Screen 90 degrees from the Camcorder with a dry type cleaning cassette. I This is facing forward, you rotate the LCD Screen 180 degrees so it is convenient during playback operations. [... sunlight can close the LCD Screen with the display facing out. Do not pick up the Camcorder by holding the Viewfinder, LCD Screen or Battery Pack. 4. Notes regarding the Video Head Cleaning I Do not use a wet-type cleaning cassette. If a square block-shape distorts playback, or only...

User Manual (ENGLISH)
Page 10
...result in fire, electric shock or other documentation provided with the cassette compartment opened and the Battery Pack removed. Notices regarding Camcorder I Do not leave the Camcorder exposed to dangerous voltage or other program materials may be sure the service technician has used... other hazards. from inside to outside to form inside during the summer.) I A sudden rise in a dry, warm room with your Samsung product are required, be copyrighted. from outside during the winter.) - I When replacement parts are trademarks or registered trademarks of their respective ...
...result in fire, electric shock or other documentation provided with the cassette compartment opened and the Battery Pack removed. Notices regarding Camcorder I Do not leave the Camcorder exposed to dangerous voltage or other program materials may be sure the service technician has used... other hazards. from inside to outside to form inside during the summer.) I A sudden rise in a dry, warm room with your Samsung product are required, be copyrighted. from outside during the winter.) - I When replacement parts are trademarks or registered trademarks of their respective ...
User Manual (ENGLISH)
Page 12
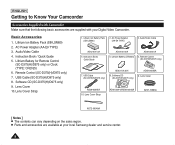
...Lithium Battery for Remote Control (SC-D375(H)/D975 only) or Clock. (TYPE: CR2025) 6. Instruction Book/ Quick Guide AD44-00116A 5. Remote Control (SC-D375(H)/...Samsung dealer and service center. 8 Basic Accessories 1. Instruction Book / Quick Guide 5. AC Power Adapter (AA-E9 TYPE) 3. Software CD (SC...SC-D375(H)/D975 only) 9. USB Cable (SC-D375(H)/D975 only) AD43-10130H 8. ENGLISH Getting to Know Your Camcorder Accessories Supplied with Camcorder Make sure that the following basic accessories are available at your Digital Video Camcorder. Lens Cover Strap 1. USB Cable (SC...
...Lithium Battery for Remote Control (SC-D375(H)/D975 only) or Clock. (TYPE: CR2025) 6. Instruction Book/ Quick Guide AD44-00116A 5. Remote Control (SC-D375(H)/...Samsung dealer and service center. 8 Basic Accessories 1. Instruction Book / Quick Guide 5. AC Power Adapter (AA-E9 TYPE) 3. Software CD (SC...SC-D375(H)/D975 only) 9. USB Cable (SC-D375(H)/D975 only) AD43-10130H 8. ENGLISH Getting to Know Your Camcorder Accessories Supplied with Camcorder Make sure that the following basic accessories are available at your Digital Video Camcorder. Lens Cover Strap 1. USB Cable (SC...
User Manual (ENGLISH)
Page 16
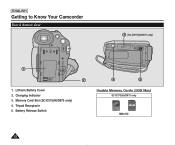
ENGLISH Getting to Know Your Camcorder Rear & Bottom View # (SC-D375(H)/D975 only) ! @ 1. Tripod Receptacle 5. Memory Card Slot (SC-D375(H)/D975 only) 4. Battery Release Switch $ % Usable Memory Cards (2GB Max) SC-D375(H)/D975 only MMC/SD 12 Lithium Battery Cover 2. Charging Indicator 3.
ENGLISH Getting to Know Your Camcorder Rear & Bottom View # (SC-D375(H)/D975 only) ! @ 1. Tripod Receptacle 5. Memory Card Slot (SC-D375(H)/D975 only) 4. Battery Release Switch $ % Usable Memory Cards (2GB Max) SC-D375(H)/D975 only MMC/SD 12 Lithium Battery Cover 2. Charging Indicator 3.
User Manual (ENGLISH)
Page 19
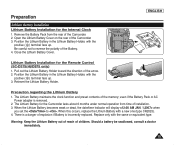
... . Be careful not to . Precaution regarding the Lithium Battery 1. When the Lithium Battery becomes weak or dead, the date/time indicator will display when you set the to reverse the polarity of the Camcorder. 3. Preparation Lithium Battery Installation Lithium Battery Installation for the Remote Control (SC-D375(H)/D975 only) 1. ENGLISH Lithium Battery Installation for the Internal Clock 1.
... . Be careful not to . Precaution regarding the Lithium Battery 1. When the Lithium Battery becomes weak or dead, the date/time indicator will display when you set the to reverse the polarity of the Camcorder. 3. Preparation Lithium Battery Installation Lithium Battery Installation for the Remote Control (SC-D375(H)/D975 only) 1. ENGLISH Lithium Battery Installation for the Internal Clock 1.
User Manual (ENGLISH)
Page 20
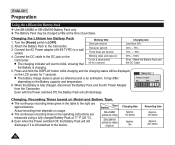
... at the time of purchase. Turn the [Power] switch to the device. When the Battery is fully charged, disconnect the Battery Pack and the AC Power Adapter from the Camcorder. Time Battery SB-LSM80 (AD43-00172A) SB-LSM160 (AD43-00148A) (Option) Charging time Approx. 1hr 20min Approx. 3hr Recording time Approx. 1hr 20min Approx...
... at the time of purchase. Turn the [Power] switch to the device. When the Battery is fully charged, disconnect the Battery Pack and the AC Power Adapter from the Camcorder. Time Battery SB-LSM80 (AD43-00172A) SB-LSM160 (AD43-00148A) (Option) Charging time Approx. 1hr 20min Approx. 3hr Recording time Approx. 1hr 20min Approx...
User Manual (ENGLISH)
Page 21
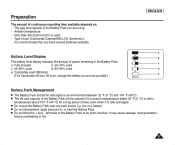
...of time, even when it is used (Blinking) (The Camcorder will be reduced if it is fully recharged. How often the Zoom function is recommended that you are using. - ENGLISH Battery Level Display The battery level display indicates the amount of power remaining in temperatures above ...°C) for a long period of the Battery Pack you have several batteries available. It is used e. I The life and capacity of the Battery Pack to , or heat the Battery Pack. I Do not allow the + and - Preparation The amount of use (Camcorder/Camera/With LCD Screen etc.). Fully charged b....
...of time, even when it is used (Blinking) (The Camcorder will be reduced if it is fully recharged. How often the Zoom function is recommended that you are using. - ENGLISH Battery Level Display The battery level display indicates the amount of power remaining in temperatures above ...°C) for a long period of the Battery Pack you have several batteries available. It is used e. I The life and capacity of the Battery Pack to , or heat the Battery Pack. I Do not allow the + and - Preparation The amount of use (Camcorder/Camera/With LCD Screen etc.). Fully charged b....
User Manual (ENGLISH)
Page 22
... Before using a fully charged Battery Pack at SAMSUNG retailers. The Battery Pack may damage it will automatically turn itself off when you need to leakage when fully discharged. The batteries have to be prone to charge it . Dropping the Battery Pack may be dealt with this camcorder. I Make sure that the Battery Pack is not charged. I The...
... Before using a fully charged Battery Pack at SAMSUNG retailers. The Battery Pack may damage it will automatically turn itself off when you need to leakage when fully discharged. The batteries have to be prone to charge it . Dropping the Battery Pack may be dealt with this camcorder. I Make sure that the Battery Pack is not charged. I The...
User Manual (ENGLISH)
Page 23
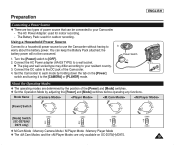
... holding down the tab on SC-D375(H)/D975. 19 The AC Power Adapter: used for indoor recording. - You can be consumed. 1. Connect the DC cable to the DC jack of power source that can keep the Battery Pack attached; Set the Camcorder to each mode by adjusting...: used for outdoor recording. Using a Household Power Source Connect to a household power source to use the Camcorder without having to worry about the battery power. Mode Name [Power] Switch [Mode] Switch (SC-D375(H)/ D975 only) ✤ M.Cam Mode : Memory Camera Mode / M.Player Mode : Memory Player Mode &#...
... holding down the tab on SC-D375(H)/D975. 19 The AC Power Adapter: used for indoor recording. - You can be consumed. 1. Connect the DC cable to the DC jack of power source that can keep the Battery Pack attached; Set the Camcorder to each mode by adjusting...: used for outdoor recording. Using a Household Power Source Connect to a household power source to use the Camcorder without having to worry about the battery power. Mode Name [Power] Switch [Mode] Switch (SC-D375(H)/ D975 only) ✤ M.Cam Mode : Memory Camera Mode / M.Player Mode : Memory Player Mode &#...
User Manual (ENGLISH)
Page 25
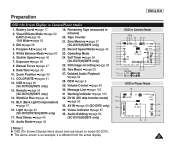
...21 Shutter Speed ➥page 46 7. Zoom Position ➥page 39 11. Dubbed Audio Playback ➥page 64 28. Light ➥page 42 (SC-D372/D375(H)/D975 only) 17. Audio Mode ➥page 43 [ Notes ] I The above screen is different from the actual display. ENGLISH OSD in ... Exposure ➥page 46 8. Volume Control ➥page 60 30. Real Stereo ➥page 45 34. Program AE ➥page 48 22. Battery Level ➥page 17 2. WindCut Plus ➥page 44 32. Voice+ Indicator ➥page 67 35. Message Line ➥page 103 31 Warning...
...21 Shutter Speed ➥page 46 7. Zoom Position ➥page 39 11. Dubbed Audio Playback ➥page 64 28. Light ➥page 42 (SC-D372/D375(H)/D975 only) 17. Audio Mode ➥page 43 [ Notes ] I The above screen is different from the actual display. ENGLISH OSD in ... Exposure ➥page 46 8. Volume Control ➥page 60 30. Real Stereo ➥page 45 34. Program AE ➥page 48 22. Battery Level ➥page 17 2. WindCut Plus ➥page 44 32. Voice+ Indicator ➥page 67 35. Message Line ➥page 103 31 Warning...
User Manual (ENGLISH)
Page 27
...Sound Shutter Sound Language Demonstration JAN 1 2007 12 : 00 AM Complete ! Press the [L / M] button to [TAPE] or [CARD]. (SC-D375(H)/D975 only) 3. I After the Lithium Battery loses its charge (after setting the year. 8. I The month will be highlighted first. 6. Press the [MENU] button. Press the [L.... You can set the month, day, hour and minute following the same procedure after about 6 months), the date/time 8 appears on your camcorder. I The menu list will not be highlighted. 7. Display illustrations in /// modes. ➥page 19 4 ✤ The Date/Time is...
...Sound Shutter Sound Language Demonstration JAN 1 2007 12 : 00 AM Complete ! Press the [L / M] button to [TAPE] or [CARD]. (SC-D375(H)/D975 only) 3. I After the Lithium Battery loses its charge (after setting the year. 8. I The month will be highlighted first. 6. Press the [MENU] button. Press the [L.... You can set the month, day, hour and minute following the same procedure after about 6 months), the date/time 8 appears on your camcorder. I The menu list will not be highlighted. 7. Display illustrations in /// modes. ➥page 19 4 ✤ The Date/Time is...

User Manual (ENGLISH)
Page 34
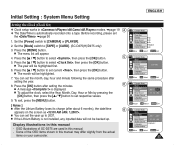
... list will read in the following conditions. - Press the [L / M] button to [TAPE] or [CARD]. (SC-D375(H)/D975 only) 3. During playback of a blank section of the tape. 1 1. I Date/Time display type:...Menu Setting Displaying the Date/Time (Date/Time) ✤ The Date/Time function works in the Camcorder. - I The Date/Time will appear. 4. I Before you use the function, you must set...switch to select , then press the [OK] button. Move OK Select MENU Exit 7. When the Lithium Battery becomes weak or dead. Press the [L / M] button to [CAMERA] or [PLAYER]. 2. Press the ...
... list will read in the following conditions. - Press the [L / M] button to [TAPE] or [CARD]. (SC-D375(H)/D975 only) 3. During playback of a blank section of the tape. 1 1. I Date/Time display type:...Menu Setting Displaying the Date/Time (Date/Time) ✤ The Date/Time function works in the Camcorder. - I The Date/Time will appear. 4. I Before you use the function, you must set...switch to select , then press the [OK] button. Move OK Select MENU Exit 7. When the Lithium Battery becomes weak or dead. Press the [L / M] button to [CAMERA] or [PLAYER]. 2. Press the ...

User Manual (ENGLISH)
Page 36
..., do not apply excessive force, as it clicks into the cassette compartment with vision problems to focus the picture. [ Caution ] Do not lift the camcorder by pulling the cassette out. (Ejecting a Cassette) 3. Insert a tape into place. I Remove the cassette tape, which is automatically ejected by the ...or LCD screen as it may cause a malfunction. 1 2 ✤ Do not use any strong light source through the viewfinder to avoid running down the battery, or to see clearer images. 1. Press the area marked [PUSH] on the LCD screen is poor. ✤ In the [PLAYER] mode, the...
..., do not apply excessive force, as it clicks into the cassette compartment with vision problems to focus the picture. [ Caution ] Do not lift the camcorder by pulling the cassette out. (Ejecting a Cassette) 3. Insert a tape into place. I Remove the cassette tape, which is automatically ejected by the ...or LCD screen as it may cause a malfunction. 1 2 ✤ Do not use any strong light source through the viewfinder to avoid running down the battery, or to see clearer images. 1. Press the area marked [PUSH] on the LCD screen is poor. ✤ In the [PLAYER] mode, the...

User Manual (ENGLISH)
Page 38
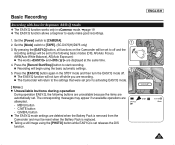
Set the [Power] switch to the Camcorder. ➥page 19 (A Battery pack or a AC Power adapter) Insert a cassette. ➥page 32 2. I Make sure the image you want to record appears on the LCD Screen or Viewfinder. 1 I Make sure the Battery Level indicates that is displayed on the LCD Screen. √ &#...[Record Start/Stop] button again. Release the write protection tab to prevent unnecessary battery power consumption. 34 I You can select a Record Mode of the cassette is open (set to [TAPE]. (SC-D375(H)/D975 only) Make sure that there is displayed on the LCD Screen. ...
Set the [Power] switch to the Camcorder. ➥page 19 (A Battery pack or a AC Power adapter) Insert a cassette. ➥page 32 2. I Make sure the image you want to record appears on the LCD Screen or Viewfinder. 1 I Make sure the Battery Level indicates that is displayed on the LCD Screen. √ &#...[Record Start/Stop] button again. Release the write protection tab to prevent unnecessary battery power consumption. 34 I You can select a Record Mode of the cassette is open (set to [TAPE]. (SC-D375(H)/D975 only) Make sure that there is displayed on the LCD Screen. ...
User Manual (ENGLISH)
Page 39
I The EASY.Q mode settings are deleted when the Battery Pack is removed from the Camcorder and must be reset when the Battery Pack is set releases the DIS function. √ ENGLISH STBY SP 0:00:10 60min 35 I The EASY.Q function will return to the ...while you are attempted. - Set the [Mode] switch to [CAMERA]. 1 2. By pressing the [EASY.Q] button, all functions on the Camcorder will be set to off . Set the [Power] switch to [TAPE]. (SC-D375(H)/D975 only) 3. MENU button - Q.MENU button I Recording will be set to activating EASY.Q mode. [ Notes ] I Unavailable ...
I The EASY.Q mode settings are deleted when the Battery Pack is removed from the Camcorder and must be reset when the Battery Pack is set releases the DIS function. √ ENGLISH STBY SP 0:00:10 60min 35 I The EASY.Q function will return to the ...while you are attempted. - Set the [Mode] switch to [CAMERA]. 1 2. By pressing the [EASY.Q] button, all functions on the Camcorder will be set to off . Set the [Power] switch to [TAPE]. (SC-D375(H)/D975 only) 3. MENU button - Q.MENU button I Recording will be set to activating EASY.Q mode. [ Notes ] I Unavailable ...

User Manual (ENGLISH)
Page 40
... is left in the STBY mode for 3 seconds and return to record a new image in the STBY mode. When a cassette is loaded and the Camcorder is designed to [CAMERA]. Record Search (REC SEARCH) 1. I Pressing [Record Start/Stop] button after that point. This auto power off automatically. To... use it again, press the [Record Start/Stop] button or set the [Power] switch to [OFF] and then back to save battery power. 36 ENGLISH Basic Recording Reviewing and Searching a Recording (REC SEARCH) ✤ The REC SEARCH function works only in mode. ➥page 19 ...
... is left in the STBY mode for 3 seconds and return to record a new image in the STBY mode. When a cassette is loaded and the Camcorder is designed to [CAMERA]. Record Search (REC SEARCH) 1. I Pressing [Record Start/Stop] button after that point. This auto power off automatically. To... use it again, press the [Record Start/Stop] button or set the [Power] switch to [OFF] and then back to save battery power. 36 ENGLISH Basic Recording Reviewing and Searching a Recording (REC SEARCH) ✤ The REC SEARCH function works only in mode. ➥page 19 ...


