
User Manual
Page 1
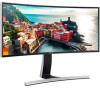
BN46-00442A-09 LCD Monitor User Manual S34E790C The color and the appearance may differ depending on the product, and the specifications are subject to change without prior notice to improve the performance.
BN46-00442A-09 LCD Monitor User Manual S34E790C The color and the appearance may differ depending on the product, and the specifications are subject to change without prior notice to improve the performance.

User Manual
Page 7
...the cable with a clean, soft and dry cloth. •• Do not apply a cleaning agent that contains alcohol, solvent, or surfactant to the monitor. ! •• Do not spray water or detergent directly on the product and computer. Otherwise, an electric shock may result. Electricity and Safety &#... use a damaged power cord or plug, or a loose power socket. •• An electric shock or fire may result. 3 Wipe the monitor with wet hands. Connect the power plug to clean the exterior of advanced LCDs are easily scratched. ――Take the following steps when cleaning...
...the cable with a clean, soft and dry cloth. •• Do not apply a cleaning agent that contains alcohol, solvent, or surfactant to the monitor. ! •• Do not spray water or detergent directly on the product and computer. Otherwise, an electric shock may result. Electricity and Safety &#... use a damaged power cord or plug, or a loose power socket. •• An electric shock or fire may result. 3 Wipe the monitor with wet hands. Connect the power plug to clean the exterior of advanced LCDs are easily scratched. ――Take the following steps when cleaning...

User Manual
Page 16
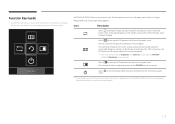
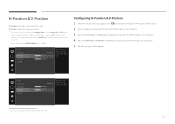
UP/DOWN: Adjust Brightness, Contrast, Sharpness. PRESS(ENTER): Display Function Key Guide. ――The function buttons page shows if Game Mode is turned on, the computer resolution changes, or the input source changes. LEFT/RIGHT: Adjust Volume. Direct Key guide Brightness Volume Features Game Mode Off ――The shortcut button screen (OSD menu) shown below is displayed only when the monitor screen is enabled. : Off : On 16
UP/DOWN: Adjust Brightness, Contrast, Sharpness. PRESS(ENTER): Display Function Key Guide. ――The function buttons page shows if Game Mode is turned on, the computer resolution changes, or the input source changes. LEFT/RIGHT: Adjust Volume. Direct Key guide Brightness Volume Features Game Mode Off ――The shortcut button screen (OSD menu) shown below is displayed only when the monitor screen is enabled. : Off : On 16
User Manual
Page 17
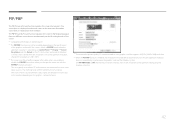
.... Information can be applied. Selects to display the Function Key Guide. Please run the corresponding function based on the top left corner of your Monitor's feature appears. Return UP/DOWN/LEFT/RIGHT: Move to settings. PIP/PBP is required. Function Key Guide ――To enter the main... menu or to use other items, press the JOG button to turn the Monitor off by moving the JOG button in the function key guide screen. ――Actual models because of functional variation, Function key guide ...
.... Information can be applied. Selects to display the Function Key Guide. Please run the corresponding function based on the top left corner of your Monitor's feature appears. Return UP/DOWN/LEFT/RIGHT: Move to settings. PIP/PBP is required. Function Key Guide ――To enter the main... menu or to use other items, press the JOG button to turn the Monitor off by moving the JOG button in the function key guide screen. ――Actual models because of functional variation, Function key guide ...

User Manual
Page 18
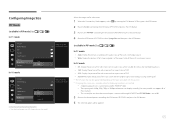
...) Move to next depth. Close Sublist without saving value. RIGHT Move to next depth. Save the value and close Sublist. 18 ――When the monitor displays nothing (i.e. Power saving mode or Non-signal mode), 2 direct keys for 2 seconds Power Off ――When the... monitor displays the Main menu the JOG Button could be used as below . JOG Button Power saving/Non-signal mode UP Source Change Down PRESS(ENTER) ...
...) Move to next depth. Close Sublist without saving value. RIGHT Move to next depth. Save the value and close Sublist. 18 ――When the monitor displays nothing (i.e. Power saving mode or Non-signal mode), 2 direct keys for 2 seconds Power Off ――When the... monitor displays the Main menu the JOG Button could be used as below . JOG Button Power saving/Non-signal mode UP Source Change Down PRESS(ENTER) ...

User Manual
Page 20
Installation Adjusting the Product Tilt and Height ――The color and shape of the stand. 20 Specifications are subject to change without notice to improve quality. 100 mm ± 2.0 mm -2˚(±2.0˚) ~ 20˚(±2.0˚) •• The monitor tilt and height can be adjusted. •• To avoid damage to the product when adjusting the tilt, push or pull the top area of the product at the center while holding the top of parts may differ from what is shown.
Installation Adjusting the Product Tilt and Height ――The color and shape of the stand. 20 Specifications are subject to change without notice to improve quality. 100 mm ± 2.0 mm -2˚(±2.0˚) ~ 20˚(±2.0˚) •• The monitor tilt and height can be adjusted. •• To avoid damage to the product when adjusting the tilt, push or pull the top area of the product at the center while holding the top of parts may differ from what is shown.
User Manual
Page 25
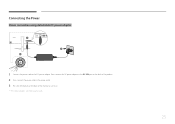
Then, connect the DC power adapter to the DC 22V port on the back of the product. 2 Next, connect the power cable to the power outlet. 3 Press the JOG button on the back of the monitor to the DC power adapter. Connecting the Power Power connection using detachable DC power adapter 1 2 3 1 Connect the power cable to turn it on. ――The input voltage is switched automatically. 25
Then, connect the DC power adapter to the DC 22V port on the back of the product. 2 Next, connect the power cable to the power outlet. 3 Press the JOG button on the back of the monitor to the DC power adapter. Connecting the Power Power connection using detachable DC power adapter 1 2 3 1 Connect the power cable to turn it on. ――The input voltage is switched automatically. 25
User Manual
Page 29
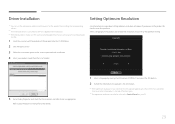
... Go to the optimum setting. Setting Optimum Resolution An information message about setting optimum resolution will appear up to three times for this monitor is as follows: ****x**** **Hz Follow the above settings to your PC. 29 Refer to set the optimum resolution and frequency for this...;―An installation driver is contained on the CD supplied with the product. ――If the file provided is faulty, visit the Samsung homepage (http://www.samsung.com/) and download the file. 1 Insert the user manual CD provided with the product into the CD-ROM drive. 2 Click "Windows...
... Go to the optimum setting. Setting Optimum Resolution An information message about setting optimum resolution will appear up to three times for this monitor is as follows: ****x**** **Hz Follow the above settings to your PC. 29 Refer to set the optimum resolution and frequency for this...;―An installation driver is contained on the CD supplied with the product. ――If the file provided is faulty, visit the Samsung homepage (http://www.samsung.com/) and download the file. 1 Insert the user manual CD provided with the product into the CD-ROM drive. 2 Click "Windows...

User Manual
Page 33
... to the desired option controlling the JOG button UP/DOWN and press the JOG button. 5 The selected option will be applied. ――When the monitor turns off, enters power-saving mode or changes input sources, Game Mode turns Off even if it is connected. Next, press the JOG button. 2 Move...
... to the desired option controlling the JOG button UP/DOWN and press the JOG button. 5 The selected option will be applied. ――When the monitor turns off, enters power-saving mode or changes input sources, Game Mode turns Off even if it is connected. Next, press the JOG button. 2 Move...

User Manual
Page 40
... satisfied. ――A digital output device is connected using the HDMI/DP cable. ――The input signal is 480p, 576p, 720p, or 1080p and monitor can display normally (Not every model can support all of these signals.). ――This can only be set when the external input is connected...
... satisfied. ――A digital output device is connected using the HDMI/DP cable. ――The input signal is 480p, 576p, 720p, or 1080p and monitor can display normally (Not every model can support all of these signals.). ――This can only be set when the external input is connected...
User Manual
Page 41
... or 1080P signal is set to Screen Fit in 0-6 levels. ――Not available when PIP/PBP Mode is input in AV mode and the monitor can display normally, select Screen Fit to the H-Position or V-Position controlling the JOG button UP/DOWN and press the JOG button. 4 Adjust the H-Position...
... or 1080P signal is set to Screen Fit in 0-6 levels. ――Not available when PIP/PBP Mode is input in AV mode and the monitor can display normally, select Screen Fit to the H-Position or V-Position controlling the JOG button UP/DOWN and press the JOG button. 4 Adjust the H-Position...
User Manual
Page 42
... graphics card and the Windows system. PIP/PBP The PIP (Picture in inset windows. If the screen is blank in transmission to the monitor depending on the graphics card performance. ――To maximize the picture quality, it is recommended to the optimum setting using the Windows ...of the screen. ――Compatible with the PIP/PBP function activated. It has nothing to two or more input sources. Alternatively, restart the monitor, then set to the optimum resolution, change the resolution to 1280 x 1024. ――The screen may flicker briefly or appear after a delay...
... graphics card and the Windows system. PIP/PBP The PIP (Picture in inset windows. If the screen is blank in transmission to the monitor depending on the graphics card performance. ――To maximize the picture quality, it is recommended to the optimum setting using the Windows ...of the screen. ――Compatible with the PIP/PBP function activated. It has nothing to two or more input sources. Alternatively, restart the monitor, then set to the optimum resolution, change the resolution to 1280 x 1024. ――The screen may flicker briefly or appear after a delay...
User Manual
Page 49
... sub-screen. 1 When the Function Key Guide appears, select by moving the JOG button UP. The input signal is 480p, 576p, 720p, or 1080p and monitor can display normally (Not every model can only be set when the external input is connected through HDMI/DP and PC/AV Mode is connected...
... sub-screen. 1 When the Function Key Guide appears, select by moving the JOG button UP. The input signal is 480p, 576p, 720p, or 1080p and monitor can display normally (Not every model can only be set when the external input is connected through HDMI/DP and PC/AV Mode is connected...
User Manual
Page 51
The input signal is connected using the HDMI/DP cable. -- A digital output device is 480p, 576p, 720p, or 1080p and monitor can display normally (Not every model can only be set to AV. 5 Move to the desired option controlling the JOG button and press the JOG ...
The input signal is connected using the HDMI/DP cable. -- A digital output device is 480p, 576p, 720p, or 1080p and monitor can display normally (Not every model can only be set to AV. 5 Move to the desired option controlling the JOG button and press the JOG ...
User Manual
Page 60
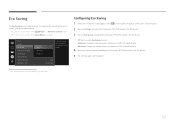
... image may differ depending on the model. 60 Auto Acceleration Configuring Eco Saving 1 When the Function Key Guide appears, select by the monitor panel. ――This option is not available when MSAAMSGUINCGBright is in Dynamic Contrast mode. ――This menu is not available when...button. •• Off: Deactivate the Eco Saving function. •• Minimum: Change the monitor power consumption to 50% of the default level. •• Maximum: Change the monitor power consumption to 75% of the product to the desired option controlling the JOG button UP/DOWN and...
... image may differ depending on the model. 60 Auto Acceleration Configuring Eco Saving 1 When the Function Key Guide appears, select by the monitor panel. ――This option is not available when MSAAMSGUINCGBright is in Dynamic Contrast mode. ――This menu is not available when...button. •• Off: Deactivate the Eco Saving function. •• Minimum: Change the monitor power consumption to 50% of the default level. •• Maximum: Change the monitor power consumption to 75% of the product to the desired option controlling the JOG button UP/DOWN and...
User Manual
Page 62
... the JOG button UP. The displayed image may differ depending on the widescreen models that include 16:9, 16:10 and 21:9. ――If the monitor is useful when you view a movie. The picture size will be enlarged. Off 1.2 Auto Acceleration PC/AV Mode DisplayPort PC HDMI 1 AV HDMI 2 Select the...
... the JOG button UP. The displayed image may differ depending on the widescreen models that include 16:9, 16:10 and 21:9. ――If the monitor is useful when you view a movie. The picture size will be enlarged. Off 1.2 Auto Acceleration PC/AV Mode DisplayPort PC HDMI 1 AV HDMI 2 Select the...
User Manual
Page 63
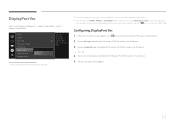
.... •• 1.1 / 1.2 4 Move to display the function-button screen and then select the icon. If this occurs, check the device specifications. ――If the monitor is in HDMI 1, HDMI 2 or DisplayPort mode and the screen says Check Signal Cable or power saving mode activates, press the JOG button to the...
.... •• 1.1 / 1.2 4 Move to display the function-button screen and then select the icon. If this occurs, check the device specifications. ――If the monitor is in HDMI 1, HDMI 2 or DisplayPort mode and the screen says Check Signal Cable or power saving mode activates, press the JOG button to the...
User Manual
Page 67
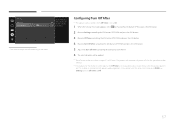
... off timer can be set to automatically activate 4 hours after the product powers on the model. Off Timer Off Timer Turn Off After Set the monitor to Off automatically turn off after the specified number of 1 to 23 hours. This is done in some regions, the Off Timer is set Off...
... off timer can be set to automatically activate 4 hours after the product powers on the model. Off Timer Off Timer Turn Off After Set the monitor to Off automatically turn off after the specified number of 1 to 23 hours. This is done in some regions, the Off Timer is set Off...
User Manual
Page 73
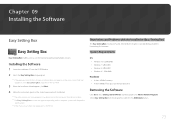
... Setting Box setup file on the CD-ROM. 3 When the Installation Wizard appears, click Next. 4 Follow the instructions given on the screen to use the monitor by the Graphics Card, Motherboard and the Networking Environment. Chapter 09 Installing the Software Easy Setting Box Easy Setting Box Easy Setting Box enables users...
... Setting Box setup file on the CD-ROM. 3 When the Installation Wizard appears, click Next. 4 Follow the instructions given on the screen to use the monitor by the Graphics Card, Motherboard and the Networking Environment. Chapter 09 Installing the Software Easy Setting Box Easy Setting Box Easy Setting Box enables users...
User Manual
Page 78
...Go to Control Panel Appearance and Themes Display Settings Advanced Monitor, and adjust Refresh rate under Monitor settings. •• Windows ME/2000: Go to Control Panel Display Settings Advanced Monitor, and adjust Refresh rate under Monitor settings. •• Windows Vista: Go to ...8226;• Windows 8(Windows 8.1): Go to Settings Control Panel Appearance and Personalization Display Screen Resolution Advanced settings Monitor, and adjust Refresh rate under Monitor settings. •• Windows XP: Go to Control Panel Appearance and Themes Display Settings, and adjust the...
...Go to Control Panel Appearance and Themes Display Settings Advanced Monitor, and adjust Refresh rate under Monitor settings. •• Windows ME/2000: Go to Control Panel Display Settings Advanced Monitor, and adjust Refresh rate under Monitor settings. •• Windows Vista: Go to ...8226;• Windows 8(Windows 8.1): Go to Settings Control Panel Appearance and Personalization Display Screen Resolution Advanced settings Monitor, and adjust Refresh rate under Monitor settings. •• Windows XP: Go to Control Panel Appearance and Themes Display Settings, and adjust the...


