User Manual
Page 2
... Lock 22 Connecting and Using a Source Device Before Connecting 23 Pre-connection Checkpoints 23 Connecting and Using a PC 23 Connection Using the HDMI Cable 23 Connection Using the DP Cable 24 Connecting to Headphones or Speakers 24 Connecting the Power 25 Tidying Up the Connected Cables 26 Connecting the Product to a PC as a USB HUB 27 Connecting a PC to the Product 27 Utilizing the Product as a USB HUB 28 Driver Installation 29 Setting Optimum Resolution 29 Screen Setup Brightness 30 Configuring Brightness 30 Contrast...
... Lock 22 Connecting and Using a Source Device Before Connecting 23 Pre-connection Checkpoints 23 Connecting and Using a PC 23 Connection Using the HDMI Cable 23 Connection Using the DP Cable 24 Connecting to Headphones or Speakers 24 Connecting the Power 25 Tidying Up the Connected Cables 26 Connecting the Product to a PC as a USB HUB 27 Connecting a PC to the Product 27 Utilizing the Product as a USB HUB 28 Driver Installation 29 Setting Optimum Resolution 29 Screen Setup Brightness 30 Configuring Brightness 30 Contrast...
User Manual
Page 3
... Power LED On 68 Configuring Power LED On 68 Reset All 69 Initializing Settings (Reset All) 69 Information Menu and Others Information 70 Displaying Information 70 Configuring Brightness, Contrast and Sharpness from the Initial Screen 71 Configuring Volume in the Initial Screen 72 Volume 72 Installing the Software Easy Setting Box 73 Installing the Software 73 Removing the Software 73 Troubleshooting Guide Requirements Before Contacting Samsung Customer Service Center 74 Testing the Product 74 Checking the Resolution and Frequency...
... Power LED On 68 Configuring Power LED On 68 Reset All 69 Initializing Settings (Reset All) 69 Information Menu and Others Information 70 Displaying Information 70 Configuring Brightness, Contrast and Sharpness from the Initial Screen 71 Configuring Volume in the Initial Screen 72 Volume 72 Installing the Software Easy Setting Box 73 Installing the Software 73 Removing the Software 73 Troubleshooting Guide Requirements Before Contacting Samsung Customer Service Center 74 Testing the Product 74 Checking the Resolution and Frequency...
User Manual
Page 6
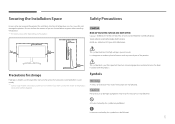
...models can develop white stains on the product. 10 cm (3.93 Inches) 10 cm (3.93 Inches) 10 cm (3.93 Inches) 10 cm (3.93 Inches) Safety Precautions Caution RISK OF ELECTRIC SHOCK DO NOT OPEN Caution : TO REDUCE THE RISK OF ELECTRIC SHOCK, DO NOT REMOVE COVER. (OR BACK) THERE ARE NO USER SERVICEABLE PARTS... (Service fee will be followed. 6 An internal temperature rise may result if instructions are not followed. Be sure to clean the inside . It is present inside of space as shown below or greater when installing the product. ――The exterior may result if instructions are...
...models can develop white stains on the product. 10 cm (3.93 Inches) 10 cm (3.93 Inches) 10 cm (3.93 Inches) 10 cm (3.93 Inches) Safety Precautions Caution RISK OF ELECTRIC SHOCK DO NOT OPEN Caution : TO REDUCE THE RISK OF ELECTRIC SHOCK, DO NOT REMOVE COVER. (OR BACK) THERE ARE NO USER SERVICEABLE PARTS... (Service fee will be followed. 6 An internal temperature rise may result if instructions are not followed. Be sure to clean the inside . It is present inside of space as shown below or greater when installing the product. ――The exterior may result if instructions are...
User Manual
Page 14
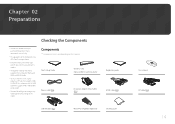
... on the model. Recommend to DP gender (Optional) Cleaning cloth User manual DP cable (P.24) 14 To ensure that the screen displays properly, a DP cable that supports 3440 x 1440 @ 50 Hz will also work. -- Quick Setup Guide Warranty card (Not available in some locations) Power cable (P.25) DC power adapter (Detachable) (P.25) Regulatory guide HDMI cable (P.23) USB 3.0 cable (P.27) Mini DP to use the HDMI cable and DP cable which is recommended. An HDMI cable that supports 3440 x 1440...
... on the model. Recommend to DP gender (Optional) Cleaning cloth User manual DP cable (P.24) 14 To ensure that the screen displays properly, a DP cable that supports 3440 x 1440 @ 50 Hz will also work. -- Quick Setup Guide Warranty card (Not available in some locations) Power cable (P.25) DC power adapter (Detachable) (P.25) Regulatory guide HDMI cable (P.23) USB 3.0 cable (P.27) Mini DP to use the HDMI cable and DP cable which is recommended. An HDMI cable that supports 3440 x 1440...
User Manual
Page 17
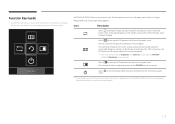
...: Move to settings. Enable/Disable: To lock/unlock the OSD control, press the LEFT button for 10 seconds when the main menu displayed. ――If the OSD control is locked, Brightness and Contrast can be different. Selects to turn the Monitor off by moving the JOG button in the function key guide screen. PRESS(ENTER): The selected item will be adjusted. A message will appear when the focus changes. Selects by...
...: Move to settings. Enable/Disable: To lock/unlock the OSD control, press the LEFT button for 10 seconds when the main menu displayed. ――If the OSD control is locked, Brightness and Contrast can be different. Selects to turn the Monitor off by moving the JOG button in the function key guide screen. PRESS(ENTER): The selected item will be adjusted. A message will appear when the focus changes. Selects by...
User Manual
Page 19
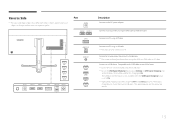
Port Description Connects to a USB device. Connects to a source device using a DP cable. Compatible with a USB cable version 3.0 or lower. ――Source devices can only connect to a PC. The speed depends on the connected devices. 19 Connects to a PC using an HDMI cable or HDMI-DVI cable. Connect to the DC power adapter. Specifications are subject to change without notice to improve quality. Connects to a PC using the and ports only. These ports charge devices faster than typical USB ports. Connect to...
Port Description Connects to a USB device. Connects to a source device using a DP cable. Compatible with a USB cable version 3.0 or lower. ――Source devices can only connect to a PC. The speed depends on the connected devices. 19 Connects to a PC using an HDMI cable or HDMI-DVI cable. Connect to the DC power adapter. Specifications are subject to change without notice to improve quality. Connects to a PC using the and ports only. These ports charge devices faster than typical USB ports. Connect to...
User Manual
Page 23
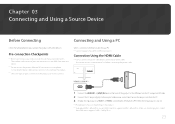
... PC. ――Connecting parts may damage the product. ――Check the types of ports at the back of the product to the HDMI port on the PC using an HDMI cable. 2 Connect the DC power adapter to connect. Next, turn on the power switch on the PC. 3 Change the input source to HDMI 1 or HDMI 2 controlling the JOG button UP/DOWN, when input source is not set. ――Provided ports may vary depending on...
... PC. ――Connecting parts may damage the product. ――Check the types of ports at the back of the product to the HDMI port on the PC using an HDMI cable. 2 Connect the DC power adapter to connect. Next, turn on the power switch on the PC. 3 Change the input source to HDMI 1 or HDMI 2 controlling the JOG button UP/DOWN, when input source is not set. ――Provided ports may vary depending on...
User Manual
Page 29
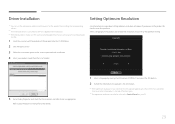
... CD-ROM drive. 2 Click "Windows Driver". 3 Follow the instructions given on the screen to proceed with installation. 4 Select your product model from the list of models. Setup Guide The optimal resolution for the first time after purchase. Refer to the optimum setting. Select a language on the product and change the resolution on your PC to your Windows OS manual for this monitor is turned off and on again. ―...
... CD-ROM drive. 2 Click "Windows Driver". 3 Follow the instructions given on the screen to proceed with installation. 4 Select your product model from the list of models. Setup Guide The optimal resolution for the first time after purchase. Refer to the optimum setting. Select a language on the product and change the resolution on your PC to your Windows OS manual for this monitor is turned off and on again. ―...
User Manual
Page 30
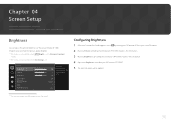
... press the JOG button. 4 Adjust the Brightness controlling the JOG button LEFT/RIGHT. 5 The selected option will make the picture appear brighter. ――This menu is not available when MSAAMSGUINCGBright is set . Low Configuring Brightness 1 When the Function Key Guide appears, select by moving the JOG button UP. The displayed image may differ depending on the model. 30 Picture Brightness Contrast Sharpness Game Mode SMAAMSGUINCG Bright Color HDMI Black Level 100 75...
... press the JOG button. 4 Adjust the Brightness controlling the JOG button LEFT/RIGHT. 5 The selected option will make the picture appear brighter. ――This menu is not available when MSAAMSGUINCGBright is set . Low Configuring Brightness 1 When the Function Key Guide appears, select by moving the JOG button UP. The displayed image may differ depending on the model. 30 Picture Brightness Contrast Sharpness Game Mode SMAAMSGUINCG Bright Color HDMI Black Level 100 75...
User Manual
Page 35
..., Standard, Movie or Custom. Picture Brightness Contrast Sharpness Game Mode SMAAMSGUINCG Bright Color HDMI Black Level Dynamic Standard Movie Custom Set to the desired option controlling the JOG button UP/DOWN and press the JOG button. 5 The selected option will save power and reduce eye fatigue. •• Custom: Select this mode when the surroundings are preset at the factory. The displayed image may differ depending on the model.
..., Standard, Movie or Custom. Picture Brightness Contrast Sharpness Game Mode SMAAMSGUINCG Bright Color HDMI Black Level Dynamic Standard Movie Custom Set to the desired option controlling the JOG button UP/DOWN and press the JOG button. 5 The selected option will save power and reduce eye fatigue. •• Custom: Select this mode when the surroundings are preset at the factory. The displayed image may differ depending on the model.
User Manual
Page 36
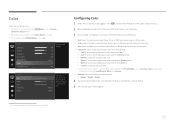
... button. •• Red: Adjust the red saturation level. Low Color Red Green Blue Color Tone Gamma 50 50 50 Normal Mode1 Adjust the red saturation level. Values closer to 100 mean greater intensity for the color. •• Green: Adjust the green saturation level. Cool 2: Set the color temperature to On. Custom: Customize the color tone. ――When the external input is connected through HDMI/DP and PC/AV Mode...
... button. •• Red: Adjust the red saturation level. Low Color Red Green Blue Color Tone Gamma 50 50 50 Normal Mode1 Adjust the red saturation level. Values closer to 100 mean greater intensity for the color. •• Green: Adjust the green saturation level. Cool 2: Set the color temperature to On. Custom: Customize the color tone. ――When the external input is connected through HDMI/DP and PC/AV Mode...
User Manual
Page 37
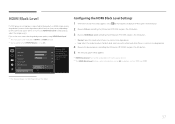
The displayed image may not be used to adjust the image quality. HDMI Black Level If a DVD player or set to On. In such case, HDMI Black Level can be compatible with some source devices. ――The HDMI Black Level feature is connected to the product via HDMI, image quality degradation (contrast/color degradation, black level, etc.) may occur, depending on the model. 37 Next, press the JOG button. 2 Move to Picture controlling the...
The displayed image may not be used to adjust the image quality. HDMI Black Level If a DVD player or set to On. In such case, HDMI Black Level can be compatible with some source devices. ――The HDMI Black Level feature is connected to the product via HDMI, image quality degradation (contrast/color degradation, black level, etc.) may occur, depending on the model. 37 Next, press the JOG button. 2 Move to Picture controlling the...
User Manual
Page 42
... graphics card used. It has nothing to the optimum setting using the Windows interface. 42 If the screen is blank in PIP/PBP mode when the optimum resolution is selected, go to two or more input sources. The issue is mainly caused when the video signals are connected to Control Panel Display Screen Resolution and click Detect on the PC. (Instructions are based on the specifications of a monitor. Alternatively, restart the monitor, then set...
... graphics card used. It has nothing to the optimum setting using the Windows interface. 42 If the screen is blank in PIP/PBP mode when the optimum resolution is selected, go to two or more input sources. The issue is mainly caused when the video signals are connected to Control Panel Display Screen Resolution and click Detect on the PC. (Instructions are based on the specifications of a monitor. Alternatively, restart the monitor, then set...
User Manual
Page 49
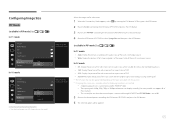
... screen input source. The input signal is 480p, 576p, 720p, or 1080p and monitor can display normally (Not every model can only be set when the external input is connected through HDMI/DP and PC/AV Mode is set to AV. 5 Move to the aspect ratio of the each screen input source. •• Wide: Display the picture in PIP mode(Size / / )) In PC mode PIP/PBP PIP/PBP Mode Size Position Sound Source Source Image Size Contrast Auto Wide Select the image On size for videos...
... screen input source. The input signal is 480p, 576p, 720p, or 1080p and monitor can display normally (Not every model can only be set when the external input is connected through HDMI/DP and PC/AV Mode is set to AV. 5 Move to the aspect ratio of the each screen input source. •• Wide: Display the picture in PIP mode(Size / / )) In PC mode PIP/PBP PIP/PBP Mode Size Position Sound Source Source Image Size Contrast Auto Wide Select the image On size for videos...
User Manual
Page 70
... Screen Options Settings Information Information Model: S34E790C DisplayPort ****x**** **kHz **Hz Picture Screen Options Settings Information Information Model: S34E790C HDMI 1 ****x**** **kHz **Hz Picture Screen Options Settings Information Information Model: S34E790C HDMI 1 ****x**** **kHz **Hz -- The displayed image may differ depending on the model. The current input source, frequency and resolution will appear. Refer to Information controlling the JOG button UP/DOWN and press the JOG button. by moving the JOG button UP. Displaying Information 1 When the Function Key Guide...
... Screen Options Settings Information Information Model: S34E790C DisplayPort ****x**** **kHz **Hz Picture Screen Options Settings Information Information Model: S34E790C HDMI 1 ****x**** **kHz **Hz Picture Screen Options Settings Information Information Model: S34E790C HDMI 1 ****x**** **kHz **Hz -- The displayed image may differ depending on the model. The current input source, frequency and resolution will appear. Refer to Information controlling the JOG button UP/DOWN and press the JOG button. by moving the JOG button UP. Displaying Information 1 When the Function Key Guide...
User Manual
Page 73
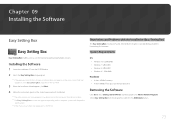
.... 2 Select the Easy Setting Box setup program. ――If the pop-up screen for the software installation does not appear on the main screen, find and double-click the Easy Setting Box setup file on the CD-ROM. 3 When the Installation Wizard appears, click Next. 4 Follow the instructions given on the screen to use the monitor by the Graphics Card, Motherboard and the...
.... 2 Select the Easy Setting Box setup program. ――If the pop-up screen for the software installation does not appear on the main screen, find and double-click the Easy Setting Box setup file on the CD-ROM. 3 When the Installation Wizard appears, click Next. 4 Follow the instructions given on the screen to use the monitor by the Graphics Card, Motherboard and the...

User Manual
Page 74
... properly connected to Standard Signal Mode Table), the message Not Optimum Mode will appear for a short time. ――The displayed resolution may vary depending on the product. 4 If the message Check Signal Cable appears, the product is operating normally by using the product test function. If the screen remains blank, check the PC system, video controller and cable. Chapter 10 Troubleshooting Guide Requirements Before Contacting Samsung Customer Service...
... properly connected to Standard Signal Mode Table), the message Not Optimum Mode will appear for a short time. ――The displayed resolution may vary depending on the product. 4 If the message Check Signal Cable appears, the product is operating normally by using the product test function. If the screen remains blank, check the PC system, video controller and cable. Chapter 10 Troubleshooting Guide Requirements Before Contacting Samsung Customer Service...

User Manual
Page 75
... . Installation issue (PC mode) Issues Solutions The screen keeps switching on and off . Not Optimum Mode is connected properly. Check that the device connected to the product. Check that the cable is properly connected to the product is powered on the screen are locked. Blank spaces on . Blank spaces are found on all four sides of the screen when an HDMI or HDMI-DVI cable is off . To resolve the problem, adjust...
... . Installation issue (PC mode) Issues Solutions The screen keeps switching on and off . Not Optimum Mode is connected properly. Check that the device connected to the product. Check that the cable is properly connected to the product is powered on the screen are locked. Blank spaces on . Blank spaces are found on all four sides of the screen when an HDMI or HDMI-DVI cable is off . To resolve the problem, adjust...
User Manual
Page 78
... the user manual for your PC or graphics card for further instructions on your graphics card. •• Windows XP: Go to Control Panel Appearance and Themes Display Settings Advanced Monitor, and adjust Refresh rate under Monitor settings. •• Windows ME/2000: Go to Control Panel Display Settings Advanced Monitor, and adjust Refresh rate under Monitor settings. •• Windows Vista: Go to Control Panel Appearance and Personalization Personalization Display Settings Advanced Settings Monitor, and adjust Refresh rate under Monitor settings. •• Windows 7: Go...
... the user manual for your PC or graphics card for further instructions on your graphics card. •• Windows XP: Go to Control Panel Appearance and Themes Display Settings Advanced Monitor, and adjust Refresh rate under Monitor settings. •• Windows ME/2000: Go to Control Panel Display Settings Advanced Monitor, and adjust Refresh rate under Monitor settings. •• Windows Vista: Go to Control Panel Appearance and Personalization Personalization Display Settings Advanced Settings Monitor, and adjust Refresh rate under Monitor settings. •• Windows 7: Go...

User Manual
Page 89
... the frequency of red, green and blue dots. Dot Pitch____ The product and screen consist of screen refreshes. Dot pitch is indicated in 85kHz. The horizontal frequency is measured in millimeters. The vertical frequency is a common connection point for performing multiple tasks at the same time. It represents the level of 1920 horizontal pixels (horizontal resolution) and 1080 vertical lines (vertical resolution). A resolution of 1920 x 1080 consists of display detail. The monitor uses VESA...
... the frequency of red, green and blue dots. Dot Pitch____ The product and screen consist of screen refreshes. Dot pitch is indicated in 85kHz. The horizontal frequency is measured in millimeters. The vertical frequency is a common connection point for performing multiple tasks at the same time. It represents the level of 1920 horizontal pixels (horizontal resolution) and 1080 vertical lines (vertical resolution). A resolution of 1920 x 1080 consists of display detail. The monitor uses VESA...


