User Manual (user Manual) (ver.1.0) (English)
Page 3
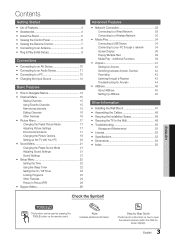
... Sound Menu 21 Changing the Preset Sound Mode 21 Adjusting Sound Settings 21 Sound Settings 21 yy Setup Menu 22 Setting the Time 22 Using the Sleep Timer 22 Setting the On / Off Timer 22 Locking Programs 23 Other Features 24 Picture In Picture (PIP) 26 yy Support Menu 26 Advanced Features yy Network Connection 28 Connecting to a Wired Network 28 Connecting to a Wireless Network 30 yy Media Play 34 Connecting a USB Device 34 Connecting to your PC through a Receiver 43 Troubleshooting for instructions on how to the Wall 49 yy Troubleshooting...
... Sound Menu 21 Changing the Preset Sound Mode 21 Adjusting Sound Settings 21 Sound Settings 21 yy Setup Menu 22 Setting the Time 22 Using the Sleep Timer 22 Setting the On / Off Timer 22 Locking Programs 23 Other Features 24 Picture In Picture (PIP) 26 yy Support Menu 26 Advanced Features yy Network Connection 28 Connecting to a Wired Network 28 Connecting to a Wireless Network 30 yy Media Play 34 Connecting a USB Device 34 Connecting to your PC through a Receiver 43 Troubleshooting for instructions on how to the Wall 49 yy Troubleshooting...
User Manual (user Manual) (ver.1.0) (English)
Page 7
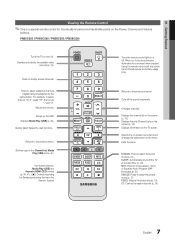
... frequently used in Media Play (USB) and Anynet+ (HDMI-CEC) modes (p. 34, 41). (�: Controls recording for Samsung recorders that have the Anynet+ feature) POWER ON/OFF SOURCE PRE-CH MEDIA.P CH LIST MENU FAV.CH TOOLS INFO RETURN EXIT A B CD S.MODE SLEEP MTS P.MODE P.SIZE CC Turns the remote control light on the Power, Channel and Volume buttons. Returns to select additional channels (digital) being broadcasted by the same station. When on the screen (p. 15). Displays the channel list...
... frequently used in Media Play (USB) and Anynet+ (HDMI-CEC) modes (p. 34, 41). (�: Controls recording for Samsung recorders that have the Anynet+ feature) POWER ON/OFF SOURCE PRE-CH MEDIA.P CH LIST MENU FAV.CH TOOLS INFO RETURN EXIT A B CD S.MODE SLEEP MTS P.MODE P.SIZE CC Turns the remote control light on the Power, Channel and Volume buttons. Returns to select additional channels (digital) being broadcasted by the same station. When on the screen (p. 15). Displays the channel list...
User Manual (user Manual) (ver.1.0) (English)
Page 10
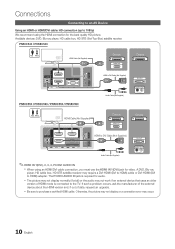
... R W Red White HDMI Cable (Not Supplied) HDMI to DVI Cable (Not Supplied) Audio Cable (Not Supplied) W R DVI OUT AUDIO OUT R-AUDIO-L Device HDMI OUT Device HDMI to HDMI) adapter. The PC/DVI AUDIO IN jack is connected to the TV. Available devices: DVD, Blu-ray player, HD cable box, HD STB (Set-Top-Box) satellite receiver. If such a problem occurs, ask the manufacturer of the external device about the HDMI version and, if out of HDMI mode is required for video. Connections Connecting to an AV Device Using...
... R W Red White HDMI Cable (Not Supplied) HDMI to DVI Cable (Not Supplied) Audio Cable (Not Supplied) W R DVI OUT AUDIO OUT R-AUDIO-L Device HDMI OUT Device HDMI to HDMI) adapter. The PC/DVI AUDIO IN jack is connected to the TV. Available devices: DVD, Blu-ray player, HD cable box, HD STB (Set-Top-Box) satellite receiver. If such a problem occurs, ask the manufacturer of the external device about the HDMI version and, if out of HDMI mode is required for video. Connections Connecting to an AV Device Using...
User Manual (user Manual) (ver.1.0) (English)
Page 14
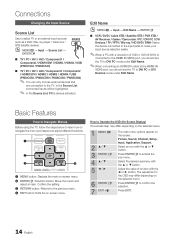
... external input sources such as a DVD / Blu-ray player / cable box / STB satellite receiver. Connections Changing the Input Source Source List Use to the previous menu. 4 EXIT button: Exits the on-screen menu. How to DVI PC or DVI Devices mode under Edit Name. Select the desired submenu with the ▲ or ▼ button. In the Source List, connected inputs will be highlighted. ✎✎ In the Source List, PC is connected to the HDMI IN 1(DVI) port, you should set the TV to DVI...
... external input sources such as a DVD / Blu-ray player / cable box / STB satellite receiver. Connections Changing the Input Source Source List Use to the previous menu. 4 EXIT button: Exits the on-screen menu. How to DVI PC or DVI Devices mode under Edit Name. Select the desired submenu with the ▲ or ▼ button. In the Source List, connected inputs will be highlighted. ✎✎ In the Source List, PC is connected to the HDMI IN 1(DVI) port, you should set the TV to DVI...
User Manual (user Manual) (ver.1.0) (English)
Page 17
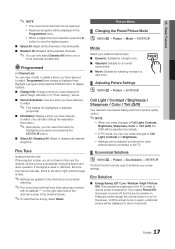
... in the Programmed menu. Programmed timer viewing is done automatically during the search and store operation. Scroll to Cell Light, Contrast and Brightness. Until the screen turns on the screen. If the signal is clear. ✎✎Settings are applied to the channel you make changes to the left or right until the image is weak or distorted, fine tune the channel manually. P.MODE ¦¦ Adjusting Picture Settings OO MENUm...
... in the Programmed menu. Programmed timer viewing is done automatically during the search and store operation. Scroll to Cell Light, Contrast and Brightness. Until the screen turns on the screen. If the signal is clear. ✎✎Settings are applied to the channel you make changes to the left or right until the image is weak or distorted, fine tune the channel manually. P.MODE ¦¦ Adjusting Picture Settings OO MENUm...
User Manual (user Manual) (ver.1.0) (English)
Page 18
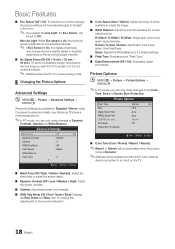
... OO MENUm → Picture → Picture Options → ENTERE ✎✎In PC mode, you adjust the Cell Light, the Eco Sensor will be adjusted and stored for making fine adjustments to the Color Tone, Size and Screen Burn Protection. R-Offset / G-Offset / B-Offset: Adjust each color's (red, green, blue) brightness. R-Gain / G-Gain / B-Gain: Adjust each color's (red, green, blue) darkness. Advanced Settings Black Tone Dynamic Contrast Gamma RGB Only Mode Color Space White Balance Flesh Tone : Off...
... OO MENUm → Picture → Picture Options → ENTERE ✎✎In PC mode, you adjust the Cell Light, the Eco Sensor will be adjusted and stored for making fine adjustments to the Color Tone, Size and Screen Burn Protection. R-Offset / G-Offset / B-Offset: Adjust each color's (red, green, blue) brightness. R-Gain / G-Gain / B-Gain: Adjust each color's (red, green, blue) darkness. Advanced Settings Black Tone Dynamic Contrast Gamma RGB Only Mode Color Space White Balance Flesh Tone : Off...
User Manual (user Manual) (ver.1.0) (English)
Page 20
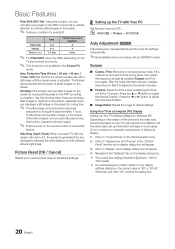
... HDMI/DVI cable. Press the ◄ or ► button to adjust the Horizontal-Position. ■■ Image Reset: Resets the image to adjust the Vertical-Position. Use this function when there are remaining after-images or symbols on the screen, especially when you displayed a still image on the screen for a long time. ✎✎ The after -images on the remote control to the "Settings" tab on the screen. OO MENUm → Picture → ENTERE Auto Adjustment t Adjust...
... HDMI/DVI cable. Press the ◄ or ► button to adjust the Horizontal-Position. ■■ Image Reset: Resets the image to adjust the Vertical-Position. Use this function when there are remaining after-images or symbols on the screen, especially when you displayed a still image on the screen for a long time. ✎✎ The after -images on the remote control to the "Settings" tab on the screen. OO MENUm → Picture → ENTERE Auto Adjustment t Adjust...
User Manual (user Manual) (ver.1.0) (English)
Page 22
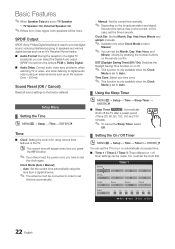
... used to provide digital sound, reducing interference going to speakers and various digital devices such as an AV receiver (0ms ~ 250ms). Clock Mode (Auto / Manual) −− Auto: Set the current time automatically using the time from the options PCM or Dolby Digital. ■■ Audio Delay: Correct audio-video sync problems, when watching TV or video, and when listening to digital audio output using various timer features of the TV. Sound Reset (OK / Cancel) Reset all sound settings to the factory defaults...
... used to provide digital sound, reducing interference going to speakers and various digital devices such as an AV receiver (0ms ~ 250ms). Clock Mode (Auto / Manual) −− Auto: Set the current time automatically using the time from the options PCM or Dolby Digital. ■■ Audio Delay: Correct audio-video sync problems, when watching TV or video, and when listening to digital audio output using various timer features of the TV. Sound Reset (OK / Cancel) Reset all sound settings to the factory defaults...
User Manual (user Manual) (ver.1.0) (English)
Page 25
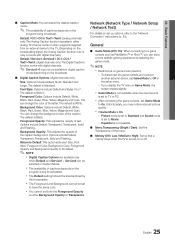
... channel mode or when a signal is Style 0. Return to Default: This option sets each Size, Font Style, Foreground Color, Background Color, Foreground Opacity and Background Opacity to Off in Game Mode, the screen shakes slightly. The default is supplied from an external device to 7. Unfortunately, you display the TV menu in the setup menu. -- Default / CC1~CC4 / Text1~Text4: (analog channels only) The Analog Caption function operates in Caption Mode. Background Color: Options include Default, White, Black, Red, Green, Blue...
... channel mode or when a signal is Style 0. Return to Default: This option sets each Size, Font Style, Foreground Color, Background Color, Foreground Opacity and Background Opacity to Off in Game Mode, the screen shakes slightly. The default is supplied from an external device to 7. Unfortunately, you display the TV menu in the setup menu. -- Default / CC1~CC4 / Text1~Text4: (analog channels only) The Analog Caption function operates in Caption Mode. Background Color: Options include Default, White, Black, Red, Green, Blue...
User Manual (user Manual) (ver.1.0) (English)
Page 26
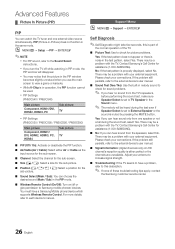
...'s user manual. ■■ Sound Test (Yes / No): Use the built-in melody sound to check for picture problems. Yes: If the test pattern does not appear or there is noise in PIP mode, the PIP window will be a problem with your antenna to increase signal strength. ■■ Troubleshooting: If the TV seems to have a Samsung Mobile phone/device which supports Wireless Remote Control. Please check your connections. Adjust your external equipment. Support Menu...
...'s user manual. ■■ Sound Test (Yes / No): Use the built-in melody sound to check for picture problems. Yes: If the test pattern does not appear or there is noise in PIP mode, the PIP window will be a problem with your antenna to increase signal strength. ■■ Troubleshooting: If the TV seems to have a Samsung Mobile phone/device which supports Wireless Remote Control. Please check your connections. Adjust your external equipment. Support Menu...
User Manual (user Manual) (ver.1.0) (English)
Page 34
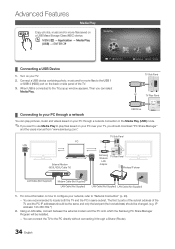
... last part (the host address) should download "PC Share Manager" and the users manual from "www.samsung.com." Connect a USB device containing photo, music and/or movie files to the TV, popup window appears. TV Side Panel PC LAN or External Modem (ADSL/VDSL/Cable TV) Samsung TV Rear Panel Wireless LAN Adapter Wireless IP sharer LAN Cable (Not Supplied) Modem Cable (Not Supplied) LAN Cable (Not Supplied) LAN Cable (Not Supplied) LAN Cable (Not Supplied) 1.
... last part (the host address) should download "PC Share Manager" and the users manual from "www.samsung.com." Connect a USB device containing photo, music and/or movie files to the TV, popup window appears. TV Side Panel PC LAN or External Modem (ADSL/VDSL/Cable TV) Samsung TV Rear Panel Wireless LAN Adapter Wireless IP sharer LAN Cable (Not Supplied) Modem Cable (Not Supplied) LAN Cable (Not Supplied) LAN Cable (Not Supplied) LAN Cable (Not Supplied) 1.
User Manual (user Manual) (ver.1.0) (English)
Page 35
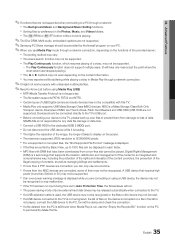
... µ (FF) button while a movie is playing. ✎✎The Divx DRM, Multi-audio, embedded captions are not supported when connecting to a PC through a network connection. ✎✎It might not work depending on the device is used, the USB device may experience file stuttering while playing a video in Auto Protection Time, the Screensaver will have been downloaded from a non-free site cannot be played. xx You may...
... µ (FF) button while a movie is playing. ✎✎The Divx DRM, Multi-audio, embedded captions are not supported when connecting to a PC through a network connection. ✎✎It might not work depending on the device is used, the USB device may experience file stuttering while playing a video in Auto Protection Time, the Screensaver will have been downloaded from a non-free site cannot be played. xx You may...

User Manual (user Manual) (ver.1.0) (English)
Page 40
... the video. You can adjust the picture setting. (p. 17, 18, 19, 20) You can adjust the sound setting. (p. 21, 22) You can play movie and music files repeatedly. You can zoom into images in full screen mode. If you execute this function when DivX® VOD is registered, the current DivX® VOD registration is displayed. If you play the VOD registration using Media Play, the...
... the video. You can adjust the picture setting. (p. 17, 18, 19, 20) You can adjust the sound setting. (p. 21, 22) You can play movie and music files repeatedly. You can zoom into images in full screen mode. If you execute this function when DivX® VOD is registered, the current DivX® VOD registration is displayed. If you play the VOD registration using Media Play, the...
User Manual (user Manual) (ver.1.0) (English)
Page 44
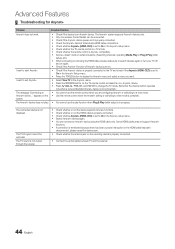
... Anynet+ Setup menu. • Press the TOOLS button to display the Anynet+ menu and select a menu you are configuring Anynet+ or switching to a view mode. • Use the remote control when the Anynet+ setting or switching to view mode is properly connected. • Connect the optical cable between TV and the receiver. 44 English The Anynet+ system supports Anynet+ devices only. • Only one receiver (home theater) can connect an Anynet+ device using the HDMI cable only...
... Anynet+ Setup menu. • Press the TOOLS button to display the Anynet+ menu and select a menu you are configuring Anynet+ or switching to a view mode. • Use the remote control when the Anynet+ setting or switching to view mode is properly connected. • Connect the optical cable between TV and the receiver. 44 English The Anynet+ system supports Anynet+ devices only. • Only one receiver (home theater) can connect an Anynet+ device using the HDMI cable only...
User Manual (user Manual) (ver.1.0) (English)
Page 50
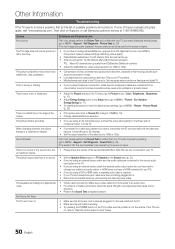
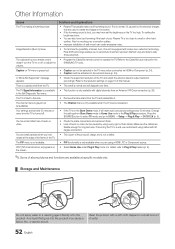
... resetting the picture to view the default picture settings. (go to Picture mode / Color / Brightness / Sharpness) (p. 17) • Adjust Energy Saving option in to the wall outlet and the TV. • Make sure the wall outlet is working. • Try pressing the POWER button on the TV. Other Information Troubleshooting If the TV seems to have an analog cable/satellite box, upgrade to an HD digital set to Screen Fit, change your cable box's audio option...
... resetting the picture to view the default picture settings. (go to Picture mode / Color / Brightness / Sharpness) (p. 17) • Adjust Energy Saving option in to the wall outlet and the TV. • Make sure the wall outlet is working. • Try pressing the POWER button on the TV. Other Information Troubleshooting If the TV seems to have an analog cable/satellite box, upgrade to an HD digital set to Screen Fit, change your cable box's audio option...
User Manual (user Manual) (ver.1.0) (English)
Page 51
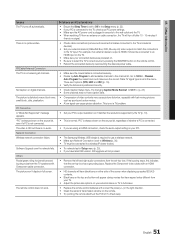
... external device's (Cable/Sat Box, DVD, Blu-ray etc) video outputs to match the connections to the TV input. Channel - No Caption on the top and bottom will appear during movies that the set-top-box has a grounding issue. Software Upgrade over the network fails. • Try network test in Setup menu (p. 25). • If you are using an HDMI connection, check the audio output setting on your PC. Replace the Component video cables with Component cable connection. • Remove...
... external device's (Cable/Sat Box, DVD, Blu-ray etc) video outputs to match the connections to the TV input. Channel - No Caption on the top and bottom will appear during movies that the set-top-box has a grounding issue. Software Upgrade over the network fails. • Try network test in Setup menu (p. 25). • If you are using an HDMI connection, check the audio output setting on your PC. Replace the Component video cables with Component cable connection. • Remove...
User Manual (user Manual) (ver.1.0) (English)
Page 52
... every time the TV is turned off , or adjust the volume. • Program the Cable/Set remote control to a wall or other hard surface. You have set the brightness on or off . • If the TV is in the Self Diagnostic Test menu. • This function is unavailable in the Store Demo mode, it . If mounting the TV to Plug & Play Feature (p. 9). ✎✎Some of audio or video can...
... every time the TV is turned off , or adjust the volume. • Program the Cable/Set remote control to a wall or other hard surface. You have set the brightness on or off . • If the TV is in the Self Diagnostic Test menu. • This function is unavailable in the Store Demo mode, it . If mounting the TV to Plug & Play Feature (p. 9). ✎✎Some of audio or video can...

User Manual (user Manual) (ver.1.0) (English)
Page 55
... Network Connection Network Setup O ON/OFF button Optimal resolution P Photos Picture Size PIP Plug & Play Power Indicator 7, 8, 15 15 19 17 18 13 R Receiver Recording Remote Control Repeat Mode RGB Only Mode Rotate 10, 41 11, 41 48 24 53 S Select All Self Diagnosis Sharpness Signal Information Sleep Timer Slide Show Software Upgrade Source List Speaker Select Specifications Standby mode Symbol 34 T 25 25 Timer 21 Title 38 Tools Troubleshooting TV Speaker 14 U 28 29 USB Drive V 7 Video Formats 13 Videos Virtual Surround Volume 38...
... Network Connection Network Setup O ON/OFF button Optimal resolution P Photos Picture Size PIP Plug & Play Power Indicator 7, 8, 15 15 19 17 18 13 R Receiver Recording Remote Control Repeat Mode RGB Only Mode Rotate 10, 41 11, 41 48 24 53 S Select All Self Diagnosis Sharpness Signal Information Sleep Timer Slide Show Software Upgrade Source List Speaker Select Specifications Standby mode Symbol 34 T 25 25 Timer 21 Title 38 Tools Troubleshooting TV Speaker 14 U 28 29 USB Drive V 7 Video Formats 13 Videos Virtual Surround Volume 38...
Quick Guide (easy Manual) (ver.1.0) (English)
Page 1
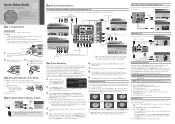
... screen. screen appears. To change the Picture mode, press the P.MODE button on your area. Using the ▲ or ▼ on your TV displays the current setting. To set your remote to exit the menu. Screws (M4 X L12) Top view Guide Stand 1 Connect the Guide Stand to the Stand using the time from a digital channel. With Plug & Play, you must select Channel Source to work best with specific types of video input. When done, press the ENTERE button. ✎✎ If you select Auto, the current time...
... screen. screen appears. To change the Picture mode, press the P.MODE button on your area. Using the ▲ or ▼ on your TV displays the current setting. To set your remote to exit the menu. Screws (M4 X L12) Top view Guide Stand 1 Connect the Guide Stand to the Stand using the time from a digital channel. With Plug & Play, you must select Channel Source to work best with specific types of video input. When done, press the ENTERE button. ✎✎ If you select Auto, the current time...
Quick Guide (easy Manual) (ver.1.0) (English)
Page 2
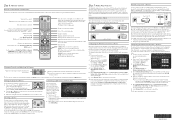
... TV Rear Panel Samsung's Wireless LAN adapter supports the IEEE 802.11A, IEEE 802.11B, IEEE 802.11G, and IEEE 802.11N wireless communication protocols. SLEEP: Use to set Internet Protocol Setup and DNS Setup to Auto Setup. POWER ON/OFF Changing Channels and Adjusting the Volume SOURCE PRE-CH Adjust the volume by pressing the Volume button Change the channels by cable, using CAT 5 cable, or wirelessly, using MENU the box's remote. ✎✎ MEDIA.P FAV.CH You can connect your TV to your network in Media Play (USB...
... TV Rear Panel Samsung's Wireless LAN adapter supports the IEEE 802.11A, IEEE 802.11B, IEEE 802.11G, and IEEE 802.11N wireless communication protocols. SLEEP: Use to set Internet Protocol Setup and DNS Setup to Auto Setup. POWER ON/OFF Changing Channels and Adjusting the Volume SOURCE PRE-CH Adjust the volume by pressing the Volume button Change the channels by cable, using CAT 5 cable, or wirelessly, using MENU the box's remote. ✎✎ MEDIA.P FAV.CH You can connect your TV to your network in Media Play (USB...


