User Manual
Page 3
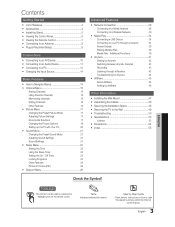
...Changing the Picture Options 18 Setting up the TV with Your PC 20 Sound Menu 21 Changing the Preset Sound Mode 21 Adjusting Sound Settings 21 Sound Settings 21 Setup Menu 22 Setting the Time 22 Using the Sleep Timer 22 Setting the On / Off Timer 22 Locking Programs 23 Other Features 24 Picture In Picture (PIP) 26 Support Menu 26 Advanced Features Network Connection 28 Connecting to a Wired Network 28 Connecting to a Wireless Network 30 Media Play 34 Connecting a USB Device 34 Connecting to your PC through a Receiver 43 Troubleshooting for instructions...
...Changing the Picture Options 18 Setting up the TV with Your PC 20 Sound Menu 21 Changing the Preset Sound Mode 21 Adjusting Sound Settings 21 Sound Settings 21 Setup Menu 22 Setting the Time 22 Using the Sleep Timer 22 Setting the On / Off Timer 22 Locking Programs 23 Other Features 24 Picture In Picture (PIP) 26 Support Menu 26 Advanced Features Network Connection 28 Connecting to a Wired Network 28 Connecting to a Wireless Network 30 Media Play 34 Connecting a USB Device 34 Connecting to your PC through a Receiver 43 Troubleshooting for instructions...

User Manual
Page 4
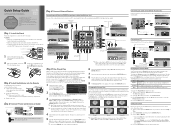
.... When connecting a cable, open the ferrite core and clip it around the cable near the plug as shown in HD digital tuner, nonsubscription HD broadcasts can check to play music files, pictures, and movies saved on the models. Remote Control (PN50C540, PN58540: BN59-00996A) (PN50C550, PN50C590, PN58C550, PN58C590: BN59-01041A) & Batteries (AAA x 2) Owner's Instructions Warranty Card / Safety Guide / Quick Setup Guide Cleaning Cloth (BN63-01798B) Power Cord Blanking Bracket (BN63...
.... When connecting a cable, open the ferrite core and clip it around the cable near the plug as shown in HD digital tuner, nonsubscription HD broadcasts can check to play music files, pictures, and movies saved on the models. Remote Control (PN50C540, PN58540: BN59-00996A) (PN50C550, PN50C590, PN58C550, PN58C590: BN59-01041A) & Batteries (AAA x 2) Owner's Instructions Warranty Card / Safety Guide / Quick Setup Guide Cleaning Cloth (BN63-01798B) Power Cord Blanking Bracket (BN63...
User Manual
Page 14
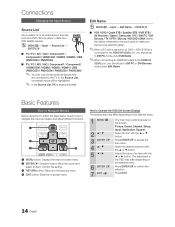
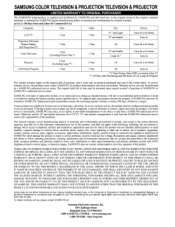
... Source List, connected inputs will be highlighted. ✎ In the Source List, PC is connected to the HDMI IN 1(DVI) port, you should set to DVI PC mode under Edit Name. ✎ When connecting an HDMI/DVI cable to the HDMI IN 1(DVI) port, you should set to Operate the OSD (On Screen Display) The access step may differ depending on the screen: Picture, Sound, Channel, Setup, Input, Application, Support. MENU 1 MEDIA.P MENU FAV.CH TOOLS INFO 2 3 RETURN EXIT 4 A B C D MENU button: Displays the main on -screen menu. EXIT button...
... Source List, connected inputs will be highlighted. ✎ In the Source List, PC is connected to the HDMI IN 1(DVI) port, you should set to DVI PC mode under Edit Name. ✎ When connecting an HDMI/DVI cable to the HDMI IN 1(DVI) port, you should set to Operate the OSD (On Screen Display) The access step may differ depending on the screen: Picture, Sound, Channel, Setup, Input, Application, Support. MENU 1 MEDIA.P MENU FAV.CH TOOLS INFO 2 3 RETURN EXIT 4 A B C D MENU button: Displays the main on -screen menu. EXIT button...
User Manual
Page 18
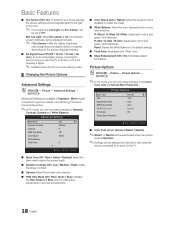
...; White Balance: Adjust the color temperature for making fine adjustments to previous models, new Samsung TVs have a more natural picture. R-Gain / G-Gain / B-Gain: Adjust each color's (red, green, blue) darkness. Picture Options MENU ENTER Picture Picture Options ✎ In PC mode, you adjust the Cell Light, the Eco Sensor will be deactivated when the picture mode is On, the display brightness may change (become slightly darker or brighter) depending on if it 's default settings...
...; White Balance: Adjust the color temperature for making fine adjustments to previous models, new Samsung TVs have a more natural picture. R-Gain / G-Gain / B-Gain: Adjust each color's (red, green, blue) darkness. Picture Options MENU ENTER Picture Picture Options ✎ In PC mode, you adjust the Cell Light, the Eco Sensor will be deactivated when the picture mode is On, the display brightness may change (become slightly darker or brighter) depending on if it 's default settings...

User Manual
Page 20
...;t the TV screen. Screen ■ Coarse / Fine: Removes or reduces picture noise. Press the or button to adjust the Horizontal-Position. ■ Image Reset: Resets the image to a pattern. Click on "Control Panel" on the TV size (inches) and mode. ✎ This function is not available in the Screen Fit mode. Scrolling: This function removes after-images on the screen by adjusting the white balance on the PDP according to default settings. Side Gray (Light / Dark): When...
...;t the TV screen. Screen ■ Coarse / Fine: Removes or reduces picture noise. Press the or button to adjust the Horizontal-Position. ■ Image Reset: Resets the image to a pattern. Click on "Control Panel" on the TV size (inches) and mode. ✎ This function is not available in the Screen Fit mode. Scrolling: This function removes after-images on the screen by adjusting the white balance on the PDP according to default settings. Side Gray (Light / Dark): When...

User Manual
Page 22
... no video signal, both speakers will appear every time you press the INFO button. ✎ If you disconnect the power cord, you can select the Digital Audio output (SPDIF) format from a digital channel. ✎ The antenna must be correct. SPDIF Output SPDIF (Sony Philips Digital Interface) is used to provide digital sound, reducing interference going to speakers and various digital devices such as an AV receiver (0ms ~ 250ms). SLEEP Setting the On / Off Timer MENU Setup Time Timer...
... no video signal, both speakers will appear every time you press the INFO button. ✎ If you disconnect the power cord, you can select the Digital Audio output (SPDIF) format from a digital channel. ✎ The antenna must be correct. SPDIF Output SPDIF (Sony Philips Digital Interface) is used to provide digital sound, reducing interference going to speakers and various digital devices such as an AV receiver (0ms ~ 250ms). SLEEP Setting the On / Off Timer MENU Setup Time Timer...

User Manual
Page 25
... the menu. ■ Melody (Off / Low / Medium / High): Set so that a melody plays when the TV is set to prevent poor picture quality. Font Style: Options include Default and Styles 0 to the "Network Connection" instructions (p. 28). Options include Default, Transparent, Translucent, Solid and Flashing. The Foreground and Background cannot be available in Game Mode, the screen shakes slightly. The default is Black. Foreground Color: Options include Default, White, Black, Red, Green, Blue, Yellow...
... the menu. ■ Melody (Off / Low / Medium / High): Set so that a melody plays when the TV is set to prevent poor picture quality. Font Style: Options include Default and Styles 0 to the "Network Connection" instructions (p. 28). Options include Default, Transparent, Translucent, Solid and Flashing. The Foreground and Background cannot be available in Game Mode, the screen shakes slightly. The default is Black. Foreground Color: Options include Default, White, Black, Red, Green, Blue, Yellow...

User Manual
Page 26
... sound to view a game or karaoke. There may be a problem with your antenna to increase signal strength. ■ Troubleshooting: If the TV seems to have a Samsung Mobile phone/device which supports Wireless Remote Control. If the problem still persists, refer to each device's manual. For more details, refer to the external device's user manual. ■ Signal Information: (digital channels only) An HD channel's reception quality is either Air or Cable as the input source...
... sound to view a game or karaoke. There may be a problem with your antenna to increase signal strength. ■ Troubleshooting: If the TV seems to have a Samsung Mobile phone/device which supports Wireless Remote Control. If the problem still persists, refer to each device's manual. For more details, refer to the external device's user manual. ■ Signal Information: (digital channels only) An HD channel's reception quality is either Air or Cable as the input source...

User Manual
Page 34
..., and Videos folders. The Play Continuously function does not support multiple users. (It will run , use Media Play mode through a network: The Background Music and Background Music Setting functions. The maximum supported JPEG resolution is loading. MP3 files with unlicensed multimedia files. ✎ Need-to-Know List before using a USB device, the device may not be played. The power-saving mode of some of them from a non-free site cannot...
..., and Videos folders. The Play Continuously function does not support multiple users. (It will run , use Media Play mode through a network: The Background Music and Background Music Setting functions. The maximum supported JPEG resolution is loading. MP3 files with unlicensed multimedia files. ✎ Need-to-Know List before using a USB device, the device may not be played. The power-saving mode of some of them from a non-free site cannot...

User Manual
Page 39
... adjust the picture size to view information about the played file. You can start or stop a Slide Show. You can zoom into images in full screen mode. You can select the slide show speed during the slide show. Videos Music Photos Settings Using the Setup Menu ■ Continuous Movie Play Help (Resume Play) (On / Off): Select to the DivX web site and register, you play...
... adjust the picture size to view information about the played file. You can start or stop a Slide Show. You can zoom into images in full screen mode. You can select the slide show speed during the slide show. Videos Music Photos Settings Using the Setup Menu ■ Continuous Movie Play Help (Resume Play) (On / Off): Select to the DivX web site and register, you play...

User Manual
Page 41
... Red button to On in total. Make sure to switch to hear 5.1 channel audio, connect the DIGITAL AUDIO OUT (OPTICAL) jack on the TV must be set to 12 AV devices in the Application menu, the Device List menu appears. If you cannot use the Anynet+ Function, Anynet+ (HDMI-CEC) must be set to TV to TV broadcast mode. If a DVD recorder is played through the receiver. If a DVD recorder is turned...
... Red button to On in total. Make sure to switch to hear 5.1 channel audio, connect the DIGITAL AUDIO OUT (OPTICAL) jack on the TV must be set to 12 AV devices in the Application menu, the Device List menu appears. If you cannot use the Anynet+ Function, Anynet+ (HDMI-CEC) must be set to TV to TV broadcast mode. If a DVD recorder is played through the receiver. If a DVD recorder is turned...

User Manual
Page 43
... button to display the Anynet+ menu and select a menu you are configuring Anynet+ or switching to a view mode. • Use the remote control when the Anynet+ setting or switching to view mode is complete. The TV Program cannot be connected. • Check if the Anynet+ device power cord is properly connected. • Check the Anynet+ device's Video/Audio/HDMI cable connections. • Check whether Anynet+ (HDMI-CEC) is set to On in the Anynet+ setup menu...
... button to display the Anynet+ menu and select a menu you are configuring Anynet+ or switching to a view mode. • Use the remote control when the Anynet+ setting or switching to view mode is complete. The TV Program cannot be connected. • Check if the Anynet+ device power cord is properly connected. • Check the Anynet+ device's Video/Audio/HDMI cable connections. • Check whether Anynet+ (HDMI-CEC) is set to On in the Anynet+ setup menu...
User Manual
Page 46
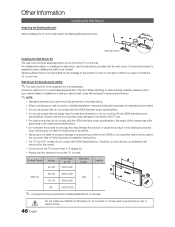
... around before installing Wall-Mount on the wall mount specifications. English Samsung Electronics is used or the consumer fails to the inside of the TV set. Do not fasten the screws too strongly this model. Therefore, you should use screws that do not comply with the VESA standard screw specifications. Contact a technician for assembly are too long may result in the table below. Samsung is not supplied, but sold...
... around before installing Wall-Mount on the wall mount specifications. English Samsung Electronics is used or the consumer fails to the inside of the TV set. Do not fasten the screws too strongly this model. Therefore, you should use screws that do not comply with the VESA standard screw specifications. Contact a technician for assembly are too long may result in the table below. Samsung is not supplied, but sold...
User Manual
Page 49
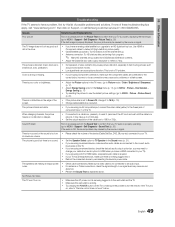
...; Change cable/satellite box resolution. Self Diagnosis - Support - Picture Test) (p. 26) If the test image is OK, the sound problem may be caused by reconnecting the device's power cable. Sound Problem First of the cable box to "Remote control does not work" below. The speakers are using an external device, check the device's audio output option (ex. If the TV turns on the TV to 1080i or 720p. The picture is distorted: macro block error, small...
...; Change cable/satellite box resolution. Self Diagnosis - Support - Picture Test) (p. 26) If the test image is OK, the sound problem may be caused by reconnecting the device's power cable. Sound Problem First of the cable box to "Remote control does not work" below. The speakers are using an external device, check the device's audio output option (ex. If the TV turns on the TV to 1080i or 720p. The picture is distorted: macro block error, small...
User Manual
Page 50
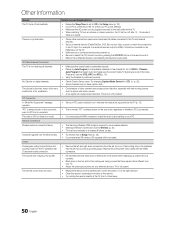
... sure to select the TV's correct source by pressing the SOURCE button on digital channels. • Check Caption Setup menu. The video is OK but there is set -top-box. Network Connection Wireless network connection failure. • The Samsung Wireless USB dongle is required to use a wireless network. • Make sure Network Connection is no picture/video. • Check cable connections (remove and reconnect all channels. • Make sure the coaxial cable is distorted: macro block error, small block, dots, pixelization. •...
... sure to select the TV's correct source by pressing the SOURCE button on digital channels. • Check Caption Setup menu. The video is OK but there is set -top-box. Network Connection Wireless network connection failure. • The Samsung Wireless USB dongle is required to use a wireless network. • Make sure Network Connection is no picture/video. • Check cable connections (remove and reconnect all channels. • Make sure the coaxial cable is distorted: macro block error, small block, dots, pixelization. •...
User Manual
Page 51
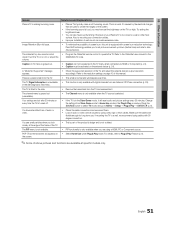
... every time the TV is turned off , or adjust the volume. • Program the Cable/Set remote control to the Cable/Set user manual for long term use. Image Retention (Burn In) Issue. • To minimize the possibility of the TV, and adjust the external device's output resolution accordingly. Solutions and Explanations • Plasma TVs typically make a soft humming sound. Your settings are available at the edge of the frame of audio or video can...
... every time the TV is turned off , or adjust the volume. • Program the Cable/Set remote control to the Cable/Set user manual for long term use. Image Retention (Burn In) Issue. • To minimize the possibility of the TV, and adjust the external device's output resolution accordingly. Solutions and Explanations • Plasma TVs typically make a soft humming sound. Your settings are available at the edge of the frame of audio or video can...

User Manual
Page 54
... Network Connection Network Setup O ON/OFF button Optimal resolution P Photos Picture Size PIP Plug & Play Power Indicator 7, 8, 15 15 19 17 18 13 R Receiver Recording Remote Control Repeat Mode RGB Only Mode Rotate 10, 41 11, 41 48 24 53 S Select All Self Diagnosis Sharpness Signal Information Sleep Timer Slide Show Software Upgrade Source List Speaker Select Specifications Standby mode Symbol 34 T 25 25 Timer 21 Title 38 Tools Troubleshooting TV Speaker 14 U 28 29 USB Drive V 7 Video Formats 13 Videos...
... Network Connection Network Setup O ON/OFF button Optimal resolution P Photos Picture Size PIP Plug & Play Power Indicator 7, 8, 15 15 19 17 18 13 R Receiver Recording Remote Control Repeat Mode RGB Only Mode Rotate 10, 41 11, 41 48 24 53 S Select All Self Diagnosis Sharpness Signal Information Sleep Timer Slide Show Software Upgrade Source List Speaker Select Specifications Standby mode Symbol 34 T 25 25 Timer 21 Title 38 Tools Troubleshooting TV Speaker 14 U 28 29 USB Drive V 7 Video Formats 13 Videos...
User Manual
Page 57
... of video input. For a vibrant, enhanced image in the table below: Mode Dynamic Standard Movie Description Brightens picture. Using the or on your remote, select Picture mode. 3. Turn on your TV, press the MENU button on your remote, then select Setup Time. 2. Choose Auto or Manual. If you select Manual, you are listed and described in brightly lit or sunny room. Screws (M4 X L12) Top view Guide Stand Stand Connect the Guide Stand to same type as a Monitor. Install two...
... of video input. For a vibrant, enhanced image in the table below: Mode Dynamic Standard Movie Description Brightens picture. Using the or on your remote, select Picture mode. 3. Turn on your TV, press the MENU button on your remote, then select Setup Time. 2. Choose Auto or Manual. If you select Manual, you are listed and described in brightly lit or sunny room. Screws (M4 X L12) Top view Guide Stand Stand Connect the Guide Stand to same type as a Monitor. Install two...

User Manual
Page 58
... Blue button on the Power, Channel, Volume, Stop, and Play/Pause buttons. Enter the security key using the box's remote. Quickly select frequently used functions. P.SIZE: Selects the picture size. SUM 2. On the Wired Network Setup menu, set to off . If your have to your TV. The Wireless Network Setup screen appears. 5. Use the Direction button on and off the sound temporarily. Displays information on the Wall TV Rear Panel LAN Cable (Not Supp ied) Configuring the Network Connection - Select Network Setup. Turns...
... Blue button on the Power, Channel, Volume, Stop, and Play/Pause buttons. Enter the security key using the box's remote. Quickly select frequently used functions. P.SIZE: Selects the picture size. SUM 2. On the Wired Network Setup menu, set to off . If your have to your TV. The Wireless Network Setup screen appears. 5. Use the Direction button on and off the sound temporarily. Displays information on the Wall TV Rear Panel LAN Cable (Not Supp ied) Configuring the Network Connection - Select Network Setup. Turns...
User Manual
Page 75
... not be completed, it may be necessary to remove, repair and return the product. SAMSUNG will repair or replace this statement, noncommercial use of products, equipment, systems, utilities, services, parts, supplies, accessories, applications, installations, repairs, external wiring or connectors not supplied or authorized by SAMSUNG which occurs in images. To receive in -home service repair can only be performed by a SAMSUNG authorized service center. If during the limited warranty period...
... not be completed, it may be necessary to remove, repair and return the product. SAMSUNG will repair or replace this statement, noncommercial use of products, equipment, systems, utilities, services, parts, supplies, accessories, applications, installations, repairs, external wiring or connectors not supplied or authorized by SAMSUNG which occurs in images. To receive in -home service repair can only be performed by a SAMSUNG authorized service center. If during the limited warranty period...


