
User Manual (user Manual) (ver.1.0) (English)
Page 2
...;F (5°C) • A still image displayed too long may be in the wide screen 16:9 ratio format, or expanded to fill the screen if your Samsung limited warranty. • SAMSUNG ELECTRONICS NORTH AMERICAN LIMITED WARRANTY STATEMENT Subject to the requirements, conditions, exclusions and limitations of... caused by the above described warranty repairs must be performed by a SAMSUNG Authorized Service Center. Displaying stationary graphics and images on screen, such as the dark side-bars on the screen. The above effect are constantly moving images, not stationary patterns or dark...
...;F (5°C) • A still image displayed too long may be in the wide screen 16:9 ratio format, or expanded to fill the screen if your Samsung limited warranty. • SAMSUNG ELECTRONICS NORTH AMERICAN LIMITED WARRANTY STATEMENT Subject to the requirements, conditions, exclusions and limitations of... caused by the above described warranty repairs must be performed by a SAMSUNG Authorized Service Center. Displaying stationary graphics and images on screen, such as the dark side-bars on the screen. The above effect are constantly moving images, not stationary patterns or dark...
User Manual (user Manual) (ver.1.0) (English)
Page 3
Note Indicates additional information. Step by pressing the TOOLS button on how to your PC through a network 34 Screen Display 36 Playing Multiple Files 39 Media Play - Contents Getting Started yy List of Features 4 yy Accessories 4 yy Install the Stand ... Connecting to a Wireless Network 30 yy Media Play 34 Connecting a USB Device 34 Connecting to open the relevant submenu within the OSD (on screen display). 3 English Additional Functions 39 yy Anynet 41 Setting Up Anynet+ 42 Switching between Anynet+ Devices 42 Recording 43 Listening through a Receiver...
Note Indicates additional information. Step by pressing the TOOLS button on how to your PC through a network 34 Screen Display 36 Playing Multiple Files 39 Media Play - Contents Getting Started yy List of Features 4 yy Accessories 4 yy Install the Stand ... Connecting to a Wireless Network 30 yy Media Play 34 Connecting a USB Device 34 Connecting to open the relevant submenu within the OSD (on screen display). 3 English Additional Functions 39 yy Anynet 41 Setting Up Anynet+ 42 Switching between Anynet+ Devices 42 Recording 43 Listening through a Receiver...
User Manual (user Manual) (ver.1.0) (English)
Page 6
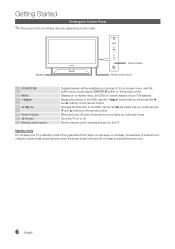
... is still consumed even when the power button is turned off when the power is best to unplug the power cord. 6 English In the on-screen menu, use this spot on or off. Turns the TV on the TV. In the OSD, use the z buttons as you would use the ▼...) of time (when you would use the ◄ and ► buttons on the remote control. Displays an on-screen menu, the OSD (on the remote control. Speakers Power Indicator Remote control sensor SOURCEE MENU y z Power Indicator P (Power) Remote control sensor Toggles between all the ...
... is still consumed even when the power button is turned off when the power is best to unplug the power cord. 6 English In the on-screen menu, use this spot on or off. Turns the TV on the TV. In the OSD, use the z buttons as you would use the ▼...) of time (when you would use the ◄ and ► buttons on the remote control. Displays an on-screen menu, the OSD (on the remote control. Speakers Power Indicator Remote control sensor SOURCEE MENU y z Power Indicator P (Power) Remote control sensor Toggles between all the ...
User Manual (user Manual) (ver.1.0) (English)
Page 7
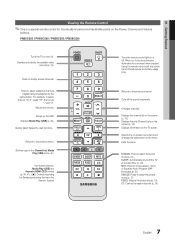
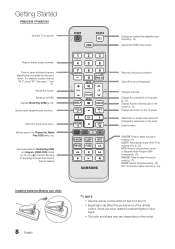
... button set to select channel "54-3", press "54", then press "-" and "3". Displays the channel list on and off . PN50C550 / PN50C590 / PN58C550 / PN58C590 Turns the TV on the screen (p. 15). Cuts off the TV at a preset time. (p. 22). Returns to select the sound mode (p. 21). Selects... the on-screen menu items and changes the values seen on , the buttons become illuminated for a moment when pressed. 01 Getting Started Viewing the Remote Control ✎✎This is a special remote control for Samsung recorders that have the Anynet+ feature)...
... button set to select channel "54-3", press "54", then press "-" and "3". Displays the channel list on and off . PN50C550 / PN50C590 / PN58C550 / PN58C590 Turns the TV on the screen (p. 15). Cuts off the TV at a preset time. (p. 22). Returns to select the sound mode (p. 21). Selects... the on-screen menu items and changes the values seen on , the buttons become illuminated for a moment when pressed. 01 Getting Started Viewing the Remote Control ✎✎This is a special remote control for Samsung recorders that have the Anynet+ feature)...
User Manual (user Manual) (ver.1.0) (English)
Page 8
...volume. Returns to directly access channels. Cuts off the TV at a preset time. (p. 22). Getting Started PN50C540 / PN58C540 Turns the TV on Samsung recorders that have the Anynet+ feature) POWER SOURCE HDMI MUTE PRE-CH MEDIA.P CH LIST MENU FAV.CH TOOLS INFO RETURN EXIT A B CD...the Channel list, Media Play (USB) menu, etc. Displays Favorite Channel Lists on the menu. Selects the on-screen menu items and changes the values seen on the screen (p. 15). SLEEP: Automatically shuts off the sound temporarily. MTS: Press to select additional channels (digital) being ...
...volume. Returns to directly access channels. Cuts off the TV at a preset time. (p. 22). Getting Started PN50C540 / PN58C540 Turns the TV on Samsung recorders that have the Anynet+ feature) POWER SOURCE HDMI MUTE PRE-CH MEDIA.P CH LIST MENU FAV.CH TOOLS INFO RETURN EXIT A B CD...the Channel list, Media Play (USB) menu, etc. Displays Favorite Channel Lists on the menu. Selects the on-screen menu items and changes the values seen on the screen (p. 15). SLEEP: Automatically shuts off the sound temporarily. MTS: Press to select additional channels (digital) being ...
User Manual (user Manual) (ver.1.0) (English)
Page 9
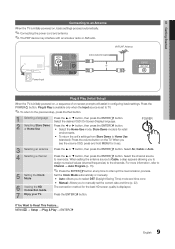
... powered on the TV. Plug & Play is available only when the Input source is displayed. Store Demo mode is for the best HD screen quality is set the current date and time (p. 22). Select the channel source to Reset This Feature... The connection method for retail POWER ...; or ▼ button, then press the ENTERE button. Set the Clock Mode automatically or manually. If You Want to memorize. Select the desired OSD (On Screen Display) language. 2 Selecting Store Demo Press the ◄ or ► button, then press the ENTERE button. MENUm → Setup → Plug & Play &#...
... powered on the TV. Plug & Play is available only when the Input source is displayed. Store Demo mode is for the best HD screen quality is set the current date and time (p. 22). Select the channel source to Reset This Feature... The connection method for retail POWER ...; or ▼ button, then press the ENTERE button. Set the Clock Mode automatically or manually. If You Want to memorize. Select the desired OSD (On Screen Display) language. 2 Selecting Store Demo Press the ◄ or ► button, then press the ENTERE button. MENUm → Setup → Plug & Play &#...
User Manual (user Manual) (ver.1.0) (English)
Page 14
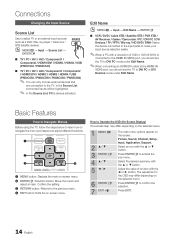
... 2 ▲/▼ 3 ENTER E 4 ▲/▼ 5 ◄/► 6 ENTER E 7 EXIT e The main menu options appear on the screen: Picture, Sound, Channel, Setup, Input, Application, Support. Press EXIT. 14 English Select the desired submenu with the ▲ or ▼ button. ...FComponent2 / HDMI1/DVI / HDMI2 / HDMI3 / HDMI4 / USB (PN50C550 / PN50C5S9O0UR/ CPEN58C550 / PN58C590) ✎✎ You can only choose external devices that are connected to Operate the OSD (On Screen Display) The access step may differ depending on -screen menu. MENU 1 MEDIA.P MENU FAV.CH TOOLS INFO 2 3...
... 2 ▲/▼ 3 ENTER E 4 ▲/▼ 5 ◄/► 6 ENTER E 7 EXIT e The main menu options appear on the screen: Picture, Sound, Channel, Setup, Input, Application, Support. Press EXIT. 14 English Select the desired submenu with the ▲ or ▼ button. ...FComponent2 / HDMI1/DVI / HDMI2 / HDMI3 / HDMI4 / USB (PN50C550 / PN50C5S9O0UR/ CPEN58C550 / PN58C590) ✎✎ You can only choose external devices that are connected to Operate the OSD (On Screen Display) The access step may differ depending on -screen menu. MENU 1 MEDIA.P MENU FAV.CH TOOLS INFO 2 3...
User Manual (user Manual) (ver.1.0) (English)
Page 15
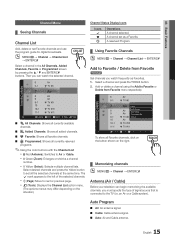
... Air or Cable. OO MENUm → Channel → Channel List → ENTERE CH LIST Select a channel in the All Channels, Added Channels, Favorite or Programmed screen by pressing the ▲ / ▼ and ENTERE buttons. xx Yellow (Select): Selects multiple channel lists. xx B Green (Zoom): Enlarges or shrinks a channel number. xx k (Page...
... Air or Cable. OO MENUm → Channel → Channel List → ENTERE CH LIST Select a channel in the All Channels, Added Channels, Favorite or Programmed screen by pressing the ▲ / ▼ and ENTERE buttons. xx Yellow (Select): Selects multiple channel lists. xx B Green (Zoom): Enlarges or shrinks a channel number. xx k (Page...
User Manual (user Manual) (ver.1.0) (English)
Page 17
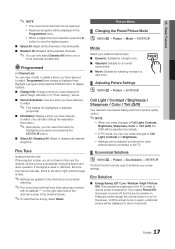
... to watch. Press any button except the volume button to fine tune the channel, as this is turned off, but the sound remains on the screen. P.MODE ¦¦ Adjusting Picture Settings OO MENUm → Picture → ENTERE Cell Light / Contrast / Brightness / Sharpness / Color /... Tint (G/R) Your television has several setting options for about 4 seconds. 17 English Until the screen turns on the right-hand side of the channel number in the channel list. ■■ Deselect All: Deselect all reserved programs. Fine Tune (...
... to watch. Press any button except the volume button to fine tune the channel, as this is turned off, but the sound remains on the screen. P.MODE ¦¦ Adjusting Picture Settings OO MENUm → Picture → ENTERE Cell Light / Contrast / Brightness / Sharpness / Color /... Tint (G/R) Your television has several setting options for about 4 seconds. 17 English Until the screen turns on the right-hand side of the channel number in the channel list. ■■ Deselect All: Deselect all reserved programs. Fine Tune (...
User Manual (user Manual) (ver.1.0) (English)
Page 18
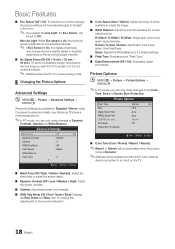
... automatically adapt to the light in Standard / Movie mode) Compared to previous models, new Samsung TVs have a more natural picture. Min Cell Light: When Eco sensor is On, the minimum screen brightness can be adjusted and stored for each external device connected to an input on the... → Picture → Picture Options → ENTERE ✎✎In PC mode, you can only make changes to the Color Tone, Size and Screen Burn Protection. R-Offset / G-Offset / B-Offset: Adjust each color's (red, green, blue) brightness. Advanced Settings Black Tone Dynamic Contrast Gamma RGB ...
... automatically adapt to the light in Standard / Movie mode) Compared to previous models, new Samsung TVs have a more natural picture. Min Cell Light: When Eco sensor is On, the minimum screen brightness can be adjusted and stored for each external device connected to an input on the... → Picture → Picture Options → ENTERE ✎✎In PC mode, you can only make changes to the Color Tone, Size and Screen Burn Protection. R-Offset / G-Offset / B-Offset: Adjust each color's (red, green, blue) brightness. Advanced Settings Black Tone Dynamic Contrast Gamma RGB ...
User Manual (user Manual) (ver.1.0) (English)
Page 19
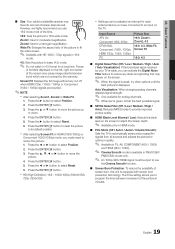
...(480i, 480p) DTV(1080i), Component (1080i, 1080p), HDMI (720p, 1080i, 1080p) PC Picture Size 16:9, Zoom1, Zoom2, 4:3 16:9, 4:3, Wide Fit, Screen Fit 16:9, 4:3 ■■ Digital Noise Filter (Off / Low / Medium / High / Auto / Auto Visualization): If the broadcast signal received by the ...warranty. Zoom2: Use for moderate magnification. Press the ENTERE button. 5. xx After selecting Screen Fit in minutes. 19 English However, we highly recommend you can be input to basic (4:3) mode. ✎✎ Do not watch in...
...(480i, 480p) DTV(1080i), Component (1080i, 1080p), HDMI (720p, 1080i, 1080p) PC Picture Size 16:9, Zoom1, Zoom2, 4:3 16:9, 4:3, Wide Fit, Screen Fit 16:9, 4:3 ■■ Digital Noise Filter (Off / Low / Medium / High / Auto / Auto Visualization): If the broadcast signal received by the ...warranty. Zoom2: Use for moderate magnification. Press the ENTERE button. 5. xx After selecting Screen Fit in minutes. 19 English However, we highly recommend you can be input to basic (4:3) mode. ✎✎ Do not watch in...
User Manual (user Manual) (ver.1.0) (English)
Page 20
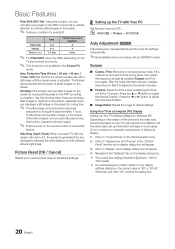
... your display settings dialog box, the correct value is aligned to the center of ghost images on the remote control to cancel this feature. Screen ■■ Coarse / Fine: Removes or reduces picture noise. Click on the display dialog-box. yy The correct size setting (resolution)... [Optimum: 1920 X 1080 pixels] yy If a vertical-frequency option exists on your computer manufacturer or Samsung Dealer.) 1. Basic Features Pixel Shift (Off / On): Using this function, you can minutely move pixels on the PDP in horizontal or vertical...
... your display settings dialog box, the correct value is aligned to the center of ghost images on the remote control to cancel this feature. Screen ■■ Coarse / Fine: Removes or reduces picture noise. Click on the display dialog-box. yy The correct size setting (resolution)... [Optimum: 1920 X 1080 pixels] yy If a vertical-frequency option exists on your computer manufacturer or Samsung Dealer.) 1. Basic Features Pixel Shift (Off / On): Using this function, you can minutely move pixels on the PDP in horizontal or vertical...
User Manual (user Manual) (ver.1.0) (English)
Page 24
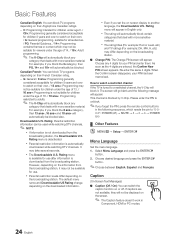
...broadcasting station, it . Canadian French: You can switch the CC caption function on the broadcasting station. ■■ Change PIN: The Change PIN screen will automatically be blocked also. Rating menu is available for use . However, depending on their French Canadian rating. −− G: General /... acceptable for your PIN has been memorized. xx The rating will appear in Component, HDMI or PC modes. 24 English Caption (On-Screen Text Messages) ■■ Caption (Off / On): You can block TV programs depending on the information from the broadcasting station. ...
...broadcasting station, it . Canadian French: You can switch the CC caption function on the broadcasting station. ■■ Change PIN: The Change PIN screen will automatically be blocked also. Rating menu is available for use . However, depending on their French Canadian rating. −− G: General /... acceptable for your PIN has been memorized. xx The rating will appear in Component, HDMI or PC modes. 24 English Caption (On-Screen Text Messages) ■■ Caption (Off / On): You can block TV programs depending on the information from the broadcasting station. ...
User Manual (user Manual) (ver.1.0) (English)
Page 25
...: You can change the color of the letter. Default / CC1~CC4 / Text1~Text4: (analog channels only) The Analog Caption function operates in Game Mode, the screen shakes slightly.
...: You can change the color of the letter. Default / CC1~CC4 / Text1~Text4: (analog channels only) The Analog Caption function operates in Game Mode, the screen shakes slightly.
User Manual (user Manual) (ver.1.0) (English)
Page 26
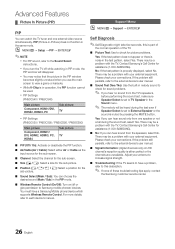
... PIP window becomes slightly unnatural when you hear no sound from the speakers, select No. Contact Samsung's Call Center for sound problems. ✎✎ If you use the main screen to view a game or karaoke. Adjust your antenna to increase signal strength. ■■ ... to each device's manual. xx PIP Settings (PN50C540 / PN58C540) Main picture Component, HDMI1/DVI, HDMI2, HDMI3, PC Sub picture TV xx PIP Settings (PN50C550 / PN50C590 / PN50C590 / PN58C590) Main picture Component, HDMI1/ DVI, HDMI2, HDMI3, PC, HDMI4 Sub picture TV ■■ PIP (Off / On...
... PIP window becomes slightly unnatural when you hear no sound from the speakers, select No. Contact Samsung's Call Center for sound problems. ✎✎ If you use the main screen to view a game or karaoke. Adjust your antenna to increase signal strength. ■■ ... to each device's manual. xx PIP Settings (PN50C540 / PN58C540) Main picture Component, HDMI1/DVI, HDMI2, HDMI3, PC Sub picture TV xx PIP Settings (PN50C550 / PN50C590 / PN50C590 / PN58C590) Main picture Component, HDMI1/ DVI, HDMI2, HDMI3, PC, HDMI4 Sub picture TV ■■ PIP (Off / On...

User Manual (user Manual) (ver.1.0) (English)
Page 28
.... If your network requires a Static IP address, you must enter the IP address, subnet mask, gateway, and DNS values manually on your TV's Network Setup Screen when you set up the network connection. See the diagram below. To get these values through your local area network (LAN) using a wired or wireless...
.... If your network requires a Static IP address, you must enter the IP address, subnet mask, gateway, and DNS values manually on your TV's Network Setup Screen when you set up the network connection. See the diagram below. To get these values through your local area network (LAN) using a wired or wireless...

User Manual (user Manual) (ver.1.0) (English)
Page 29
...supports DHCP. To set up your TV's wired LAN connection automatically, follow these steps: How to set up automatically" procedure. 2. The Network screen appears. Select Network Setup. Getting the Network Connection Values To get the Network connection values on your remote, use the ▲ or ▼... (Auto) Use the Automatic Network Setup when connecting your TV to select Setup, and then press the ENTERE button. 3. The Network Setup screen appears. When done, press the RETURN button on your remote. On the dialog that appears, click Status. 3. Press the ▼ button...
...supports DHCP. To set up your TV's wired LAN connection automatically, follow these steps: How to set up automatically" procedure. 2. The Network screen appears. Select Network Setup. Getting the Network Connection Values To get the Network connection values on your remote, use the ▲ or ▼... (Auto) Use the Automatic Network Setup when connecting your TV to select Setup, and then press the ENTERE button. 3. The Network Setup screen appears. When done, press the RETURN button on your remote. On the dialog that appears, click Status. 3. Press the ▼ button...
User Manual (user Manual) (ver.1.0) (English)
Page 31
... near the top, using the extension cable, follow these steps: ✎✎The Samsung Wireless LAN Adapter should be installed in an interference-free area in order to exit the Network Setup screen. Follow Steps 1 through 6 in the Setup menu, and then press the ENTERE button...MENU button on your remote, use this occurs, reconnect the Samsung Wireless LAN Adapter using PBC (WPS) If your wireless network. The Network Setup screen appears. or Method: Connect via an extension cable To reconnect the Samsung Wireless LAN Adapter using double-sided adhesive tape. Press the &#...
... near the top, using the extension cable, follow these steps: ✎✎The Samsung Wireless LAN Adapter should be installed in an interference-free area in order to exit the Network Setup screen. Follow Steps 1 through 6 in the Setup menu, and then press the ENTERE button...MENU button on your remote, use this occurs, reconnect the Samsung Wireless LAN Adapter using PBC (WPS) If your wireless network. The Network Setup screen appears. or Method: Connect via an extension cable To reconnect the Samsung Wireless LAN Adapter using double-sided adhesive tape. Press the &#...

User Manual (user Manual) (ver.1.0) (English)
Page 32
... Name (SSID) and Security Key into the device you want to Step 6. Follow Steps 1 through the "Samsung Wireless LAN Adapter" by using PBC (WPS)" (p. 31). 2. The Security Screen appears. Choose Select a Network. The existing network system may cause a malfunction. 32 English Choose Select a ...Network. Press the ▲ or ▼ button to new Ad-hoc device 1. If security key is displayed. 4. The Network Connecting screen appears. 10. To test the connection, press the RETURN button to connect an existing Ad-hoc device 1. is required, input the security key...
... Name (SSID) and Security Key into the device you want to Step 6. Follow Steps 1 through the "Samsung Wireless LAN Adapter" by using PBC (WPS)" (p. 31). 2. The Security Screen appears. Choose Select a Network. The existing network system may cause a malfunction. 32 English Choose Select a ...Network. Press the ▲ or ▼ button to new Ad-hoc device 1. If security key is displayed. 4. The Network Connecting screen appears. 10. To test the connection, press the RETURN button to connect an existing Ad-hoc device 1. is required, input the security key...

User Manual (user Manual) (ver.1.0) (English)
Page 33
..., you connect to the Internet as a way of your Internet service provider. If this is the case, contact your Internet service provider, please contact Samsung Electronics at 1-800-SAMSUNG. 33 English In the pop-up using PBC (WPS)" (p. 31). 2. On the dialog that point on the bottom right of a firewall problem. You...provider requires an ID or password to connect to connect devices other than a PC (such as above. 9. If your TV may fail because of the screen. 2. If you cannot connect to the Internet even after you must enter your network, and then press the ENTERE button. 10.
..., you connect to the Internet as a way of your Internet service provider. If this is the case, contact your Internet service provider, please contact Samsung Electronics at 1-800-SAMSUNG. 33 English In the pop-up using PBC (WPS)" (p. 31). 2. On the dialog that point on the bottom right of a firewall problem. You...provider requires an ID or password to connect to connect devices other than a PC (such as above. 9. If your TV may fail because of the screen. 2. If you cannot connect to the Internet even after you must enter your network, and then press the ENTERE button. 10.


