User Manual
Page 3
... button on screen display). 3 English Contents Getting Started yy List of Features 4 yy Accessories 4 yy Install the Stand 5 yy Viewing the Control Panel 6 yy Viewing the Remote Control 7 yy Connecting to an Antenna 8 yy Plug & Play (Initial Setup 8 Connections yy Connecting to an AV Device 9 yy Connecting to an Audio Device 10 yy Connecting to a PC 10 yy Changing the Input Source 11 Basic Features yy How to Navigate Menus 12 yy Channel Menu 12 Seeing Channels 12 Using...
... button on screen display). 3 English Contents Getting Started yy List of Features 4 yy Accessories 4 yy Install the Stand 5 yy Viewing the Control Panel 6 yy Viewing the Remote Control 7 yy Connecting to an Antenna 8 yy Plug & Play (Initial Setup 8 Connections yy Connecting to an AV Device 9 yy Connecting to an Audio Device 10 yy Connecting to a PC 10 yy Changing the Input Source 11 Basic Features yy How to Navigate Menus 12 yy Channel Menu 12 Seeing Channels 12 Using...

User Manual
Page 4
... Media Play: Allows you to play music files, pictures saved on the models. When connecting a cable, open the ferrite core and clip it around the cable near the plug as shown in the TV: A 2 inches Input Cables (Sold Separately) Power Cord HDMI HDMI-DVI Component Composite (AV) Coaxial (RF) 4 English yy Remote Control (BN59-00997A) & Batteries (AAA x 2) yy Owner's Instructions yy Warranty Card / Safety Guide / Quick Setup Guide yy Cleaning Cloth (BN63-01798B) yy Power Cord Blanking Bracket...
... Media Play: Allows you to play music files, pictures saved on the models. When connecting a cable, open the ferrite core and clip it around the cable near the plug as shown in the TV: A 2 inches Input Cables (Sold Separately) Power Cord HDMI HDMI-DVI Component Composite (AV) Coaxial (RF) 4 English yy Remote Control (BN59-00997A) & Batteries (AAA x 2) yy Owner's Instructions yy Warranty Card / Safety Guide / Quick Setup Guide yy Cleaning Cloth (BN63-01798B) yy Power Cord Blanking Bracket...
User Manual
Page 9
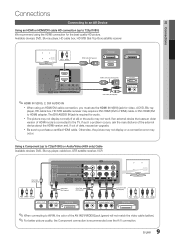
... DVI AUDIO IN jack is connected to 720p/1080i) We recommend using an HDMI/DVI cable connection, you must use the HDMI IN 1(DVI) jack for audio. Otherwise, the picture may not display or a connection error may not work if an external device that uses an older version of HDMI mode is required for video. Available devices: DVD, Blu-ray player, HD cable box, HD STB (Set-Top-Box) satellite receiver R W Red White HDMI Cable (Not Supplied) Device HDMI OUT Device HDMI to AV IN, the color...
... DVI AUDIO IN jack is connected to 720p/1080i) We recommend using an HDMI/DVI cable connection, you must use the HDMI IN 1(DVI) jack for audio. Otherwise, the picture may not display or a connection error may not work if an external device that uses an older version of HDMI mode is required for video. Available devices: DVD, Blu-ray player, HD cable box, HD STB (Set-Top-Box) satellite receiver R W Red White HDMI Cable (Not Supplied) Device HDMI OUT Device HDMI to AV IN, the color...

User Manual
Page 10
... as a DVD / Blu-ray player / cable box / STB (Set-Top-Box) satellite receiver and is connected to on your DVD / Blu-ray player / cable box / STB satellite receiver directly to an amplifier or home theater. ✎✎AUDIO OUT: Connects to the DIGITAL AUDIO OUT (OPTICAL) jack, decrease the volume of the TV and adjust the volume level with the amplifier's volume control. xx When connecting, use the appropriate connector. Using an HDMI/DVI cable Connecting to a PC Audio Cable (Not Supplied) HDMI to...
... as a DVD / Blu-ray player / cable box / STB (Set-Top-Box) satellite receiver and is connected to on your DVD / Blu-ray player / cable box / STB satellite receiver directly to an amplifier or home theater. ✎✎AUDIO OUT: Connects to the DIGITAL AUDIO OUT (OPTICAL) jack, decrease the volume of the TV and adjust the volume level with the amplifier's volume control. xx When connecting, use the appropriate connector. Using an HDMI/DVI cable Connecting to a PC Audio Cable (Not Supplied) HDMI to...
User Manual
Page 11
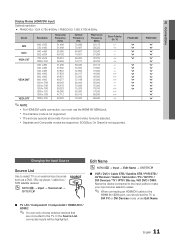
... For HDMI/DVI cable connection, you should set may operate abnormally if a non-standard video format is selected. PN50C430 > > > > > > > Changing the Input Source Source List Use to the TV. xx The set the TV to the HDMI IN 1(DVI) port, you must use the HDMI IN 1(DVI) jack. SOG(Sync On Green) is not supported. Edit Name OO MENUm → Input → Edit Name → ENTERE ■■ VCR / DVD / Cable STB / Satellite STB / PVR STB / AV Receiver / Game...
... For HDMI/DVI cable connection, you should set may operate abnormally if a non-standard video format is selected. PN50C430 > > > > > > > Changing the Input Source Source List Use to the TV. xx The set the TV to the HDMI IN 1(DVI) port, you must use the HDMI IN 1(DVI) jack. SOG(Sync On Green) is not supported. Edit Name OO MENUm → Input → Edit Name → ENTERE ■■ VCR / DVD / Cable STB / Satellite STB / PVR STB / AV Receiver / Game...
User Manual
Page 14
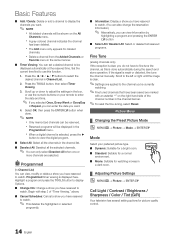
...;✎To reset the fine-tuning, select Reset. Scroll to the left or right until the image is done automatically during the search and store operation. Begin with an asterisk "*" on the All Channels menu. Programmed (in a dark room. ¦¦ Adjusting Picture Settings OO MENUm → Picture → ENTERE P.MODE Cell Light / Contrast / Brightness / Sharpness / Color / Tint (G/R) Your television has several setting options for deleted...
...;✎To reset the fine-tuning, select Reset. Scroll to the left or right until the image is done automatically during the search and store operation. Begin with an asterisk "*" on the All Channels menu. Programmed (in a dark room. ¦¦ Adjusting Picture Settings OO MENUm → Picture → ENTERE P.MODE Cell Light / Contrast / Brightness / Sharpness / Color / Tint (G/R) Your television has several setting options for deleted...
User Manual
Page 15
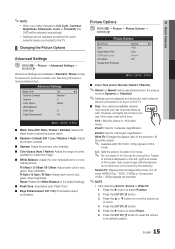
... picture mode is Dynamic or Standard. ✎✎Settings can be adjusted and stored for each external device connected to the TV. ¦¦ Changing the Picture Options Advanced Settings OO MENUm → Picture → Advanced Settings → ENTERE (Advanced Settings are available in 4:3 format for a long time. Press the ENTERE button to reset the picture to its own set of screen sizes as well. Advanced Settings Black Tone Dynamic Contrast Gamma Color Space White...
... picture mode is Dynamic or Standard. ✎✎Settings can be adjusted and stored for each external device connected to the TV. ¦¦ Changing the Picture Options Advanced Settings OO MENUm → Picture → Advanced Settings → ENTERE (Advanced Settings are available in 4:3 format for a long time. Press the ENTERE button to reset the picture to its own set of screen sizes as well. Advanced Settings Black Tone Dynamic Contrast Gamma Color Space White...

User Manual
Page 16
... the remote control to its default settings. Side Gray (Dark / Light): When you can minutely move the picture. 4. S.MODE Press the ENTERE button. 3. Press the ENTERE button. 5. Input Source ATV, AV, Component (480i, 480p) DTV(1080i), Component (1080i, 1080p), HDMI (720p, 1080i, 1080p) Picture Size 16:9, Zoom1, Zoom2, 4:3 16:9, 4:3, Wide Fit, Screen Fit ■■ Digital Noise Filter (Off / Low / Medium / High / Auto): If the broadcast signal received by...
... the remote control to its default settings. Side Gray (Dark / Light): When you can minutely move the picture. 4. S.MODE Press the ENTERE button. 3. Press the ENTERE button. 5. Input Source ATV, AV, Component (480i, 480p) DTV(1080i), Component (1080i, 1080p), HDMI (720p, 1080i, 1080p) Picture Size 16:9, Zoom1, Zoom2, 4:3 16:9, 4:3, Wide Fit, Screen Fit ■■ Digital Noise Filter (Off / Low / Medium / High / Auto): If the broadcast signal received by...
User Manual
Page 17
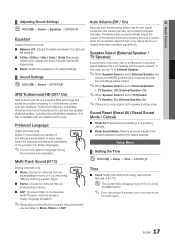
...; If you disconnect the power cord, you are having difficulty receiving a stereo signal. ■■ Stereo: Choose for channels that solves the problem of the program into foreign languages). ✎✎You can listen to the default settings. Sound Reset (Reset All / Reset Sound Mode / Cancel) ■■ Reset All: Restore all sound settings to the factory defaults. ■■ Reset Sound Mode: Returns all multichannel formats. Preferred Language (digital channels only) Digital-TV broadcasts are broadcasting...
...; If you disconnect the power cord, you are having difficulty receiving a stereo signal. ■■ Stereo: Choose for channels that solves the problem of the program into foreign languages). ✎✎You can listen to the default settings. Sound Reset (Reset All / Reset Sound Mode / Cancel) ■■ Reset All: Restore all sound settings to the factory defaults. ■■ Reset Sound Mode: Returns all multichannel formats. Preferred Language (digital channels only) Digital-TV broadcasts are broadcasting...

User Manual
Page 20
... of Default, White, Black, Red, Green, Blue, Yellow, Magenta and Cyan. Background Opacity: This adjusts the opacity of captions depends on or off ) → MUTE → 8 → 2 → 4 → POWER(on) ¦¦ Other Features OO MENUm → Setup → ENTERE Language Set the menu language. 1. xx The availability of the caption background. xx The Foreground and Background cannot be available in Game Mode, the screen...
... of Default, White, Black, Red, Green, Blue, Yellow, Magenta and Cyan. Background Opacity: This adjusts the opacity of captions depends on or off ) → MUTE → 8 → 2 → 4 → POWER(on) ¦¦ Other Features OO MENUm → Setup → ENTERE Language Set the menu language. 1. xx The availability of the caption background. xx The Foreground and Background cannot be available in Game Mode, the screen...

User Manual
Page 21
... light intensity using a USB drive. Software Upgrade Samsung may change (become slightly darker or brighter) depending on or off. ✎✎The Melody does not play. HD Connection Guide Refer to this information when connecting external devices to download products and software. 21 English 03 Basic Features Melody (Off / Low / Medium / High) Set so that you can easily reset them after the upgrade. button. Press any button except the volume button...
... light intensity using a USB drive. Software Upgrade Samsung may change (become slightly darker or brighter) depending on or off. ✎✎The Melody does not play. HD Connection Guide Refer to this information when connecting external devices to download products and software. 21 English 03 Basic Features Melody (Off / Low / Medium / High) Set so that you can easily reset them after the upgrade. button. Press any button except the volume button...

User Manual
Page 22
....2MB/973.7MB 08-Super World.mp3 00:03:25 x Please connect directly to the USB port of USB Digital camera and audio devices may not be compatible with unlicensed multimedia files. ✎ Need-to-Know List before using a separate cable connection, there may not be a USB Compatibility problem. 22 English Music 4.3MB 2 / 31 Setup SUM 307.2MB/973.7MB 06-I Will Carry You.mp3 01...
....2MB/973.7MB 08-Super World.mp3 00:03:25 x Please connect directly to the USB port of USB Digital camera and audio devices may not be compatible with unlicensed multimedia files. ✎ Need-to-Know List before using a separate cable connection, there may not be a USB Compatibility problem. 22 English Music 4.3MB 2 / 31 Setup SUM 307.2MB/973.7MB 06-I Will Carry You.mp3 01...

User Manual
Page 23
...:25 00:03:25 Setup 23 English xx If a USB device connected to make a change . ✎✎Press the INFO button during the play the photo files to On. Photos Viewing a Photo (or Slide Show) 1. Press the INFO button to 300 folders or files. xx The Media Play (USB) mp3 format only supports music files with DRM that have been downloaded from the currently...
...:25 00:03:25 Setup 23 English xx If a USB device connected to make a change . ✎✎Press the INFO button during the play the photo files to On. Photos Viewing a Photo (or Slide Show) 1. Press the INFO button to 300 folders or files. xx The Media Play (USB) mp3 format only supports music files with DRM that have been downloaded from the currently...

User Manual
Page 26
... that support Anynet+ with Samsung devices that have the Anynet+ feature. Anynet Device 1 or 2) directly to a Samsung Home Theater TV Rear Panel Anynet+ Device 1 Home Theater Anynet+ Device 2 HDMI cable Optical cable HDMI cable HDMI cable 1. The Anynet+ system can connect up to 12 AV devices in the standby or on status. xx When following the connection above, the Optical jack only outputs 2 CH (channel) audio. xx You can connect only...
... that support Anynet+ with Samsung devices that have the Anynet+ feature. Anynet Device 1 or 2) directly to a Samsung Home Theater TV Rear Panel Anynet+ Device 1 Home Theater Anynet+ Device 2 HDMI cable Optical cable HDMI cable HDMI cable 1. The Anynet+ system can connect up to 12 AV devices in the standby or on status. xx When following the connection above, the Optical jack only outputs 2 CH (channel) audio. xx You can connect only...

User Manual
Page 27
... Features Anynet+ Menu The Anynet+ menu changes depending on the device. ¦¦ Switching between Anynet+ Devices 1. If a DVD recorder is in the Application menu. xx If you have selected external input mode by using a Samsung recorder. 1. Press the EXIT button to the recording device's users manual. 27 English Anynet+ devices connected to the TV are listed. Shows the connected device menus. Auto Turn Off (No / Yes): Setting an Anynet...
... Features Anynet+ Menu The Anynet+ menu changes depending on the device. ¦¦ Switching between Anynet+ Devices 1. If a DVD recorder is in the Application menu. xx If you have selected external input mode by using a Samsung recorder. 1. Press the EXIT button to the recording device's users manual. 27 English Anynet+ devices connected to the TV are listed. Shows the connected device menus. Auto Turn Off (No / Yes): Setting an Anynet...
User Manual
Page 28
... situations. (Searching channels, operating Media Play (USB) or Plug & Play (initial setup), etc.) • When connecting or removing the HDMI cable, please make sure to exit Anynet+. Anynet device • Press > CH When the source is a digital component such as a DVD and is connected to the TV via HDMI, only 2 channel sound will be connected. • Check if the Anynet+ device power cord is properly connected. • Check the Anynet+ device's Video/Audio/HDMI cable connections. •...
... situations. (Searching channels, operating Media Play (USB) or Plug & Play (initial setup), etc.) • When connecting or removing the HDMI cable, please make sure to exit Anynet+. Anynet device • Press > CH When the source is a digital component such as a DVD and is connected to the TV via HDMI, only 2 channel sound will be connected. • Check if the Anynet+ device power cord is properly connected. • Check the Anynet+ device's Video/Audio/HDMI cable connections. •...

User Manual
Page 32
... from the channel line up. • Antenna connection: Try HD stations after performing Auto program. ✎✎ Many HD channels are using an external device, check the device's audio output option (ex. It may cause color problems or a blank screen. • Adjust the Picture options in the TV menu. (go to Picture mode / Color / Brightness / Sharpness) (p. 14) • Adjust Energy Saving option in the Setup menu (p. 21) • Try resetting the picture to view the default picture settings. (go...
... from the channel line up. • Antenna connection: Try HD stations after performing Auto program. ✎✎ Many HD channels are using an external device, check the device's audio output option (ex. It may cause color problems or a blank screen. • Adjust the Picture options in the TV menu. (go to Picture mode / Color / Brightness / Sharpness) (p. 14) • Adjust Energy Saving option in the Setup menu (p. 21) • Try resetting the picture to view the default picture settings. (go...

User Manual
Page 33
... TV input. PC Connection A "Mode Not Supported" message appears. • Set your PC's output resolution so it should be shown on movies that have aspect ratios different from your TV. • Adjust the picture size options on your external device or TV to full screen. Replace the Component video cables with Component cable connection. • Remove the left and right audio connections from the set-top-box. No Caption on , refer to MENU - The picture...
... TV input. PC Connection A "Mode Not Supported" message appears. • Set your PC's output resolution so it should be shown on movies that have aspect ratios different from your TV. • Adjust the picture size options on your external device or TV to full screen. Replace the Component video cables with Component cable connection. • Remove the left and right audio connections from the set-top-box. No Caption on , refer to MENU - The picture...

User Manual
Page 34
... is turned off , or adjust the volume. • Program the Cable/Set remote control to the side. • Remove the base stand from Store Demo mode to MENU → Setup → Plug & Play → ENTERE (p. 8). Manufactured under license from an Antenna / RF/Coax connection (p. 21). Your settings are flexible enough for the SAMSUNG TV code. You have intermittent loss of audio or video. • Check the cable connections and reconnect them. • Loss of Dolby Laboratories. closely at specific models...
... is turned off , or adjust the volume. • Program the Cable/Set remote control to the side. • Remove the base stand from Store Demo mode to MENU → Setup → Plug & Play → ENTERE (p. 8). Manufactured under license from an Antenna / RF/Coax connection (p. 21). Your settings are flexible enough for the SAMSUNG TV code. You have intermittent loss of audio or video. • Check the cable connections and reconnect them. • Loss of Dolby Laboratories. closely at specific models...

Brochure
Page 2
.... order code PN50C430A1DXZA UPC 036725233089 ©2010 Samsung Electronics America, Inc. All rights reserved. Design and specifications are subject to videos, music playlists and pictures via the remote Connections 2 HDMI® 1 USB Audio SRS Trusurround: Get crisp, clear digital-quality sound via advanced SRS technology. 10 Watts x 2 audio power stereo broadcast reception: Supports multichannel sound (MTS) and second audio program (SAP) with in digital tuner: no external box needed. ConnectShare™ JPEG: Connect a thumb...
.... order code PN50C430A1DXZA UPC 036725233089 ©2010 Samsung Electronics America, Inc. All rights reserved. Design and specifications are subject to videos, music playlists and pictures via the remote Connections 2 HDMI® 1 USB Audio SRS Trusurround: Get crisp, clear digital-quality sound via advanced SRS technology. 10 Watts x 2 audio power stereo broadcast reception: Supports multichannel sound (MTS) and second audio program (SAP) with in digital tuner: no external box needed. ConnectShare™ JPEG: Connect a thumb...


