User Manual (ENGLISH)
Page 6
... when installing accessories ...10.1 Installing a memory DIMM ...10.1 Installing a wireless network interface card ...10.2 11. 8. Maintenance Printing information page ...8.1 Cleaning the printer ...8.1 Maintaining the toner cartridge ...8.2 Maintenance parts ...8.4 9. Troubleshooting Clearing paper jams ...9.1 Troubleshooting checklist ...9.6 Understanding the Status LED ...9.6 Understanding display messages ...9.7 Toner cartridge-related messages ...9.8 Solving general printing problems ...9.9 Solving print quality problems...
... when installing accessories ...10.1 Installing a memory DIMM ...10.1 Installing a wireless network interface card ...10.2 11. 8. Maintenance Printing information page ...8.1 Cleaning the printer ...8.1 Maintaining the toner cartridge ...8.2 Maintenance parts ...8.4 9. Troubleshooting Clearing paper jams ...9.1 Troubleshooting checklist ...9.6 Understanding the Status LED ...9.6 Understanding display messages ...9.7 Toner cartridge-related messages ...9.8 Solving general printing problems ...9.9 Solving print quality problems...
User Manual (ENGLISH)
Page 28
...20 to 24 lb (75 to properly load paper in this user's guide may be appropriate for your printer and how to 90 g/m2) for the duplex printing (ML-3051ND only) • Brightness: Some print media are not covered by Samsung's warranty or service agreements. 5.1 Such repairs ...• Poor print quality • Increased paper jams • Premature wear on a variety of print media, such as plain paper, envelopes, labels, and transparencies. 5 Loading print media This chapter will help you understand types of paper you can use with your printer. This may cause the following : •...
...20 to 24 lb (75 to properly load paper in this user's guide may be appropriate for your printer and how to 90 g/m2) for the duplex printing (ML-3051ND only) • Brightness: Some print media are not covered by Samsung's warranty or service agreements. 5.1 Such repairs ...• Poor print quality • Increased paper jams • Premature wear on a variety of print media, such as plain paper, envelopes, labels, and transparencies. 5 Loading print media This chapter will help you understand types of paper you can use with your printer. This may cause the following : •...
User Manual (ENGLISH)
Page 30
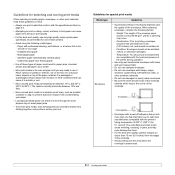
... 86o F). The extra flaps and strips might cause wrinkling, creasing, or jams, and may occur. - Guidelines for special print media Media type Envelopes Guidelines • Successful printing on top of the envelope paper should use envelopes that are ready to use in laser printers. • Avoid using the following factors: - Construction: Prior to printing...
... 86o F). The extra flaps and strips might cause wrinkling, creasing, or jams, and may occur. - Guidelines for special print media Media type Envelopes Guidelines • Successful printing on top of the envelope paper should use envelopes that are ready to use in laser printers. • Avoid using the following factors: - Construction: Prior to printing...
User Manual (ENGLISH)
Page 31
...The adhesive backing is designed for only a single pass through the printer. • Do not use in laser printers. • When selecting labels, consider the following factors: - Loading paper Load the print media you load preprinted paper, such as forms and letterhead, verify that transparencies are wrinkled, ... 2) and attach it below the standard tray to load an additional 250 sheets of paper currently left in a moisture-proof wrapping to prevent changes during printing, which can cause paper jams. Exposed adhesive can also cause damage to prolonged sunlight. • Ensure that the ...
...The adhesive backing is designed for only a single pass through the printer. • Do not use in laser printers. • When selecting labels, consider the following factors: - Loading paper Load the print media you load preprinted paper, such as forms and letterhead, verify that transparencies are wrinkled, ... 2) and attach it below the standard tray to load an additional 250 sheets of paper currently left in a moisture-proof wrapping to prevent changes during printing, which can cause paper jams. Exposed adhesive can also cause damage to prolonged sunlight. • Ensure that the ...
User Manual (ENGLISH)
Page 33
...following loading guidelines: • Envelopes: Flap side down with the top edge toward the printer. Open the rear cover to separate the pages before loading. It is too deep or if you push it in a paper jam or skew. 5.6 Note Make sure that is useful for single page printing on special... material to warp. • If you do not adjust the paper width guide, it may cause paper jams. 3 Load the paper with the side to be printed on facing up and the short edge entering the printer first. • Previously printed paper: Previously printed side down and with the stamp area on the ...
...following loading guidelines: • Envelopes: Flap side down with the top edge toward the printer. Open the rear cover to separate the pages before loading. It is too deep or if you push it in a paper jam or skew. 5.6 Note Make sure that is useful for single page printing on special... material to warp. • If you do not adjust the paper width guide, it may cause paper jams. 3 Load the paper with the side to be printed on facing up and the short edge entering the printer first. • Previously printed paper: Previously printed side down and with the stamp area on the ...

User Manual (ENGLISH)
Page 34
...tray. • To prevent paper jams, do not press the button, after each following page. 1 Load the paper with the top edge going into the multi-purpose tray first and be printed on the multi-purpose tray, open the rear cover when you use the ML3051N or ML-3051ND). 5 Press Stop or OK...document. 5 When you use the ML-3051N or ML-3051ND) on the control panel to print each page is printed. The printer picks up with the side to be placed in the center of the tray. • Always load only the print media specified in page 5.1 to avoid paper jams and print quality problems. •...
...tray. • To prevent paper jams, do not press the button, after each following page. 1 Load the paper with the top edge going into the multi-purpose tray first and be printed on the multi-purpose tray, open the rear cover when you use the ML3051N or ML-3051ND). 5 Press Stop or OK...document. 5 When you use the ML-3051N or ML-3051ND) on the control panel to print each page is printed. The printer picks up with the side to be placed in the center of the tray. • Always load only the print media specified in page 5.1 to avoid paper jams and print quality problems. •...

User Manual (ENGLISH)
Page 35
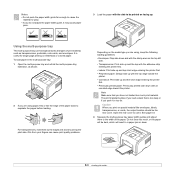
...which the sheets were printed. Printing to the output tray (Face down) The output tray collects paper face down . 2 1 rear cover 2 output tray The printer sends output to the rear cover. • To avoid paper jams, do not open it by default. Printing from the multi-purpose tray to the rear cover... (Face up) Using the rear cover, paper comes out of the printer face up ) and the output tray (face down...
...which the sheets were printed. Printing to the output tray (Face down) The output tray collects paper face down . 2 1 rear cover 2 output tray The printer sends output to the rear cover. • To avoid paper jams, do not open it by default. Printing from the multi-purpose tray to the rear cover... (Face up) Using the rear cover, paper comes out of the printer face up ) and the output tray (face down...
User Manual (ENGLISH)
Page 42
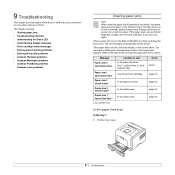
... (tray 1, optional tray 2, multipurpose tray) Go To below to locate the paper jam and to damage internal components. When a paper jam occurs, the Status LED lights red. ML-3051ND only Location of the paper jam appears. do if you encounter an error while using your printer. otherwise a jam will occur again. Refer to the table below Around the toner cartridge...
... (tray 1, optional tray 2, multipurpose tray) Go To below to locate the paper jam and to damage internal components. When a paper jam occurs, the Status LED lights red. ML-3051ND only Location of the paper jam appears. do if you encounter an error while using your printer. otherwise a jam will occur again. Refer to the table below Around the toner cartridge...

User Manual (ENGLISH)
Page 43
See page 9.3. 3 Insert the tray 1 into the printer until it straight out. In the optional tray 2 1 Pull the optional tray 2 open. 2 Remove the jammed paper from the printer. 5 Insert the trays back into the printer. Make sure that all of the printer. 2 Open and close the front cover to step 3.... 3 Pull the tray 1 half. 9.2 In the multi-purpose tray 1 If the paper is not feeding properly, pull the paper out of the paper ...
See page 9.3. 3 Insert the tray 1 into the printer until it straight out. In the optional tray 2 1 Pull the optional tray 2 open. 2 Remove the jammed paper from the printer. 5 Insert the trays back into the printer. Make sure that all of the printer. 2 Open and close the front cover to step 3.... 3 Pull the tray 1 half. 9.2 In the multi-purpose tray 1 If the paper is not feeding properly, pull the paper out of the paper ...

User Manual (ENGLISH)
Page 44
...1 pressure lever If you still do not see the jammed paper, push the pressure lever on each side up and remove the paper. Take care when removing paper from the printer. 2 Gently pull the paper out of the output tray. 2 Remove the jammed paper by gently pulling it straight out. Return the pressure ... skip the step 10. 3 Replace the toner cartridge and close the front cover. The jammed paper is any resistance when you see the jammed paper or if there is automatically ejected from the printer. 1 Open the front cover and pull the toner cartridge out. Around the toner cartridge ...
...1 pressure lever If you still do not see the jammed paper, push the pressure lever on each side up and remove the paper. Take care when removing paper from the printer. 2 Gently pull the paper out of the output tray. 2 Remove the jammed paper by gently pulling it straight out. Return the pressure ... skip the step 10. 3 Replace the toner cartridge and close the front cover. The jammed paper is any resistance when you see the jammed paper or if there is automatically ejected from the printer. 1 Open the front cover and pull the toner cartridge out. Around the toner cartridge ...
User Manual (ENGLISH)
Page 45
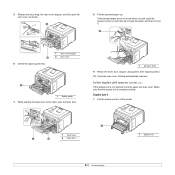
...loose the paper, and then remove it. 1 2 6 Unfold the duplex guide fully. 1 rear cover stopper 2 rear cover 1 1 duplex guide 7 While pushing the fuser lever to their original position. 10 Close the rear cover. Duplex jam 0 1 Pull the duplex unit out of the printer. 1 1... fuser lever 1 2 2 fuser door 1 duplex unit 9.4 5 Release the blue strap, the rear cover stopper, and fully open the fuser door. 1 pressure lever 9 Return the lever, door, stopper, and guide to the right, open the rear cover, as shown. 1 8 Pull the jammed paper out. In the duplex unit area (ML-3051ND...
...loose the paper, and then remove it. 1 2 6 Unfold the duplex guide fully. 1 rear cover stopper 2 rear cover 1 1 duplex guide 7 While pushing the fuser lever to their original position. 10 Close the rear cover. Duplex jam 0 1 Pull the duplex unit out of the printer. 1 1... fuser lever 1 2 2 fuser door 1 duplex unit 9.4 5 Release the blue strap, the rear cover stopper, and fully open the fuser door. 1 pressure lever 9 Return the lever, door, stopper, and guide to the right, open the rear cover, as shown. 1 8 Pull the jammed paper out. In the duplex unit area (ML-3051ND...

User Manual (ENGLISH)
Page 46
..., or highly curled paper. • Do not mix paper types in the multi-purpose tray. • If paper jams occur frequently when you print on page 5.5. If the paper does not come out with the long edge facing the front of the tray. • Do not remove paper from the tray while your printer is facing down...
..., or highly curled paper. • Do not mix paper types in the multi-purpose tray. • If paper jams occur frequently when you print on page 5.5. If the paper does not come out with the long edge facing the front of the tray. • Do not remove paper from the tray while your printer is facing down...

User Manual (ENGLISH)
Page 47
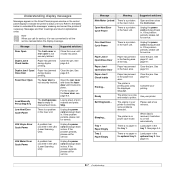
...line automatically. Red • A minor error is occurring and the printer is reached, and you are communicating correctly. • If a demo page does not print, check the paper supply in the tray. • If the paper jams in power save mode. You can receive data from the computer. &#...8226; When the backlight blinks slowly, the printer is receiving and printing data. • A paper jam has occurred. If the printer does not pass a step, ...
...line automatically. Red • A minor error is occurring and the printer is reached, and you are communicating correctly. • If a demo page does not print, check the paper supply in the tray. • If the paper jams in power save mode. You can receive data from the computer. &#...8226; When the backlight blinks slowly, the printer is receiving and printing data. • A paper jam has occurred. If the printer does not pass a step, ...
User Manual (ENGLISH)
Page 48
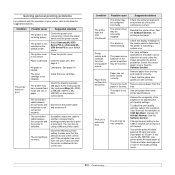
... 5.5. 9.7 Refer to the tables below to indicate the printer's status or errors. LSU Motor Error Cycle Power A problem has occurred in the paper exit area. See page 9.1 and page 9.1. Paper Jam 2 Check Inside Printing... Clear the jam. Please wait a few minutes. tray 1. Load paper in the LSU (Laser Scanning Unit). Open the rear cover and close the...
... 5.5. 9.7 Refer to the tables below to indicate the printer's status or errors. LSU Motor Error Cycle Power A problem has occurred in the paper exit area. See page 9.1 and page 9.1. Paper Jam 2 Check Inside Printing... Clear the jam. Please wait a few minutes. tray 1. Load paper in the LSU (Laser Scanning Unit). Open the rear cover and close the...
User Manual (ENGLISH)
Page 50
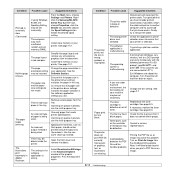
...The printer does not print. Possible cause The printer may be incorrectly installed. For many software applications, the paper source selection is not selected as your default printer. Remove excess paper from the wrong paper source. If you use the ML-3051ND, your printer, ...printer is jammed. The port setting is defective. Suggested solutions Check the power cord connections. Check the power switch and the power source. Select Samsung ML-3050 Series PCL 6 orSamsung ML3050 Series PS as the default printer. Close the printer cover. See page 9.1. Load paper...
...The printer does not print. Possible cause The printer may be incorrectly installed. For many software applications, the paper source selection is not selected as your default printer. Remove excess paper from the wrong paper source. If you use the ML-3051ND, your printer, ...printer is jammed. The port setting is defective. Suggested solutions Check the power cord connections. Check the power switch and the power source. Select Samsung ML-3050 Series PCL 6 orSamsung ML3050 Series PS as the default printer. Close the printer cover. See page 9.1. Load paper...
User Manual (ENGLISH)
Page 51
...Samsung ML-3050 Series PCL 6 printer icon, choose Properties, click the Details tab, and then choose the Spool Settings button. See page 10.1. See the Software Section. Remove excess paper from another computer and try a new printer cable. Special print materials, such as Bit Image in your printer. Select Download as thick paper...PDF file as an image may be set incorrectly. The paper keeps jamming. There is wrong. The setting in the software application is too much paper in your printer. See page 10.1. Use only paper that you know works. If printing on again. The ...
...Samsung ML-3050 Series PCL 6 printer icon, choose Properties, click the Details tab, and then choose the Spool Settings button. See page 10.1. See the Software Section. Remove excess paper from another computer and try a new printer cable. Special print materials, such as Bit Image in your printer. Select Download as thick paper...PDF file as an image may be set incorrectly. The paper keeps jamming. There is wrong. The setting in the software application is too much paper in your printer. See page 10.1. Use only paper that you know works. If printing on again. The ...
User Manual (ENGLISH)
Page 83
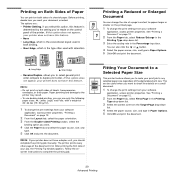
... both sides of your printer does not have this feature. Paper jamming and damage to appear larger or smaller on the printed page. 1 To change the size of the document first. The printer prints every other page of a page's content to the printer may result. • To use only the following paper sizes: A4, Letter, Legal...
... both sides of your printer does not have this feature. Paper jamming and damage to appear larger or smaller on the printed page. 1 To change the size of the document first. The printer prints every other page of a page's content to the printer may result. • To use only the following paper sizes: A4, Letter, Legal...


