
User Manual (ENGLISH)
Page 5
... 1.8 Chapter 2: SETTING UP YOUR PRINTER Unpacking 2.2 Selecting a Location 2.3 Installing the Toner Cartridge 2.4 Loading Paper 2.7 Changing the Paper Size in the Paper Tray ......... 2.9 Connecting a Printer Cable 2.11 For Local Printing 2.11 For Network Printing 2.13 Turning the Printer On 2.15 Printing a Demo Page 2.16 Installing Printer Software 2.17 Printer Driver Features 2.18 Installing Printer Software in Windows 2.19...
... 1.8 Chapter 2: SETTING UP YOUR PRINTER Unpacking 2.2 Selecting a Location 2.3 Installing the Toner Cartridge 2.4 Loading Paper 2.7 Changing the Paper Size in the Paper Tray ......... 2.9 Connecting a Printer Cable 2.11 For Local Printing 2.11 For Network Printing 2.13 Turning the Printer On 2.15 Printing a Demo Page 2.16 Installing Printer Software 2.17 Printer Driver Features 2.18 Installing Printer Software in Windows 2.19...
User Manual (ENGLISH)
Page 7
... Guide 4.27 Changing the Status Monitor Program Setting .... 4.28 Setting Up a Locally Shared Printer 4.29 In Windows 9x/Me 4.29 In Windows NT 4.0/2000/XP 4.30 Chapter 5: MAINTAINING YOUR PRINTER Maintaining the Toner Cartridge 5.2 Redistributing Toner 5.3 Replacing the Toner Cartridge 5.5 Cleaning the Printer 5.5 Cleaning the Outside 5.5 Cleaning the Inside 5.5 Printing Configuration Pages 5.8 Consumables and Replacement...
... Guide 4.27 Changing the Status Monitor Program Setting .... 4.28 Setting Up a Locally Shared Printer 4.29 In Windows 9x/Me 4.29 In Windows NT 4.0/2000/XP 4.30 Chapter 5: MAINTAINING YOUR PRINTER Maintaining the Toner Cartridge 5.2 Redistributing Toner 5.3 Replacing the Toner Cartridge 5.5 Cleaning the Printer 5.5 Cleaning the Outside 5.5 Cleaning the Inside 5.5 Printing Configuration Pages 5.8 Consumables and Replacement...
User Manual (ENGLISH)
Page 24
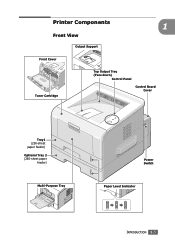
Printer Components 1 Front View Output Support Front Cover Toner Cartridge Top Output Tray (Face down) Control Panel Control Board Cover Tray1 (250-sheet paper feeder) Optional Tray 2 (250-sheet paper feeder) Multi-Purpose Tray Power Switch Paper Level Indicator INTRODUCTION 1.5
Printer Components 1 Front View Output Support Front Cover Toner Cartridge Top Output Tray (Face down) Control Panel Control Board Cover Tray1 (250-sheet paper feeder) Optional Tray 2 (250-sheet paper feeder) Multi-Purpose Tray Power Switch Paper Level Indicator INTRODUCTION 1.5
User Manual (ENGLISH)
Page 26
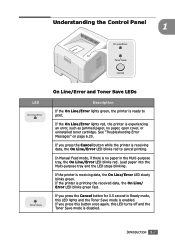
.... In Manual Feed mode, if there is no paper, open cover, or uninstalled toner cartridge. If the printer is printing the received data, the On Line/ Error LED blinks green fast. INTRODUCTION 1.7 If the printer is receiving data, the On Line/Error LED slowly blinks green. Load paper into the ... page 6.20. Understanding the Control Panel 1 LED On Line/Error and Toner Save LEDs Description If the On Line/Error lights green, the printer is ready to cancel printing. If you press the Cancel button while the printer is receiving data, the On Line/Error LED blinks red to print.
.... In Manual Feed mode, if there is no paper, open cover, or uninstalled toner cartridge. If the printer is printing the received data, the On Line/ Error LED blinks green fast. INTRODUCTION 1.7 If the printer is receiving data, the On Line/Error LED slowly blinks green. Load paper into the ... page 6.20. Understanding the Control Panel 1 LED On Line/Error and Toner Save LEDs Description If the On Line/Error lights green, the printer is ready to cancel printing. If you press the Cancel button while the printer is receiving data, the On Line/Error LED blinks red to print.
User Manual (ENGLISH)
Page 28
This chapter includes: • Unpacking • Installing the Toner Cartridge • Loading Paper • Connecting a Printer Cable • Turning the Printer On • Printing a Demo Page • Installing Printer Software • Viewing the User's Guide 2 SETTING UP YOUR PRINTER This chapter provides step by step information on setting up your printer.
This chapter includes: • Unpacking • Installing the Toner Cartridge • Loading Paper • Connecting a Printer Cable • Turning the Printer On • Printing a Demo Page • Installing Printer Software • Viewing the User's Guide 2 SETTING UP YOUR PRINTER This chapter provides step by step information on setting up your printer.
User Manual (ENGLISH)
Page 29
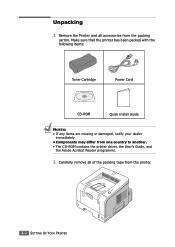
Make sure that the printer has been packed with the following items: Toner Cartridge Power Cord CD-ROM Quick Install Guide NOTES: • If any items are missing or damaged, notify your dealer immediately. • Components may differ from one country to another. • The CD-ROM contains the printer driver, the User's Guide, and the Adobe Acrobat Reader programme. 2 Carefully remove all accessories from the printer. 2.2 SETTING UP YOUR PRINTER Unpacking 1 Remove the Printer and all of the packing tape from the packing carton.
Make sure that the printer has been packed with the following items: Toner Cartridge Power Cord CD-ROM Quick Install Guide NOTES: • If any items are missing or damaged, notify your dealer immediately. • Components may differ from one country to another. • The CD-ROM contains the printer driver, the User's Guide, and the Adobe Acrobat Reader programme. 2 Carefully remove all accessories from the printer. 2.2 SETTING UP YOUR PRINTER Unpacking 1 Remove the Printer and all of the packing tape from the packing carton.
User Manual (ENGLISH)
Page 31
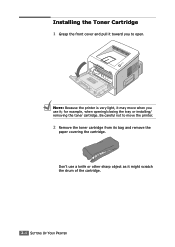
NOTE: Because the printer is very light, it may move the printer. 2 Remove the toner cartridge from its bag and remove the paper covering the cartridge. Be careful not to move when you to open. Installing the Toner Cartridge 1 Grasp the front cover and pull it toward you use a knife or other sharp object as it might scratch the drum of the cartridge. 2.4 SETTING UP YOUR PRINTER Don't use it; for example, when opening/closing the tray or installing/ removing the toner cartridge.
NOTE: Because the printer is very light, it may move the printer. 2 Remove the toner cartridge from its bag and remove the paper covering the cartridge. Be careful not to move when you to open. Installing the Toner Cartridge 1 Grasp the front cover and pull it toward you use a knife or other sharp object as it might scratch the drum of the cartridge. 2.4 SETTING UP YOUR PRINTER Don't use it; for example, when opening/closing the tray or installing/ removing the toner cartridge.
User Manual (ENGLISH)
Page 32
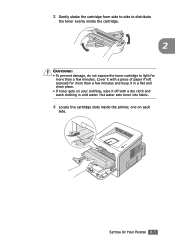
Cover it with a dry cloth and wash clothing in cold water. Hot water sets toner into fabric. 4 Locate the cartridge slots inside the cartridge. 2 CAUTIONS: • To prevent damage, do not expose the toner cartridge to distribute the toner evenly inside the printer, one on your clothing, wipe it off with a piece of paper if left exposed for more than a few minutes and keep it in a flat and clean place. • If toner gets on each side. SETTING UP YOUR PRINTER 2.5 3 Gently shake the cartridge from side to side to light for more than a few minutes.
Cover it with a dry cloth and wash clothing in cold water. Hot water sets toner into fabric. 4 Locate the cartridge slots inside the cartridge. 2 CAUTIONS: • To prevent damage, do not expose the toner cartridge to distribute the toner evenly inside the printer, one on your clothing, wipe it off with a piece of paper if left exposed for more than a few minutes and keep it in a flat and clean place. • If toner gets on each side. SETTING UP YOUR PRINTER 2.5 3 Gently shake the cartridge from side to side to light for more than a few minutes.

User Manual (ENGLISH)
Page 33
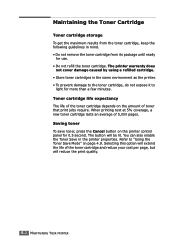
Make sure that the cover is securely closed. NOTE: When printing text at 5% coverage, you can expect a toner cartridge life of approximately 5,000 pages. 2.6 SETTING UP YOUR PRINTER 5 Grasp the handle and insert the cartridge into the printer until it snaps into place. 6 Close the front cover.
Make sure that the cover is securely closed. NOTE: When printing text at 5% coverage, you can expect a toner cartridge life of approximately 5,000 pages. 2.6 SETTING UP YOUR PRINTER 5 Grasp the handle and insert the cartridge into the printer until it snaps into place. 6 Close the front cover.
User Manual (ENGLISH)
Page 84
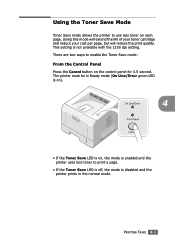
... in Ready mode (On Line/Error green LED is on). 4 • If the Toner Save LED is on, the mode is enabled and the printer uses less toner to use less toner on the control panel for 0.5 second. This setting is not available with the 1200 dpi setting. Using this ...mode will extend the life of your toner cartridge and reduce your cost per page, but will reduce the print quality. There are two ways to enable the Toner Save mode: From the Control...
... in Ready mode (On Line/Error green LED is on). 4 • If the Toner Save LED is on, the mode is enabled and the printer uses less toner to use less toner on the control panel for 0.5 second. This setting is not available with the 1200 dpi setting. Using this ...mode will extend the life of your toner cartridge and reduce your cost per page, but will reduce the print quality. There are two ways to enable the Toner Save mode: From the Control...
User Manual (ENGLISH)
Page 97
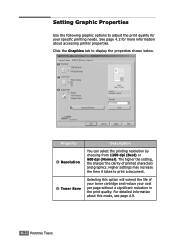
... Selecting this mode, see page 4.9. 4.22 PRINTING TASKS The higher the setting, the sharper the clarity of your toner cartridge and reduce your specific printing needs. For detailed information about accessing printer properties. Click the Graphics tab to adjust the print quality for more information about this option will extend the life...
... Selecting this mode, see page 4.9. 4.22 PRINTING TASKS The higher the setting, the sharper the clarity of your toner cartridge and reduce your specific printing needs. For detailed information about accessing printer properties. Click the Graphics tab to adjust the print quality for more information about this option will extend the life...
User Manual (ENGLISH)
Page 108
This chapter includes: • Maintaining the Toner Cartridge • Cleaning the Printer • Printing Configuration Pages • Consumables and Replacement Parts 5 MAINTAINING YOUR PRINTER This chapter provides suggestions for high-quality and economical printing and information for maintaining the toner cartridge and the printer.
This chapter includes: • Maintaining the Toner Cartridge • Cleaning the Printer • Printing Configuration Pages • Consumables and Replacement Parts 5 MAINTAINING YOUR PRINTER This chapter provides suggestions for high-quality and economical printing and information for maintaining the toner cartridge and the printer.
User Manual (ENGLISH)
Page 109
...will be lit. The printer warranty does not cover damage caused by using a refilled cartridge. • Store toner cartridges in the printer properties. The button will reduce the print quality. 5.2 MAINTAINING YOUR PRINTER Selecting this option will extend the life of the toner cartridge depends on the printer control panel for 0.5 ...second. You can also enable the Toner Save in the same environment as the printer. • To prevent damage to the toner cartridge, do not expose it to "Using the Toner Save Mode" on page 4.9. Saving toner To save toner, press ...
...will be lit. The printer warranty does not cover damage caused by using a refilled cartridge. • Store toner cartridges in the printer properties. The button will reduce the print quality. 5.2 MAINTAINING YOUR PRINTER Selecting this option will extend the life of the toner cartridge depends on the printer control panel for 0.5 ...second. You can also enable the Toner Save in the same environment as the printer. • To prevent damage to the toner cartridge, do not expose it to "Using the Toner Save Mode" on page 4.9. Saving toner To save toner, press ...
User Manual (ENGLISH)
Page 110
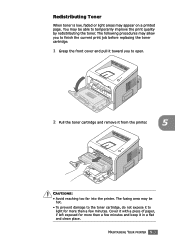
... exposed for more than a few minutes and keep it from the printer. 5 CAUTIONS: • Avoid reaching too far into the printer. MAINTAINING YOUR PRINTER 5.3 You may allow you to finish the current print job before replacing the toner cartridge. 1 Grasp the front cover and pull it toward you to open.... 2 Pull the toner cartridge and remove it in a flat and clean place...
... exposed for more than a few minutes and keep it from the printer. 5 CAUTIONS: • Avoid reaching too far into the printer. MAINTAINING YOUR PRINTER 5.3 You may allow you to finish the current print job before replacing the toner cartridge. 1 Grasp the front cover and pull it toward you to open.... 2 Pull the toner cartridge and remove it in a flat and clean place...
User Manual (ENGLISH)
Page 111
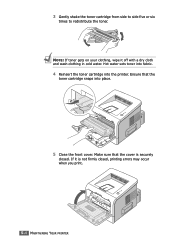
If it off with a dry cloth and wash clothing in cold water. Ensure that the cover is not firmly closed . Hot water sets toner into fabric. 4 Reinsert the toner cartridge into place. 5 Close the front cover. Make sure that the toner cartridge snaps into the printer. NOTE: If toner gets on your clothing, wipe it is securely closed , printing errors may occur when you print. 5.4 MAINTAINING YOUR PRINTER 3 Gently shake the toner cartridge from side to side five or six times to redistribute the toner.
If it off with a dry cloth and wash clothing in cold water. Ensure that the cover is not firmly closed . Hot water sets toner into fabric. 4 Reinsert the toner cartridge into place. 5 Close the front cover. Make sure that the toner cartridge snaps into the printer. NOTE: If toner gets on your clothing, wipe it is securely closed , printing errors may occur when you print. 5.4 MAINTAINING YOUR PRINTER 3 Gently shake the toner cartridge from side to side five or six times to redistribute the toner.
User Manual (ENGLISH)
Page 112
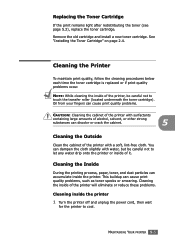
... print quality, follow the cleaning procedures below each time the toner cartridge is replaced or if print quality problems occur. See "Installing the Toner Cartridge" on page 2.4. NOTE: While cleaning the inside the printer. Remove the old cartridge and install a new toner cartridge. MAINTAINING YOUR PRINTER 5.5 Cleaning the Inside During the printing process, paper, toner, and...
... print quality, follow the cleaning procedures below each time the toner cartridge is replaced or if print quality problems occur. See "Installing the Toner Cartridge" on page 2.4. NOTE: While cleaning the inside the printer. Remove the old cartridge and install a new toner cartridge. MAINTAINING YOUR PRINTER 5.5 Cleaning the Inside During the printing process, paper, toner, and...
User Manual (ENGLISH)
Page 113
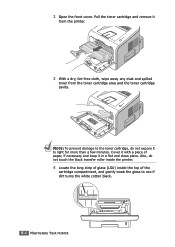
...lint-free cloth, wipe away any dust and spilled toner from the toner cartridge area and the toner cartridge cavity. Also, do not expose it to see if dirt turns the white cotton black. 5.6 MAINTAINING YOUR PRINTER Pull the toner cartridge and remove it in a flat and clean place. Cover it with ...a piece of the cartridge compartment, and gently swab the glass to light for more than a few minutes. 2 Open the...
...lint-free cloth, wipe away any dust and spilled toner from the toner cartridge area and the toner cartridge cavity. Also, do not expose it to see if dirt turns the white cotton black. 5.6 MAINTAINING YOUR PRINTER Pull the toner cartridge and remove it in a flat and clean place. Cover it with ...a piece of the cartridge compartment, and gently swab the glass to light for more than a few minutes. 2 Open the...
User Manual (ENGLISH)
Page 114
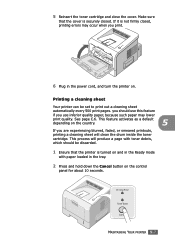
...closed , printing errors may occur when you use this feature if you print. 6 Plug in the power cord, and turn the printer on. This feature activates as a default depending on the control panel for about 10 seconds. This process will clean the drum inside ...the toner cartridge. See page C.6. MAINTAINING YOUR PRINTER 5.7 5 Reinsert the toner cartridge and close the cover. Make sure that the printer is not firmly closed . you should be set to print out a cleaning sheet automatically...
...closed , printing errors may occur when you use this feature if you print. 6 Plug in the power cord, and turn the printer on. This feature activates as a default depending on the control panel for about 10 seconds. This process will clean the drum inside ...the toner cartridge. See page C.6. MAINTAINING YOUR PRINTER 5.7 5 Reinsert the toner cartridge and close the cover. Make sure that the printer is not firmly closed . you should be set to print out a cleaning sheet automatically...
User Manual (ENGLISH)
Page 115
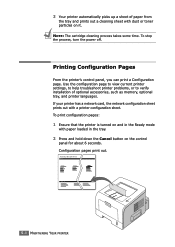
... on the control panel for about 6 seconds. Samsung ML-2250 Series 5.8 MAINTAINING YOUR PRINTER To print configuration pages: 1 Ensure that the printer is turned on and in the Ready mode with paper loaded in the tray. 2 Press and hold down the Cancel button on it. NOTE: The cartridge cleaning process takes some time. Configuration pages print...
... on the control panel for about 6 seconds. Samsung ML-2250 Series 5.8 MAINTAINING YOUR PRINTER To print configuration pages: 1 Ensure that the printer is turned on and in the Ready mode with paper loaded in the tray. 2 Press and hold down the Cancel button on it. NOTE: The cartridge cleaning process takes some time. Configuration pages print...
User Manual (ENGLISH)
Page 120
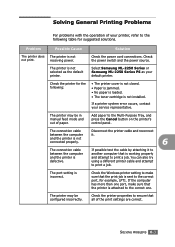
...the Cancel button on the printer's control panel. receiving power. The printer is not installed. Select Samsung ML-2250 Series or Samsung ML-2250 Series PS as the default printer. Check the power switch and the power source. The port setting is not not print. The printer may be configured incorrectly. ... by attaching it . Check the printer properties to ensure that is working properly and attempt to the following : • The printer cover is not closed. • Paper is jammed. • No paper is loaded. • The toner cartridge is not selected as your default...
...the Cancel button on the printer's control panel. receiving power. The printer is not installed. Select Samsung ML-2250 Series or Samsung ML-2250 Series PS as the default printer. Check the power switch and the power source. The port setting is not not print. The printer may be configured incorrectly. ... by attaching it . Check the printer properties to ensure that is working properly and attempt to the following : • The printer cover is not closed. • Paper is jammed. • No paper is loaded. • The toner cartridge is not selected as your default...


