
User Manual (ENGLISH)
Page 5
... Cartridge 5.2 Redistributing Toner 5.3 Replacing the Toner Cartridge 5.4 Cleaning the Printer 5.5 Cleaning the Outside 5.5 Cleaning the Inside 5.5 Consumables and Replacement Parts 5.8 Chapter 6: SOLVING PROBLEMS Troubleshooting Checklist 6.2 Solving General Printing Problems 6.3 Clearing Paper Jams 6.7 In the Paper Exit Area 6.7 In the Paper Feed Area 6.9 Around the Toner Cartridge 6.10 Tips for Avoiding Paper Jams When Printing on the A5-sized...
... Cartridge 5.2 Redistributing Toner 5.3 Replacing the Toner Cartridge 5.4 Cleaning the Printer 5.5 Cleaning the Outside 5.5 Cleaning the Inside 5.5 Consumables and Replacement Parts 5.8 Chapter 6: SOLVING PROBLEMS Troubleshooting Checklist 6.2 Solving General Printing Problems 6.3 Clearing Paper Jams 6.7 In the Paper Exit Area 6.7 In the Paper Feed Area 6.9 Around the Toner Cartridge 6.10 Tips for Avoiding Paper Jams When Printing on the A5-sized...
User Manual (ENGLISH)
Page 16
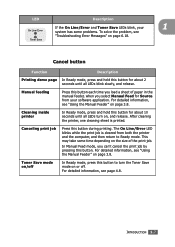
In Manual Feed mode, you select Manual Feed for about 2 seconds until all LEDs blink slowly, and release. INTRODUCTION 1.7 After cleaning the printer, one cleaning sheet is cleared from your 1 system has some time depending on the size of paper in the manual feeder, when you can't cancel the...information, see "Troubleshooting Error Messages" on or off In Ready mode, press this button to Ready mode. This may take some problems. To solve the problem, see "Using the Manual Feeder" on page 3.8. The On Line/Error LED blinks while the print job is printed. Toner ...
In Manual Feed mode, you select Manual Feed for about 2 seconds until all LEDs blink slowly, and release. INTRODUCTION 1.7 After cleaning the printer, one cleaning sheet is cleared from your 1 system has some time depending on the size of paper in the manual feeder, when you can't cancel the...information, see "Troubleshooting Error Messages" on or off In Ready mode, press this button to Ready mode. This may take some problems. To solve the problem, see "Using the Manual Feeder" on page 3.8. The On Line/Error LED blinks while the print job is printed. Toner ...

User Manual (ENGLISH)
Page 50
... For details, see page 4.6. Load transparencies in laser printers. • Ensure that transparencies are printed out. USING PRINT MATERIALS 3.13 The inside of the printer maybe hot. 4 Press the Cancel button to ... software application, and then select the correct paper size and type. Note: Please be careful when you must select Manual Feed for use in the manual feeder with the... adhesive strip going first. Oils deposited on the transparency can cause print quality problems. • Be careful not to start feeding. 3...
... For details, see page 4.6. Load transparencies in laser printers. • Ensure that transparencies are printed out. USING PRINT MATERIALS 3.13 The inside of the printer maybe hot. 4 Press the Cancel button to ... software application, and then select the correct paper size and type. Note: Please be careful when you must select Manual Feed for use in the manual feeder with the... adhesive strip going first. Oils deposited on the transparency can cause print quality problems. • Be careful not to start feeding. 3...

User Manual (ENGLISH)
Page 93
... purchase the consumables and replacement parts, contact Samsung dealer or the place where you will need to replace the roller and fuser unit to maintain top performance and avoid print quality problems and paper feed problems resulting from worn parts. Consumables and Replacement Parts... From time to time, you bought your product. The following items should be installed by a trained service personnel. 5.8 MAINTAINING YOUR PRINTER
... purchase the consumables and replacement parts, contact Samsung dealer or the place where you will need to replace the roller and fuser unit to maintain top performance and avoid print quality problems and paper feed problems resulting from worn parts. Consumables and Replacement Parts... From time to time, you bought your product. The following items should be installed by a trained service personnel. 5.8 MAINTAINING YOUR PRINTER
User Manual (ENGLISH)
Page 96
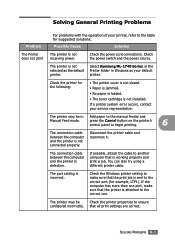
... cartridge is not receiving power. Disconnect the printer cable and reconnect it. The printer may be Check the printer properties to ensure configured incorrectly. Select Samsung ML-1740 Series in the Printer folder in Add paper to the manual feeder and Manual Feed mode. Solving General Printing Problems Problem For problems with the operation of your printer, refer to the table for example...
... cartridge is not receiving power. Disconnect the printer cable and reconnect it. The printer may be Check the printer properties to ensure configured incorrectly. Select Samsung ML-1740 Series in the Printer folder in Add paper to the manual feeder and Manual Feed mode. Solving General Printing Problems Problem For problems with the operation of your printer, refer to the table for example...

User Manual (ENGLISH)
Page 97
... the Samsung ML-1740 Serise printer icon, choose Properties, click the Details tab, and then choose the Spool Settings button. Select the desired spool setting. The page layout is too thick. The paper size and the paper size settings do not match. Problem Possible Cause Solution The printer does not print. (continued) The printer driver may be incorrect. Printer selects...
... the Samsung ML-1740 Serise printer icon, choose Properties, click the Details tab, and then choose the Spool Settings button. Select the desired spool setting. The page layout is too thick. The paper size and the paper size settings do not match. Problem Possible Cause Solution The printer does not print. (continued) The printer driver may be incorrect. Printer selects...

User Manual (ENGLISH)
Page 101
Then pull the paper gently out. Note: Please be resumed. 6.8 SOLVING PROBLEMS Printing can be careful when you open the rear cover. The inside of the printer is caught in the feed rollers. 2 Open the rear output tray. 3 Loosen the paper if it is still hot. 4 Close the rear output tray. 5 Open and close the front cover.
Then pull the paper gently out. Note: Please be resumed. 6.8 SOLVING PROBLEMS Printing can be careful when you open the rear cover. The inside of the printer is caught in the feed rollers. 2 Open the rear output tray. 3 Loosen the paper if it is still hot. 4 Close the rear output tray. 5 Open and close the front cover.

User Manual (ENGLISH)
Page 102
In the Paper Feed Area 1 Slide out the tray to expose the jammed paper. 2 Remove any missfeed paper by pulling it out by the visible edge from the tray. Printing can be resumed. SOLVING PROBLEMS 6.9 Make sure that all of the paper is properly aligned in the tray. 6 3 Slide the tray back into the printer. 4 Open and close the front cover.
In the Paper Feed Area 1 Slide out the tray to expose the jammed paper. 2 Remove any missfeed paper by pulling it out by the visible edge from the tray. Printing can be resumed. SOLVING PROBLEMS 6.9 Make sure that all of the paper is properly aligned in the tray. 6 3 Slide the tray back into the printer. 4 Open and close the front cover.

User Manual (ENGLISH)
Page 110
... of characters that should be defective. Also try another type of transparency. Because of the composition of paper in the input tray. 6 SOLVING PROBLEMS 6.17 Curl If the printed paper is curl or paper does not feed into the printer: • Turn over the stack of the transparency, some character voids are normal. • You may...
... of characters that should be defective. Also try another type of transparency. Because of the composition of paper in the input tray. 6 SOLVING PROBLEMS 6.17 Curl If the printed paper is curl or paper does not feed into the printer: • Turn over the stack of the transparency, some character voids are normal. • You may...
User Manual (ENGLISH)
Page 111
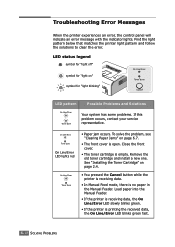
... cover. • The toner cartridge is printing the received data, the On Line/Error LED blinks green fast. 6.18 SOLVING PROBLEMS Load paper into the Manual Feeder. • If the printer is receiving data, the On Line/Error LED slowly blinks green. • If the... You pressed the Cancel button while the printer is receiving data. • In Manual Feed mode, there is open. To solve the problem, see "Clearing Paper Jams" on page 6.7. • The front cover is no paper in the Manual Feeder. Troubleshooting Error Messages When the printer experiences an error, the control panel will...
... cover. • The toner cartridge is printing the received data, the On Line/Error LED blinks green fast. 6.18 SOLVING PROBLEMS Load paper into the Manual Feeder. • If the printer is receiving data, the On Line/Error LED slowly blinks green. • If the... You pressed the Cancel button while the printer is receiving data. • In Manual Feed mode, there is open. To solve the problem, see "Clearing Paper Jams" on page 6.7. • The front cover is no paper in the Manual Feeder. Troubleshooting Error Messages When the printer experiences an error, the control panel will...
User Manual (ENGLISH)
Page 144
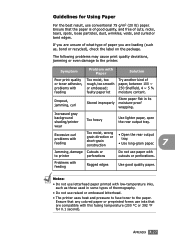
... this fusing temperature (200 °C or 392 °F for Using Paper For the best result, use raised or embossed letterhead. • The printer uses heat and pressure to fuse toner to the paper. Problems with cutouts or perforations. Guidelines for 0.1 second). Excessive curl problems with feeding Too moist, wrong • Open the rear output grain direction...
... this fusing temperature (200 °C or 392 °F for Using Paper For the best result, use raised or embossed letterhead. • The printer uses heat and pressure to fuse toner to the paper. Problems with cutouts or perforations. Guidelines for 0.1 second). Excessive curl problems with feeding Too moist, wrong • Open the rear output grain direction...


