User Manual (user Manual) (ver.1.0) (English)
Page 2
... and Maintenance 1-2 Safety Precautions 1-3 INSTALLING THE PRODUCT Package Contents 2-1 Connecting the Cables for a 1 x 1 Video Wall 2-2 Connecting the Cables for a 1 x 3 or 2 x 3 Video Wall 2-3 Kensington Lock 2-4 USING THE PRODUCT Setting the Optimal Resolution 3-1 Standard Signal Mode Table 3-2 Installing the ...MultiScreen 4-3 TROUBLESHOOTING Monitor Self-Diagnosis 5-1 Before Requesting Service 5-2 FAQ 5-3 MORE INFORMATION Specifications 6-1 Power Saving Function 6-2 Contact SAMSUNG WORLDWIDE 6-3 Correct Disposal of This Product (Waste Electrical & Electronic Equipment) -
... and Maintenance 1-2 Safety Precautions 1-3 INSTALLING THE PRODUCT Package Contents 2-1 Connecting the Cables for a 1 x 1 Video Wall 2-2 Connecting the Cables for a 1 x 3 or 2 x 3 Video Wall 2-3 Kensington Lock 2-4 USING THE PRODUCT Setting the Optimal Resolution 3-1 Standard Signal Mode Table 3-2 Installing the ...MultiScreen 4-3 TROUBLESHOOTING Monitor Self-Diagnosis 5-1 Before Requesting Service 5-2 FAQ 5-3 MORE INFORMATION Specifications 6-1 Power Saving Function 6-2 Contact SAMSUNG WORLDWIDE 6-3 Correct Disposal of This Product (Waste Electrical & Electronic Equipment) -
User Manual (user Manual) (ver.1.0) (English)
Page 3
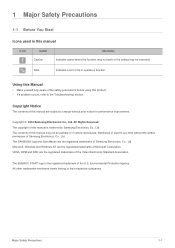
...Agency. 1 Major Safety Precautions 1-1 Before You Start Icons used in any form without prior notice for performance improvement. The SAMSUNG logo and SyncMaster are subject to the 'Troubleshooting' section. Note Indicates a hint or tip to their respective companies. Copyright... trademarks of the Video Electronics Standard Association. VESA, DPM and DDC are the registered trademarks of Samsung Electronics, Co., Ltd. Microsoft, Windows and Windows NT are the registered trademarks of Samsung Electronics, Co., Ltd. Copyright © 2010 Samsung Electronics Co., Ltd...
...Agency. 1 Major Safety Precautions 1-1 Before You Start Icons used in any form without prior notice for performance improvement. The SAMSUNG logo and SyncMaster are subject to the 'Troubleshooting' section. Note Indicates a hint or tip to their respective companies. Copyright... trademarks of the Video Electronics Standard Association. VESA, DPM and DDC are the registered trademarks of Samsung Electronics, Co., Ltd. Microsoft, Windows and Windows NT are the registered trademarks of Samsung Electronics, Co., Ltd. Copyright © 2010 Samsung Electronics Co., Ltd...
User Manual (user Manual) (ver.1.0) (English)
Page 11
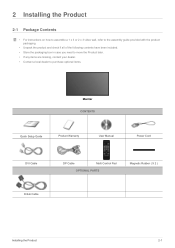
2 Installing the Product 2-1 Package Contents • For instructions on how to assemble a 1 x 3 or 2 x 3 video wall, refer to the assembly guide provided with the product packaging. • Unpack the product and check if all of the following contents have been ...
2 Installing the Product 2-1 Package Contents • For instructions on how to assemble a 1 x 3 or 2 x 3 video wall, refer to the assembly guide provided with the product packaging. • Unpack the product and check if all of the following contents have been ...
User Manual (user Manual) (ver.1.0) (English)
Page 12
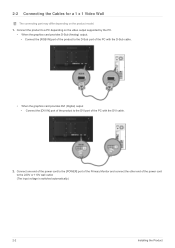
... to the 220V or 110V wall outlet. (The input voltage is switched automatically.) 2-2 Installing the Product 2-2 Connecting the Cables for a 1 x 1 Video Wall The connecting part may differ depending on the video output supported by the PC. • When the graphics card provides D-Sub (Analog) output. • Connect the [RGB IN] port of...
... to the 220V or 110V wall outlet. (The input voltage is switched automatically.) 2-2 Installing the Product 2-2 Connecting the Cables for a 1 x 1 Video Wall The connecting part may differ depending on the video output supported by the PC. • When the graphics card provides D-Sub (Analog) output. • Connect the [RGB IN] port of...
User Manual (user Manual) (ver.1.0) (English)
Page 14
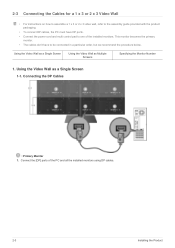
... as a Single Screen Using the Video Wall as a Single Screen 1-1. This monitor becomes the primary monitor. • The cables don't have DP ports. • Connect the power cord and multi control ... recommend the procedure below. Connect the [DP] ports of the installed monitors. Using the Video Wall as Multiple Screens Specifying the Monitor Number 1. 2-3 Connecting the Cables for a 1 x 3 or 2 x 3 Video Wall • For instructions on how to assemble a 1 x 3 or 2 x 3 video wall, refer to the assembly guide provided with the product packaging. • To connect...
... as a Single Screen Using the Video Wall as a Single Screen 1-1. This monitor becomes the primary monitor. • The cables don't have DP ports. • Connect the power cord and multi control ... recommend the procedure below. Connect the [DP] ports of the installed monitors. Using the Video Wall as Multiple Screens Specifying the Monitor Number 1. 2-3 Connecting the Cables for a 1 x 3 or 2 x 3 Video Wall • For instructions on how to assemble a 1 x 3 or 2 x 3 video wall, refer to the assembly guide provided with the product packaging. • To connect...
User Manual (user Manual) (ver.1.0) (English)
Page 17
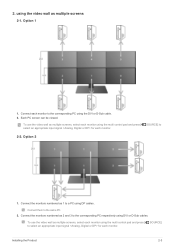
... the monitors numbered as multiple screens 2-1. Each PC screen can be viewed. Installing the Product 2-3 Option 2 1. Connect them to the corresponding PC using the video wall as 2 and 3 to a PC using DVI or D-Sub cables. Connect the monitors numbered as multiple screens, select each monitor using the multi control ...pad and press [ SOURCE] to select an appropriate input signal for each monitor to the same PC. 2. 2. To use the video wall as 1 to the corresponding PC respectively using DP cables. Option 1 1. using the DVI or D-Sub cable. 2.
... the monitors numbered as multiple screens 2-1. Each PC screen can be viewed. Installing the Product 2-3 Option 2 1. Connect them to the corresponding PC using the video wall as 2 and 3 to a PC using DVI or D-Sub cables. Connect the monitors numbered as multiple screens, select each monitor using the multi control ...pad and press [ SOURCE] to select an appropriate input signal for each monitor to the same PC. 2. 2. To use the video wall as 1 to the corresponding PC respectively using DP cables. Option 1 1. using the DVI or D-Sub cable. 2.

User Manual (user Manual) (ver.1.0) (English)
Page 34
...is connected. If you click the mouse or press any key, the screen will be displayed because some graphics cards do not output the video signal. THE IMAGE IS TOO LIGHT OR TOO DARK. Is the graphics card configured correctly? Is the "Not Optimum Mode" message displayed ...to the (Standard Signal Mode Table) Set up the appropriate resolution and the frequency for the product. If the problem continues, please contact your nearest Samsung Electronics Service Center. A BLANK SCREEN APPEARS / I CANNOT TURN THE PRODUCT ON Is the power cord connected properly? Is a blank screen displayed and...
...is connected. If you click the mouse or press any key, the screen will be displayed because some graphics cards do not output the video signal. THE IMAGE IS TOO LIGHT OR TOO DARK. Is the graphics card configured correctly? Is the "Not Optimum Mode" message displayed ...to the (Standard Signal Mode Table) Set up the appropriate resolution and the frequency for the product. If the problem continues, please contact your nearest Samsung Electronics Service Center. A BLANK SCREEN APPEARS / I CANNOT TURN THE PRODUCT ON Is the power cord connected properly? Is a blank screen displayed and...
User Manual (user Manual) (ver.1.0) (English)
Page 36
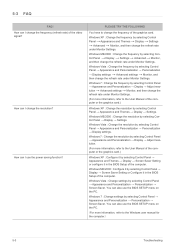
... → Display → Settings → Advanced → Monitor, and then change the frequency of the graphics card. You have to the User Manual of the video signal? Windows Vista : Change the frequency by selecting Control Panel → Appearance and Themes → Display → Settings. trol Panel → Display → Settings →...
... → Display → Settings → Advanced → Monitor, and then change the frequency of the graphics card. You have to the User Manual of the video signal? Windows Vista : Change the frequency by selecting Control Panel → Appearance and Themes → Display → Settings. trol Panel → Display → Settings →...


