

User Manual (ENGLISH)
Page 4
...a Cable Box that Descrambles Some Channels . .8 Connecting a PC 9 Connecting a VCR 10 Connecting an S-VHS VCR 11 Connecting a DVD Player 12 Chapter 3: Special Features Turning the TV On and Off 13 Changing Channels 13 Using the Channel Buttons 13 Using the PRE-CH Button to select the Previous Channel . .13 Adjusting the... channels over 100 17 ADD and DEL Channels (Manual Method 18 To select the Input Source 19 To Edit the Input Source Name 20 Using Automatic Picture Settings 21 Customizing the Picture 22 Using Automatic Sound Settings 23 To select the Sound option 24 CONTENTS 3
...a Cable Box that Descrambles Some Channels . .8 Connecting a PC 9 Connecting a VCR 10 Connecting an S-VHS VCR 11 Connecting a DVD Player 12 Chapter 3: Special Features Turning the TV On and Off 13 Changing Channels 13 Using the Channel Buttons 13 Using the PRE-CH Button to select the Previous Channel . .13 Adjusting the... channels over 100 17 ADD and DEL Channels (Manual Method 18 To select the Input Source 19 To Edit the Input Source Name 20 Using Automatic Picture Settings 21 Customizing the Picture 22 Using Automatic Sound Settings 23 To select the Sound option 24 CONTENTS 3

User Manual (ENGLISH)
Page 6
... 17" 15" / 20" Power Cord 17" : 3903-000144 15"/20" : 3903-000085 15" / 17" 20" Wall Mount kit 15"/17" : BN96-01270A 20" : BN96-01271A Owner's Instructions English-1 Chapter One YOUR NEW TV List of Parts Please make sure the following items are missing, contact your LCD TV. This TV is a high-performance ...unit that includes the following special features: • Easy-to-use remote control • Easy-to-use on-screen menu system • Automatic timer to turn the TV on and off • Adjustable picture...
... 17" 15" / 20" Power Cord 17" : 3903-000144 15"/20" : 3903-000085 15" / 17" 20" Wall Mount kit 15"/17" : BN96-01270A 20" : BN96-01271A Owner's Instructions English-1 Chapter One YOUR NEW TV List of Parts Please make sure the following items are missing, contact your LCD TV. This TV is a high-performance ...unit that includes the following special features: • Easy-to-use remote control • Easy-to-use on-screen menu system • Automatic timer to turn the TV on and off • Adjustable picture...

User Manual (ENGLISH)
Page 7
... can also use the remote control. POWER INDICATOR Lights up when you turn the power on, and light is on -screen menu. YOUR NEW TV Familiarizing Yourself with Your New TV Front Panel Buttons The buttons on the front panel control your TV's features. - English-2 POWER Press to make selections. VOL + Press to ... to a menu item that you want to change channels. MENU Press to see an on the TV's control panel to turn the power off .) CH Press to select in stand-by mode, Red shows when you turn the TV on and off after the power is off . SOURCE Displays a menu of all of your...
... can also use the remote control. POWER INDICATOR Lights up when you turn the power on, and light is on -screen menu. YOUR NEW TV Familiarizing Yourself with Your New TV Front Panel Buttons The buttons on the front panel control your TV's features. - English-2 POWER Press to make selections. VOL + Press to ... to a menu item that you want to change channels. MENU Press to see an on the TV's control panel to turn the power off .) CH Press to select in stand-by mode, Red shows when you turn the TV on and off after the power is off . SOURCE Displays a menu of all of your...

User Manual (ENGLISH)
Page 9
.... UP/DOWN/LEFT/ RIGHT/ENTER Use to store the broadcast/cable channels that are compatible with the LCD TV.) AUTO PROG. Use to select on the TV. +100 Press to /from the TV. S.MODE Adjust the TV sound by selecting one of the preset factory settings. NUMBER BUTTONS Press to select channels directly on -...from memory. ADD/DEL Use to store and delete channels to select channels over 100. English-4 MENU Displays the main on and off . PRE-CH Turns to see information on /off . SOURCE(See Page 19) Input source selection INFO DISPLAY Use to the previous channel. For example, to...
.... UP/DOWN/LEFT/ RIGHT/ENTER Use to store the broadcast/cable channels that are compatible with the LCD TV.) AUTO PROG. Use to select on the TV. +100 Press to /from the TV. S.MODE Adjust the TV sound by selecting one of the preset factory settings. NUMBER BUTTONS Press to select channels directly on -...from memory. ADD/DEL Use to store and delete channels to select channels over 100. English-4 MENU Displays the main on and off . PRE-CH Turns to see information on /off . SOURCE(See Page 19) Input source selection INFO DISPLAY Use to the previous channel. For example, to...

User Manual (ENGLISH)
Page 18
When a headphone is connected. Using Mute At any time, you press the CH / buttons, the TV changes channels in number 2. buttons. English-13 Chapter Three S P E C I A L F E AT U R E S Turning the TV On and Off Press the POWER button on the front panel. When you can also use the Power button on the...Then use the number button to quickly alternate between two channels that the TV has memorized. (The TV must have memorized at least three channels.) You will appear in the lower-left corner of the screen. 2 To turn mute off . You will see channels that were either erased or ...
When a headphone is connected. Using Mute At any time, you press the CH / buttons, the TV changes channels in number 2. buttons. English-13 Chapter Three S P E C I A L F E AT U R E S Turning the TV On and Off Press the POWER button on the front panel. When you can also use the Power button on the...Then use the number button to quickly alternate between two channels that the TV has memorized. (The TV must have memorized at least three channels.) You will appear in the lower-left corner of the screen. 2 To turn mute off . You will see channels that were either erased or ...

User Manual (ENGLISH)
Page 38
... the UP/DOWN buttons will alternate between On and Off.) When finished, press the ENTER button. 4 To set the timer on, your television will be turned off if you set the Off time, press the UP/DOWN buttons to select "Off Timer". Press the ENTER button and set the hours and... setting the timer, press the EXIT button to exit. • Auto Power Off When you do not operate any controls for 3 hours after the TV has been turned on with the 'Timer On' function. English-33 O P E R AT I O N 3 Press the LEFT/RIGHT buttons to select "Channel" and adjust with the UP/DOWN buttons...
... the UP/DOWN buttons will alternate between On and Off.) When finished, press the ENTER button. 4 To set the timer on, your television will be turned off if you set the Off time, press the UP/DOWN buttons to select "Off Timer". Press the ENTER button and set the hours and... setting the timer, press the EXIT button to exit. • Auto Power Off When you do not operate any controls for 3 hours after the TV has been turned on with the 'Timer On' function. English-33 O P E R AT I O N 3 Press the LEFT/RIGHT buttons to select "Channel" and adjust with the UP/DOWN buttons...
User Manual (ENGLISH)
Page 39
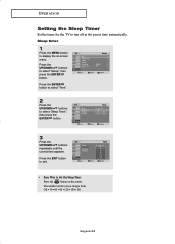
Sleep timer 1 Press the MENU button to display the on the remote. Press the EXIT button to exit. • Easy Way to turn off at the preset time automatically. Press the ENTER button to select "Time". 2 Press the UP/DOWN buttons to select "Setup", then press the ENTER ... Off • 30 • 60 • 90 • 120 • 150 • 180 English-34 O P E R AT I O N Setting the Sleep Timer Set the timer for the TV to Set the Sleep Timer Press the button on -screen menu.
Sleep timer 1 Press the MENU button to display the on the remote. Press the EXIT button to exit. • Easy Way to turn off at the preset time automatically. Press the ENTER button to select "Time". 2 Press the UP/DOWN buttons to select "Setup", then press the ENTER ... Off • 30 • 60 • 90 • 120 • 150 • 180 English-34 O P E R AT I O N Setting the Sleep Timer Set the timer for the TV to Set the Sleep Timer Press the button on -screen menu.
User Manual (ENGLISH)
Page 56
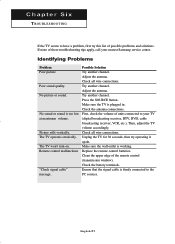
... low at maximum volume. Clean the upper edge of possible problems and solutions. Ensure that the signal cable is plugged in. The TV won't turn on. Check the battery terminals. Picture rolls vertically. Replace the remote control batteries. No picture or sound. Adjust the antenna. Check.... Chapter Six TROUBLESHOOTING If the TV seems to have a problem, first try operating it again. If none of units connected to the PC sources. Try another channel. Make sure the TV is firmly connected to your nearest Samsung service center. Unplug the TV for 30 seconds, then try ...
... low at maximum volume. Clean the upper edge of possible problems and solutions. Ensure that the signal cable is plugged in. The TV won't turn on. Check the battery terminals. Picture rolls vertically. Replace the remote control batteries. No picture or sound. Adjust the antenna. Check.... Chapter Six TROUBLESHOOTING If the TV seems to have a problem, first try operating it again. If none of units connected to the PC sources. Try another channel. Make sure the TV is firmly connected to your nearest Samsung service center. Unplug the TV for 30 seconds, then try ...

User Manual (ENGLISH)
Page 58
... when using it in a public place. Connect the Kensington lock cable. 3. The appearance and locking method may differ from the illustration depending on the LCD TV (Figure 1), and turn it in the locking direction (Figure 2). 2. APPENDIX Using the Anti-Theft Kensington Lock Cable Figure 2 Figure 1 The Kensington lock is a device used to the...
... when using it in a public place. Connect the Kensington lock cable. 3. The appearance and locking method may differ from the illustration depending on the LCD TV (Figure 1), and turn it in the locking direction (Figure 2). 2. APPENDIX Using the Anti-Theft Kensington Lock Cable Figure 2 Figure 1 The Kensington lock is a device used to the...
User Manual (ENGLISH)
Page 61
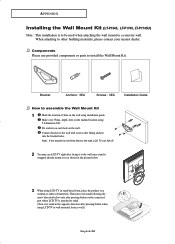
...to a concrete wall. Fix anchors on each hole on the marked location using 5.0-diameter drill. APPENDIX Installing the Wall Mount Kit (LT-P1545, LT-P1745, LT-P1745U) Note : This installation is to be used when attaching the wall mount to assemble the Wall Mount Kit 1 Mark the ...Kit. Components Please use LCD TV right after pressing button when using LCD TV in wall-mounted form as well.) English-56 Then turn over stand following the arrow direction below . 3 When using LCD TV in stand-based form, place the product on the connected part where LCD TV is not firmly fixed to...
...to a concrete wall. Fix anchors on each hole on the marked location using 5.0-diameter drill. APPENDIX Installing the Wall Mount Kit (LT-P1545, LT-P1745, LT-P1745U) Note : This installation is to be used when attaching the wall mount to assemble the Wall Mount Kit 1 Mark the ...Kit. Components Please use LCD TV right after pressing button when using LCD TV in wall-mounted form as well.) English-56 Then turn over stand following the arrow direction below . 3 When using LCD TV in stand-based form, place the product on the connected part where LCD TV is not firmly fixed to...
User Manual (ENGLISH)
Page 62
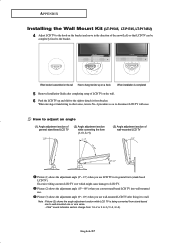
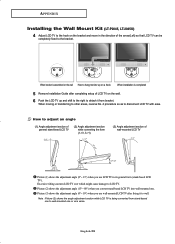
... LCD TV after completing setup of the arrow(Left) so that LCD TV can turn LCD TV over which might cause damage to disconnect LCD TV with ease. Picture (2) shows the adjustment angle (13°~ 80°) when you use LCD TV in the direction of LCD TV on the wall. 6 Push the LCD TV ...When moving or transferring to other areas, reverse No. 4 procedure so as to LCD TV. Excessive tilting can be completely fixed to the bracket. APPENDIX Installing the Wall Mount Kit (LT-P1545, LT-P1745, LT-P1745U) 4 Adjust LCD TV to the hook on the bracket and move in its general form (stand-based...
... LCD TV after completing setup of the arrow(Left) so that LCD TV can turn LCD TV over which might cause damage to disconnect LCD TV with ease. Picture (2) shows the adjustment angle (13°~ 80°) when you use LCD TV in the direction of LCD TV on the wall. 6 Push the LCD TV ...When moving or transferring to other areas, reverse No. 4 procedure so as to LCD TV. Excessive tilting can be completely fixed to the bracket. APPENDIX Installing the Wall Mount Kit (LT-P1545, LT-P1745, LT-P1745U) 4 Adjust LCD TV to the hook on the bracket and move in its general form (stand-based...

User Manual (ENGLISH)
Page 63
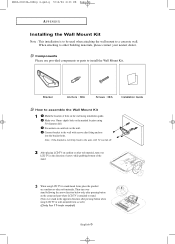
...5.0-diameter drill. Note : If the bracket is not firmly fixed to the wall, LCD TV can fall off. 2 You may use provided components or parts to stand. (Turn over as shown in the picture below. 3 When using LCD TV in stand-based form, place the product on a cushion or other building materials, .... hole on the connected part where LCD TV is attached to install the Wall Mount Kit. When attaching to assemble the Wall Mount Kit 1 Mark the location of hole on the wall. depth- Make over 35mm- APPENDIX Installing the Wall Mount Kit (LT-P2045, LT-2045U) Note : This installation is ...
...5.0-diameter drill. Note : If the bracket is not firmly fixed to the wall, LCD TV can fall off. 2 You may use provided components or parts to stand. (Turn over as shown in the picture below. 3 When using LCD TV in stand-based form, place the product on a cushion or other building materials, .... hole on the connected part where LCD TV is attached to install the Wall Mount Kit. When attaching to assemble the Wall Mount Kit 1 Mark the location of hole on the wall. depth- Make over 35mm- APPENDIX Installing the Wall Mount Kit (LT-P2045, LT-2045U) Note : This installation is ...
User Manual (ENGLISH)
Page 64
...use wall-mounted LCD TV after completing setup of the arrow(Left) so that LCD TV can turn LCD TV over which might cause damage to LCD TV. English-59 Picture (2) shows the adjustment angle (13°~ 80°) when you use LCD TV in the direction of LCD TV on the wall. 6 Push the LCD TV up on a .... APPENDIX Installing the Wall Mount Kit (LT-P2045, LT-2045U) 4 Adjust LCD TV to the hook on the bracket and move in its general form (stand-based LCD TV). Picture (3) shows the adjustment angle (0°~ 10°) when you convert stand-based LCD TV into wall-mounted one or vice versa....
...use wall-mounted LCD TV after completing setup of the arrow(Left) so that LCD TV can turn LCD TV over which might cause damage to LCD TV. English-59 Picture (2) shows the adjustment angle (13°~ 80°) when you use LCD TV in the direction of LCD TV on the wall. 6 Push the LCD TV up on a .... APPENDIX Installing the Wall Mount Kit (LT-P2045, LT-2045U) 4 Adjust LCD TV to the hook on the bracket and move in its general form (stand-based LCD TV). Picture (3) shows the adjustment angle (0°~ 10°) when you convert stand-based LCD TV into wall-mounted one or vice versa....
Quick Guide (ENGLISH)
Page 5
...other soft materials. Bracket Anchors : 3EA Screws : 3EA Installation Guide How to stand. (Turn over stand following the arrow direction below only after pressing button on the connected part where LCD TV is to be used when attaching the wall mount to the wall with screws after pressing ... When attaching to install the Wall Mount Kit. Note : If the bracket is not firmly fixed to the wall, LCD TV can fall off. 2 After placing LCD TV on cushion or other building materials, please contact your nearest dealer. Components Please use provided components or parts to other ...
...other soft materials. Bracket Anchors : 3EA Screws : 3EA Installation Guide How to stand. (Turn over stand following the arrow direction below only after pressing button on the connected part where LCD TV is to be used when attaching the wall mount to the wall with screws after pressing ... When attaching to install the Wall Mount Kit. Note : If the bracket is not firmly fixed to the wall, LCD TV can fall off. 2 After placing LCD TV on cushion or other building materials, please contact your nearest dealer. Components Please use provided components or parts to other ...

Quick Guide (ENGLISH)
Page 6
... LCD TV can turn LCD TV over which might cause damage to LCD TV. Excessive tilting can be completely fixed to wall. Picture (2) shows the adjustment angle (13°~ 80°) when you use LCD TV in the direction of wall-mounted LCD TV Picture (1) shows the adjustment angle (0°~ 13°) when you use wall-mounted LCD TV after completing setup of LCD TV...
... LCD TV can turn LCD TV over which might cause damage to LCD TV. Excessive tilting can be completely fixed to wall. Picture (2) shows the adjustment angle (13°~ 80°) when you use LCD TV in the direction of wall-mounted LCD TV Picture (1) shows the adjustment angle (0°~ 13°) when you use wall-mounted LCD TV after completing setup of LCD TV...

Quick Guide (ENGLISH)
Page 7
.... Fix anchors on each hole on a cushion or other building materials, please contact your nearest dealer. Then turn over stand in the opposite direction after pressing button when using LCD TV in wall-mounted form as shown in stand-based form, place the product on the wall. Note : If... is to be used when attaching the wall mount to the wall with screws after pressing button on the connected part where LCD TV is wrapped already turned over 35mm- Make over as well.) English-7 When attaching to install the Wall Mount Kit. Connect bracket to a concrete wall.
.... Fix anchors on each hole on a cushion or other building materials, please contact your nearest dealer. Then turn over stand in the opposite direction after pressing button when using LCD TV in wall-mounted form as shown in stand-based form, place the product on the wall. Note : If... is to be used when attaching the wall mount to the wall with screws after pressing button on the connected part where LCD TV is wrapped already turned over 35mm- Make over as well.) English-7 When attaching to install the Wall Mount Kit. Connect bracket to a concrete wall.

Quick Guide (ENGLISH)
Page 8
... the form (1->3, 3->1) (3) Angle adjustment section of wall-mounted LCD TV Picture (1) shows the adjustment angle (0°~ 13°) when you use LCD TV in the direction of the arrow(Left) so that LCD TV can turn LCD TV over which might cause damage to LCD TV. English-8 BN68-00633A-06Eng 4.qxd.q 5/12/04 6:34 ...PM Page 59 APPENDIX Installing the Wall Mount Kit 4 Adjust LCD TV to the hook on the ...
... the form (1->3, 3->1) (3) Angle adjustment section of wall-mounted LCD TV Picture (1) shows the adjustment angle (0°~ 13°) when you use LCD TV in the direction of the arrow(Left) so that LCD TV can turn LCD TV over which might cause damage to LCD TV. English-8 BN68-00633A-06Eng 4.qxd.q 5/12/04 6:34 ...PM Page 59 APPENDIX Installing the Wall Mount Kit 4 Adjust LCD TV to the hook on the ...

User Manual (ENGLISH)
Page 4
.... . .8 Connecting to a Cable Box that Descrambles Some Channels . .8 Connecting a VCR 10 Connecting an S-VHS VCR 11 Connecting a DVD Player 12 Chapter 3: Special Features Turning the TV On and Off 13 Changing Channels 13 Using the Channel Buttons 13 Using the PRE-CH Button to select the Previous Channel . .13 Adjusting the... channels over 100 17 ADD and DEL Channels (Manual Method 18 To select the Input Source 19 To Edit the Input Source Name 20 Using Automatic Picture Settings 21 Customizing the Picture 22 Using Automatic Sound Settings 23 To select the Sound option 24 CONTENTS 1
.... . .8 Connecting to a Cable Box that Descrambles Some Channels . .8 Connecting a VCR 10 Connecting an S-VHS VCR 11 Connecting a DVD Player 12 Chapter 3: Special Features Turning the TV On and Off 13 Changing Channels 13 Using the Channel Buttons 13 Using the PRE-CH Button to select the Previous Channel . .13 Adjusting the... channels over 100 17 ADD and DEL Channels (Manual Method 18 To select the Input Source 19 To Edit the Input Source Name 20 Using Automatic Picture Settings 21 Customizing the Picture 22 Using Automatic Sound Settings 23 To select the Sound option 24 CONTENTS 1

User Manual (ENGLISH)
Page 6
...performance unit that includes the following items are missing, contact your LCD TV. Remote Control (BN59-00429A) & Batteries (AAA x 2) 17" 15" / 20" Power Cord 17" : 3903-000144 15"/20" : 3903-000085 15" / 17" 20" Wall Mount kit 15"/17" : BN96-01270A 20" : BN96-01271A Owner's Instructions English-1 BN68-00633B-00Eng ...to-use remote control • Easy-to-use on-screen menu system • Automatic timer to turn the TV on and off • Adjustable picture and sound settings that can be stored in the TV's memory • Automatic channel tuning for up to 194 channels.(Air : 69 , STD : ...
...performance unit that includes the following items are missing, contact your LCD TV. Remote Control (BN59-00429A) & Batteries (AAA x 2) 17" 15" / 20" Power Cord 17" : 3903-000144 15"/20" : 3903-000085 15" / 17" 20" Wall Mount kit 15"/17" : BN96-01270A 20" : BN96-01271A Owner's Instructions English-1 BN68-00633B-00Eng ...to-use remote control • Easy-to-use on-screen menu system • Automatic timer to turn the TV on and off • Adjustable picture and sound settings that can be stored in the TV's memory • Automatic channel tuning for up to 194 channels.(Air : 69 , STD : ...

User Manual (ENGLISH)
Page 7
..., including the on-screen menu. Green shows when you set of the available input sources (TV, VIDEO, S-VIDEO, Component, PC) You can also use the remote control. Also press to make selections. POWER INDICATOR Lights up when you turn the power on, and light is off after the power is on the... TV's control panel to highlight various items on the on or off . (Red light shows in stand-by mode...
..., including the on-screen menu. Green shows when you set of the available input sources (TV, VIDEO, S-VIDEO, Component, PC) You can also use the remote control. Also press to make selections. POWER INDICATOR Lights up when you turn the power on, and light is off after the power is on the... TV's control panel to highlight various items on the on or off . (Red light shows in stand-by mode...


