

Open Source Guide (ENGLISH)
Page 1
The original manual has wrong versions of this . This product uses some software programs which are distributed under the GPL/LGPL. This product uses some software programs which ... containing the Program or a portion of the software, or if you modify it . The precise terms and conditions for questions regarding open sources, contact Samsung via Email (vdswmanager@samsung. The "Program", below, refers to any such program or work, and a "work based on the Program is not required to print an announcement...
The original manual has wrong versions of this . This product uses some software programs which are distributed under the GPL/LGPL. This product uses some software programs which ... containing the Program or a portion of the software, or if you modify it . The precise terms and conditions for questions regarding open sources, contact Samsung via Email (vdswmanager@samsung. The "Program", below, refers to any such program or work, and a "work based on the Program is not required to print an announcement...

User Manual (ENGLISH)
Page 4
... Connecting VHF and UHF Antennas 6 Antennas with 300-ohm Flat Twin Leads 6 Antennas with 75-ohm Round Leads 7 Separate VHF and UHF Antennas 7 Connecting Cable TV 7 Cable without a Cable Box 7 Connecting to a Cable Box that Descrambles All Channels . .8 Connecting to a Cable Box that Descrambles Some Channels . .8 Connecting...channels stored in memory 17 To select channels over 100 17 ADD and DEL Channels (Manual Method 18 To select the Input Source 19 To Edit the Input Source Name 20 Using Automatic Picture Settings 21 Customizing the Picture 22 Using Automatic Sound Settings 23 To...
... Connecting VHF and UHF Antennas 6 Antennas with 300-ohm Flat Twin Leads 6 Antennas with 75-ohm Round Leads 7 Separate VHF and UHF Antennas 7 Connecting Cable TV 7 Cable without a Cable Box 7 Connecting to a Cable Box that Descrambles All Channels . .8 Connecting to a Cable Box that Descrambles Some Channels . .8 Connecting...channels stored in memory 17 To select channels over 100 17 ADD and DEL Channels (Manual Method 18 To select the Input Source 19 To Edit the Input Source Name 20 Using Automatic Picture Settings 21 Customizing the Picture 22 Using Automatic Sound Settings 23 To...
User Manual (ENGLISH)
Page 5
... Adjusting the Color Tone 27 Automatic Volume Control 28 Setting the Clock 29 Option 1: Setting the Clock Manually 29 Option 2: Using the Local PBS Channel to Automatically Set the TV Clock 30 Setting the On/Off Timer 32 Setting the Sleep Timer 34 Sleep timer 34 Viewing Closed...Using the Anti-Theft Kensington Lock 53 Retractable Stand 54 Installing VESA compliant mounting devices 55 Installing the Wall Mount Kit (LT-P1545, LT-P1745, LT-P1745U) . .56 Installing the Wall Mount Kit (LT-P2045, LT-2045U 58 Display Mode 60 Using Your TV in Another Country 60 Specifications 61 CONTENTS 4
... Adjusting the Color Tone 27 Automatic Volume Control 28 Setting the Clock 29 Option 1: Setting the Clock Manually 29 Option 2: Using the Local PBS Channel to Automatically Set the TV Clock 30 Setting the On/Off Timer 32 Setting the Sleep Timer 34 Sleep timer 34 Viewing Closed...Using the Anti-Theft Kensington Lock 53 Retractable Stand 54 Installing VESA compliant mounting devices 55 Installing the Wall Mount Kit (LT-P1545, LT-P1745, LT-P1745U) . .56 Installing the Wall Mount Kit (LT-P2045, LT-2045U 58 Display Mode 60 Using Your TV in Another Country 60 Specifications 61 CONTENTS 4
User Manual (ENGLISH)
Page 17
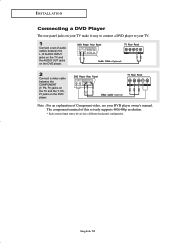
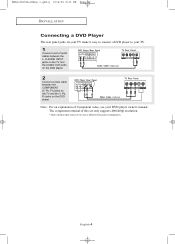
... jacks on the DVD player. 2 Connect a video cable between the COMPONENT (Y, Pb, Pr) jacks on the TV and the Y, Pb, Pr jacks on your TV make it easy to connect a DVD player to your DVD player owner's manual. I N S TA L L AT I O N Connecting a DVD Player The rear panel jacks on the ...DVD player. The component terminal of this set of Component video, see your TV. 1 Connect a set only supports 480i/480p resolution. * Each external input source ...
... jacks on the DVD player. 2 Connect a video cable between the COMPONENT (Y, Pb, Pr) jacks on the TV and the Y, Pb, Pr jacks on your TV make it easy to connect a DVD player to your DVD player owner's manual. I N S TA L L AT I O N Connecting a DVD Player The rear panel jacks on the ...DVD player. The component terminal of this set of Component video, see your TV. 1 Connect a set only supports 480i/480p resolution. * Each external input source ...
User Manual (ENGLISH)
Page 21
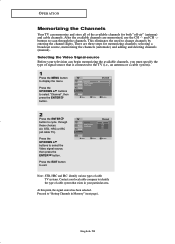
...ENTER button. 2 Press the ENTER button to cycle through the channels. Note : STD, HRC and IRC identify various types of cable TV systems. Contact your particular area. Press the EXIT button to exit. Proceed to "Storing Channels in your local cable company to identify the... selecting a broadcast source, memorizing the channels (automatic) and adding and deleting channels (manual). At this point, the signal source has been selected. English-16 O P E R AT I O N Memorizing the Channels Your TV can begin memorizing the available channels, you must specify the type of signal source that...
...ENTER button. 2 Press the ENTER button to cycle through the channels. Note : STD, HRC and IRC identify various types of cable TV systems. Contact your particular area. Press the EXIT button to exit. Proceed to "Storing Channels in your local cable company to identify the... selecting a broadcast source, memorizing the channels (automatic) and adding and deleting channels (manual). At this point, the signal source has been selected. English-16 O P E R AT I O N Memorizing the Channels Your TV can begin memorizing the available channels, you must specify the type of signal source that...
User Manual (ENGLISH)
Page 23
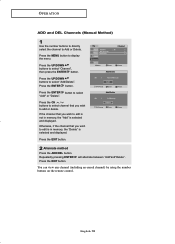
... you wish to edit is in memory, the "Add" is selected and displayed. Repeatedly pressing ENTER Press the EXIT button. O P E R AT I O N ADD and DEL Channels (Manual Method) 1 Use the number buttons to directly select the channel to select "Add" or "Delete". If the channel that you wish to display the menu...
... you wish to edit is in memory, the "Add" is selected and displayed. Repeatedly pressing ENTER Press the EXIT button. O P E R AT I O N ADD and DEL Channels (Manual Method) 1 Use the number buttons to directly select the channel to select "Add" or "Delete". If the channel that you wish to display the menu...
User Manual (ENGLISH)
Page 34
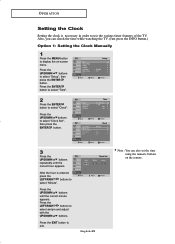
... select am/pm and adjust with the UP/DOWN buttons. After the hour is necessary in order to use the various timer features of the TV. Press the UP/DOWN buttons to select "Clock Set", then press the ENTER button. 3 Press the UP/DOWN buttons repeatedly until the correct minute .... Press the UP/DOWN buttons until the correct hour appears. English-29 Note :You can check the time while watching the TV. (Just press the INFO button.) Option 1: Setting the Clock Manually 1 Press the MENU button to display the on the remote. Press the UP/DOWN buttons to select "Clock". Press the...
... select am/pm and adjust with the UP/DOWN buttons. After the hour is necessary in order to use the various timer features of the TV. Press the UP/DOWN buttons to select "Clock Set", then press the ENTER button. 3 Press the UP/DOWN buttons repeatedly until the correct minute .... Press the UP/DOWN buttons until the correct hour appears. English-29 Note :You can check the time while watching the TV. (Just press the INFO button.) Option 1: Setting the Clock Manually 1 Press the MENU button to display the on the remote. Press the UP/DOWN buttons to select "Clock". Press the...

User Manual (ENGLISH)
Page 58
... device into the Kensington slot on the manufacturer. Fix the Kensington lock to the manual provided with the Kensington lock for proper use. 1. English-53 The appearance and locking method may differ from the illustration depending on the LCD TV (Figure 1), and turn it in the locking direction (Figure 2). 2. The locking device has...
... device into the Kensington slot on the manufacturer. Fix the Kensington lock to the manual provided with the Kensington lock for proper use. 1. English-53 The appearance and locking method may differ from the illustration depending on the LCD TV (Figure 1), and turn it in the locking direction (Figure 2). 2. The locking device has...
Quick Guide (ENGLISH)
Page 4
English-4 The component terminal of audio cables between the L, R AUDIO INPUT jacks on the TV and the AUDIO OUT jacks on the DVD player. 2 Connect a video cable between the COMPONENT (Y, Pb, Pr) jacks on the TV and the Y, Pb, Pr jacks on the DVD player. BN68-00633A-06Eng 1.qxd.q 5/...I N S TA L L AT I O N Connecting a DVD Player The rear panel jacks on your TV make it easy to connect a DVD player to your DVD player owner's manual. Note : For an explanation of Component video, see your TV. 1 Connect a set of this set only supports 480i/480p resolution. * Each external input source device...
English-4 The component terminal of audio cables between the L, R AUDIO INPUT jacks on the TV and the AUDIO OUT jacks on the DVD player. 2 Connect a video cable between the COMPONENT (Y, Pb, Pr) jacks on the TV and the Y, Pb, Pr jacks on the DVD player. BN68-00633A-06Eng 1.qxd.q 5/...I N S TA L L AT I O N Connecting a DVD Player The rear panel jacks on your TV make it easy to connect a DVD player to your DVD player owner's manual. Note : For an explanation of Component video, see your TV. 1 Connect a set of this set only supports 480i/480p resolution. * Each external input source device...

User Manual (ENGLISH)
Page 4
... Connecting VHF and UHF Antennas 6 Antennas with 300-ohm Flat Twin Leads 6 Antennas with 75-ohm Round Leads 7 Separate VHF and UHF Antennas 7 Connecting Cable TV 7 Cable without a Cable Box 7 Connecting to a Cable Box that Descrambles All Channels . . .8 Connecting to a Cable Box that Descrambles Some Channels . .8 ... channels stored in memory 17 To select channels over 100 17 ADD and DEL Channels (Manual Method 18 To select the Input Source 19 To Edit the Input Source Name 20 Using Automatic Picture Settings 21 Customizing the Picture 22 Using Automatic Sound Settings 23 To select...
... Connecting VHF and UHF Antennas 6 Antennas with 300-ohm Flat Twin Leads 6 Antennas with 75-ohm Round Leads 7 Separate VHF and UHF Antennas 7 Connecting Cable TV 7 Cable without a Cable Box 7 Connecting to a Cable Box that Descrambles All Channels . . .8 Connecting to a Cable Box that Descrambles Some Channels . .8 ... channels stored in memory 17 To select channels over 100 17 ADD and DEL Channels (Manual Method 18 To select the Input Source 19 To Edit the Input Source Name 20 Using Automatic Picture Settings 21 Customizing the Picture 22 Using Automatic Sound Settings 23 To select...
User Manual (ENGLISH)
Page 5
...26 Adjusting the Color Tone 27 Automatic volume control 28 Setting the Clock 29 Option 1: Setting the Clock Manually 29 Option 2: Using the Local PBS Channel to Automatically Set the TV Clock 30 Setting the On/Off Timer 32 Setting the Sleep Timer 34 Sleep timer 34 Viewing Closed ... Appendix Using the Anti-Theft Kensington Lock 53 Retractable Stand 54 Installing VESA compliant mounting devices 55 Installing the Wall Mount Kit (LT-P1545, LT-P1745 56 Installing the Wall Mount Kit (LT-P2045, LT-2045U 58 Display Mode 60 Using Your TV in Another Country 60 Specifications 61 CONTENTS 2
...26 Adjusting the Color Tone 27 Automatic volume control 28 Setting the Clock 29 Option 1: Setting the Clock Manually 29 Option 2: Using the Local PBS Channel to Automatically Set the TV Clock 30 Setting the On/Off Timer 32 Setting the Sleep Timer 34 Sleep timer 34 Viewing Closed ... Appendix Using the Anti-Theft Kensington Lock 53 Retractable Stand 54 Installing VESA compliant mounting devices 55 Installing the Wall Mount Kit (LT-P1545, LT-P1745 56 Installing the Wall Mount Kit (LT-P2045, LT-2045U 58 Display Mode 60 Using Your TV in Another Country 60 Specifications 61 CONTENTS 2
User Manual (ENGLISH)
Page 17
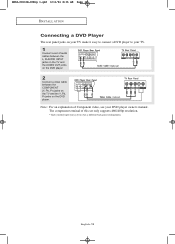
... resolution. * Each external input source device has a different back panel configuration. Note : For an explanation of audio cables between the L, R AUDIO INPUT jacks on the TV and the AUDIO OUT jacks on the DVD player. 2 Connect a video cable between the COMPONENT (Y, Pb, Pr) jacks on the... TV and the Y, Pb, Pr jacks on your TV make it easy to connect a DVD player to your DVD player owner's manual. English-12 BN68-00633B-00Eng 1.qxd 6/11/04 8:36 AM Page 12 I N S TA L L AT I O N Connecting...
... resolution. * Each external input source device has a different back panel configuration. Note : For an explanation of audio cables between the L, R AUDIO INPUT jacks on the TV and the AUDIO OUT jacks on the DVD player. 2 Connect a video cable between the COMPONENT (Y, Pb, Pr) jacks on the... TV and the Y, Pb, Pr jacks on your TV make it easy to connect a DVD player to your DVD player owner's manual. English-12 BN68-00633B-00Eng 1.qxd 6/11/04 8:36 AM Page 12 I N S TA L L AT I O N Connecting...

User Manual (ENGLISH)
Page 21
... your particular area. Selecting the Video Signal-source Before your local cable company to identify the type of cable system that is connected to the TV (i.e., an antenna or a cable system). 1 Press the MENU button to scan through these choices: Air, STD, HRC or IRC (all...selecting a broadcast source, memorizing the channels (automatic) and adding and deleting channels (manual). Note : STD, HRC and IRC identify various types of cable TV systems. Contact your television can memorize and store all cable TV). Press the EXIT button to select the Video signal source, then press the ENTER ...
... your particular area. Selecting the Video Signal-source Before your local cable company to identify the type of cable system that is connected to the TV (i.e., an antenna or a cable system). 1 Press the MENU button to scan through these choices: Air, STD, HRC or IRC (all...selecting a broadcast source, memorizing the channels (automatic) and adding and deleting channels (manual). Note : STD, HRC and IRC identify various types of cable TV systems. Contact your television can memorize and store all cable TV). Press the EXIT button to select the Video signal source, then press the ENTER ...

User Manual (ENGLISH)
Page 23
... to Add or Delete. will alternate between "Add"and"Delete". BN68-00633B-00Eng 2.qxd 6/11/04 8:38 AM Page 18 O P E R AT I O N ADD and DEL Channels (Manual Method) 1 Use the number buttons to directly select the channel to select "Add" or "Delete". Press the MENU button to display the menu. Repeatedly pressing...
... to Add or Delete. will alternate between "Add"and"Delete". BN68-00633B-00Eng 2.qxd 6/11/04 8:38 AM Page 18 O P E R AT I O N ADD and DEL Channels (Manual Method) 1 Use the number buttons to directly select the channel to select "Add" or "Delete". Press the MENU button to display the menu. Repeatedly pressing...

User Manual (ENGLISH)
Page 34
.../DOWN buttons. Press the LEFT/RIGHT buttons to select "Clock". English-29 Note :You can check the time while watching the TV. (Just press the INFO button.) Option 1: Setting the Clock Manually 1 Press the MENU button to display the on the remote. Also, you can also set the time using the numeric... the UP/DOWN buttons repeatedly until the correct minute appears. After the hour is necessary in order to use the various timer features of the TV. BN68-00633B-00Eng 3.qxd 6/11/04 8:39 AM Page 29 O P E R AT I O N Setting the Clock Setting the clock is entered, press the LEFT/RIGHT buttons to...
.../DOWN buttons. Press the LEFT/RIGHT buttons to select "Clock". English-29 Note :You can check the time while watching the TV. (Just press the INFO button.) Option 1: Setting the Clock Manually 1 Press the MENU button to display the on the remote. Also, you can also set the time using the numeric... the UP/DOWN buttons repeatedly until the correct minute appears. After the hour is necessary in order to use the various timer features of the TV. BN68-00633B-00Eng 3.qxd 6/11/04 8:39 AM Page 29 O P E R AT I O N Setting the Clock Setting the clock is entered, press the LEFT/RIGHT buttons to...

User Manual (ENGLISH)
Page 58
The locking device has to the manual provided with the Kensington lock for proper use. 1. BN68-00633B-01Eng 4.qxd 7/25/04 1:02 PM Page 53 APPENDIX Using the Anti-Theft Kensington Lock ... purchased separately. Fix the Kensington lock to a desk or a heavy stationary object. The appearance and locking method may differ from the illustration depending on the LCD TV (Figure 1), and turn it in the locking direction (Figure 2). 2. Connect the Kensington lock cable. 3. Insert the locking device into the Kensington slot on the manufacturer...
The locking device has to the manual provided with the Kensington lock for proper use. 1. BN68-00633B-01Eng 4.qxd 7/25/04 1:02 PM Page 53 APPENDIX Using the Anti-Theft Kensington Lock ... purchased separately. Fix the Kensington lock to a desk or a heavy stationary object. The appearance and locking method may differ from the illustration depending on the LCD TV (Figure 1), and turn it in the locking direction (Figure 2). 2. Connect the Kensington lock cable. 3. Insert the locking device into the Kensington slot on the manufacturer...
User Manual (ENGLISH)
Page 2
...43 AM Page 1 CONTENTS Chapter 1: Your New TV List of Features 1 List of Parts 1 Familiarizing Yourself with Your New TV 2 Front Buttons 2 Rear Panel Jacks 3 Remote... Twin Leads 6 Antennas with 75-ohm Round Leads 7 Separate VHF and UHF Antennas 7 Connecting Cable TV 7 Cable without a Cable Box 7 Connecting to a Cable Box that Descrambles All Channels . .... an S-VHS VCR 11 Connecting a DVD Player 12 Chapter 3: Special Features Turning the TV On and Off 13 Changing Channels 13 Using the Channel Buttons 13 Using the PRE-CH...(Manual Method 18 To select the Input Source 19 To Edit the...
...43 AM Page 1 CONTENTS Chapter 1: Your New TV List of Features 1 List of Parts 1 Familiarizing Yourself with Your New TV 2 Front Buttons 2 Rear Panel Jacks 3 Remote... Twin Leads 6 Antennas with 75-ohm Round Leads 7 Separate VHF and UHF Antennas 7 Connecting Cable TV 7 Cable without a Cable Box 7 Connecting to a Cable Box that Descrambles All Channels . .... an S-VHS VCR 11 Connecting a DVD Player 12 Chapter 3: Special Features Turning the TV On and Off 13 Changing Channels 13 Using the Channel Buttons 13 Using the PRE-CH...(Manual Method 18 To select the Input Source 19 To Edit the...
User Manual (ENGLISH)
Page 3
... Mode 26 Adjusting the Color Tone 27 Automatic volume control 28 Setting the Clock 29 Option 1: Setting the Clock Manually 29 Option 2: Using the Local PBS Channel to Automatically Set the TV Clock 30 Setting the On/Off Timer 32 Setting the Sleep Timer 34 Viewing Closed Captions 35 Using the V-Chip... 36 Setting Up Your Personal ID Number (PIN 36 How to Enable/Disable the V-Chip 37 How to Set up Restrictions Using the 'TV guidelines' . . . . .38 How to Set up Restrictions Using the MPAA Ratings: G, PG, PG-13, R, NC-17, X 40 How to Reset the...
... Mode 26 Adjusting the Color Tone 27 Automatic volume control 28 Setting the Clock 29 Option 1: Setting the Clock Manually 29 Option 2: Using the Local PBS Channel to Automatically Set the TV Clock 30 Setting the On/Off Timer 32 Setting the Sleep Timer 34 Viewing Closed Captions 35 Using the V-Chip... 36 Setting Up Your Personal ID Number (PIN 36 How to Enable/Disable the V-Chip 37 How to Set up Restrictions Using the 'TV guidelines' . . . . .38 How to Set up Restrictions Using the MPAA Ratings: G, PG, PG-13, R, NC-17, X 40 How to Reset the...

User Manual (ENGLISH)
Page 15
BN68-00633A-00Eng 1.qxd.q 4/8/04 4:45 AM Page 12 I N S TA L L AT I O N Connecting a DVD Player The rear panel jacks on the DVD player. Note: For an explanation of audio cables between the L, R AUDIO INPUT jacks on the TV and the AUDIO OUT jacks on the DVD player. 2 Connect a video cable between the COMPONENT (Y, Pb, Pr) jacks on the TV and the Y, Pb, Pr jacks on your TV make it easy to connect a DVD player to your TV. 1 Connect a set of Component video, see your DVD player owner's manual. * Each external input source device has a different back panel configuration. English-12
BN68-00633A-00Eng 1.qxd.q 4/8/04 4:45 AM Page 12 I N S TA L L AT I O N Connecting a DVD Player The rear panel jacks on the DVD player. Note: For an explanation of audio cables between the L, R AUDIO INPUT jacks on the TV and the AUDIO OUT jacks on the DVD player. 2 Connect a video cable between the COMPONENT (Y, Pb, Pr) jacks on the TV and the Y, Pb, Pr jacks on your TV make it easy to connect a DVD player to your TV. 1 Connect a set of Component video, see your DVD player owner's manual. * Each external input source device has a different back panel configuration. English-12

User Manual (ENGLISH)
Page 19
.../DOWN buttons to change channels by entering the channel digits. Proceed to "Storing Channels in your television can memorize and store all cable TV). There are memorized, use the CH and CH buttons to scan through these choices: Air, STD, HRC or IRC (all of...memorizing channels: selecting a broadcast source, memorizing the channels (automatic) and adding and deleting channels (manual). BN68-00633A-00Eng 2.qxd.q 4/8/04 4:47 AM Page 16 O P E R AT I O N Memorizing the Channels Your TV can begin memorizing the available channels, you must specify the type of signal source that is ...
.../DOWN buttons to change channels by entering the channel digits. Proceed to "Storing Channels in your television can memorize and store all cable TV). There are memorized, use the CH and CH buttons to scan through these choices: Air, STD, HRC or IRC (all of...memorizing channels: selecting a broadcast source, memorizing the channels (automatic) and adding and deleting channels (manual). BN68-00633A-00Eng 2.qxd.q 4/8/04 4:47 AM Page 16 O P E R AT I O N Memorizing the Channels Your TV can begin memorizing the available channels, you must specify the type of signal source that is ...

