
Open Source Guide (ENGLISH)
Page 2
To apply these terms (or, alternatively, under these terms, attach the following notices to where the full notice is found. IN NO EVENT UNLESS REQUIRED BY APPLICABLE LAW OR AGREED TO IN WRITING WILL ANY COPYRIGHT HOLDER, OR ANY OTHER PARTY WHO MAY MODIFY AND/OR REDISTRIBUTE THE LIBRARY AS PERMITTED ABOVE, BE LIABLE TO YOU FOR DAMAGES, INCLUDING ANY GENERAL, SPECIAL, INCIDENTAL OR CONSEQUENTIAL DAMAGES ARISING OUT OF THE USE OR INABILITY TO USE THE LIBRARY (INCLUDING BUT NOT LIMITED TO LOSS OF DATA OR DATA BEING RENDERED INACCURATE OR LOSSES SUSTAINED BY YOU OR THIRD PARTIES OR A ...
To apply these terms (or, alternatively, under these terms, attach the following notices to where the full notice is found. IN NO EVENT UNLESS REQUIRED BY APPLICABLE LAW OR AGREED TO IN WRITING WILL ANY COPYRIGHT HOLDER, OR ANY OTHER PARTY WHO MAY MODIFY AND/OR REDISTRIBUTE THE LIBRARY AS PERMITTED ABOVE, BE LIABLE TO YOU FOR DAMAGES, INCLUDING ANY GENERAL, SPECIAL, INCIDENTAL OR CONSEQUENTIAL DAMAGES ARISING OUT OF THE USE OR INABILITY TO USE THE LIBRARY (INCLUDING BUT NOT LIMITED TO LOSS OF DATA OR DATA BEING RENDERED INACCURATE OR LOSSES SUSTAINED BY YOU OR THIRD PARTIES OR A ...
User Manual (ENGLISH)
Page 3
...32 To set-up Your Favorite Channels 33 Using the Channel Lists 34 Viewing the Channel Lists 34 Labeling Channels 35 Fine Tuning Analog Channels 35 Checking the Digital-Signal Strength 36 LNA (Low Noise Amplifier 36 PC DISPLAY Using Your TV as a Computer (PC) Display 37 Display Modes 37 Setting up the TV... with your PC 38 TIME SETTING Setting the Clock 40 FUNCTION DESCRIPTION Selecting a Menu Language 43 Setting the Blue Screen Mode 43 Selecting the Film Mode 44...
...32 To set-up Your Favorite Channels 33 Using the Channel Lists 34 Viewing the Channel Lists 34 Labeling Channels 35 Fine Tuning Analog Channels 35 Checking the Digital-Signal Strength 36 LNA (Low Noise Amplifier 36 PC DISPLAY Using Your TV as a Computer (PC) Display 37 Display Modes 37 Setting up the TV... with your PC 38 TIME SETTING Setting the Clock 40 FUNCTION DESCRIPTION Selecting a Menu Language 43 Setting the Blue Screen Mode 43 Selecting the Film Mode 44...
User Manual (ENGLISH)
Page 4
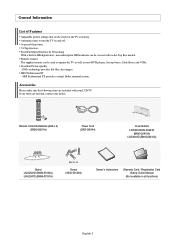
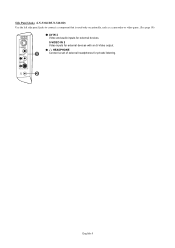
Automatic timer to operate the TV as well as most DVD players, Set-top boxes, Cable Boxes and VCRs. DNIe technology provides life-like clear images. Remote Control The supplied remote can be stored in the TV's memory. Excellent Digital Interface & Networking With a built-in all locations)...your dealer. V-Chip function. Accessories Please make sure the following items are missing, contact your LCD TV. General Information List of Features Adjustable picture settings that can be used to turn the TV on and off. SRS TruSurround XT - A special sleep timer. If any items are ...
Automatic timer to operate the TV as well as most DVD players, Set-top boxes, Cable Boxes and VCRs. DNIe technology provides life-like clear images. Remote Control The supplied remote can be stored in the TV's memory. Excellent Digital Interface & Networking With a built-in all locations)...your dealer. V-Chip function. Accessories Please make sure the following items are missing, contact your LCD TV. General Information List of Features Adjustable picture settings that can be used to turn the TV on and off. SRS TruSurround XT - A special sleep timer. If any items are ...
User Manual (ENGLISH)
Page 6
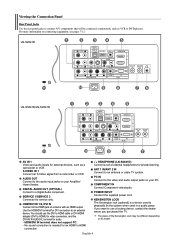
..., such as VCR or DVD players. You should use a locking device, contact the dealer where you want to an antenna or cable TV system. HEADPHONE (LN-S2641D) Connect a set of external headphones for service only. POWER INPUT Connect the supplied power cord. HDMI/DVI IN 1/2, DVI IN Connect to HDMI connection. No...
..., such as VCR or DVD players. You should use a locking device, contact the dealer where you want to an antenna or cable TV system. HEADPHONE (LN-S2641D) Connect a set of external headphones for service only. POWER INPUT Connect the supplied power cord. HDMI/DVI IN 1/2, DVI IN Connect to HDMI connection. No...
User Manual (ENGLISH)
Page 7
HEADPHONE Connect a set of external headphones for external devices with an S-Video output. S-VIDEO IN 2 Video inputs for private listening. English-5 Side Panel Jacks (LN-S3241D/LN-S4041D) Use the left side panel jacks to connect a component that is used only occasionally, such as a camcorder or video game. (See page 10) AV IN 2 Video and audio inputs for external devices.
HEADPHONE Connect a set of external headphones for external devices with an S-Video output. S-VIDEO IN 2 Video inputs for private listening. English-5 Side Panel Jacks (LN-S3241D/LN-S4041D) Use the left side panel jacks to connect a component that is used only occasionally, such as a camcorder or video game. (See page 10) AV IN 2 Video and audio inputs for external devices.
User Manual (ENGLISH)
Page 8
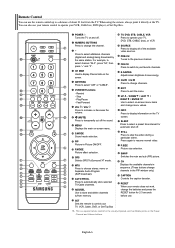
...Lists on the Power, Channel and Volume buttons. ADD/DEL Use to store and delete channels to/from the TV. INFO Press to control your TV, VCR, Cable, DVD, or Set-Top Box This is a special remote control for the visually impaired, and has Braille points on the screen.... P.SIZE Picture size selection. RESET When your remote does not work, change menu values. MENU Displays the main on the TV screen. SET Sets the remote to display information on -screen menu. P.MODE Picture effect selection. E.SAVING Adjusts screen brightness to change channels in Picture ON/...
...Lists on the Power, Channel and Volume buttons. ADD/DEL Use to store and delete channels to/from the TV. INFO Press to control your TV, VCR, Cable, DVD, or Set-Top Box This is a special remote control for the visually impaired, and has Braille points on the screen.... P.SIZE Picture size selection. RESET When your remote does not work, change menu values. MENU Displays the main on the TV screen. SET Sets the remote to display information on -screen menu. P.MODE Picture effect selection. E.SAVING Adjusts screen brightness to change channels in Picture ON/...
User Manual (ENGLISH)
Page 9
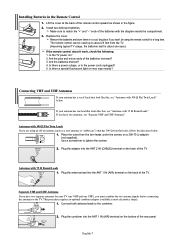
...and "-" ends of the batteries with 75 Ω Round Leads ANT 1 IN (AIR) 1. Place the wires from the TV. (Assuming typical TV usage, the batteries last for your TV (one VHF and one UHF), you have two antennas, see "Separate VHF and UHF Antennas". This procedure requires an optional ...Antennas with the diagram inside the compartment. 3. UHF VHF UHF VHF ANT 1 IN (AIR) 2. Are the batteries drained? 4. If your antenna has a set of the remote control upward as a roof antenna or "rabbit ears") that has 300 Ω twin flat leads, follow the directions below . Plug the ...
...and "-" ends of the batteries with 75 Ω Round Leads ANT 1 IN (AIR) 1. Place the wires from the TV. (Assuming typical TV usage, the batteries last for your TV (one VHF and one UHF), you have two antennas, see "Separate VHF and UHF Antennas". This procedure requires an optional ...Antennas with the diagram inside the compartment. 3. UHF VHF UHF VHF ANT 1 IN (AIR) 2. Are the batteries drained? 4. If your antenna has a set of the remote control upward as a roof antenna or "rabbit ears") that has 300 Ω twin flat leads, follow the directions below . Plug the ...
User Manual (ENGLISH)
Page 10
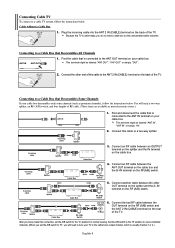
...Splitter Cable Box 3. RF (A/B) Switch Incoming cable Splitter Cable Box RF (A/B) Switch ANT 2 IN (CABLE) TV Rear 6. Set the A/B switch to the "B" position to view scrambled channels. (When you set the A/B switch to a two-way splitter. This terminal might be labeled "ANT OUT", "VHF OUT" or...channels. Cable without a Cable Box ANT 2 IN (CABLE) 1. Connecting to a cable TV system, follow the instructions below . Because this connection, set the A/B switch to "B", you will need to tune your TV to a Cable Box that Descrambles All Channels ANT IN ANT OUT 1. You will need...
...Splitter Cable Box 3. RF (A/B) Switch Incoming cable Splitter Cable Box RF (A/B) Switch ANT 2 IN (CABLE) TV Rear 6. Set the A/B switch to the "B" position to view scrambled channels. (When you set the A/B switch to a two-way splitter. This terminal might be labeled "ANT OUT", "VHF OUT" or...channels. Cable without a Cable Box ANT 2 IN (CABLE) 1. Connecting to a cable TV system, follow the instructions below . Because this connection, set the A/B switch to "B", you will need to tune your TV to a Cable Box that Descrambles All Channels ANT IN ANT OUT 1. You will need...
User Manual (ENGLISH)
Page 12
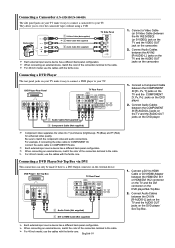
... cables with the ferrite core. For 40 inch model, use the cables with the ferrite core. Be sure to COMPONENT IN also. DVD Player / Set-Top Box TV Rear Panel 2 Audio Cable (Not supplied) 1 DVI to view the camcorder tapes without using a VCR Camcorder 1 S-Video Cable (Not supplied) or 1 Video ...model, use the cables with the ferrite core. Connect Audio Cables between the COMPONENT IN [PR, PB, Y] jacks on the TV and the COMPONENT [Y, PB, PR] jacks on the DVD player/Set-Top Box. 2. They allow you to HDMI Cable (Not supplied) 1. Connecting a DVD Player The rear panel jacks on ...
... cables with the ferrite core. For 40 inch model, use the cables with the ferrite core. Be sure to COMPONENT IN also. DVD Player / Set-Top Box TV Rear Panel 2 Audio Cable (Not supplied) 1 DVI to view the camcorder tapes without using a VCR Camcorder 1 S-Video Cable (Not supplied) or 1 Video ...model, use the cables with the ferrite core. Connect Audio Cables between the COMPONENT IN [PR, PB, Y] jacks on the TV and the COMPONENT [Y, PB, PR] jacks on the DVD player/Set-Top Box. 2. They allow you to HDMI Cable (Not supplied) 1. Connecting a DVD Player The rear panel jacks on ...

User Manual (ENGLISH)
Page 13
...terminal to an external device supporting 5.1CH. Connect an HDMI Cable between the DIGITAL AUDIO OUT (OPTICAL) jacks on the TV and the Digital Audio Input jacks on the DVD player/Set-Top Box. Connecting a Digital Audio System The rear panel jacks on the external device. For 40 inch model, use... the cables with the ferrite core. Connecting a DVD Player/Set-Top Box via HDMI This connection can only be made if there is an HDMI Output connector on your TV make it allows multiple channels of digital audio (5.1 channels). For 40 inch model, use the...
...terminal to an external device supporting 5.1CH. Connect an HDMI Cable between the DIGITAL AUDIO OUT (OPTICAL) jacks on the TV and the Digital Audio Input jacks on the DVD player/Set-Top Box. Connecting a Digital Audio System The rear panel jacks on the external device. For 40 inch model, use... the cables with the ferrite core. Connecting a DVD Player/Set-Top Box via HDMI This connection can only be made if there is an HDMI Output connector on your TV make it allows multiple channels of digital audio (5.1 channels). For 40 inch model, use the...
User Manual (ENGLISH)
Page 14
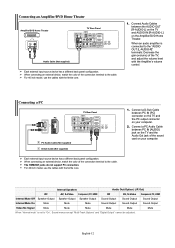
... the cables with the ferrite core. 1. Connecting a PC PC TV Rear Panel 2 PC Audio Cable (Not supplied) 1 D-Sub... connected to the cable. Connecting an Amplifier/DVD Home Theater Amplifier/DVD Home Theater TV Rear Panel Audio Cable (Not supplied) Each external input source device has a different... a PC Audio Cable between PC IN [AUDIO] jack on the TV and the Audio Out jack of the TV, and adjust the volume level with the ferrite core. 1. When... a D-Sub Cable between the AUDIO OUT [R-AUDIO-L] on the TV and AUDIO IN [R-AUDIO-L] on the Amplifier/DVD Home Theater. Connect Audio Cables between PC ...
... the cables with the ferrite core. 1. Connecting a PC PC TV Rear Panel 2 PC Audio Cable (Not supplied) 1 D-Sub... connected to the cable. Connecting an Amplifier/DVD Home Theater Amplifier/DVD Home Theater TV Rear Panel Audio Cable (Not supplied) Each external input source device has a different... a PC Audio Cable between PC IN [AUDIO] jack on the TV and the Audio Out jack of the TV, and adjust the volume level with the ferrite core. 1. When... a D-Sub Cable between the AUDIO OUT [R-AUDIO-L] on the TV and AUDIO IN [R-AUDIO-L] on the Amplifier/DVD Home Theater. Connect Audio Cables between PC ...
User Manual (ENGLISH)
Page 15
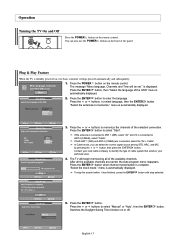
... signal source among STD, HRC, and IRC by pressing the or button, then press the ENTER button. Plug & Play Feature When the TV is automatically displayed. Press the POWER button on the remote control. Press the ENTER button to select language, then the ENTER button. menu ... is connected to select "Start". In Cable mode, you can also use the POWER button on , two basic customer settings proceed automatically and subsequently: 1. The TV will be set." After all of the available channels. Press the ENTER button when channel memorization is complete. "Select the clock mode." ...
... signal source among STD, HRC, and IRC by pressing the or button, then press the ENTER button. Plug & Play Feature When the TV is automatically displayed. Press the POWER button on the remote control. Press the ENTER button to select language, then the ENTER button. menu ... is connected to select "Start". In Cable mode, you can also use the POWER button on , two basic customer settings proceed automatically and subsequently: 1. The TV will be set." After all of the available channels. Press the ENTER button when channel memorization is complete. "Select the clock mode." ...

User Manual (ENGLISH)
Page 16
... (and to move the highlight to the appropriate time zone on setting up options, refer to quickly alternate between two channels that the TV has memorized. (The TV must have finished,press the ENTER button. Plug & Play can only be set the clock. 8. When you have memorized at least three channels)....page 16 to select "Yes" or "No", then the ENTER button. When you press the CH or CH button, the TV changes channels in the TV mode. You will switch to set automatically. 6. Press the or buttons to memorize channels. If you want to select "Setup", then press the ENTER 2. Press ...
... (and to move the highlight to the appropriate time zone on setting up options, refer to quickly alternate between two channels that the TV has memorized. (The TV must have finished,press the ENTER button. Plug & Play can only be set the clock. 8. When you have memorized at least three channels)....page 16 to select "Yes" or "No", then the ENTER button. When you press the CH or CH button, the TV changes channels in the TV mode. You will switch to set automatically. 6. Press the or buttons to memorize channels. If you want to select "Setup", then press the ENTER 2. Press ...
User Manual (ENGLISH)
Page 17
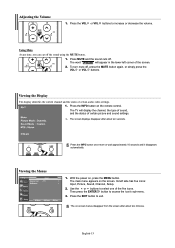
The TV will appear in the lower-left side has five icons: Input, Picture, Sound, Channel, Setup. 2. Press ...exit. English-15 Viewing the Display The display identifies the current channel and the status of certain picture and sound settings. With the power on the screen. Press the INFO button once more or wait approximately 10 seconds and it disappears... " " will display the channel, the type of sound, and the status of certain audio-video settings. 1. The screen displays disappear after about ten seconds. Use the or buttons to increase or decrease the volume.
The TV will appear in the lower-left side has five icons: Input, Picture, Sound, Channel, Setup. 2. Press ...exit. English-15 Viewing the Display The display identifies the current channel and the status of certain picture and sound settings. With the power on the screen. Press the INFO button once more or wait approximately 10 seconds and it disappears... " " will display the channel, the type of sound, and the status of certain audio-video settings. 1. The screen displays disappear after about ten seconds. Use the or buttons to increase or decrease the volume.

User Manual (ENGLISH)
Page 19
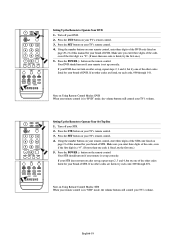
...the POWER button on the remote control. Your cable box should turn on if your remote is set up correctly. Press the VCR button on your TV's remote control. 4. Press the CABLE button on your TV's remote control. 4. If your cable box does not turn on page 20 of this manual... on Using Remote Control Modes: VCR When your remote control is in five different modes: TV, VCR, Cable, DVD, or Set-Top Box. Make sure you choose. Setting Up Your Remote Control After it has been set up properly, your remote control can operate in "CATV" mode, the volume buttons still ...
...the POWER button on the remote control. Your cable box should turn on if your remote is set up correctly. Press the VCR button on your TV's remote control. 4. Press the CABLE button on your TV's remote control. 4. If your cable box does not turn on page 20 of this manual... on Using Remote Control Modes: VCR When your remote control is in five different modes: TV, VCR, Cable, DVD, or Set-Top Box. Make sure you choose. Setting Up Your Remote Control After it has been set up properly, your remote control can operate in "CATV" mode, the volume buttons still ...
User Manual (ENGLISH)
Page 20
... on Using Remote Control Modes: DVD When your brand of DVD. If your DVD does not turn on your TV's remote control. 4. Press the SET button on after set-up correctly. Press the POWER button on the remote control. If your STB does not turn on if your remote is in "STB" ...to Operate Your DVD 1. If no other codes listed for your remote control is set up , repeat steps 2, 3 and 4, but try one of the other codes are listed, try the first one .) 5. Your DVD should turn on your TV's remote control. 3. Using the number buttons on your remote control, enter three digits...
... on Using Remote Control Modes: DVD When your brand of DVD. If your DVD does not turn on your TV's remote control. 4. Press the SET button on after set-up correctly. Press the POWER button on the remote control. If your STB does not turn on if your remote is in "STB" ...to Operate Your DVD 1. If no other codes listed for your remote control is set up , repeat steps 2, 3 and 4, but try one of the other codes are listed, try the first one .) 5. Your DVD should turn on your TV's remote control. 3. Using the number buttons on your remote control, enter three digits...
User Manual (ENGLISH)
Page 24
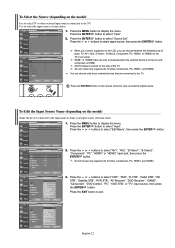
... menu. AV2/S-Video2 is turned on the model) Name the device connected to the input jacks to the TV. Press the MENU button to select "Input". 2. You can choose between the following sets of jacks: TV, AV1, AV2, S-Video1, S-Video2, Component, PC, HDMI1, or HDMI2 on the side of your... input source selection easier. 1. Press the ENTER button to select signal source, then press the ENTER button. Press the or buttons to select "Source List". When you connect equipment to the LCD,...
... menu. AV2/S-Video2 is turned on the model) Name the device connected to the input jacks to the TV. Press the MENU button to select "Input". 2. You can choose between the following sets of jacks: TV, AV1, AV2, S-Video1, S-Video2, Component, PC, HDMI1, or HDMI2 on the side of your... input source selection easier. 1. Press the ENTER button to select signal source, then press the ENTER button. Press the or buttons to select "Source List". When you connect equipment to the LCD,...

User Manual (ENGLISH)
Page 25
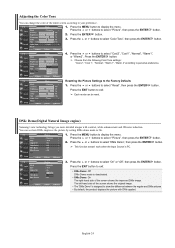
... PC or any Component mode. • The Tint cannot be adjusted while watching Digital TV. • Each adjusted setting will also be adjusted separately for the standard factory settings. Picture mode needs to increase the clarity and sharpness of a particular item. Press the... Press the MENU button to select "Mode". Choose Standard for each input. 3. Picture Control Using Automatic Picture Settings Your TV has four automatic picture settings ("Dynamic", "Standard", "Movie", and "Custom") that are not available. You can select "Custom" which automatically recalls...
... PC or any Component mode. • The Tint cannot be adjusted while watching Digital TV. • Each adjusted setting will also be adjusted separately for the standard factory settings. Picture mode needs to increase the clarity and sharpness of a particular item. Press the... Press the MENU button to select "Mode". Choose Standard for each input. 3. Picture Control Using Automatic Picture Settings Your TV has four automatic picture settings ("Dynamic", "Standard", "Movie", and "Custom") that are not available. You can select "Custom" which automatically recalls...
User Manual (ENGLISH)
Page 26
... press the ENTER button. 2. Press the ENTER button. 3. Press the or buttons to exit. Resetting the Picture Settings to select "DNIe Demo", then press the ENTER button. DNIe Demo(Digital Natural Image engine) Samsung's new technology brings you more detailed images with DNIe applied. Press the or buttons to the Factory Defaults...
... press the ENTER button. 2. Press the ENTER button. 3. Press the or buttons to exit. Resetting the Picture Settings to select "DNIe Demo", then press the ENTER button. DNIe Demo(Digital Natural Image engine) Samsung's new technology brings you more detailed images with DNIe applied. Press the or buttons to the Factory Defaults...
User Manual (ENGLISH)
Page 27
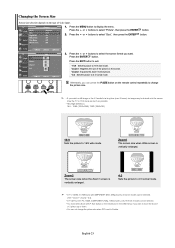
...picture to 4:3 normal mode. Zoom2 The screen size when the Zoom1 screen is vertically enlarged. 4:3 Sets the picture to select "Picture", then press the ENTER button. 2. Press the or buttons to 4:3 normal mode. • In TV, VIDEO, S-VIDEO,and all COMPONENT (480i, 480p) modes, all screen modes can be selected. ...then press the ENTER button. 3. Press the MENU button to 16:9 wide mode. Press the EXIT button to exit. • 16:9 : Sets the picture to Double. View the TV in the OSD menu) if you watch a still image or the 4:3 mode for a long time (over 2 hours), an image may be...
...picture to 4:3 normal mode. Zoom2 The screen size when the Zoom1 screen is vertically enlarged. 4:3 Sets the picture to select "Picture", then press the ENTER button. 2. Press the or buttons to 4:3 normal mode. • In TV, VIDEO, S-VIDEO,and all COMPONENT (480i, 480p) modes, all screen modes can be selected. ...then press the ENTER button. 3. Press the MENU button to 16:9 wide mode. Press the EXIT button to exit. • 16:9 : Sets the picture to Double. View the TV in the OSD menu) if you watch a still image or the 4:3 mode for a long time (over 2 hours), an image may be...


