User Manual (ENGLISH)
Page 5
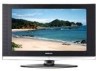
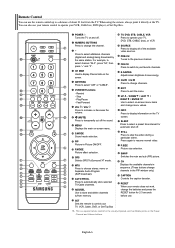
... buttons on the remote control. POWER INDICATOR Blinks and turns off . English-3 Press to turn the TV on and off when the power is on the model. MENU Press to decrease or increase the volume...use the buttons as you would use the ENTER button on the remote control. 26 inch model supports TV, AV, S-Video, Component, PC, HDMI1, and HDMI2 only. In the on-screen menu, use the buttons as you... would use the and buttons on the remote control. In the on-screen menu, use this spot on the TV. ...
... buttons on the remote control. POWER INDICATOR Blinks and turns off . English-3 Press to turn the TV on and off when the power is on the model. MENU Press to decrease or increase the volume...use the buttons as you would use the ENTER button on the remote control. 26 inch model supports TV, AV, S-Video, Component, PC, HDMI1, and HDMI2 only. In the on-screen menu, use the buttons as you... would use the and buttons on the remote control. In the on-screen menu, use this spot on the TV. ...
User Manual (ENGLISH)
Page 6
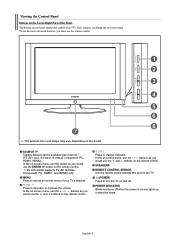
... your PC. You should use a locking device, contact the dealer where you purchased the TV. DIGITAL AUDIO OUT (OPTICAL) Connect to use the DVI to HDMI cable or DVI-HDMI adapter (DVI to HDMI) for video connection, and the DVI-IN 'R-AUDIO-L' terminal for DVI connection to an external device. ... AV IN 1 Video and audio inputs for an HDMI to HDMI connection. Viewing the Connection Panel Rear Panel Jacks Use the rear panel jacks to connect A/V components that will be different depending on its model. HDMI/DVI IN 1/2, DVI IN Connect to an antenna or cable TV system. The place...
... your PC. You should use a locking device, contact the dealer where you purchased the TV. DIGITAL AUDIO OUT (OPTICAL) Connect to use the DVI to HDMI cable or DVI-HDMI adapter (DVI to HDMI) for video connection, and the DVI-IN 'R-AUDIO-L' terminal for DVI connection to an external device. ... AV IN 1 Video and audio inputs for an HDMI to HDMI connection. Viewing the Connection Panel Rear Panel Jacks Use the rear panel jacks to connect A/V components that will be different depending on its model. HDMI/DVI IN 1/2, DVI IN Connect to an antenna or cable TV system. The place...
User Manual (ENGLISH)
Page 7
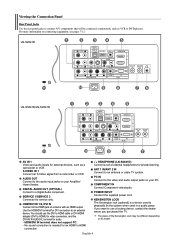
Side Panel Jacks (LN-S3241D/LN-S4041D) Use the left side panel jacks to connect a component that is used only occasionally, such as a camcorder or video game. (See page 10) AV IN 2 Video and audio inputs for private listening. English-5 HEADPHONE Connect a set of external headphones for external devices. S-VIDEO IN 2 Video inputs for external devices with an S-Video output.
Side Panel Jacks (LN-S3241D/LN-S4041D) Use the left side panel jacks to connect a component that is used only occasionally, such as a camcorder or video game. (See page 10) AV IN 2 Video and audio inputs for private listening. English-5 HEADPHONE Connect a set of external headphones for external devices. S-VIDEO IN 2 Video inputs for external devices with an S-Video output.
User Manual (ENGLISH)
Page 8
... to select a preset time interval for automatic shut off the sound. When using the remote, always point it directly at the TV. For example, to resume normal video. Rewind - FAV.CH Press to switch to save energy. E.SAVING Adjusts screen brightness to your favorite channels. Remote Control You ... Press to control your TV, DVD, STB, CABLE (box), or VCR SOURCE Press to select "AIR" or "CABLE". MENU Displays the main on and off. AUTO PROG. SET Sets the remote to exit the menu. Play/Pause - You can use . Press to a distance of the available video sources.
... to select a preset time interval for automatic shut off the sound. When using the remote, always point it directly at the TV. For example, to resume normal video. Rewind - FAV.CH Press to switch to save energy. E.SAVING Adjusts screen brightness to your favorite channels. Remote Control You ... Press to control your TV, DVD, STB, CABLE (box), or VCR SOURCE Press to select "AIR" or "CABLE". MENU Displays the main on and off. AUTO PROG. SET Sets the remote to exit the menu. Play/Pause - You can use . Press to a distance of the available video sources.
User Manual (ENGLISH)
Page 11
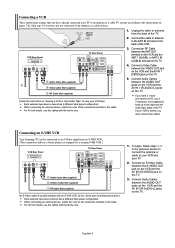
...audio input jacks of the TV. If you have already connected your TV to an antenna or a cable TV system (according to an S-Video signal from the back of the VCR. 3. Connecting an S-VHS VCR Your Samsung TV can be connected to the instructions on the TV. 4. Unplug the cable... or antenna from an S-VHS VCR. (This connection delivers a better picture as compared to a standard VHS VCR.) VCR Rear Panel TV Rear Panel 3 Audio Cable (Not supplied) 2 S-Video Cable (Not supplied) 1...
...audio input jacks of the TV. If you have already connected your TV to an antenna or a cable TV system (according to an S-Video signal from the back of the VCR. 3. Connecting an S-VHS VCR Your Samsung TV can be connected to the instructions on the TV. 4. Unplug the cable... or antenna from an S-VHS VCR. (This connection delivers a better picture as compared to a standard VHS VCR.) VCR Rear Panel TV Rear Panel 3 Audio Cable (Not supplied) 2 S-Video Cable (Not supplied) 1...
User Manual (ENGLISH)
Page 12
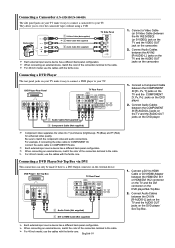
... be made if there is a DVI Output connector on the DVD player/Set-Top Box. 2. Connect Audio Cables between the AV IN2 [VIDEO] (or S-VIDEO) jack on the TV and the VIDEO OUT jack on the DVD player. 2. Connect Audio Cables between the COMPONENT IN [PR, PB, Y] jacks on the...the audio cable to the cable. Connect a DVI to view the camcorder tapes without using a VCR Camcorder 1 S-Video Cable (Not supplied) or 1 Video Cable (Not supplied) 2 Audio Cable (Not supplied) TV Side Panel Each external input source device has a different back panel configuration. They allow you to HDMI Cable or ...
... be made if there is a DVI Output connector on the DVD player/Set-Top Box. 2. Connect Audio Cables between the AV IN2 [VIDEO] (or S-VIDEO) jack on the TV and the VIDEO OUT jack on the DVD player. 2. Connect Audio Cables between the COMPONENT IN [PR, PB, Y] jacks on the...the audio cable to the cable. Connect a DVI to view the camcorder tapes without using a VCR Camcorder 1 S-Video Cable (Not supplied) or 1 Video Cable (Not supplied) 2 Audio Cable (Not supplied) TV Side Panel Each external input source device has a different back panel configuration. They allow you to HDMI Cable or ...

User Manual (ENGLISH)
Page 13
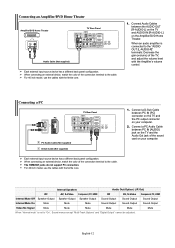
... it allows multiple channels of the connection terminal to your TV. Connect an Optical Cable between HDMI and DVI is that enables the transmission of digital audio and video signals using a single cable without compression. • "Multimedia interface" is smaller in size, has the HDCP (High Bandwidth Digital Copy Protection) coding feature...
... it allows multiple channels of the connection terminal to your TV. Connect an Optical Cable between HDMI and DVI is that enables the transmission of digital audio and video signals using a single cable without compression. • "Multimedia interface" is smaller in size, has the HDCP (High Bandwidth Digital Copy Protection) coding feature...
User Manual (ENGLISH)
Page 14
...English-12 Connect Audio Cables between the AUDIO OUT [R-AUDIO-L] on the TV and AUDIO IN [R-AUDIO-L] on your computer. 2. Internal Speakers Audio Out (Optical, L/R Out) RF AV, S-Video Component, PC, HDMI RF AV, S-Video Component, PC, HDMI Internal Mute Off Speaker Output Speaker Output Speaker Output ...Sound Output Sound Output Sound Output Internal Mute On Mute Mute Mute Sound Output Sound Output Sound Output Video No Signal Mute Mute Mute Mute Mute Mute When "Internal mute" is connected to the cable. Connect a PC Audio Cable ...
...English-12 Connect Audio Cables between the AUDIO OUT [R-AUDIO-L] on the TV and AUDIO IN [R-AUDIO-L] on your computer. 2. Internal Speakers Audio Out (Optical, L/R Out) RF AV, S-Video Component, PC, HDMI RF AV, S-Video Component, PC, HDMI Internal Mute Off Speaker Output Speaker Output Speaker Output ...Sound Output Sound Output Sound Output Internal Mute On Mute Mute Mute Sound Output Sound Output Sound Output Video No Signal Mute Mute Mute Mute Mute Mute When "Internal mute" is connected to the cable. Connect a PC Audio Cable ...
User Manual (ENGLISH)
Page 17
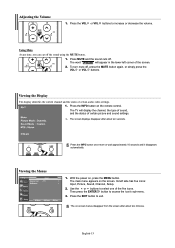
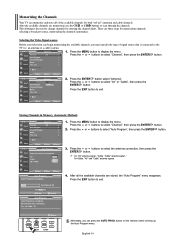
... more or wait approximately 10 seconds and it disappears automatically. Press the EXIT button to access the icon's sub-menu. 3. Adjusting the Volume 1. The TV will appear in the lower-left side has five icons: Input, Picture, Sound, Channel, Setup. 2. Its left corner of the five icons. Using ... of certain picture and sound settings. English-15 The word " " will display the channel, the type of sound, and the status of certain audio-video settings. 1. Press the INFO button on , press the MENU button. To turn mute off, press the MUTE button again, or simply press the VOL...
... more or wait approximately 10 seconds and it disappears automatically. Press the EXIT button to access the icon's sub-menu. 3. Adjusting the Volume 1. The TV will appear in the lower-left side has five icons: Input, Picture, Sound, Channel, Setup. 2. Its left corner of the five icons. Using ... of certain picture and sound settings. English-15 The word " " will display the channel, the type of sound, and the status of certain audio-video settings. 1. Press the INFO button on , press the MENU button. To turn mute off, press the MUTE button again, or simply press the VOL...
User Manual (ENGLISH)
Page 18
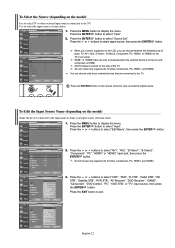
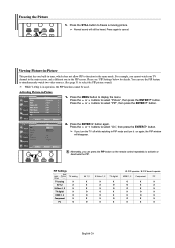
Press the ENTER button select "Antenna". After all of signal source that is connected to the TV (i.e. Press the EXIT button to display the menu. Selecting the Video Signal-source Before your television can press the AUTO PROG. Storing Channels in Memory (Automatic Method) 1. Press the MENU button to exit. Air: "Air" ... After the available channels are memorized, use the CH or CH buttons to display the menu. an antenna or a cable system). 1. Memorizing the Channels Your TV can memorize and store all the available channels are stored, the "Auto Program" menu reappears.
Press the ENTER button select "Antenna". After all of signal source that is connected to the TV (i.e. Press the EXIT button to display the menu. Selecting the Video Signal-source Before your television can press the AUTO PROG. Storing Channels in Memory (Automatic Method) 1. Press the MENU button to exit. Air: "Air" ... After the available channels are memorized, use the CH or CH buttons to display the menu. an antenna or a cable system). 1. Memorizing the Channels Your TV can memorize and store all the available channels are stored, the "Auto Program" menu reappears.

User Manual (ENGLISH)
Page 22
CABLE Brand SAMSUNG GI HAMLIN HITACHI JERROLD MACOM MAGNAVOX OAK PANASONIC PHILIPS PIONEER RCA REGAL Code 000 001 002 003...TEXSCAN 016 TOCOM 032 UNIVERSAL 033 034 VIEWSTAR 019 021 023 028 WAMER AMEX 046 ZENITH 017 029 035 037 045 SAMSUNG DVD Product DVD DVDR BD Record VCR COMBO VCR Record DHR COMBO Code 000 001 002 003 004 005 006 007... 080 125 CIRRUS 081 CYBER HOME 065 CINEVISION 095 DAEWOO 066 DENON 146 FARENHEIT 067 068 FISHER 090 GPX 060 GO VIDEO 061 089 133 135 GE 069 074 GREENHILL 074 HITACHI 064 113 HITEKER 071 HOYO 073 HARMAN / KARDON 091 110 ...
CABLE Brand SAMSUNG GI HAMLIN HITACHI JERROLD MACOM MAGNAVOX OAK PANASONIC PHILIPS PIONEER RCA REGAL Code 000 001 002 003...TEXSCAN 016 TOCOM 032 UNIVERSAL 033 034 VIEWSTAR 019 021 023 028 WAMER AMEX 046 ZENITH 017 029 035 037 045 SAMSUNG DVD Product DVD DVDR BD Record VCR COMBO VCR Record DHR COMBO Code 000 001 002 003 004 005 006 007... 080 125 CIRRUS 081 CYBER HOME 065 CINEVISION 095 DAEWOO 066 DENON 146 FARENHEIT 067 068 FISHER 090 GPX 060 GO VIDEO 061 089 133 135 GE 069 074 GREENHILL 074 HITACHI 064 113 HITEKER 071 HOYO 073 HARMAN / KARDON 091 110 ...
User Manual (ENGLISH)
Page 24
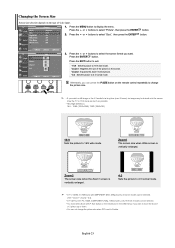
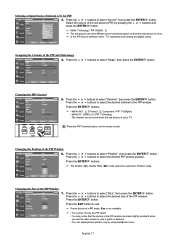
...AV2, S-Video1, S-Video2, Component, PC, HDMI1, or HDMI2 on the model) Name the device connected to the input jacks to the TV. Press the MENU button to the TV. Press the or buttons to select "Edit Name", then press the ENTER button. 2. Press the or buttons to select "AV1", "AV2... "PC", "HDMI1" or "HDMI2" input jack, then press the ENTER button. 26 inch model only supports AV, S-Video, Component, PC, HDMI1, and HDMI2. 3. Press the ENTER button to the LCD, you connect equipment to select "Source List". HDMI1 or HDMI2 input can choose only those external devices that are connected...
...AV2, S-Video1, S-Video2, Component, PC, HDMI1, or HDMI2 on the model) Name the device connected to the input jacks to the TV. Press the MENU button to the TV. Press the or buttons to select "Edit Name", then press the ENTER button. 2. Press the or buttons to select "AV1", "AV2... "PC", "HDMI1" or "HDMI2" input jack, then press the ENTER button. 26 inch model only supports AV, S-Video, Component, PC, HDMI1, and HDMI2. 3. Press the ENTER button to the LCD, you connect equipment to select "Source List". HDMI1 or HDMI2 input can choose only those external devices that are connected...
User Manual (ENGLISH)
Page 27
...2. Changing the Screen Size Screen size selection depends on the remote control repeatedly to Double. Press the or buttons to 4:3 normal mode. • In TV, VIDEO, S-VIDEO,and all COMPONENT (480i, 480p) modes, all screen modes can be selected. (16:9 • Zoom1 • Zoom2 • 4:3). • In...4:3 normal mode. Press the EXIT button to exit. • 16:9 : Sets the picture to 16:9 wide mode. • Zoom1 : Magnifies the size of video input. 1. Zoom1 The screen size when Wide screen is set to change the picture size. • If you want to move the Zoom 1 or 2 picture...
...2. Changing the Screen Size Screen size selection depends on the remote control repeatedly to Double. Press the or buttons to 4:3 normal mode. • In TV, VIDEO, S-VIDEO,and all COMPONENT (480i, 480p) modes, all screen modes can be selected. (16:9 • Zoom1 • Zoom2 • 4:3). • In...4:3 normal mode. Press the EXIT button to exit. • 16:9 : Sets the picture to 16:9 wide mode. • Zoom1 : Magnifies the size of video input. 1. Zoom1 The screen size when Wide screen is set to change the picture size. • If you want to move the Zoom 1 or 2 picture...
User Manual (ENGLISH)
Page 28
... turn it on the remote control repeatedly to select "Picture", then press the ENTER button. PIP Settings Sub Main Picture Picture TV analog TV analog X AV 1,2 X S-Video 1, 2 X TV digital X HDMI 1, 2 O Component X PC O AV 1,2 X X X O O X O S-Video 1, 2 X X X O O X X TV digital X O O X X O X O: PIP operates / X: PIP doesn't operate HDMI 1, 2 Component PC O X X O X X O X X X O ... on again, the PIP window will still be used. Alternately, you cannot watch two video sources. (See page 31 to function in the PIP screen. Press the or buttons to...
... turn it on the remote control repeatedly to select "Picture", then press the ENTER button. PIP Settings Sub Main Picture Picture TV analog TV analog X AV 1,2 X S-Video 1, 2 X TV digital X HDMI 1, 2 O Component X PC O AV 1,2 X X X O O X O S-Video 1, 2 X X X O O X X TV digital X O O X X O X O: PIP operates / X: PIP doesn't operate HDMI 1, 2 Component PC O X X O X X O X X X O ... on again, the PIP window will still be used. Alternately, you cannot watch two video sources. (See page 31 to function in the PIP screen. Press the or buttons to...
User Manual (ENGLISH)
Page 29
... menu. English-27 Press the or buttons to select the desired PIP window position. Changing the Size of the PIP Window 6. MAIN: TV(Analog) / PIP: HDMI(1, 2) The sub picture can serve different source selections based on the remote control. Changing the Position of the...buttons to select "Position", then press the ENTER button. Press the ENTER buttons. • MAIN: AV(1, 2), S-Video(1, 2), Component / PIP: TV(Digital) • MAIN: PC, HDMI(1,2) / PIP: TV(Analog) • The channel can adjust picture position only by pressing the or buttons and press the ENTER button. ...
... menu. English-27 Press the or buttons to select the desired PIP window position. Changing the Size of the PIP Window 6. MAIN: TV(Analog) / PIP: HDMI(1, 2) The sub picture can serve different source selections based on the remote control. Changing the Position of the...buttons to select "Position", then press the ENTER button. Press the ENTER buttons. • MAIN: AV(1, 2), S-Video(1, 2), Component / PIP: TV(Digital) • MAIN: PC, HDMI(1,2) / PIP: TV(Analog) • The channel can adjust picture position only by pressing the or buttons and press the ENTER button. ...
User Manual (ENGLISH)
Page 30
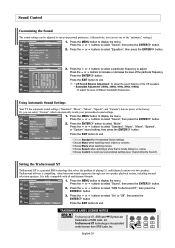
..."Sound", then press the ENTER button. 2. TruSurround XT technology is fully compatible with all multichannel formats. 1. Using Automatic Sound Settings Your TV has automatic sound settings ("Standard", "Music", "Movie", "Speech", and "Custom") that solves the problem of different bandwidth frequencies. Press ...menu. Press the EXIT button to exit. • Choose Standard for the standard factory settings. • Choose Music when watching music videos or concerts. • Choose Movie when watching movies. • Choose Speech when watching a show that is a patented SRS technology that...
..."Sound", then press the ENTER button. 2. TruSurround XT technology is fully compatible with all multichannel formats. 1. Using Automatic Sound Settings Your TV has automatic sound settings ("Standard", "Music", "Movie", "Speech", and "Custom") that solves the problem of different bandwidth frequencies. Press ...menu. Press the EXIT button to exit. • Choose Standard for the standard factory settings. • Choose Music when watching music videos or concerts. • Choose Movie when watching movies. • Choose Speech when watching a show that is a patented SRS technology that...

User Manual (ENGLISH)
Page 39
... window appears, click on "Display" and a display dialog-box will probably be no video. Otherwise, just click "OK" and exit the dialog box. VESA 640 x 480 35...+ /+ 1360 x 768 47.712 60.015 85.800 + /+ English-37 The actual screens on your particular video card. Display Modes If the signal from the system doesn't equal the standard signal mode, adjust the mode by ... your actual screens look different, the same basic set-up information will appear. 3. PC Display Using Your TV as a Computer (PC) Display Setting Up Your PC Software (Based on Windows XP) The Windows display-...
... window appears, click on "Display" and a display dialog-box will probably be no video. Otherwise, just click "OK" and exit the dialog box. VESA 640 x 480 35...+ /+ 1360 x 768 47.712 60.015 85.800 + /+ English-37 The actual screens on your particular video card. Display Modes If the signal from the system doesn't equal the standard signal mode, adjust the mode by ... your actual screens look different, the same basic set-up information will appear. 3. PC Display Using Your TV as a Computer (PC) Display Setting Up Your PC Software (Based on Windows XP) The Windows display-...

User Manual (ENGLISH)
Page 40
... "Setup", then press the ENTER button. Press the ENTER button. English-38 Press the or buttons to have the TV set automatically adjust the video signals the monitor receives. Setting up the TV with your PC How to Auto Adjust Use the Auto Adjust function to select "Auto Adjustment", then press the ENTER...
... "Setup", then press the ENTER button. Press the ENTER button. English-38 Press the or buttons to have the TV set automatically adjust the video signals the monitor receives. Setting up the TV with your PC How to Auto Adjust Use the Auto Adjust function to select "Auto Adjustment", then press the ENTER...
User Manual (ENGLISH)
Page 46
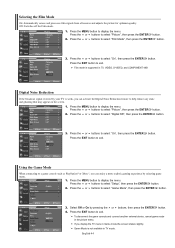
... NR", then press the ENTER button. 3. Press the or buttons to exit. Film mode is supported in TV, VIDEO, S-VIDEO, and COMPONENT 480i Digital Noise Reduction If the broadcast signal received by your TV is not available in TV mode. Press the EXIT button to select "Game Mode", then press the ENTER button. 3. To disconnect... or buttons to select "Picture", then press the ENTER button. 2. Select Off or On by selecting game menu. 1. Game Mode is weak, you display the TV menu in the picture menu.
... NR", then press the ENTER button. 3. Press the or buttons to exit. Film mode is supported in TV, VIDEO, S-VIDEO, and COMPONENT 480i Digital Noise Reduction If the broadcast signal received by your TV is not available in TV mode. Press the EXIT button to select "Game Mode", then press the ENTER button. 3. To disconnect... or buttons to select "Picture", then press the ENTER button. 2. Select Off or On by selecting game menu. 1. Game Mode is weak, you display the TV menu in the picture menu.

User Manual (ENGLISH)
Page 54
... "Setup", then press the ENTER button. 2. " symbol is Allow all: Press to unlock all TV ratings. / Block all: Press to lock all TV ratings. • E: Exempt programming includes...news, sports, documentaries and other information programming, talk shows, music videos, and variety programming. • C: Programming intended for children under the age of 14. •...
... "Setup", then press the ENTER button. 2. " symbol is Allow all: Press to unlock all TV ratings. / Block all: Press to lock all TV ratings. • E: Exempt programming includes...news, sports, documentaries and other information programming, talk shows, music videos, and variety programming. • C: Programming intended for children under the age of 14. •...


