Quick Guide (easy Manual) (ver.1.0) (English)
Page 1
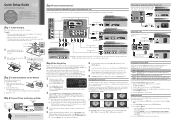
... four preset Picture Modes with factory adjusted settings, each time you press the P.SIZE button, you want. 4. Turn on your TV, press the MENU button on your new Samsung TV. xx If you select Manual, you have a digital channel in the table below to connect your remote, then select Setup &#... product, visit: www.samsung.com/ register. If you can take up and running , press the Up, Down, Left or Right arrow buttons on your TV to an external A/V device. To register this unit. Step 1: Install the Stand Follow the steps below to connect the TV to the stand. ✎✎NOTE...
... four preset Picture Modes with factory adjusted settings, each time you press the P.SIZE button, you want. 4. Turn on your TV, press the MENU button on your new Samsung TV. xx If you select Manual, you have a digital channel in the table below to connect your remote, then select Setup &#... product, visit: www.samsung.com/ register. If you can take up and running , press the Up, Down, Left or Right arrow buttons on your TV to an external A/V device. To register this unit. Step 1: Install the Stand Follow the steps below to connect the TV to the stand. ✎✎NOTE...
User Manual (user Manual) (ver.1.0) (English)
Page 2
...of LCD Displays that offer picture sizing features, use parts provided by a SAMSUNG Authorized Service Center. The above for reference only and may result in a problem with a stand. xx If you contact the TV because some parts can cause uneven aging of television formats used for the...by your model offers this effect, please follow below recommendations: • Avoid displaying the same TV channel for long periods. • Always try to an increase in -home or on SAMSUNG products purchased in the LCD picture. Along with the product due to display a full screen image...
...of LCD Displays that offer picture sizing features, use parts provided by a SAMSUNG Authorized Service Center. The above for reference only and may result in a problem with a stand. xx If you contact the TV because some parts can cause uneven aging of television formats used for the...by your model offers this effect, please follow below recommendations: • Avoid displaying the same TV channel for long periods. • Always try to an increase in -home or on SAMSUNG products purchased in the LCD picture. Along with the product due to display a full screen image...
User Manual (user Manual) (ver.1.0) (English)
Page 3
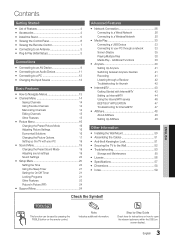
...Up Anynet+ 41 Switching between Anynet+ Devices 41 Recording 41 Listening through a Receiver 42 Troubleshooting for Anynet+ 42 yy Internet@TV 43 Getting Started with your PC 19 yy Sound Menu 19 Changing the Preset Sound Mode 19 Adjusting sound settings 19 Sound ...Screen Display 35 Playing Multiple Files 38 Media Play - ENGLISH 3 English Contents Getting Started yy List of Features 4 yy Accessories 4 yy Install the Stand 5 yy Viewing the Control Panel 6 yy Viewing the Remote Control 7 yy Connecting to an Antenna 8 yy Plug & Play (Initial Setup 8 Connections...
...Up Anynet+ 41 Switching between Anynet+ Devices 41 Recording 41 Listening through a Receiver 42 Troubleshooting for Anynet+ 42 yy Internet@TV 43 Getting Started with your PC 19 yy Sound Menu 19 Changing the Preset Sound Mode 19 Adjusting sound settings 19 Sound ...Screen Display 35 Playing Multiple Files 38 Media Play - ENGLISH 3 English Contents Getting Started yy List of Features 4 yy Accessories 4 yy Install the Stand 5 yy Viewing the Control Panel 6 yy Viewing the Remote Control 7 yy Connecting to an Antenna 8 yy Plug & Play (Initial Setup 8 Connections...
User Manual (user Manual) (ver.1.0) (English)
Page 5
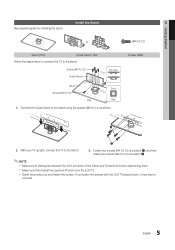
... screws. 01 Getting Started See separate guide for installing the stand. With your TV upright, connect the TV to one side. 5 English If you fasten the screws with the LCD TV placed down, it may lean to the Stand. 3. Screws (M4 X L12) Guide Stand Top view Stand Screws (M4 X L12) Rear Front Rear 1. xx Make sure that...
... screws. 01 Getting Started See separate guide for installing the stand. With your TV upright, connect the TV to one side. 5 English If you fasten the screws with the LCD TV placed down, it may lean to the Stand. 3. Screws (M4 X L12) Guide Stand Top view Stand Screws (M4 X L12) Rear Front Rear 1. xx Make sure that...

User Manual (user Manual) (ver.1.0) (English)
Page 51
... follow these steps: 1. Overly rigid or thick cables can damage input jacks over long term use . ✎✎Please find a "K" icon on the TV model. 51 English Wrap the Kensington lock cable around a large, stationary object such as desk or chair. 1 2. Insert the locking device into the Kensington... ✎✎These are not visible through the looped end of the TV. A kensington slot is not supplied by Samsung. It is turned on. Slide the end of the cable with the lock attached through the transparent stand. Assembling the Cables Enclose the cables in the Cable tie so that ...
... follow these steps: 1. Overly rigid or thick cables can damage input jacks over long term use . ✎✎Please find a "K" icon on the TV model. 51 English Wrap the Kensington lock cable around a large, stationary object such as desk or chair. 1 2. Insert the locking device into the Kensington... ✎✎These are not visible through the looped end of the TV. A kensington slot is not supplied by Samsung. It is turned on. Slide the end of the cable with the lock attached through the transparent stand. Assembling the Cables Enclose the cables in the Cable tie so that ...

User Manual (user Manual) (ver.1.0) (English)
Page 55
... settings are using overly rigid or thick cables. You have no impact on TV menu is a plastic smell from the TV. Clean the product with digital channels from an Antenna / RF/Coax connection (p. 25). • Remove the base stand from Store Demo mode to produce. The PIP menu is unavailable in the Plug...
... settings are using overly rigid or thick cables. You have no impact on TV menu is a plastic smell from the TV. Clean the product with digital channels from an Antenna / RF/Coax connection (p. 25). • Remove the base stand from Store Demo mode to produce. The PIP menu is unavailable in the Plug...


