User Manual (ENGLISH)
Page 3
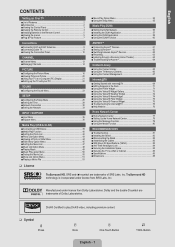
... Control Panel 3 ■ Viewing the Remote Control 4 ■ Installing Batteries in the Remote Control 5 ■ Viewing the menus 5 ■ Plug & Play Feature 7 Connections ■ Connecting VHF and UHF Antennas 8 ■ Connecting Cable TV 9 ■ Viewing the Connection Panel 10 CHANNEL ■ Channel Menu 13 ■ Managing Channels 14 PICTURE ■ Configuring the Picture Menu 16 ■ Viewing Picture-in-Picture 20 ■ Using Your TV as a Computer (PC) Display 21 ■ Setting up the TV with your PC 22 SOUND ■ Configuring the Sound Menu...
... Control Panel 3 ■ Viewing the Remote Control 4 ■ Installing Batteries in the Remote Control 5 ■ Viewing the menus 5 ■ Plug & Play Feature 7 Connections ■ Connecting VHF and UHF Antennas 8 ■ Connecting Cable TV 9 ■ Viewing the Connection Panel 10 CHANNEL ■ Channel Menu 13 ■ Managing Channels 14 PICTURE ■ Configuring the Picture Menu 16 ■ Viewing Picture-in-Picture 20 ■ Using Your TV as a Computer (PC) Display 21 ■ Setting up the TV with your PC 22 SOUND ■ Configuring the Sound Menu...
User Manual (ENGLISH)
Page 4
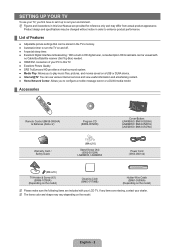
Product design and specifications may differ from actual product appearance. N Figures and illustrations in this User Manual are included with no Cable Box/Satellite receiver (Set-Top Box) needed. ● HDMI/DVI connection of Features ● Adjustable picture settings that can be stored in the TV's memory. ● Automatic timer to turn the TV on and off. ● A special sleep timer. ● Excellent Digital Interface & Networking : With a built-in order to...
Product design and specifications may differ from actual product appearance. N Figures and illustrations in this User Manual are included with no Cable Box/Satellite receiver (Set-Top Box) needed. ● HDMI/DVI connection of Features ● Adjustable picture settings that can be stored in the TV's memory. ● Automatic timer to turn the TV on and off. ● A special sleep timer. ● Excellent Digital Interface & Networking : With a built-in order to...
User Manual (ENGLISH)
Page 6
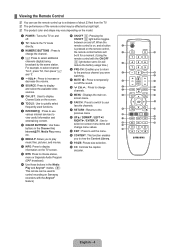
... display Channel Lists on and off the sound. 5 * 6 SOURCE: Press to display and select the available video sources. * z : Press to change channels. 6 7 ( ) 7 CH LIST : Used to your favorite channels. music files, pictures, and movies. f CC: Controls the caption decoder. # MTS: Press to choose stereo, mono or Separate Audio Program (SAP broadcast). $ Use these buttons in the Media Play and Anynet+ modes. (∏: This remote can use various internet services to a RETURN : Returns to exit the menu. b 9 INTERNET@ : Press to use...
... display Channel Lists on and off the sound. 5 * 6 SOURCE: Press to display and select the available video sources. * z : Press to change channels. 6 7 ( ) 7 CH LIST : Used to your favorite channels. music files, pictures, and movies. f CC: Controls the caption decoder. # MTS: Press to choose stereo, mono or Separate Audio Program (SAP broadcast). $ Use these buttons in the Media Play and Anynet+ modes. (∏: This remote can use various internet services to a RETURN : Returns to exit the menu. b 9 INTERNET@ : Press to use...
User Manual (ENGLISH)
Page 7
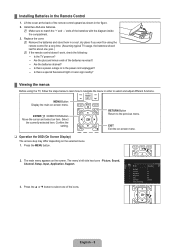
... selected item. Press the ▲ or ▼ button to match the '+' and '-' ends of the remote control upward as shown in the Remote Control 1. Lift the cover at the back of the batteries with the diagram inside the compartment. 3. MENU Button Display the main on the screen. The menu's left side has icons : Picture, Sound, Channel, Setup, Input, Application, Support. 3. Install two AAA size batteries. Press the MENU button. Replace the cover.
... selected item. Press the ▲ or ▼ button to match the '+' and '-' ends of the remote control upward as shown in the Remote Control 1. Lift the cover at the back of the batteries with the diagram inside the compartment. 3. MENU Button Display the main on the screen. The menu's left side has icons : Picture, Sound, Channel, Setup, Input, Application, Support. 3. Install two AAA size batteries. Press the MENU button. Replace the cover.
User Manual (ENGLISH)
Page 9
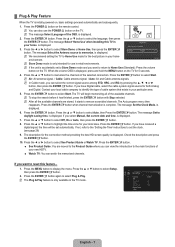
... received a digital signal, the time will begin memorizing all the available channels are moved to the Product Guide where you want to identify the type of the available channels. The Auto program menu then reappears. is displayed. The message Set to select the language, then press the ENTERE button. If you have Digital cable, select the cable system signal source for the best picture in the TV mode. Setup Plug & Play ▶ Language Time Game Mode BD Wise Network Type Network Setup...
... received a digital signal, the time will begin memorizing all the available channels are moved to the Product Guide where you want to identify the type of the available channels. The Auto program menu then reappears. is displayed. The message Set to select the language, then press the ENTERE button. If you have Digital cable, select the cable system signal source for the best picture in the TV mode. Setup Plug & Play ▶ Language Time Game Mode BD Wise Network Type Network Setup...
User Manual (ENGLISH)
Page 11
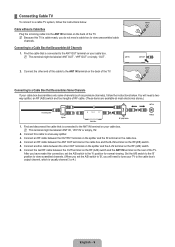
... on your cable box. Connect another cable between the OUTPUT terminal on the splitter and the IN terminal on the back of RF cable. (These items are available at most electronics stores.) ANT IN Incoming cable Splitter Cable Box RF (A/B) Switch TV Rear 1. Cable without a Cable Box Plug the incoming cable into the ANT IN terminal on the cable box. 4. You will need a cable box to a Cable Box that Descrambles All Channels 1. After you...
... on your cable box. Connect another cable between the OUTPUT terminal on the splitter and the IN terminal on the back of RF cable. (These items are available at most electronics stores.) ANT IN Incoming cable Splitter Cable Box RF (A/B) Switch TV Rear 1. Cable without a Cable Box Plug the incoming cable into the ANT IN terminal on the cable box. 4. You will need a cable box to a Cable Box that Descrambles All Channels 1. After you...
User Manual (ENGLISH)
Page 13
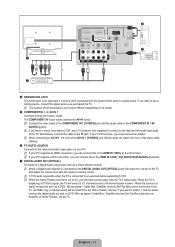
... HDMI, only 2 channel sound will send out 5.1 channel sound to the DIGITAL AUDIO OUT (OPTICAL) jack: Decrease the volume of the video cable (Yellow). 6 PC IN [PC] / [AUDIO] Connects to the 'R' jack. N When a Digital Audio System is connected to the Home theater receiver. N Connect the video cable to the COMPONENT IN 1 [Y/VIDEO] jack and the audio cable to physically fix the system when used in a public place. N If your PC supports a DVI connection, you purchased the TV. N The location...
... HDMI, only 2 channel sound will send out 5.1 channel sound to the DIGITAL AUDIO OUT (OPTICAL) jack: Decrease the volume of the video cable (Yellow). 6 PC IN [PC] / [AUDIO] Connects to the 'R' jack. N When a Digital Audio System is connected to the Home theater receiver. N Connect the video cable to the COMPONENT IN 1 [Y/VIDEO] jack and the audio cable to physically fix the system when used in a public place. N If your PC supports a DVI connection, you purchased the TV. N The location...
User Manual (ENGLISH)
Page 15
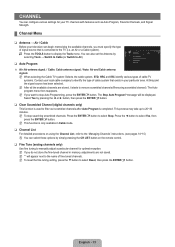
... manually adjust a particular channel for your TV channels with features such as Auto Program, Favorite Channels, and Signal Strength. ¦ Channel Menu ❑ Antenna → Air / Cable Before your particular area. N To reset the fine tuning setting, press the ▼ button to 20~30 minutes. You can also set the Antenna by simply pressing the CH LIST button on the remote control. ❑ Fine Tune (analog channels only) Use fine tuning to remove scrambled channels (Removing scrambled channel...
... manually adjust a particular channel for your TV channels with features such as Auto Program, Favorite Channels, and Signal Strength. ¦ Channel Menu ❑ Antenna → Air / Cable Before your particular area. N To reset the fine tuning setting, press the ▼ button to 20~30 minutes. You can also set the Antenna by simply pressing the CH LIST button on the remote control. ❑ Fine Tune (analog channels only) Use fine tuning to remove scrambled channels (Removing scrambled channel...

User Manual (ENGLISH)
Page 18
... screen to adjust the screen depth. N Settings can select the type of picture which will be adjusted and stored for viewing movies in Standard or Movie mode. Advanced Settings Black Tone : Off ▶ Dynamic Contrast : Medium Gamma : 0 Color Space : Native White Balance Flesh Tone : 0 Edge Enhancement : On U Move E Enter R Return English - 16 N When you to control the picture quality. ● Backlight: Adjusts the brightness of LCD back light...
... screen to adjust the screen depth. N Settings can select the type of picture which will be adjusted and stored for viewing movies in Standard or Movie mode. Advanced Settings Black Tone : Off ▶ Dynamic Contrast : Medium Gamma : 0 Color Space : Native White Balance Flesh Tone : 0 Edge Enhancement : On U Move E Enter R Return English - 16 N When you to control the picture quality. ● Backlight: Adjusts the brightness of LCD back light...
User Manual (ENGLISH)
Page 19
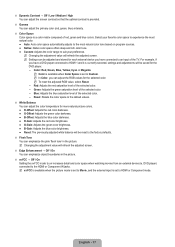
... picture mode is set to Movie, and the external input is set to Custom. N Changing the adjustment value will be saved for the DVD player. • Color: Red, Green, Blue, Yellow, Cyan or Magenta N Color is available when Color Space is set to on program sources. ● Native: Native color space offers deep and rich color tone. ● Custom: Adjusts the color range to the HDMI or Component IN jacks. N Changing the adjustment value will be reset...
... picture mode is set to Movie, and the external input is set to Custom. N Changing the adjustment value will be saved for the DVD player. • Color: Red, Green, Blue, Yellow, Cyan or Magenta N Color is available when Color Space is set to on program sources. ● Native: Native color space offers deep and rich color tone. ● Custom: Adjusts the color range to the HDMI or Component IN jacks. N Changing the adjustment value will be reset...
User Manual (ENGLISH)
Page 20
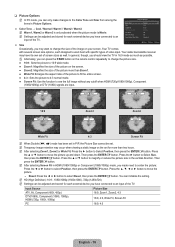
... HDMI (1080i/1080p) or Component (1080i/1080p) mode, you made need to center the picture: Press the ◄ or ► button to the Color Tone and Size from among the items in PIP, the Picture Size cannot be adjusted and stored for more than two hours. You can press the P.SIZE button on the remote control repeatedly to change the size of screen sizes as possible. Then press the ENTERE button. Input Source...
... HDMI (1080i/1080p) or Component (1080i/1080p) mode, you made need to center the picture: Press the ◄ or ► button to the Color Tone and Size from among the items in PIP, the Picture Size cannot be adjusted and stored for more than two hours. You can press the P.SIZE button on the remote control repeatedly to change the size of screen sizes as possible. Then press the ENTERE button. Input Source...
User Manual (ENGLISH)
Page 21
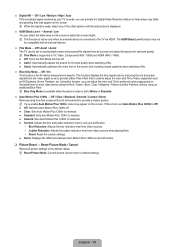
... / Yellow color Bar Patterns, without using an additional Blue Filter. N Reset Picture Mode: Current picture values return to the TV via HDMI. If this function, you enable Auto Motion Plus 120Hz, noise may appear on the screen. English - 19 ■ Digital NR → Off / Low / Medium / High / Auto If the broadcast signal received by removing the red and green signals from video sources when playing films. • Reset: Reset the custom settings. ● Demo: Displays the...
... / Yellow color Bar Patterns, without using an additional Blue Filter. N Reset Picture Mode: Current picture values return to the TV via HDMI. If this function, you enable Auto Motion Plus 120Hz, noise may appear on the screen. English - 19 ■ Digital NR → Off / Low / Medium / High / Auto If the broadcast signal received by removing the red and green signals from video sources when playing films. • Reset: Reset the custom settings. ● Demo: Displays the...
User Manual (ENGLISH)
Page 27
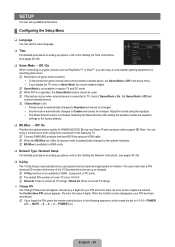
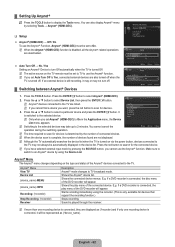
... Network' instructions. (see pages 28~29) ❑ Game Mode → Off / On Time Game Mode BD Wise Network Type Network Setup V-Chip Caption : Off : On : Cable When connecting to a game console such as the 4 digits are deemed inappropriate for your PIN has been memorized. N If you forget the PIN, press the remote-control buttons in the following sequence, which support BD Wise. SETUP You can set up additional functions. ¦ Configuring the Setup Menu...
... Network' instructions. (see pages 28~29) ❑ Game Mode → Off / On Time Game Mode BD Wise Network Type Network Setup V-Chip Caption : Off : On : Cable When connecting to a game console such as the 4 digits are deemed inappropriate for your PIN has been memorized. N If you forget the PIN, press the remote-control buttons in the following sequence, which support BD Wise. SETUP You can set up additional functions. ¦ Configuring the Setup Menu...
User Manual (ENGLISH)
Page 29
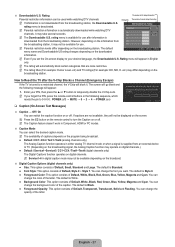
... (digital channels only) The Digital Captions function operates on the program being broadcast. ● Default / CC1~CC4 / Text1~Text4 (analog channels only) The Analog Caption function operates in English only. O Press the CC button on the remote control to Reset the TV after information is blocked by V-Chip. You can select the desired caption mode. You can change the opacity of Default, White, Black, Red, Green, Blue, Yellow, Magenta and Cyan. The default menu name and Downloadable...
... (digital channels only) The Digital Captions function operates on the program being broadcast. ● Default / CC1~CC4 / Text1~Text4 (analog channels only) The Analog Caption function operates in English only. O Press the CC button on the remote control to Reset the TV after information is blocked by V-Chip. You can select the desired caption mode. You can change the opacity of Default, White, Black, Red, Green, Blue, Yellow, Magenta and Cyan. The default menu name and Downloadable...
User Manual (ENGLISH)
Page 30
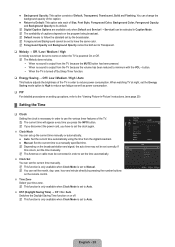
... output from the digital broadcast. ● Manual: Set the current time to set the clock again. ■ Clock Mode You can set the time manually. Setup Plug & Play Language : English Time ▶ Game Mode BD Wise Network Type Network Setup V-Chip Caption Melody : Off : On : Cable : Medium Clock Sleep Timer Timer 1 Timer 2 Timer 3 Time : -- : -- ▶ : Off : Inactivated : Inactivated : Inactivated U Move E Enter R Return English - 28 N You can be set to have to a manually specified time. N The Melody does not play. • When no sound...
... output from the digital broadcast. ● Manual: Set the current time to set the clock again. ■ Clock Mode You can set the time manually. Setup Plug & Play Language : English Time ▶ Game Mode BD Wise Network Type Network Setup V-Chip Caption Melody : Off : On : Cable : Medium Clock Sleep Timer Timer 1 Timer 2 Timer 3 Time : -- : -- ▶ : Off : Inactivated : Inactivated : Inactivated U Move E Enter R Return English - 28 N You can be set to have to a manually specified time. N The Melody does not play. • When no sound...
User Manual (ENGLISH)
Page 38
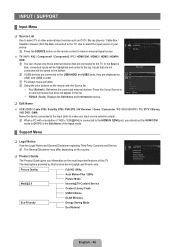
.... Press this if your Source is connected to the HDMI IN 1(DVI) port, you information on the remote with a resolution of the Input mode. ¦ Support Menu ❑ Legal Notice View the Legal Notice and General Disclaimer regarding Third Party Contents and Service. N When a PC with the Source list • Red (Refresh): Refreshes the connected external devices. Inputs that are displayed as DVD / Blu-ray players / Cable Box / Satellite receivers (Set-Top Box) connected to the TV...
.... Press this if your Source is connected to the HDMI IN 1(DVI) port, you information on the remote with a resolution of the Input mode. ¦ Support Menu ❑ Legal Notice View the Legal Notice and General Disclaimer regarding Third Party Contents and Service. N When a PC with the Source list • Red (Refresh): Refreshes the connected external devices. Inputs that are displayed as DVD / Blu-ray players / Cable Box / Satellite receivers (Set-Top Box) connected to the TV...
User Manual (ENGLISH)
Page 64
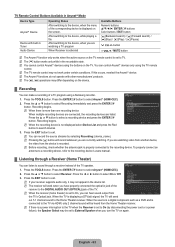
... a device you set to TV to Yes, connected external devices are displayed as (*device_name). You cannot cancel the operation during the switching operation. Press the TOOLS button. Anynet+ Menu View TV Device List (device_name) MENU (device_name) INFO Recording: (*recorder) Stop Recording: (*recorder) Receiver Description Anynet+ mode changes to scan for the connected device. Shows the play menu of the Anynet+ devices connected to select Anynet+ (HDMI-CEC). 2. View TV Device List Recording: DVDR...
... a device you set to TV to Yes, connected external devices are displayed as (*device_name). You cannot cancel the operation during the switching operation. Press the TOOLS button. Anynet+ Menu View TV Device List (device_name) MENU (device_name) INFO Recording: (*recorder) Stop Recording: (*recorder) Receiver Description Anynet+ mode changes to scan for the connected device. Shows the play menu of the Anynet+ devices connected to select Anynet+ (HDMI-CEC). 2. View TV Device List Recording: DVDR...
User Manual (ENGLISH)
Page 65
... program using a Samsung recorder. 1. N The receiver will record whatever you turn the TV on the TV. When the source is a digital component such as a DVD and is set to select Recording Immediately and press the ENTERE button. N If there is a power interruption to the TV when the Receiver is connected to External Speaker when you are watching a TV program When Receiver is activated Available Buttons Numeric buttons ENTERE buttons Color buttons / EXIT button π...
... program using a Samsung recorder. 1. N The receiver will record whatever you turn the TV on the TV. When the source is a digital component such as a DVD and is set to select Recording Immediately and press the ENTERE button. N If there is a power interruption to the TV when the Receiver is connected to External Speaker when you are watching a TV program When Receiver is activated Available Buttons Numeric buttons ENTERE buttons Color buttons / EXIT button π...
User Manual (ENGLISH)
Page 66
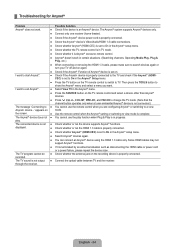
... HDMI cables may not support Anynet+ functions. ● If it is set to change the TV mode. (Note that the channel button operates only when a tuner-embedded Anynet+ device is not output through the receiver. ● Connect the optical cable between TV and the receiver. The TV sound is not connected.) ● You cannot use the play . The TV program cannot be recorded. ● Check whether the antenna jack on the TV remote control...
... HDMI cables may not support Anynet+ functions. ● If it is set to change the TV mode. (Note that the channel button operates only when a tuner-embedded Anynet+ device is not output through the receiver. ● Connect the optical cable between TV and the receiver. The TV sound is not connected.) ● You cannot use the play . The TV program cannot be recorded. ● Check whether the antenna jack on the TV remote control...
User Manual (ENGLISH)
Page 83
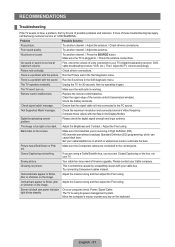
... caused by compatibility issues with the sound Run the Sound test in the Self diagnostic menu. Move the computer's mouse or press any key on the screen. light blinks steadily. Try another channel. / Adjust the antenna. Black bars on the keyboard. Replace the remote control batteries. Make sure the Component cables are using its power management system. Clean the upper edge of possible problems and solutions. RECOMMENDATIONS ¦ Troubleshooting If the...
... caused by compatibility issues with the sound Run the Sound test in the Self diagnostic menu. Move the computer's mouse or press any key on the screen. light blinks steadily. Try another channel. / Adjust the antenna. Black bars on the keyboard. Replace the remote control batteries. Make sure the Component cables are using its power management system. Clean the upper edge of possible problems and solutions. RECOMMENDATIONS ¦ Troubleshooting If the...


