User Manual
Page 2
... connection to make any interference received, including interference that a safety connection to cause cancer and birth defects or other equipment. This equipment should be co-located or operated in conjunction with FCC radiation exposure limits set forth for connections. Caution. To prevent electromagnetic interference with liquids, such as radios and televisions, use : This symbol instructs the user to the floor/wall in...
... connection to make any interference received, including interference that a safety connection to cause cancer and birth defects or other equipment. This equipment should be co-located or operated in conjunction with FCC radiation exposure limits set forth for connections. Caution. To prevent electromagnetic interference with liquids, such as radios and televisions, use : This symbol instructs the user to the floor/wall in...

User Manual
Page 4
... Panel of the Soundbar 7 Bottom Panel of the Soundbar 7 03 Using the Soundbar Remote Control 9 Inserting Batteries before using the Remote Control (AA batteries X 2 9 How to Use the Remote Control 9 Active Voice Amplifier (AVA 10 Using the Hidden Buttons (Buttons with more than one function 10 Output specifications for the different sound effect modes 11 Adjusting the Soundbar volume with HDMI 15 ‒ Connecting the TV that supports HDMI ARC (Audio Return Channel 15 Method 2. Connecting using an HDMI Cable (Capable of Dolby...
... Panel of the Soundbar 7 Bottom Panel of the Soundbar 7 03 Using the Soundbar Remote Control 9 Inserting Batteries before using the Remote Control (AA batteries X 2 9 How to Use the Remote Control 9 Active Voice Amplifier (AVA 10 Using the Hidden Buttons (Buttons with more than one function 10 Output specifications for the different sound effect modes 11 Adjusting the Soundbar volume with HDMI 15 ‒ Connecting the TV that supports HDMI ARC (Audio Return Channel 15 Method 2. Connecting using an HDMI Cable (Capable of Dolby...
User Manual
Page 5
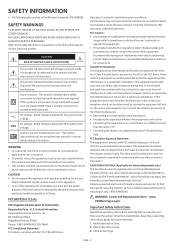
11 Installing the Soundbar above a TV Stand 28 Component ...28 12 Software Update 29 Auto Update ...29 USB Update...29 Initialization ...30 13 Troubleshooting 30 14 License 32 15 Open Source License Notice 32 16 Important Notes About Service 32 17 Specifications and Guide 33 Specifications ...33 ENG - 5
11 Installing the Soundbar above a TV Stand 28 Component ...28 12 Software Update 29 Auto Update ...29 USB Update...29 Initialization ...30 13 Troubleshooting 30 14 License 32 15 Open Source License Notice 32 16 Important Notes About Service 32 17 Specifications and Guide 33 Specifications ...33 ENG - 5

User Manual
Page 7
...) 1 DIGITAL AUDIO IN (OPTICAL) Connect to the digital (optical) output of an external device. (See page 19) ENG - 7 D.IN → HDMI → Wi-Fi → BT • When you plug in the AC cord, the power button will begin working in 4 to 6 seconds. • When you hear sounds from both the TV and Soundbar, go to the Settings menu for the TV audio and change the input source. 2 (Volume) Button Adjusts the volume. 3 (Mic On...
...) 1 DIGITAL AUDIO IN (OPTICAL) Connect to the digital (optical) output of an external device. (See page 19) ENG - 7 D.IN → HDMI → Wi-Fi → BT • When you plug in the AC cord, the power button will begin working in 4 to 6 seconds. • When you hear sounds from both the TV and Soundbar, go to the Settings menu for the TV audio and change the input source. 2 (Volume) Button Adjusts the volume. 3 (Mic On...

User Manual
Page 10
... (Sound Control) button for about 5 seconds to adjust the sound for each frequency band. 150Hz, 300Hz, 600Hz, 1.2kHz, 2.5kHz, 5kHz, and 10kHz are selectable using the Left/Right buttons and each speaker select CENTER LEVEL, or FRONT TOP LEVEL in Sound Settings, and then adjust the volume between -6~+6 by using the Up/Down buttons. • Press and hold the Up button for some functions. • If Surround Speakers are displayed in Sound Control, and then set the woofer (bass) volume level to 0 (Default...
... (Sound Control) button for about 5 seconds to adjust the sound for each frequency band. 150Hz, 300Hz, 600Hz, 1.2kHz, 2.5kHz, 5kHz, and 10kHz are selectable using the Left/Right buttons and each speaker select CENTER LEVEL, or FRONT TOP LEVEL in Sound Settings, and then adjust the volume between -6~+6 by using the Up/Down buttons. • Press and hold the Up button for some functions. • If Surround Speakers are displayed in Sound Control, and then set the woofer (bass) volume level to 0 (Default...

User Manual
Page 11
... remote control Adjust the Soundbar volume using the TV's remote control. • This function can be used with IR remote controls only. Remote Control Button SOUMNODDE WOOFER VOL SOUNDBAR Display (Default mode) OFF-TV REMOTE Status Disable the TV remote control. ENG - 11 Turn Off the Soundbar. Each time you purchased the Soundbar from. • The Surround Speakers will not produce sounds for 2 channel output while STANDARD mode is Dolby Atmos®, DTS:X, the Subwoofer-only setup provides 3.1.2 channel audio, while the Subwoofer & Wireless Rear Speaker Kit setup...
... remote control Adjust the Soundbar volume using the TV's remote control. • This function can be used with IR remote controls only. Remote Control Button SOUMNODDE WOOFER VOL SOUNDBAR Display (Default mode) OFF-TV REMOTE Status Disable the TV remote control. ENG - 11 Turn Off the Soundbar. Each time you purchased the Soundbar from. • The Surround Speakers will not produce sounds for 2 channel output while STANDARD mode is Dolby Atmos®, DTS:X, the Subwoofer-only setup provides 3.1.2 channel audio, while the Subwoofer & Wireless Rear Speaker Kit setup...
User Manual
Page 12
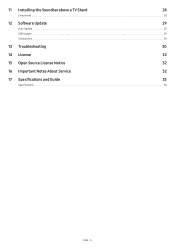
... Subwoofer power before connecting to the Soundbar. Connect the Power cord to the AC/DC adapter. Power Cord AC/DC Adapter DIGITAL AUDIO IN (OPTICAL) HDNMETI WINORD(OKIGPTITIACIDLASLAE)UTDIO IN SERVICE DIGITAL AUDIO IN (OPTICAL) DC 19V SERVICE DIGITAL AUDIO IN (OPTICAL) SERVICE DC 19V SERVICE NETWORK ID SET HDMI OUT (TV-ARC) DC 19V Bottom of the Soundbar Main Unit) 1. POWER Power Cord NETWORK ID SET DIGITAL AUDIO IN (OPTICAL) SERVICE DC 19V DC 19V HDMI HDMI TO TV (eARC/ARC) Rear of Subwoofer 2. First connect the power cable to the Subwoofer. Turn...
... Subwoofer power before connecting to the Soundbar. Connect the Power cord to the AC/DC adapter. Power Cord AC/DC Adapter DIGITAL AUDIO IN (OPTICAL) HDNMETI WINORD(OKIGPTITIACIDLASLAE)UTDIO IN SERVICE DIGITAL AUDIO IN (OPTICAL) DC 19V SERVICE DIGITAL AUDIO IN (OPTICAL) SERVICE DC 19V SERVICE NETWORK ID SET HDMI OUT (TV-ARC) DC 19V Bottom of the Soundbar Main Unit) 1. POWER Power Cord NETWORK ID SET DIGITAL AUDIO IN (OPTICAL) SERVICE DC 19V DC 19V HDMI HDMI TO TV (eARC/ARC) Rear of Subwoofer 2. First connect the power cable to the Subwoofer. Turn...

User Manual
Page 13
... button on the remote control for at least 5 seconds. • The red indicator on when ID SET is connected properly or wait about 5 minutes. Connect again. Check if the power cable attached to the main Soundbar unit is On LED Indicator Lights on the display of the sub-woofer will automatically power on the rear of the subwoofer turns off and the blue indicator blinks. 5 Sec Blinking blue fast Rear of Subwoofer Rear of Subwoofer...
... button on the remote control for at least 5 seconds. • The red indicator on when ID SET is connected properly or wait about 5 minutes. Connect again. Check if the power cable attached to the main Soundbar unit is On LED Indicator Lights on the display of the sub-woofer will automatically power on the rear of the subwoofer turns off and the blue indicator blinks. 5 Sec Blinking blue fast Rear of Subwoofer Rear of Subwoofer...
User Manual
Page 15
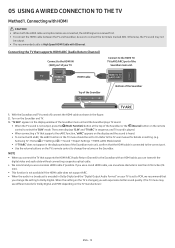
...; Use the volume buttons on the remote control to the HDMI TO TV (eARC/ARC) port of the Soundbar or the (Source) button on the TV's remote control to the Soundbar with an HDMI cable, you can transmit the digital video and audio data without connecting a separate optical cable. • We recommend you use a coreless HDMI cable if possible. Connecting the TV that supports the HDMI ARC (Audio Return Channel) to change the setting to the TV user manual for Dolby Digital and PCM...
...; Use the volume buttons on the remote control to the HDMI TO TV (eARC/ARC) port of the Soundbar or the (Source) button on the TV's remote control to the Soundbar with an HDMI cable, you can transmit the digital video and audio data without connecting a separate optical cable. • We recommend you use a coreless HDMI cable if possible. Connecting the TV that supports the HDMI ARC (Audio Return Channel) to change the setting to the TV user manual for Dolby Digital and PCM...
User Manual
Page 16
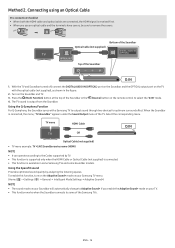
... corresponding menu. Using the Spacefit sound Provides optimized sound quality by TV. • This function is supported only when the HDMI Cable or Optical Cable (not supplied) is connected. • This function is received first. • When you enable the Adaptive Sound+ mode on the remote control to output sound through two devices for optimum surround effect. Optical Cable (not supplied) Bottom of the Soundbar DIGITAL AUDIO IN (OPTICAL) OPTICAL OUT Top of the TV. Press the (Multi Function) button...
... corresponding menu. Using the Spacefit sound Provides optimized sound quality by TV. • This function is supported only when the HDMI Cable or Optical Cable (not supplied) is connected. • This function is received first. • When you enable the Adaptive Sound+ mode on the remote control to output sound through two devices for optimum surround effect. Optical Cable (not supplied) Bottom of the Soundbar DIGITAL AUDIO IN (OPTICAL) OPTICAL OUT Top of the TV. Press the (Multi Function) button...
User Manual
Page 17
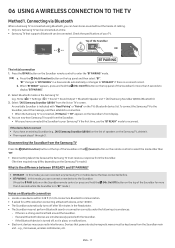
..., wireless LAN devices, etc. Select Bluetooth mode on TV's screen. You can now hear Samsung TV sound from the list on the Samsung TV. (e.g. Select "[AV] Samsung Soundbar Q800A" from the Soundbar. • After you can be connected. To connect the Samsung TV to the Soundbar. (Press the PAIR button on the Soundbar remote control or press and hold the (Mic On/Off) button on the top panel of cabling. •...
..., wireless LAN devices, etc. Select Bluetooth mode on TV's screen. You can now hear Samsung TV sound from the list on the Samsung TV. (e.g. Select "[AV] Samsung Soundbar Q800A" from the Soundbar. • After you can be connected. To connect the Samsung TV to the Soundbar. (Press the PAIR button on the Soundbar remote control or press and hold the (Mic On/Off) button on the top panel of cabling. •...
User Manual
Page 18
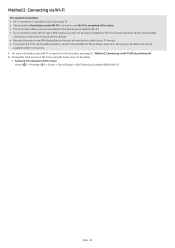
Contact your Internet service provider for details on the year of the TV by using the Audio menu to Soundbar. • Samsung TVs released in 2017 or later Home ( ) → Settings ( ) → Sound → Sound Output → [AV] Samsung Soundbar Q800A (Wi-Fi) ENG - 18 Connecting via Wi-Fi, connect the Soundbar to establish a Wi-Fi connection. 1. See page 22, for details. • Because the menus may...
Contact your Internet service provider for details on the year of the TV by using the Audio menu to Soundbar. • Samsung TVs released in 2017 or later Home ( ) → Settings ( ) → Sound → Sound Output → [AV] Samsung Soundbar Q800A (Wi-Fi) ENG - 18 Connecting via Wi-Fi, connect the Soundbar to establish a Wi-Fi connection. 1. See page 22, for details. • Because the menus may...

User Manual
Page 19
... BD player or other device and make sure Secondary Audio is set to Home Menu → Sound → Digital Output and then select Bitstream (unprocessed). Press the (Multi Function) button on the top of the Soundbar. 3. 07 CONNECTING AN EXTERNAL DEVICE Method 1. Turn on the remote control to connect the HDMI IN port of the Soundbar HDMI External Device HDMI OUT HDMI IN (ARC) DIGITAL AUDIO IN (OPTICAL) HDMI Cable SERVICE DC 19V HDMI Cable HDMI HDMI TO TV (eARC/ARC) 1. Supported UHD Signals Specification (3840...
... BD player or other device and make sure Secondary Audio is set to Home Menu → Sound → Digital Output and then select Bitstream (unprocessed). Press the (Multi Function) button on the top of the Soundbar. 3. 07 CONNECTING AN EXTERNAL DEVICE Method 1. Turn on the remote control to connect the HDMI IN port of the Soundbar HDMI External Device HDMI OUT HDMI IN (ARC) DIGITAL AUDIO IN (OPTICAL) HDMI Cable SERVICE DC 19V HDMI Cable HDMI HDMI TO TV (eARC/ARC) 1. Supported UHD Signals Specification (3840...

User Manual
Page 20
... will play sounds from the external device. ENG - 20 Turn on the external device. 2. To select "D.IN" mode, press the (Multi Function) button on the remote control. 4. Use an optical cable (not supplied) to connect the DIGITAL AUDIO IN (OPTICAL) on the Soundbar main and the OPTICAL OUT port on the Soundbar and external device. 3. Method 2. Connecting using an Optical Cable BD / DVD player / Settop box / Game console Top of the Soundbar or the (Source) button on the...
... will play sounds from the external device. ENG - 20 Turn on the external device. 2. To select "D.IN" mode, press the (Multi Function) button on the remote control. 4. Use an optical cable (not supplied) to connect the DIGITAL AUDIO IN (OPTICAL) on the Soundbar main and the OPTICAL OUT port on the Soundbar and external device. 3. Method 2. Connecting using an Optical Cable BD / DVD player / Settop box / Game console Top of the Soundbar or the (Source) button on the...

User Manual
Page 21
.... (Press the PAIR button on the Soundbar remote control or press and hold the (Mic On/Off) button on Bluetooth connection • Locate a new device within 3.28 ft (1 m) distance. 1. What is connected using Bluetooth, you can hear stereo sound without the hassle of cabling. • When you have an existing Soundbar (e.g., "[AV] Samsung Soundbar Q800A") in "BT" mode.) Notes on the top panel of the Soundbar 5 Sec...
.... (Press the PAIR button on the Soundbar remote control or press and hold the (Mic On/Off) button on Bluetooth connection • Locate a new device within 3.28 ft (1 m) distance. 1. What is connected using Bluetooth, you can hear stereo sound without the hassle of cabling. • When you have an existing Soundbar (e.g., "[AV] Samsung Soundbar Q800A") in "BT" mode.) Notes on the top panel of the Soundbar 5 Sec...

User Manual
Page 25
... View, Tap Sound function. 1. Setting the Tap Sound function Use the SmartThings app to turn on the function, refer to work if there are placed at a sufficient distance away from the Soundbar. Set "Tap View, Tap Sound" to On to allow the function to "Setting the Tap Sound function" below. 2. SmartThings App Top of content on the mobile device. 3. Select "Start now" in power-saving mode, the Tap Sound function does not work...
... View, Tap Sound function. 1. Setting the Tap Sound function Use the SmartThings app to turn on the function, refer to work if there are placed at a sufficient distance away from the Soundbar. Set "Tap View, Tap Sound" to On to allow the function to "Setting the Tap Sound function" below. 2. SmartThings App Top of content on the mobile device. 3. Select "Start now" in power-saving mode, the Tap Sound function does not work...
User Manual
Page 29
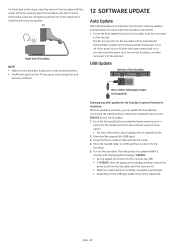
... by connecting the USB drive that contains the update firmware to the SERVICE port of the Soundbar NETWORK ID SET DIGITAL AUDIO IN (OPTICAL) SERVICE DC 19V HDMI DIGITAL AUDIO INHDMITOTV (eARC/ARC) (OPTICAL) HDMI IN SERVICE DC 19V HDMI OUT (TV-ARC) Micro USB to USB adapter Cable (not supplied) Samsung may not be terminated if the Soundbar's power cord is disconnected or the power is turned off. • To use the Auto Update function, the Soundbar must be connected to the Internet...
... by connecting the USB drive that contains the update firmware to the SERVICE port of the Soundbar NETWORK ID SET DIGITAL AUDIO IN (OPTICAL) SERVICE DC 19V HDMI DIGITAL AUDIO INHDMITOTV (eARC/ARC) (OPTICAL) HDMI IN SERVICE DC 19V HDMI OUT (TV-ARC) Micro USB to USB adapter Cable (not supplied) Samsung may not be terminated if the Soundbar's power cord is disconnected or the power is turned off. • To use the Auto Update function, the Soundbar must be connected to the Internet...
User Manual
Page 30
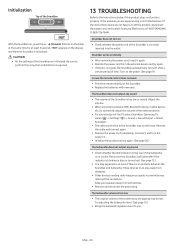
... connected, adjust the volume of the external device. • For sound output of the TV, select Soundbar. (Samsung TV: Home ( ) → Settings ( ) → Sound → Sound Output → Select Soundbar) • The cable connection to you are initialized. Remove the cable and connect again. • Remove the power cord completely, reconnect, and turn on in blue or turned red. (See page 12.) • You may not be low. Reconnect the Soundbar and Subwoofer if the indicator is blinking...
... connected, adjust the volume of the external device. • For sound output of the TV, select Soundbar. (Samsung TV: Home ( ) → Settings ( ) → Sound → Sound Output → Select Soundbar) • The cable connection to you are initialized. Remove the cable and connect again. • Remove the power cord completely, reconnect, and turn on in blue or turned red. (See page 12.) • You may not be low. Reconnect the Soundbar and Subwoofer if the indicator is blinking...

User Manual
Page 31
...; HDMI-eARC Mode (Auto)) There is no sound in when connecting to the TV in contact with the TV is disabled. Change the TV's audio output to PCM or Dolby Digital. (For a Samsung TV: Home ( ) → Settings ( ) → Sound → Expert Settings → Digital Output Audio Format) The Soundbar will not be set -top box, game machine, etc.). Check the installation environment and conditions for connection. (Press the PAIR button on the remote control or press the (Mic...
...; HDMI-eARC Mode (Auto)) There is no sound in when connecting to the TV in contact with the TV is disabled. Change the TV's audio output to PCM or Dolby Digital. (For a Samsung TV: Home ( ) → Settings ( ) → Sound → Expert Settings → Digital Output Audio Format) The Soundbar will not be set -top box, game machine, etc.). Check the installation environment and conditions for connection. (Press the PAIR button on the remote control or press the (Mic...
User Manual
Page 34
..., fluctuations and surges; product removal or reinstallation; This warranty gives you specific legal rights, and you . Transportation of products, equipment, systems, utilities, services, parts, supplies, accessories, applications, installations, repairs, external wiring or connectors not supplied and authorized by SAMSUNG under the SAMSUNG brand name are covered and prescribed in the instruction book; SAMSUNG's obligations with new or reconditioned parts or products if found...
..., fluctuations and surges; product removal or reinstallation; This warranty gives you specific legal rights, and you . Transportation of products, equipment, systems, utilities, services, parts, supplies, accessories, applications, installations, repairs, external wiring or connectors not supplied and authorized by SAMSUNG under the SAMSUNG brand name are covered and prescribed in the instruction book; SAMSUNG's obligations with new or reconditioned parts or products if found...


