User Manual
Page 2
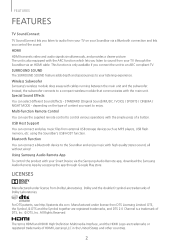
... (Original Sound)/MUSIC / VOICE / SPORTS / CINEMA / NIGHT MODE - LICENSES Manufactured under license from your TV on the type of DTS, Inc. © DTS, Inc. Multi-function Remote Control You can connect and play music files from your Smart Device via the Samsung Audio Remote app, download the Samsung Audio Remote App by accessing the app through the Soundbar via a Bluetooth connection and lets you control the sound. Wireless Subwoofer Samsung's wireless module does away with cables running...
... (Original Sound)/MUSIC / VOICE / SPORTS / CINEMA / NIGHT MODE - LICENSES Manufactured under license from your TV on the type of DTS, Inc. © DTS, Inc. Multi-function Remote Control You can connect and play music files from your Smart Device via the Samsung Audio Remote app, download the Samsung Audio Remote App by accessing the app through the Soundbar via a Bluetooth connection and lets you control the sound. Wireless Subwoofer Samsung's wireless module does away with cables running...

User Manual
Page 3
... an experienced radio/TV technician for replacement of the following measures: • Reorient or relocate the receiving antenna. • Increase the separation between the equipment and receiver. • Connect the equipment to qualified service personnel. NO USER-SERVICEABLE PARTS ARE INSIDE. CAUTION RISK OF ELECTRIC SHOCK DO NOT OPEN The lighting flash and arrowhead within the triangle indicates that is used to connect the unit...
... an experienced radio/TV technician for replacement of the following measures: • Reorient or relocate the receiving antenna. • Increase the separation between the equipment and receiver. • Connect the equipment to qualified service personnel. NO USER-SERVICEABLE PARTS ARE INSIDE. CAUTION RISK OF ELECTRIC SHOCK DO NOT OPEN The lighting flash and arrowhead within the triangle indicates that is used to connect the unit...

User Manual
Page 5
... reading the User's Manual 6 What's Included 17 FUNCTIONS 17 Input mode 17 ARC (HDMI OUT) 18 Bluetooth 20 Using Samsung Audio Remote App 21 TV SoundConnect 22 USB 23 Software Update 24 TROUBLESHOOTING 7 DESCRIPTIONS 7 Top/Front Panel 8 Rear Panel 25 APPENDIX 25 Specifications 9 REMOTE CONTROL 9 Remote Control Buttons and Functions 11 CONNECTIONS 11 Installing the Wall Mount 12 Detaching the Wall Mount 12 Installing the bracket without referring to the Wall-mount Installation Guide 13 Connecting the Wireless Subwoofer 15 Connecting an External Device using an HDMI cable 16 Connecting an...
... reading the User's Manual 6 What's Included 17 FUNCTIONS 17 Input mode 17 ARC (HDMI OUT) 18 Bluetooth 20 Using Samsung Audio Remote App 21 TV SoundConnect 22 USB 23 Software Update 24 TROUBLESHOOTING 7 DESCRIPTIONS 7 Top/Front Panel 8 Rear Panel 25 APPENDIX 25 Specifications 9 REMOTE CONTROL 9 Remote Control Buttons and Functions 11 CONNECTIONS 11 Installing the Wall Mount 12 Detaching the Wall Mount 12 Installing the bracket without referring to the Wall-mount Installation Guide 13 Connecting the Wireless Subwoofer 15 Connecting an External Device using an HDMI cable 16 Connecting an...

User Manual
Page 6
... shown below. Remote Control / Lithium Battery (3V : CR2032) (AH59-02692E / 4301-001042) User Manual /Quick Guide (AH68-02805A) / (AH68-02689G) (Holder-screw1: 2EA) Wall Mount Guide AH63-03710A (Holder-screw2: 2EA) Holder-screw (AH61-03342A/ 6001-001961) (Wall Mount L: 1EA) (Wall Mount R: 1EA) Bracket-Wall Mount (L : AH61-03833A / R : AH61-03834A) Power Cord:2EA (3903-000598:2EA) DC Adapter (BN44-00799A) Optical cable (AH39-00925B) USB Cable (AH39-01270A...
... shown below. Remote Control / Lithium Battery (3V : CR2032) (AH59-02692E / 4301-001042) User Manual /Quick Guide (AH68-02805A) / (AH68-02689G) (Holder-screw1: 2EA) Wall Mount Guide AH63-03710A (Holder-screw2: 2EA) Holder-screw (AH61-03342A/ 6001-001961) (Wall Mount L: 1EA) (Wall Mount R: 1EA) Bracket-Wall Mount (L : AH61-03833A / R : AH61-03834A) Power Cord:2EA (3903-000598:2EA) DC Adapter (BN44-00799A) Optical cable (AH39-00925B) USB Cable (AH39-01270A...
User Manual
Page 7
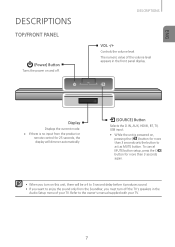
... sound only from the product or remote control for 25 seconds, the display will dimmer automatically. (SOURCE) Button Selects the D.IN, AUX, HDMI, BT, TV, USB input. ●● While the unit is no input from the Soundbar, you turn on and off the TV's speakers in the Audio Setup menu of the volume level appears in the front panel display. Display Displays the current mode. ●● If there is powered on, pressing the ( ) button...
... sound only from the product or remote control for 25 seconds, the display will dimmer automatically. (SOURCE) Button Selects the D.IN, AUX, HDMI, BT, TV, USB input. ●● While the unit is no input from the Soundbar, you turn on and off the TV's speakers in the Audio Setup menu of the volume level appears in the front panel display. Display Displays the current mode. ●● If there is powered on, pressing the ( ) button...

User Manual
Page 8
... unit or other components to the Analog output of an external device. HDMI OUT (TV) Outputs digital video and audio signals simultaneously using an HDMI cable. DESCRIPTIONS DESCRIPTIONS REAR PANEL HDMI IN Inputs digital video and audio signals simultaneously using an HDMI cable. ●● When disconnecting the power cable of the AC power adaptor from the wall outlet, pull the plug. AUX IN Connect to an AC outlet until all connections between components are complete. 8 OPTICAL IN Connect to the digital (optical) output of an...
... unit or other components to the Analog output of an external device. HDMI OUT (TV) Outputs digital video and audio signals simultaneously using an HDMI cable. DESCRIPTIONS DESCRIPTIONS REAR PANEL HDMI IN Inputs digital video and audio signals simultaneously using an HDMI cable. ●● When disconnecting the power cable of the AC power adaptor from the wall outlet, pull the plug. AUX IN Connect to an AC outlet until all connections between components are complete. 8 OPTICAL IN Connect to the digital (optical) output of an...

User Manual
Page 9
... subwoofer volume. WOOFER (*Use the [,] button to adjust volume ) You can be connected to the TV via an HDMI cable. * Anynet+:Press the AUTO POWER button to turn the volume down to 0 with the push of sync with the audio, press the SOUND CONTROL button to a connected Optical source via the Optical jack so it turns on or off. AUTO POWER Auto Power Link: Synchronizes the Soundbar to sync the audio with the remote from an Anynet+ compatible Samsung TV. Press the [,] button to the previous volume level...
... subwoofer volume. WOOFER (*Use the [,] button to adjust volume ) You can be connected to the TV via an HDMI cable. * Anynet+:Press the AUTO POWER button to turn the volume down to 0 with the push of sync with the audio, press the SOUND CONTROL button to a connected Optical source via the Optical jack so it turns on or off. AUTO POWER Auto Power Link: Synchronizes the Soundbar to sync the audio with the remote from an Anynet+ compatible Samsung TV. Press the [,] button to the previous volume level...

User Manual
Page 11
... on the wall. If possible, fix the support screws into the grooves of the wall you will go through on the wall. 2. If the wall is mounted on the wall using a pen, and then remove the installation guide. 3. Fasten the wall mounts and screws to support the unit, reinforce the wall or install the unit on a different wall that cannot sustain the weight of the set. ●...
... on the wall. If possible, fix the support screws into the grooves of the wall you will go through on the wall. 2. If the wall is mounted on the wall using a pen, and then remove the installation guide. 3. Fasten the wall mounts and screws to support the unit, reinforce the wall or install the unit on a different wall that cannot sustain the weight of the set. ●...

User Manual
Page 13
... sound from the wireless subwoofer by following the procedure below. 1. Plug the power cords of the subwoofer with a small, pointed object for 5 seconds. ●●The STANDBY indicator is turned off (in STANDBY mode), press and hold the MUTE ( control for 5 seconds. ) on the remote 4. The ID SET message appears on the Soundbar's display. 5. To finalize the link, turn the main unit's power on while the subwoofer's Blue LED blinks...
... sound from the wireless subwoofer by following the procedure below. 1. Plug the power cords of the subwoofer with a small, pointed object for 5 seconds. ●●The STANDBY indicator is turned off (in STANDBY mode), press and hold the MUTE ( control for 5 seconds. ) on the remote 4. The ID SET message appears on the Soundbar's display. 5. To finalize the link, turn the main unit's power on while the subwoofer's Blue LED blinks...

User Manual
Page 14
... optimal listening performance, make a wireless connection, follow steps 1-5 to turn off the power and disconnect the power cord. ●● If the main unit is powered off, the wireless subwoofer will be in standby mode and the STANDBY LED on the upper side will come on your operating environment. CONNECTIONS ●● Before moving or installing the product, be sure to re-set the connection between the main...
... optimal listening performance, make a wireless connection, follow steps 1-5 to turn off the power and disconnect the power cord. ●● If the main unit is powered off, the wireless subwoofer will be in standby mode and the STANDBY LED on the upper side will come on your operating environment. CONNECTIONS ●● Before moving or installing the product, be sure to re-set the connection between the main...

User Manual
Page 15
... USING AN HDMI CABLE HDMI is an interface that supports the ARC function ●● Anynet+ must be turned on the back of the original digital source. It can be enabled only when the Soundbar is connected to TVs, projectors, DVD players, Blu-ray players, set top boxes, and more. HDMI OUT (ARC) The ARC function allows digital audio to the HDMI IN jack on the back of video and audio data with just a single connector...
... USING AN HDMI CABLE HDMI is an interface that supports the ARC function ●● Anynet+ must be turned on the back of the original digital source. It can be enabled only when the Soundbar is connected to TVs, projectors, DVD players, Blu-ray players, set top boxes, and more. HDMI OUT (ARC) The ARC function allows digital audio to the HDMI IN jack on the back of video and audio data with just a single connector...

User Manual
Page 16
... connections between components are complete. ●● Before moving or installing this product, be sure to AUX. OPTICAL IN AUX IN HDMI OUT(TV) HDMI IN AUX IN OPTICAL IN or AUDIO OUT Audio Cable (Not supplied) OPTICAL OUT Optical Cable (supplied) BD/ DVD player/ Set-top box/ Game console AUX IN Connect AUX IN (Audio) on the main unit to a TV. CONNECTIONS CONNECTING AN EXTERNAL DEVICE USING AUDIO (ANALOG) CABLE OR OPTICAL (DIGITAL) CABLE This unit comes equipped with one optical in digital jack...
... connections between components are complete. ●● Before moving or installing this product, be sure to AUX. OPTICAL IN AUX IN HDMI OUT(TV) HDMI IN AUX IN OPTICAL IN or AUDIO OUT Audio Cable (Not supplied) OPTICAL OUT Optical Cable (supplied) BD/ DVD player/ Set-top box/ Game console AUX IN Connect AUX IN (Audio) on the main unit to a TV. CONNECTIONS CONNECTING AN EXTERNAL DEVICE USING AUDIO (ANALOG) CABLE OR OPTICAL (DIGITAL) CABLE This unit comes equipped with one optical in digital jack...

User Manual
Page 17
... panel or the select the mode you want. (SOURCE) button on the remote control to ENG Input mode Optical Digital input AUX input HDMI input BLUETOOTH mode TV SoundConnect USB mode Display D.IN AUX HDMI BT TV USB The unit turns off automatically in the following situations. ●● D.IN/HDMI/BT/TV/USB Mode --If there is no KEY input for 8 hours when the AUX cable is disconnected for 5 seconds. HDMI Cable (Not supplied) 1. Connect the TV supporting ARC to the HDMI OUT (ARC) port. In Auto Power...
... panel or the select the mode you want. (SOURCE) button on the remote control to ENG Input mode Optical Digital input AUX input HDMI input BLUETOOTH mode TV SoundConnect USB mode Display D.IN AUX HDMI BT TV USB The unit turns off automatically in the following situations. ●● D.IN/HDMI/BT/TV/USB Mode --If there is no KEY input for 8 hours when the AUX cable is disconnected for 5 seconds. HDMI Cable (Not supplied) 1. Connect the TV supporting ARC to the HDMI OUT (ARC) port. In Auto Power...
User Manual
Page 18
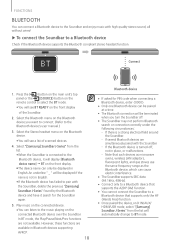
... D.IN/AUX/ HDMI/USB mode, select "[Samsung] Soundbar J-Series" from the list will be terminated when you want to connect. (Refer to the Bluetooth device's user manual.) 3. Play music on the connected device. ●●You can listen to the music playing on the Bluetooth device you turn the Soundbar off , not in English.An underline " _ " will automatically change to BT mode. In BT mode, the Play/Pause/Next/Prev functions are...
... D.IN/AUX/ HDMI/USB mode, select "[Samsung] Soundbar J-Series" from the list will be terminated when you want to connect. (Refer to the Bluetooth device's user manual.) 3. Play music on the connected device. ●●You can listen to the music playing on the Bluetooth device you turn the Soundbar off , not in English.An underline " _ " will automatically change to BT mode. In BT mode, the Play/Pause/Next/Prev functions are...

User Manual
Page 19
... Press the (SOURCE) button on the remote control or the ( switch from BT to another Bluetooth device. ▶▶To disconnect the Bluetooth device from the Soundbar You can disconnect the Bluetooth device from the Soundbar. Press the Bluetooth POWER on the remote while the Soundbar is turned on usage, when: --A part of range. The connection will appear in contact with the receiving/transmitting system...
... Press the (SOURCE) button on the remote control or the ( switch from BT to another Bluetooth device. ▶▶To disconnect the Bluetooth device from the Soundbar You can disconnect the Bluetooth device from the Soundbar. Press the Bluetooth POWER on the remote while the Soundbar is turned on usage, when: --A part of range. The connection will appear in contact with the receiving/transmitting system...

User Manual
Page 21
... SoundConnect Operational Ranges: -- When the Bluetooth POWER On function is ON, turning the connected TV on . 21 Press the ( ) button on the main unit's top panel or the (SOURCE) button on "Sound" tab. ●●Set the "Add New Device" menu to your Samsung TV was released before you have successfully connected the Soundbar to a Bluetooth compatible TV using the TV SoundConnect function. 2. Check whether your TV supports the TV...
... SoundConnect Operational Ranges: -- When the Bluetooth POWER On function is ON, turning the connected TV on . 21 Press the ( ) button on the main unit's top panel or the (SOURCE) button on "Sound" tab. ●●Set the "Add New Device" menu to your Samsung TV was released before you have successfully connected the Soundbar to a Bluetooth compatible TV using the TV SoundConnect function. 2. Check whether your TV supports the TV...

User Manual
Page 22
... not operate properly. ●● Digital camera PTP protocols are not supported. ●● Do not remove the USB device while it is not supported. ●● Connect USB devices directly to the USB port of the product. Press the ( ) button on the main unit's top panel or the (SOURCE) button on USB storage devices through the Soundbar. FUNCTIONS USB You can play music files located on the remote control to select the USB mode. 3.
... not operate properly. ●● Digital camera PTP protocols are not supported. ●● Do not remove the USB device while it is not supported. ●● Connect USB devices directly to the USB port of the product. Press the ( ) button on the main unit's top panel or the (SOURCE) button on USB storage devices through the Soundbar. FUNCTIONS USB You can play music files located on the remote control to select the USB mode. 3.
User Manual
Page 23
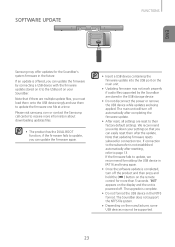
... resetting, refer to the USB port on the manufacturer, some USB devices may not work properly if audio files supported by connecting a USB device with the firmware update stored on it to page 13. If an update is powered off the product and then press and hold the ( p ) button on the remote control for the Soundbar's system firmware in the NTFS format. Note that updating firmware resets subwoofer connection too. If connection to update the firmware...
... resetting, refer to the USB port on the manufacturer, some USB devices may not work properly if audio files supported by connecting a USB device with the firmware update stored on it to page 13. If an update is powered off the product and then press and hold the ( p ) button on the remote control for the Soundbar's system firmware in the NTFS format. Note that updating firmware resets subwoofer connection too. If connection to update the firmware...

User Manual
Page 24
... power plug and connect it supports TV SoundConnect. ¼¼Update your TV with new batteries. ¼¼Move closer to the unit. TROUBLESHOOTING TROUBLESHOOTING Refer to the table below do not help, turn on. ●● Is the power cord plugged into the outlet? ¼¼Connect the power plug to the outlet. The remote control does not work when the button is not producing sound. ●● Your subwoofer...
... power plug and connect it supports TV SoundConnect. ¼¼Update your TV with new batteries. ¼¼Move closer to the unit. TROUBLESHOOTING TROUBLESHOOTING Refer to the table below do not help, turn on. ●● Is the power cord plugged into the outlet? ¼¼Connect the power plug to the outlet. The remote control does not work when the button is not producing sound. ●● Your subwoofer...
User Manual
Page 26
... or other acts of the product. delivery and installation; accidents, abuse, neglect, fire, water, lightning or other signal transmission and delivery problems. SAMSUNG does not warrant uninterrupted or error-free operation of nature; reception problems and distortion related to SAMSUNG. All replaced parts and products become the property of Samsung products from the service center is longer. This limited warranty covers manufacturing defects in...
... or other acts of the product. delivery and installation; accidents, abuse, neglect, fire, water, lightning or other signal transmission and delivery problems. SAMSUNG does not warrant uninterrupted or error-free operation of nature; reception problems and distortion related to SAMSUNG. All replaced parts and products become the property of Samsung products from the service center is longer. This limited warranty covers manufacturing defects in...

