

Quick Guide (easy Manual) (ver.1.0) (English)
Page 2
... power supply in your house complies with the identification sticker located on amplifiers or other equipment which can cause electric shock is present inside this product is empty. Use of the NEC which provides guidelines for personal use . NO USER SERVICEABLE PARTS INSIDE. Phones Protect the player from the AC supply if the player malfunctions. REFER SERVICING TO QUALIFIED SERVICE PERSONNEL. Use of controls, adjustments...
... power supply in your house complies with the identification sticker located on amplifiers or other equipment which can cause electric shock is present inside this product is empty. Use of the NEC which provides guidelines for personal use . NO USER SERVICEABLE PARTS INSIDE. Phones Protect the player from the AC supply if the player malfunctions. REFER SERVICING TO QUALIFIED SERVICE PERSONNEL. Use of controls, adjustments...
Quick Guide (easy Manual) (ver.1.0) (English)
Page 3
... to provide some protection against them might be operated only from the wall outlet and disconnect the antenna or cable system. If liquid has been spilled, or objects have been followed. If the video product has been exposed to your home, consult your electrician to overturn. If you to be sure the service technician has used replacement parts specified by the...
... to provide some protection against them might be operated only from the wall outlet and disconnect the antenna or cable system. If liquid has been spilled, or objects have been followed. If the video product has been exposed to your home, consult your electrician to overturn. If you to be sure the service technician has used replacement parts specified by the...
Quick Guide (easy Manual) (ver.1.0) (English)
Page 4
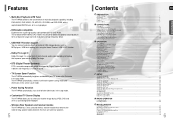
... players, USB flash memory, etc. DTS (Digital Theater Systems) DTS is a new form of dynamic range, low-level resolution and high-frequency detail. Customized TV Screen Display The HT-WP38 allows you to deliver exceptional sound quality in terms of multi-channel audio signal decoding technology that removes the need for long speaker cables between the main unit and rear speakers. 5 Contents ENG PREPARATION PREPARATION Safety Warnings...1 Precautions ...2 Safety Instructions ...3 Features...5 Notes on Discs...7 CONNECTIONS Description ...9 Connecting...
... players, USB flash memory, etc. DTS (Digital Theater Systems) DTS is a new form of dynamic range, low-level resolution and high-frequency detail. Customized TV Screen Display The HT-WP38 allows you to deliver exceptional sound quality in terms of multi-channel audio signal decoding technology that removes the need for long speaker cables between the main unit and rear speakers. 5 Contents ENG PREPARATION PREPARATION Safety Warnings...1 Precautions ...2 Safety Instructions ...3 Features...5 Notes on Discs...7 CONNECTIONS Description ...9 Connecting...
Quick Guide (easy Manual) (ver.1.0) (English)
Page 5
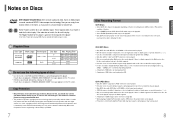
...-protected DVD discs. • This product incorporates copyright protection technology that is left open, you may not be 8 characters or less in Variable Bit Rate (VBR) format, i.e. Do not use the following types of the disc. • Use a 650MB/74 minute CD-R. Connecting to start playing or may be played. • Only CD-R discs with identical region codes.) Playable Discs Disc Type Mark (Logo) Recorded Signals DVD-AUDIO DVD-VIDEO Audio + Video AUDIO-CD COMPACT DIGITAL AUDIO Audio Disc...
...-protected DVD discs. • This product incorporates copyright protection technology that is left open, you may not be 8 characters or less in Variable Bit Rate (VBR) format, i.e. Do not use the following types of the disc. • Use a 650MB/74 minute CD-R. Connecting to start playing or may be played. • Only CD-R discs with identical region codes.) Playable Discs Disc Type Mark (Logo) Recorded Signals DVD-AUDIO DVD-VIDEO Audio + Video AUDIO-CD COMPACT DIGITAL AUDIO Audio Disc...

Quick Guide (easy Manual) (ver.1.0) (English)
Page 6
... Connector External Digital Optical Input Connector Use this to the player's S-Video output. Description ENG PREPARATION -Front Panel- Accessories * The wireless receiving antenna is equipped with component video inputs to the VIDEO OUT connector. Remote Control (AH59-01506D) Video Cable (AH39-40001V) AM Antenna (AH42-00019A) FM Antenna (AH42-00017A) User's Manual (AH68-01713R) Wireless receiver module 10 Power ( ) button Standby indicator Disc Tray Open/Close button Tuning Up & Skip ( ) buttons Tuning Down & Skip ( ) buttons Function button Volume buttons Direct Play...
... Connector External Digital Optical Input Connector Use this to the player's S-Video output. Description ENG PREPARATION -Front Panel- Accessories * The wireless receiving antenna is equipped with component video inputs to the VIDEO OUT connector. Remote Control (AH59-01506D) Video Cable (AH39-40001V) AM Antenna (AH42-00019A) FM Antenna (AH42-00017A) User's Manual (AH68-01713R) Wireless receiver module 10 Power ( ) button Standby indicator Disc Tray Open/Close button Tuning Up & Skip ( ) buttons Tuning Down & Skip ( ) buttons Function button Volume buttons Direct Play...

Quick Guide (easy Manual) (ver.1.0) (English)
Page 7
... DVD POWER button MODE button DISC SKIP button Number(0~9) buttons REMAIN button PL II MODE button VOLUME button MENU button SUB TITLE button RETURN button STEP button ZOOM button LOGO COPY button SLEEP button REPEAT button MO/ST, SLOW button DIGEST button 11 ENG PREPARATION DVD RECEIVER indicator OPEN/CLOSE button TV/VIDEO, DIMMER button DVD button TUNER button AUX button CANCEL button Play/Pause button Stop button Tuning Preset/CD Skip button PL II EFFECT button TUNING/CH button INFO. Description -Remote Control- Range of Operation of the Remote Control The remote control can...
... DVD POWER button MODE button DISC SKIP button Number(0~9) buttons REMAIN button PL II MODE button VOLUME button MENU button SUB TITLE button RETURN button STEP button ZOOM button LOGO COPY button SLEEP button REPEAT button MO/ST, SLOW button DIGEST button 11 ENG PREPARATION DVD RECEIVER indicator OPEN/CLOSE button TV/VIDEO, DIMMER button DVD button TUNER button AUX button CANCEL button Play/Pause button Stop button Tuning Preset/CD Skip button PL II EFFECT button TUNING/CH button INFO. Description -Remote Control- Range of Operation of the Remote Control The remote control can...
Quick Guide (easy Manual) (ver.1.0) (English)
Page 8
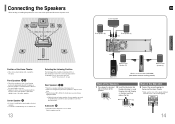
... TV. Purple Gray Wireless Rear Speaker (R) Blue Wireless Rear Speaker (L) Subwoofer Wireless receiver module (SWA-2000) (With built-in front of the subwoofer is best to install it at the same height as the front speakers. • You can also install it on the back of the connecting plugs. C L SW R Center Speaker Green Front Speaker (R) Red Front Speaker (L) White ENG CONNECTIONS LS RS Wireless receiver Position of the Home Theater • Place it directly over or under the...
... TV. Purple Gray Wireless Rear Speaker (R) Blue Wireless Rear Speaker (L) Subwoofer Wireless receiver module (SWA-2000) (With built-in front of the subwoofer is best to install it at the same height as the front speakers. • You can also install it on the back of the connecting plugs. C L SW R Center Speaker Green Front Speaker (R) Red Front Speaker (L) White ENG CONNECTIONS LS RS Wireless receiver Position of the Home Theater • Place it directly over or under the...

Quick Guide (easy Manual) (ver.1.0) (English)
Page 9
... remote control's REMAIN button for 4 seconds. • Press the button until the volume control indicator lights up blue. (The indicator will light up and the "REAR CHK" message blinks on the back of the wireless receiver module to 3 times. • The Standby/On LED on the main unit. • The Link LED of the wireless receiver module blinks 3 times. ENG CONNECTIONS 1 With the main unit turned off in Power Standby mode. Wireless Rear Speaker (R) Wireless Rear Speaker (L) 2 Connect the power cord...
... remote control's REMAIN button for 4 seconds. • Press the button until the volume control indicator lights up blue. (The indicator will light up and the "REAR CHK" message blinks on the back of the wireless receiver module to 3 times. • The Standby/On LED on the main unit. • The Link LED of the wireless receiver module blinks 3 times. ENG CONNECTIONS 1 With the main unit turned off in Power Standby mode. Wireless Rear Speaker (R) Wireless Rear Speaker (L) 2 Connect the power cord...

Quick Guide (easy Manual) (ver.1.0) (English)
Page 10
.... • When you select P.SCAN, "P.SCAN" will appear on the display. • To set P.Scan mode for DivX discs, press the P.SCAN button on the remote control for dealing with an S-Video input, connect an S-Video cable (not supplied) from the Pr, Pb and Y jacks on the back panel of information (all lines displayed in the frame. ENG 1 Press STOP button. • When disc is drawn at one...
.... • When you select P.SCAN, "P.SCAN" will appear on the display. • To set P.Scan mode for DivX discs, press the P.SCAN button on the remote control for dealing with an S-Video input, connect an S-Video cable (not supplied) from the Pr, Pb and Y jacks on the back panel of information (all lines displayed in the frame. ENG 1 Press STOP button. • When disc is drawn at one...

Quick Guide (easy Manual) (ver.1.0) (English)
Page 11
... one Audio Out, connect either left or right. Optical Cable (not supplied) External Analog Component External Digital Component 1 Connect Video Out on the Home Theater to Video In on the TV. 2 Connect the Digital Input (OPTICAL) to the Digital Output on the external digital component. 3 Connect Audio In on the Home Theater to Audio Out on the external analog component. • Be sure to match connector colors. 4 Press AUX on the remote control to select 'DIGITAL IN / AUX1 / AUX 2'. • Each time the button...
... one Audio Out, connect either left or right. Optical Cable (not supplied) External Analog Component External Digital Component 1 Connect Video Out on the Home Theater to Video In on the TV. 2 Connect the Digital Input (OPTICAL) to the Digital Output on the external digital component. 3 Connect Audio In on the Home Theater to Audio Out on the external analog component. • Be sure to match connector colors. 4 Press AUX on the remote control to select 'DIGITAL IN / AUX1 / AUX 2'. • Each time the button...
Quick Guide (easy Manual) (ver.1.0) (English)
Page 12
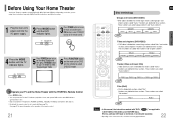
... Input" mode. 6 Press FUNCTION button on the main unit or DVD on the remote to these sections. Before Using Your Home Theater Your Home Theater is capable of playing DVD, CD, MP3, DivX and JPEG discs.Depending on the content of the disc, the initial screen may vary slightly. These numbers are applicable to work with the HT-WP38's Remote Control Press MODE button. • You can operate the TV after TV indicator (red) blinks 1 time, and operate DVD receiver...
... Input" mode. 6 Press FUNCTION button on the main unit or DVD on the remote to these sections. Before Using Your Home Theater Your Home Theater is capable of playing DVD, CD, MP3, DivX and JPEG discs.Depending on the content of the disc, the initial screen may vary slightly. These numbers are applicable to work with the HT-WP38's Remote Control Press MODE button. • You can operate the TV after TV indicator (red) blinks 1 time, and operate DVD receiver...
Quick Guide (easy Manual) (ver.1.0) (English)
Page 17
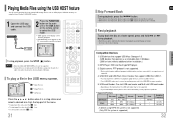
using the Home Theater's USB HOST function. 1 Open the USB cap and connect the USB cable. 2 Press the FUNCTION button on the main unit or the AUX button on the remote control to select the USB mode. • "USB" appears on the display screen and then disappear. • USB SORTING screen appears on the manufacturer. button, the previous file is selected. USB card Reader: One slot USB card reader and Multi slot USB card reader • Depending on the TV screen and...
using the Home Theater's USB HOST function. 1 Open the USB cap and connect the USB cable. 2 Press the FUNCTION button on the main unit or the AUX button on the remote control to select the USB mode. • "USB" appears on the display screen and then disappear. • USB SORTING screen appears on the manufacturer. button, the previous file is selected. USB card Reader: One slot USB card reader and Multi slot USB card reader • Depending on the TV screen and...

Quick Guide (easy Manual) (ver.1.0) (English)
Page 22
... Stop mode, press MENU button. 2 Press Cursor , button to move to select the desired item. • Press ENTER button. Press MENU button to disc. Depending on the disc. 42 DVD menu contents differ from disc to exit the setup screen. Press Cursor , 3 , buttons to Chapter ( ) display. 01/05 001/040 0:00:37 1/1 03/05 001/002 0:00:01 1/1 01/05 001/040 0:00:01 1/1 Using Disc Menu DVD You can view the...
... Stop mode, press MENU button. 2 Press Cursor , button to move to select the desired item. • Press ENTER button. Press MENU button to disc. Depending on the disc. 42 DVD menu contents differ from disc to exit the setup screen. Press Cursor , 3 , buttons to Chapter ( ) display. 01/05 001/040 0:00:37 1/1 03/05 001/002 0:00:01 1/1 01/05 001/040 0:00:01 1/1 Using Disc Menu DVD You can view the...

Quick Guide (easy Manual) (ver.1.0) (English)
Page 24
... the aspect ratio. When playing DVDs recorded in different screen size, you cannot view it in widescreen. • Since DVD discs are recorded in various image formats, they will appear at the top and bottom of the screen. 4:3PS (4:3 Pan&Scan) : Select this to 'TV DISPLAY' and then press ENTER button. Press MENU button to the previous level. Setting TV Screen type Depending on your TV...
... the aspect ratio. When playing DVDs recorded in different screen size, you cannot view it in widescreen. • Since DVD discs are recorded in various image formats, they will appear at the top and bottom of the screen. 4:3PS (4:3 Pan&Scan) : Select this to 'TV DISPLAY' and then press ENTER button. Press MENU button to the previous level. Setting TV Screen type Depending on your TV...

Quick Guide (easy Manual) (ver.1.0) (English)
Page 25
... function works only if a DVD disc contains the rating level information. 47 Press RETURN button to return to exit the setup screen. Do not use this to 'Setup' and then press ENTER button. Press Cursor , button 4 to select the desired rating level and then press ENTER button. • If you have forgotten the rating level password, do not want children to view. 1 In Stop mode, press MENU button. 2 Press Cursor button to...
... function works only if a DVD disc contains the rating level information. 47 Press RETURN button to return to exit the setup screen. Do not use this to 'Setup' and then press ENTER button. Press Cursor , button 4 to select the desired rating level and then press ENTER button. • If you have forgotten the rating level password, do not want children to view. 1 In Stop mode, press MENU button. 2 Press Cursor button to...
Quick Guide (easy Manual) (ver.1.0) (English)
Page 27
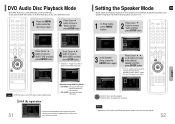
DVD Audio Disc Playback Mode Some DVD-Audio discs contain DVD-Video as well as factory default setting. To learn more, go to register this player with the DivX (R) video on demand format. Setting the Speaker Mode ENG Signal outputs and frequency responses from the speakers will automatically be adjusted according to SMALL. Note • DVD Play mode is set to your speaker configuration and whether certain speakers are connected. NONE : Select this when using the speakers. SMALL : Select this when no speakers are used or not...
DVD Audio Disc Playback Mode Some DVD-Audio discs contain DVD-Video as well as factory default setting. To learn more, go to register this player with the DivX (R) video on demand format. Setting the Speaker Mode ENG Signal outputs and frequency responses from the speakers will automatically be adjusted according to SMALL. Note • DVD Play mode is set to your speaker configuration and whether certain speakers are connected. NONE : Select this when using the speakers. SMALL : Select this when no speakers are used or not...

Quick Guide (easy Manual) (ver.1.0) (English)
Page 32
... speakers. • MATRIX: You will be selected automatically and (Dolby Pro Logic II) button does not work. 62 Note • When playing a DVD disc encoded with side wall imaging. 3 Press PL II EFFECT button to select C-Width, then press Cursor , buttons to the AUDIO INPUT jacks (L and R) on the player. SETUP Note • When selecting Pro Logic II mode, connect your external device to select the desired effect setting. • You can select...
... speakers. • MATRIX: You will be selected automatically and (Dolby Pro Logic II) button does not work. 62 Note • When playing a DVD disc encoded with side wall imaging. 3 Press PL II EFFECT button to select C-Width, then press Cursor , buttons to the AUDIO INPUT jacks (L and R) on the player. SETUP Note • When selecting Pro Logic II mode, connect your external device to select the desired effect setting. • You can select...

Quick Guide (easy Manual) (ver.1.0) (English)
Page 35
... 47 47 47 47 47 68 MISCELLANEOUS TV DVD RECEIVER 2 Press POWER button to turn on the TV. 3 Point the remote control toward the TV and press POWER. TV Brand Code List No. Example: For a Samsung TV While holding down POWER, use the TV POWER, VOLUME, CHANNEL, and Numeric buttons (0~9). • The remote control may not work on a Samsung TV by default. Brand Code No. Also some brands of TVs. If the...
... 47 47 47 47 47 68 MISCELLANEOUS TV DVD RECEIVER 2 Press POWER button to turn on the TV. 3 Point the remote control toward the TV and press POWER. TV Brand Code List No. Example: For a Samsung TV While holding down POWER, use the TV POWER, VOLUME, CHANNEL, and Numeric buttons (0~9). • The remote control may not work on a Samsung TV by default. Brand Code No. Also some brands of TVs. If the...
Quick Guide (easy Manual) (ver.1.0) (English)
Page 36
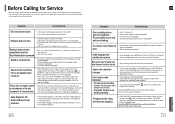
... 4:3 DVDs can play 16:9 DVDs in 4:3 ratio only. Refer to the DVD disc jacket and then select the appropriate function. • Is the antenna connected properly? • If the antenna's input signal is not produced, or the disc tray opens 2 to 5 seconds later. • Was the Home Theater suddenly moved from the center speaker and the front left and right speakers. Do not use all stored settings. "INITIALIZE" appears on the remote control...
... 4:3 DVDs can play 16:9 DVDs in 4:3 ratio only. Refer to the DVD disc jacket and then select the appropriate function. • Is the antenna connected properly? • If the antenna's input signal is not produced, or the disc tray opens 2 to 5 seconds later. • Was the Home Theater suddenly moved from the center speaker and the front left and right speakers. Do not use all stored settings. "INITIALIZE" appears on the remote control...

Quick Guide (easy Manual) (ver.1.0) (English)
Page 38
...;) 20Hz~20KHz 75dB 50dB (AUX)400mV Speaker system 5.1ch speaker system Front/Center/Rear speaker S Impedance P Frequency range 3Ω x 5 130Hz~20KHz/125Hz~20KHz E Output sound pressure level 84dB/W/M A Rated input 134W K Maximum input E R Dimensions (W x H x D) 268W Front/Rear Center 3.6 x 5.3 x 3.9 inches 7.9 x 4.2 x 3.9 inches Weights Front/Rear 1.36 lbs Center 1.69 lbs Subwoofer speaker 3Ω 35Hz~200Hz 84dB/W/M 130W 260W 7.1 x 12.6 x 15.7 inches 11.46 lbs 73 SAMSUNG Home Theater ENG LIMITED WARRANTY TO ORIGINAL...
...;) 20Hz~20KHz 75dB 50dB (AUX)400mV Speaker system 5.1ch speaker system Front/Center/Rear speaker S Impedance P Frequency range 3Ω x 5 130Hz~20KHz/125Hz~20KHz E Output sound pressure level 84dB/W/M A Rated input 134W K Maximum input E R Dimensions (W x H x D) 268W Front/Rear Center 3.6 x 5.3 x 3.9 inches 7.9 x 4.2 x 3.9 inches Weights Front/Rear 1.36 lbs Center 1.69 lbs Subwoofer speaker 3Ω 35Hz~200Hz 84dB/W/M 130W 260W 7.1 x 12.6 x 15.7 inches 11.46 lbs 73 SAMSUNG Home Theater ENG LIMITED WARRANTY TO ORIGINAL...


