Samsung HT-TXQ120 Research
Related Manual Pages


Related Videos

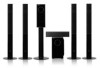
samsung 46" crystal gloss with home cinema samsung ht-txq120
Duration: 1:52
Total Views: 7,101
Duration: 1:52
Total Views: 7,101
Samsung HT-TXQ120
Duration: 1:22
Total Views: 7,060
Duration: 1:22
Total Views: 7,060
samsung ht-txq120
Duration: 2:22
Total Views: 521
Duration: 2:22
Total Views: 521
Similar Questions

Samsung Ht-txq120
My samsung ht-txq120 dont want to turn on. What ca i do
My samsung ht-txq120 dont want to turn on. What ca i do
(Posted by Anonymous-158635 8 years ago)

My Samsung Ht-txq120 Audio Power Off
My samsung HT-TXQ120 no audio, and the indiator lamp in subwoofer is standby. please help me
My samsung HT-TXQ120 no audio, and the indiator lamp in subwoofer is standby. please help me
(Posted by sundager81 8 years ago)

No Sound From Any Speaker Samsung Home Theater Ht-tz512.
I relocated sound system and samsung series 5 580 tv to another room but no sound. Any ideas of how ...
I relocated sound system and samsung series 5 580 tv to another room but no sound. Any ideas of how ...
(Posted by msnavy77 8 years ago)

Why Does My System Now Say Protection And Will Not Work Samsung Ht-txq120
Samsung Ht-txq120 Will Not Work When I Switch On It Shows Protection On The Screen
Samsung Ht-txq120 Will Not Work When I Switch On It Shows Protection On The Screen
(Posted by jstaylor 9 years ago)

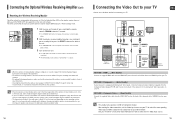
Connecting For Sound From T.v/cable Box Using Digital Audio Cable.
I'm lost. I've read the directions and must be doing something wrong, can't figure out what. Want to...
I'm lost. I've read the directions and must be doing something wrong, can't figure out what. Want to...
(Posted by mallison15 9 years ago)