User Manual (ENGLISH)
Page 8
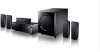
Description [ Front panel ] POWER STANDBY Indicator TONE CONTROL button Remote control sensor SURROUND button POWER button AUX IN Jack HEADPHONE Jack 7.1CH IN STEREO FUNCTION button INPUT MODE button SETUP button TUNING MODE button SELECT( VOLUME CONTROL , ) button [ Display ] DOLBY DIGITAL EX INDICATOR DIGITAL LIVE SURROUND INDICATOR INDICATOR SPEAKER INDICATORS L.PCM INDICATOR FRONT DISPLAY RADIO BROADCASTING RECEIVING INDICATOR RADIO FREQUENCY INDICATOR RADIO STEREO INDICATORS DTS INDICATOR 8
Description [ Front panel ] POWER STANDBY Indicator TONE CONTROL button Remote control sensor SURROUND button POWER button AUX IN Jack HEADPHONE Jack 7.1CH IN STEREO FUNCTION button INPUT MODE button SETUP button TUNING MODE button SELECT( VOLUME CONTROL , ) button [ Display ] DOLBY DIGITAL EX INDICATOR DIGITAL LIVE SURROUND INDICATOR INDICATOR SPEAKER INDICATORS L.PCM INDICATOR FRONT DISPLAY RADIO BROADCASTING RECEIVING INDICATOR RADIO FREQUENCY INDICATOR RADIO STEREO INDICATORS DTS INDICATOR 8
User Manual (ENGLISH)
Page 10
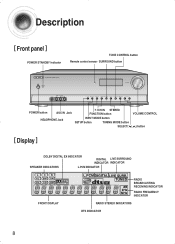
... control ] TV button AMP button POWER button NUMBER (0~9) buttons SLEEP button SUBWOOFER button EX/ES button EXTERNAL DEVICE PLAYBACK button MUTE button VOLUME CONTROL button SETUP/MENU button CURSOR/ENTER button DRC button INFO button NEO : 6 MODE button STEREO button SPK LEVEL button SFE MODE button DVD button VCR button DIMMER...
... control ] TV button AMP button POWER button NUMBER (0~9) buttons SLEEP button SUBWOOFER button EX/ES button EXTERNAL DEVICE PLAYBACK button MUTE button VOLUME CONTROL button SETUP/MENU button CURSOR/ENTER button DRC button INFO button NEO : 6 MODE button STEREO button SPK LEVEL button SFE MODE button DVD button VCR button DIMMER...
User Manual (ENGLISH)
Page 18
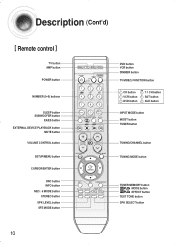
...than two AV receivers (Anynet+ installed). With Anynet+ You can listen to OFF. - Anynet+ Using Anynet+(HDMI-CEC) 1 Connect the AV receiver to a Samsung TV with an HDMI cable. (See page 17) 2 Set the Anynet+ function on your TV. (See the TV instruction manual for about 5 seconds or ... display and goes into Setup Mode. 2 Press œ √ button to select the "ANYNET+ MODE", and then press the ENTER button. 3 Press the ...† button to set ANYNET+ to audio through the AV receiver. • Receiver : Off : You can operate this unit, power on your Samsung TV's remote control. ...
...than two AV receivers (Anynet+ installed). With Anynet+ You can listen to OFF. - Anynet+ Using Anynet+(HDMI-CEC) 1 Connect the AV receiver to a Samsung TV with an HDMI cable. (See page 17) 2 Set the Anynet+ function on your TV. (See the TV instruction manual for about 5 seconds or ... display and goes into Setup Mode. 2 Press œ √ button to select the "ANYNET+ MODE", and then press the ENTER button. 3 Press the ...† button to set ANYNET+ to audio through the AV receiver. • Receiver : Off : You can operate this unit, power on your Samsung TV's remote control. ...
User Manual (ENGLISH)
Page 21
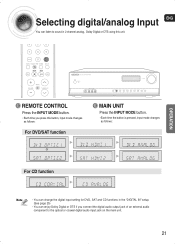
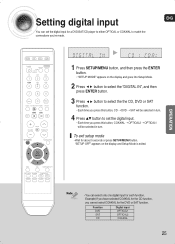
... or coaxial digital audio input jack on the main unit. 21 Selecting digital/analog Input ENG You can listen to sound in the "DIGITAL IN" setup. (See page 25) • You can change the digital input setting for DVD, SAT and CD functions in 2 channel analog , Dolby Digital or DTS using...
... or coaxial digital audio input jack on the main unit. 21 Selecting digital/analog Input ENG You can listen to sound in the "DIGITAL IN" setup. (See page 25) • You can change the digital input setting for DVD, SAT and CD functions in 2 channel analog , Dolby Digital or DTS using...
User Manual (ENGLISH)
Page 22
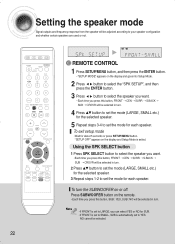
...whether certain speakers are used or not. √ REMOTE CONTROL 1 Press SETUP/MENU button, and then press the ENTER button. • "SETUP MODE" appears on the display and goes into Setup Mode. 2 Press button to select the "SPK SETUP", and then press the ENTER button. 3 Press button to select the...; SUB ➝ CROVR will be selected in turn the SUBWOOFER on the display and Setup Mode is automatically set the mode for about 5 seconds or press SETUP/MENU button. "SETUP OFF" appears on or off. To exit setup mode • Wait for each speaker. To turn . 4 Press ...† button to...
...whether certain speakers are used or not. √ REMOTE CONTROL 1 Press SETUP/MENU button, and then press the ENTER button. • "SETUP MODE" appears on the display and goes into Setup Mode. 2 Press button to select the "SPK SETUP", and then press the ENTER button. 3 Press button to select the...; SUB ➝ CROVR will be selected in turn the SUBWOOFER on the display and Setup Mode is automatically set the mode for about 5 seconds or press SETUP/MENU button. "SETUP OFF" appears on or off. To exit setup mode • Wait for each speaker. To turn . 4 Press ...† button to...
User Manual (ENGLISH)
Page 23
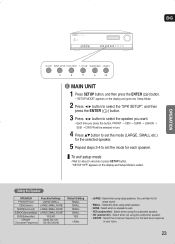
...this button, FRONT ➝ CEN ➝ SURR ➝ S.BACK ➝ SUB ➝ CROVR will be selected in your room. 23 To exit setup mode • Wait for the selected speaker. 5 Repeat steps 3-4 to select the speaker you want. • Each time you press this when using ...; button to set the mode (LARGE, SMALL etc.) for about 5 seconds or press SETUP button. ENG OPERATION MAIN UNIT 1 Press SETUP button, and then press the ENTER ( ) button. • "SETUP MODE" appears on the display and Setup Mode is used • YES (subwoofer) : Select when using the subwoofer speaker. ...
...this button, FRONT ➝ CEN ➝ SURR ➝ S.BACK ➝ SUB ➝ CROVR will be selected in your room. 23 To exit setup mode • Wait for the selected speaker. 5 Repeat steps 3-4 to select the speaker you want. • Each time you press this when using ...; button to set the mode (LARGE, SMALL etc.) for about 5 seconds or press SETUP button. ENG OPERATION MAIN UNIT 1 Press SETUP button, and then press the ENTER ( ) button. • "SETUP MODE" appears on the display and Setup Mode is used • YES (subwoofer) : Select when using the subwoofer speaker. ...
User Manual (ENGLISH)
Page 24
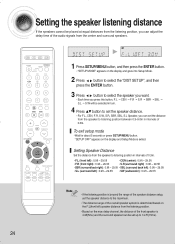
...left) : 0.9ft ~ 29.5ft • SW (subwoofer) : 0.9ft ~ 29.5ft • If the listening position is beyond the range of the speaker distance setup, set the speaker distance to the maximum. • The distance range of the overall speaker system is determined based on the F.L(front left) speaker distance... distance. • For F.L, CEN, F.R, S.W, S.R, SBR, SBL, S.L Speaker, you can be set up to 14.7ft(15ms). 24 "SETUP OFF" appears on the display and Setup Mode is 4.9ft(5ms) and the surround speaker can set the distance from the speaker to listening position between 0.3~9.0m in intervals...
...left) : 0.9ft ~ 29.5ft • SW (subwoofer) : 0.9ft ~ 29.5ft • If the listening position is beyond the range of the speaker distance setup, set the speaker distance to the maximum. • The distance range of the overall speaker system is determined based on the F.L(front left) speaker distance... distance. • For F.L, CEN, F.R, S.W, S.R, SBR, SBL, S.L Speaker, you can be set up to 14.7ft(15ms). 24 "SETUP OFF" appears on the display and Setup Mode is 4.9ft(5ms) and the surround speaker can set the distance from the speaker to listening position between 0.3~9.0m in intervals...
User Manual (ENGLISH)
Page 25
... OPTICAL or COAXIAL to match the connections you've made . √ 1 Press SETUP/MENU button, and then press the ENTER button. • "SETUP MODE" appears on the display and Setup Mode is exited. "SETUP OFF" appears on the display and goes into Setup Mode. 2 Press button to select the "DIGITAL IN", and then press ENTER... will be selected in turn . 4 Press ...† button to set the digital input. • Each time you cannot select COAXIAL for about 5 seconds or press SETUP/MENU button. To exit setup mode • Wait for the DVD or SAT function.
... OPTICAL or COAXIAL to match the connections you've made . √ 1 Press SETUP/MENU button, and then press the ENTER button. • "SETUP MODE" appears on the display and Setup Mode is exited. "SETUP OFF" appears on the display and goes into Setup Mode. 2 Press button to select the "DIGITAL IN", and then press ENTER... will be selected in turn . 4 Press ...† button to set the digital input. • Each time you cannot select COAXIAL for about 5 seconds or press SETUP/MENU button. To exit setup mode • Wait for the DVD or SAT function.
User Manual (ENGLISH)
Page 26
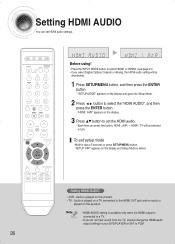
... HDMI audio. • Each time you do not hear sound from the TV, should change the HDMI audio output setting for about 5 seconds or press SETUP/MENU button. Setting HDMI AUDIO You can set HDMI audio settings. √ Before using! • Press the INPUT MODE button to select HDMI1 or HDMI2.... (see page 21) • If you select Digital (Optical, Coaxial) or Analog, the HDMI audio setting will be selected in turn. To exit setup mode • Wait for your DVD PLAYER or SAT to a TV. • If you press this product. • HDMI AUDIO setting is available only when...
... HDMI audio. • Each time you do not hear sound from the TV, should change the HDMI audio output setting for about 5 seconds or press SETUP/MENU button. Setting HDMI AUDIO You can set HDMI audio settings. √ Before using! • Press the INPUT MODE button to select HDMI1 or HDMI2.... (see page 21) • If you select Digital (Optical, Coaxial) or Analog, the HDMI audio setting will be selected in turn. To exit setup mode • Wait for your DVD PLAYER or SAT to a TV. • If you press this product. • HDMI AUDIO setting is available only when...
User Manual (ENGLISH)
Page 27
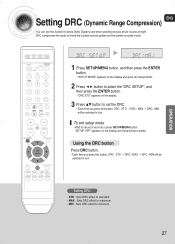
... • Wait for about 5 seconds or press SETUP/MENU button. "SETUP OFF" appears on the display. 3 Press ...† button to set the DRC. • Each time you press this function to minimum. 27 Using the DRC ... to make the loudest sounds quieter and the quietest sounds louder. √ 1 Press SETUP/MENU button, and then press the ENTER button. • "SETUP MODE" appears on the display and goes into Setup Mode. 2 Press button to select the "DRC SETUP", and then press the ENTER button. • "DRC:STD" appears on the display...
... • Wait for about 5 seconds or press SETUP/MENU button. "SETUP OFF" appears on the display. 3 Press ...† button to set the DRC. • Each time you press this function to minimum. 27 Using the DRC ... to make the loudest sounds quieter and the quietest sounds louder. √ 1 Press SETUP/MENU button, and then press the ENTER button. • "SETUP MODE" appears on the display and goes into Setup Mode. 2 Press button to select the "DRC SETUP", and then press the ENTER button. • "DRC:STD" appears on the display...
User Manual (ENGLISH)
Page 28
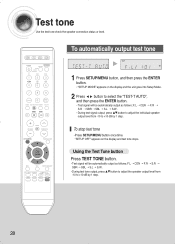
... tone stops. Using the Test Tone button Press TEST TONE button. • Test signal will be automatically output as follows; "SETUP OFF" appears on the display and the unit goes into Setup Mode. 2 Press button to select the "TEST-T AUTO", and then press the ENTER button. • Test signal will be automatically... output, press ...† button to adjust the individual speaker output level from -10 to +10 dB by 1 step. 28 To stop test tone • Press SETUP/MENU button once time. Test tone Use the test tone check the speaker connection status or level.
... tone stops. Using the Test Tone button Press TEST TONE button. • Test signal will be automatically output as follows; "SETUP OFF" appears on the display and the unit goes into Setup Mode. 2 Press button to select the "TEST-T AUTO", and then press the ENTER button. • Test signal will be automatically... output, press ...† button to adjust the individual speaker output level from -10 to +10 dB by 1 step. 28 To stop test tone • Press SETUP/MENU button once time. Test tone Use the test tone check the speaker connection status or level.

User Manual (ENGLISH)
Page 29
... output level from -10 to +10dB by 1 step. • The sound gets quieter at -10dB and louder at +10dB. To stop test tone • Press SETUP/MENU button once time. Test Tone Output • F.L (front left) : -10 ~ +10dB • CEN (center) : -10 ~ +10dB • F.R (front right) : -10 ~ +10dB • S.R... back left) : -10 ~ +10dB • S.L (surround left) : -10 ~ +10dB • S.W (subwoofer) : -10 ~ +10dB 29 OPERATION ENG To Manually Output Test Tone √ 1 Press SETUP/MENU button, and then press the ENTER button. • "SETUP MODE" appears on the display and test tone stops.
... output level from -10 to +10dB by 1 step. • The sound gets quieter at -10dB and louder at +10dB. To stop test tone • Press SETUP/MENU button once time. Test Tone Output • F.L (front left) : -10 ~ +10dB • CEN (center) : -10 ~ +10dB • F.R (front right) : -10 ~ +10dB • S.R... back left) : -10 ~ +10dB • S.L (surround left) : -10 ~ +10dB • S.W (subwoofer) : -10 ~ +10dB 29 OPERATION ENG To Manually Output Test Tone √ 1 Press SETUP/MENU button, and then press the ENTER button. • "SETUP MODE" appears on the display and test tone stops.
User Manual (ENGLISH)
Page 30
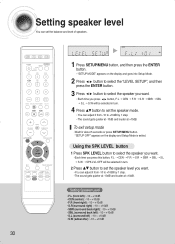
...10 ~ +10dB • S.L (surround left) : -10 ~ +10dB • S.W (subwoofer) : -10 ~ +10dB 30 "SETUP OFF" appears on the display and goes into Setup Mode. 2 Press button to select the "LEVEL SETUP", and then press the ENTER button. 3 Press button to select the speaker you want. • Each time you... will be selected in turn. 4 Press ...† button to set the balance and level of speakers. √ 1 Press SETUP/MENU button, and then press the ENTER button. • "SETUP MODE" appears on the display and Setup Mode is exited. To exit setup mode • Wait for about 5 seconds or press...
...10 ~ +10dB • S.L (surround left) : -10 ~ +10dB • S.W (subwoofer) : -10 ~ +10dB 30 "SETUP OFF" appears on the display and goes into Setup Mode. 2 Press button to select the "LEVEL SETUP", and then press the ENTER button. 3 Press button to select the speaker you want. • Each time you... will be selected in turn. 4 Press ...† button to set the balance and level of speakers. √ 1 Press SETUP/MENU button, and then press the ENTER button. • "SETUP MODE" appears on the display and Setup Mode is exited. To exit setup mode • Wait for about 5 seconds or press...
User Manual (ENGLISH)
Page 31
To exit setup mode • Wait for PCM audio signals with sampling frequencies of 32KHz, 44KHz or 48KHz. • Sound will not be selected in turn . Dolby Pro ...
To exit setup mode • Wait for PCM audio signals with sampling frequencies of 32KHz, 44KHz or 48KHz. • Sound will not be selected in turn . Dolby Pro ...
User Manual (ENGLISH)
Page 32
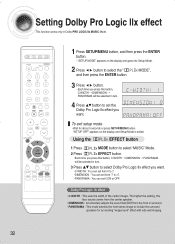
...center speaker. • DIMENSION : Incrementally adjusts the sound field (DSP)from -7 to select Dolby Pro Logic IIx effect you want. To exit setup mode • Wait for an exciting "wraparound" effect with side wall imaging. 32 Setting Dolby Pro Logic llx effect This function works only in... Dolby PRO LOGIC IIx MUSIC Mode. 1 Press SETUP/MENU button, and then press the ENTER button. • "SETUP MODE" appears on the display and Setup Mode is exited. MODE", 3 Press button. • Each time you press this button, C-WIDTH ...
...center speaker. • DIMENSION : Incrementally adjusts the sound field (DSP)from -7 to select Dolby Pro Logic IIx effect you want. To exit setup mode • Wait for an exciting "wraparound" effect with side wall imaging. 32 Setting Dolby Pro Logic llx effect This function works only in... Dolby PRO LOGIC IIx MUSIC Mode. 1 Press SETUP/MENU button, and then press the ENTER button. • "SETUP MODE" appears on the display and Setup Mode is exited. MODE", 3 Press button. • Each time you press this button, C-WIDTH ...
User Manual (ENGLISH)
Page 33
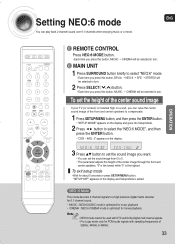
... the center sound image If your TV (or screen) is optimized for movie playback. • NEO:6 mode cannot be selected in turn . To exit setup mode • Wait for music playback • CINEMA : NEO:6 CINEMA mode is installed high on a wall, you want. • You can set... Digital multi channel signals. • Pro Logic works only for PCM audio signals with sampling frequencies of 32KHz, 44KHz or 48KHz. 33 "SETUP OFF" appears on the display and Setup Mode is the highest. NEO : 6 Mode This mode decodes 2 channel signals to a high precision digital matrix decoder. "0" is the...
... the center sound image If your TV (or screen) is optimized for movie playback. • NEO:6 mode cannot be selected in turn . To exit setup mode • Wait for music playback • CINEMA : NEO:6 CINEMA mode is installed high on a wall, you want. • You can set... Digital multi channel signals. • Pro Logic works only for PCM audio signals with sampling frequencies of 32KHz, 44KHz or 48KHz. 33 "SETUP OFF" appears on the display and Setup Mode is the highest. NEO : 6 Mode This mode decodes 2 channel signals to a high precision digital matrix decoder. "0" is the...
User Manual (ENGLISH)
Page 34
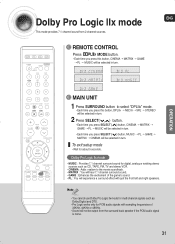
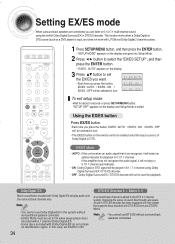
...Digital EX will play in 6.1/7.1 channel automatically. • ON : Dolby Digital or DTS signal will be played in 6.1/7.1 channel. Dolby Digital - "SETUP OFF" appears on the remote control is enabled only if the input source is added to set to 6.1 or 7.1 multi-channel sound using Dolby Digital...EX / DTS ES decoder. • OFF : Dolby Digital Surround EX / DTS ES decoder will not be used for about 5 seconds or press SETUP/MENU button. A built-in the system without surround back speakers connected. Setting EX/ES mode When surround back speakers are connected, you can recognize,...
...Digital EX will play in 6.1/7.1 channel automatically. • ON : Dolby Digital or DTS signal will be played in 6.1/7.1 channel. Dolby Digital - "SETUP OFF" appears on the remote control is enabled only if the input source is added to set to 6.1 or 7.1 multi-channel sound using Dolby Digital...EX / DTS ES decoder. • OFF : Dolby Digital Surround EX / DTS ES decoder will not be used for about 5 seconds or press SETUP/MENU button. A built-in the system without surround back speakers connected. Setting EX/ES mode When surround back speakers are connected, you can recognize,...
User Manual (ENGLISH)
Page 35
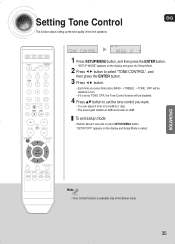
...can adjust it from -6 to TONE: OFF, the Tone Control function will be selected in the Stereo mode. 35 To exit setup mode • Wait for about 5 seconds or press SETUP/MENU button. OPERATION • Tone Control function is available only in turn. • If it is exited. Setting Tone Control... ENG This function allows setting up the tone quality of the front speakers. 1 Press SETUP/MENU button, and then press the ENTER button. • "SETUP MODE" appears on the display and Setup Mode is set to +6dB by 1 step. • The sound gets smaller at -6dB and louder...
...can adjust it from -6 to TONE: OFF, the Tone Control function will be selected in the Stereo mode. 35 To exit setup mode • Wait for about 5 seconds or press SETUP/MENU button. OPERATION • Tone Control function is available only in turn. • If it is exited. Setting Tone Control... ENG This function allows setting up the tone quality of the front speakers. 1 Press SETUP/MENU button, and then press the ENTER button. • "SETUP MODE" appears on the display and Setup Mode is set to +6dB by 1 step. • The sound gets smaller at -6dB and louder...
User Manual (ENGLISH)
Page 36
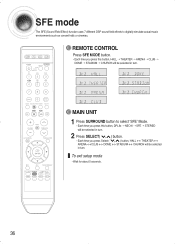
MAIN UNIT 1 Press SURROUND button to digitally simulate actual music environments such as concert halls or cinemas. To exit setup mode • Wait for about 5 seconds. 36 SFE mode The SFE (Sound Field Effect) function uses 7 different DSP sound field effects to select 'SFE' Mode. &#...
MAIN UNIT 1 Press SURROUND button to digitally simulate actual music environments such as concert halls or cinemas. To exit setup mode • Wait for about 5 seconds. 36 SFE mode The SFE (Sound Field Effect) function uses 7 different DSP sound field effects to select 'SFE' Mode. &#...
User Manual (ENGLISH)
Page 37
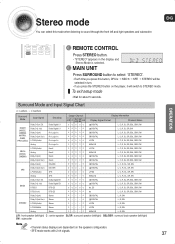
... STEREO mode. Surround Mode and Input Signal Chart o = active, - = inactive Surround Mode Input Signal DOLBY (MUSIC, CINEMA, MATRIX, GAME, PRO LOGIC) Dolby D Surr. O O-- - To exit setup mode • Wait for about 5 seconds. O O OO O O O OO O O O OO O O O OO O O O OO O O O OO O O O OO O O O OO O O O OO - O O OO - O O OO O O O OO O O O OO O O O OO O O O-- - EX EX/ES Dolby D (5.1ch...
... STEREO mode. Surround Mode and Input Signal Chart o = active, - = inactive Surround Mode Input Signal DOLBY (MUSIC, CINEMA, MATRIX, GAME, PRO LOGIC) Dolby D Surr. O O-- - To exit setup mode • Wait for about 5 seconds. O O OO O O O OO O O O OO O O O OO O O O OO O O O OO O O O OO O O O OO O O O OO - O O OO - O O OO O O O OO O O O OO O O O OO O O O-- - EX EX/ES Dolby D (5.1ch...


