
Open Source Guide (ENGLISH)
Page 2
16. and each source file to most effectively convey the exclusion of the greatest possible use to the public, we recommend making it to Your New Libraries If you develop a new library, and you want it free software that everyone can do so by permitting redistribution under the terms of the ordinary General...the full notice is safest to attach them to the start of each file should have at least the "copyright" line and a pointer to the library. You can redistribute and change. IN NO EVENT UNLESS REQUIRED BY APPLICABLE LAW OR AGREED TO IN WRITING WILL ANY COPYRIGHT HOLDER, OR ANY ...
16. and each source file to most effectively convey the exclusion of the greatest possible use to the public, we recommend making it to Your New Libraries If you develop a new library, and you want it free software that everyone can do so by permitting redistribution under the terms of the ordinary General...the full notice is safest to attach them to the start of each file should have at least the "copyright" line and a pointer to the library. You can redistribute and change. IN NO EVENT UNLESS REQUIRED BY APPLICABLE LAW OR AGREED TO IN WRITING WILL ANY COPYRIGHT HOLDER, OR ANY ...

User Manual (ENGLISH)
Page 4
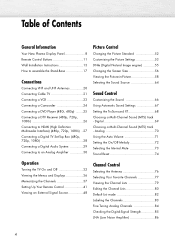
Table of Contents General Information Your New Plasma Display Panel 8 Remote Control Buttons 11 Wall Installation Instructions 13 How to assemble the Stand-Base 17 Connections Connecting VHF and UHF Antennas 20 Connecting Cable TV 21 Connecting a VCR 23 Connecting a Camcorder 24 Connecting a DVD Player (480i, 480p) ........25 Connecting a DTV Receiver (480p, 720p, 1080i 26 Connecting to HDMI (High Definition Multimedia Interface) (480p, 720p, 1080i) ..27 Connecting a Digital TV Set-Top Box (480p, 720p, 1080i 28 Connecting a Digital Audio System 29 Connecting to an Analog Amplifier...
Table of Contents General Information Your New Plasma Display Panel 8 Remote Control Buttons 11 Wall Installation Instructions 13 How to assemble the Stand-Base 17 Connections Connecting VHF and UHF Antennas 20 Connecting Cable TV 21 Connecting a VCR 23 Connecting a Camcorder 24 Connecting a DVD Player (480i, 480p) ........25 Connecting a DTV Receiver (480p, 720p, 1080i 26 Connecting to HDMI (High Definition Multimedia Interface) (480p, 720p, 1080i) ..27 Connecting a Digital TV Set-Top Box (480p, 720p, 1080i 28 Connecting a Digital Audio System 29 Connecting to an Analog Amplifier...
User Manual (ENGLISH)
Page 10
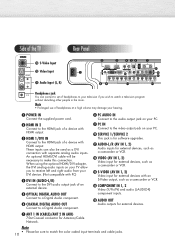
... receive left and right audio from your television if you wish to watch a television program without disturbing other people in the room. When using the optional HDMI/DVI adapter, the DVI analog audio inputs on your hearing. Œ POWER IN Connect the supplied power cord. ´ HDMI IN 2 Connect to the HDMI jack of a device with HDMI output. ˇ HDMI 1/DVI IN Connect to the HDMI jack of a device with separate analog audio inputs. Side of the TV Rear Panel Ò S-Video Input...
... receive left and right audio from your television if you wish to watch a television program without disturbing other people in the room. When using the optional HDMI/DVI adapter, the DVI analog audio inputs on your hearing. Œ POWER IN Connect the supplied power cord. ´ HDMI IN 2 Connect to the HDMI jack of a device with HDMI output. ˇ HDMI 1/DVI IN Connect to the HDMI jack of a device with separate analog audio inputs. Side of the TV Rear Panel Ò S-Video Input...
User Manual (ENGLISH)
Page 11
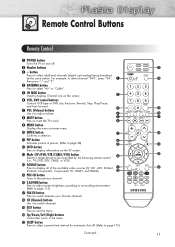
... to adjust volume. " MUTE button Press to mute the TV sound. ' MENU button Displays the main on-screen menu. ˝ ENTER button Confirms a selection. Ô PIP button Activates picture in the menu. ¸ SLEEP button Press to select a preset time interval for automatic shut off . ´ Number buttons ˇ - button Press to select additional channels (digital and analog) being broadcast by the Samsung remote control (i.e., TV, DVD, STB, CABLE, or VCR). Ú SOURCE button Press to display all of the available video sources (TV...
... to adjust volume. " MUTE button Press to mute the TV sound. ' MENU button Displays the main on-screen menu. ˝ ENTER button Confirms a selection. Ô PIP button Activates picture in the menu. ¸ SLEEP button Press to select a preset time interval for automatic shut off . ´ Number buttons ˇ - button Press to select additional channels (digital and analog) being broadcast by the Samsung remote control (i.e., TV, DVD, STB, CABLE, or VCR). Ú SOURCE button Press to display all of the available video sources (TV...
User Manual (ENGLISH)
Page 13
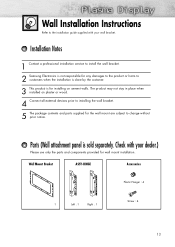
....) Please use only the parts and components provided for the wall mount are subject to change without prior notice. Wall Mount Bracket ASSY-HINGE Accessories Plastic Hanger : 4 1 Left : 1 Right : 1 Screw : 4 13 Wall Installation Instructions Refer to the installation guide supplied with your wall bracket. The product may not stay in place when installed on cement walls. Parts (Wall attachment panel is for installing on plaster or wood. 4 Connect all external devices prior to installing the wall bracket. 5 The...
....) Please use only the parts and components provided for the wall mount are subject to change without prior notice. Wall Mount Bracket ASSY-HINGE Accessories Plastic Hanger : 4 1 Left : 1 Right : 1 Screw : 4 13 Wall Installation Instructions Refer to the installation guide supplied with your wall bracket. The product may not stay in place when installed on cement walls. Parts (Wall attachment panel is for installing on plaster or wood. 4 Connect all external devices prior to installing the wall bracket. 5 The...

User Manual (ENGLISH)
Page 14
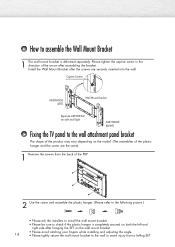
... model. (The assemblies of the plastic hanger and the screw are securely inserted into Left and Right. Install the Wall Mount Bracket after the screws are the same) 1 Remove the screws from a falling SET. How to avoid injury from the back of the PDP. 2 Use the screw and assemble the plastic hanger. (Please refer to the following picture.) • Please ask the installers to install the wall mount bracket...
... model. (The assemblies of the plastic hanger and the screw are securely inserted into Left and Right. Install the Wall Mount Bracket after the screws are the same) 1 Remove the screws from a falling SET. How to avoid injury from the back of the PDP. 2 Use the screw and assemble the plastic hanger. (Please refer to the following picture.) • Please ask the installers to install the wall mount bracket...

User Manual (ENGLISH)
Page 16
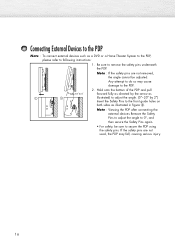
Note : Viewing the PDP after connecting the external devices Remove the Safety Pins to adjust the angle to secure the PDP using the safety pins. Note : If the safety pins are not used, the PDP may cause damage to remove the safety pins underneath the PDP. If the safety pins are not removed, the angle... by the arrow as illustrated in figure @. Connecting External Devices to the PDP Note : To connect external devices such as a DVD or a Home Theater System to the PDP, please refer to the front guide holes on both sides as illustrated) to adjust the angle. (0°~20° by 2°...
Note : Viewing the PDP after connecting the external devices Remove the Safety Pins to adjust the angle to secure the PDP using the safety pins. Note : If the safety pins are not used, the PDP may cause damage to remove the safety pins underneath the PDP. If the safety pins are not removed, the angle... by the arrow as illustrated in figure @. Connecting External Devices to the PDP Note : To connect external devices such as a DVD or a Home Theater System to the PDP, please refer to the front guide holes on both sides as illustrated) to adjust the angle. (0°~20° by 2°...

User Manual (ENGLISH)
Page 35
Press the ▲ or ▼ button to select "Setup", then press the ENTER button. 2 Press the ENTER button to the previous page. TV Plug & Play Language Time Game Mode V-Chip Caption † More Setup √ : English √ √ : Off √ √ √ Move Enter Return i Menu language, Channels and Time will be accessed in the TV mode. 35 Note • Plug and Play can only be set. Start 3 For further details on setting up options, refer to select "Plug & Play". To reset this feature... 1 Press the MENU button.
Press the ▲ or ▼ button to select "Setup", then press the ENTER button. 2 Press the ENTER button to the previous page. TV Plug & Play Language Time Game Mode V-Chip Caption † More Setup √ : English √ √ : Off √ √ √ Move Enter Return i Menu language, Channels and Time will be accessed in the TV mode. 35 Note • Plug and Play can only be set. Start 3 For further details on setting up options, refer to select "Plug & Play". To reset this feature... 1 Press the MENU button.

User Manual (ENGLISH)
Page 92
... SOURCE button to select "Position", then press the ENTER button. TV Move Enter Position Return 4 Adjust the position of the screen if it is not well-aligned. TV PC Image Lock √ Position √ Auto Adjustment Image Reset 3 Press the ▲ or ▼ button to select "PC." 1 Press the MENU button. Adjust Enter Return TV Position 5 Press the EXIT button to select "PC", then press the ENTER button. TV Plug & Play Language Time Game Mode V-Chip Caption...
... SOURCE button to select "Position", then press the ENTER button. TV Move Enter Position Return 4 Adjust the position of the screen if it is not well-aligned. TV PC Image Lock √ Position √ Auto Adjustment Image Reset 3 Press the ▲ or ▼ button to select "PC." 1 Press the MENU button. Adjust Enter Return TV Position 5 Press the EXIT button to select "PC", then press the ENTER button. TV Plug & Play Language Time Game Mode V-Chip Caption...
User Manual (ENGLISH)
Page 95
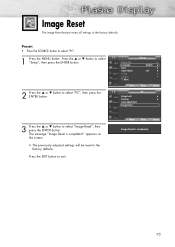
... the MENU button. The message "Image Reset is completed. 95 TV PC Image Lock √ Position √ Auto Adjustment Image Reset 3 Press the ▲ or ▼ button to the factory defaults. appears on the screen. • The previously adjusted settings will be reset to select "Image Reset", then press the ENTER button. Move Enter Return Image Reset is completed." Press the EXIT button to select "PC", then press the ENTER button. TV Plug & Play Language Time Game Mode V-Chip Caption † More Setup...
... the MENU button. The message "Image Reset is completed. 95 TV PC Image Lock √ Position √ Auto Adjustment Image Reset 3 Press the ▲ or ▼ button to the factory defaults. appears on the screen. • The previously adjusted settings will be reset to select "Image Reset", then press the ENTER button. Move Enter Return Image Reset is completed." Press the EXIT button to select "PC", then press the ENTER button. TV Plug & Play Language Time Game Mode V-Chip Caption † More Setup...
User Manual (ENGLISH)
Page 98
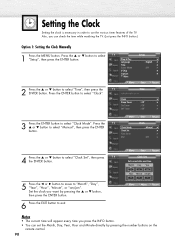
... current time will appear every time you press the INFO button. • You can check the time while watching the TV. (Just press the INFO button.) Option 1: Setting the Clock Manually 1 Press the MENU button. Also, you want by pressing the number buttons on the remote control. 98 Press the ▲ or ▼ button to select "Time", then press the ENTER button. TV Plug & Play Language Time Game Mode V-Chip Caption † More Setup √...
... current time will appear every time you press the INFO button. • You can check the time while watching the TV. (Just press the INFO button.) Option 1: Setting the Clock Manually 1 Press the MENU button. Also, you want by pressing the number buttons on the remote control. 98 Press the ▲ or ▼ button to select "Time", then press the ENTER button. TV Plug & Play Language Time Game Mode V-Chip Caption † More Setup √...
User Manual (ENGLISH)
Page 108
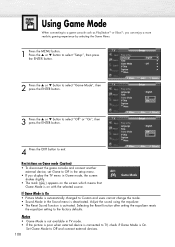
... factory defaults. Adjust the sound using the equalizer. • The Reset Sound function is on the screen which means that Game Mode is activated. Selecting the Reset function after setting the equalizer resets the equalizer setting to Off in the setup menu. • If you can enjoy a more realistic gaming experience by selecting the Game Menu. 1 Press the MENU button. Using Game Mode When connecting to a game console such as PlayStationTM or XboxTM, you display the TV menu in Game mode...
... factory defaults. Adjust the sound using the equalizer. • The Reset Sound function is on the screen which means that Game Mode is activated. Selecting the Reset function after setting the equalizer resets the equalizer setting to Off in the setup menu. • If you can enjoy a more realistic gaming experience by selecting the Game Menu. 1 Press the MENU button. Using Game Mode When connecting to a game console such as PlayStationTM or XboxTM, you display the TV menu in Game mode...

User Manual (ENGLISH)
Page 134
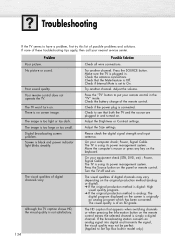
... the antenna connections. Check that both the TV and the source are plugged in . Press the "TV" button to Set Top Box built-in the "TV" mode. Check to see that the Mute feature is analog: The digital program displayed on the keyboard. Power, Signal Cable. Power, Signal Cable. The visual qualities of an SD grade. The TV won't turn on the panel or remote control. On your equipment check (STB, DVD, etc) ; Press the Source button on . Troubleshooting...
... the antenna connections. Check that both the TV and the source are plugged in . Press the "TV" button to Set Top Box built-in the "TV" mode. Check to see that the Mute feature is analog: The digital program displayed on the keyboard. Power, Signal Cable. Power, Signal Cable. The visual qualities of an SD grade. The TV won't turn on the panel or remote control. On your equipment check (STB, DVD, etc) ; Press the Source button on . Troubleshooting...
User Manual (ENGLISH)
Page 136
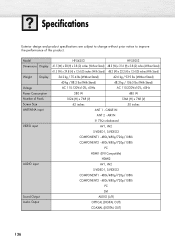
Model Dimensions Display Weight Display Voltage Power Consumption Number of this product. Specifications Exterior design and product specifications are subject to change without prior notice to improve the performance of Pixels Screen Size ANTENNA input VIDEO input AUDIO input Sound Output Audio Output HP-S4253 HP-S5053 41.5 (W) x 28 (H) x 3.8 (D) inches (Without Stand) 48.3 (W) x 31.6 (H) x 3.8 (D) inches (Without Stand) 41.5 (W) x 29.8 (H) x 13.4 (D) inches (With Stand) 48.3 (W) x 33.3 (H) x 13.4 (D) inches (With Stand) 34.2 kg / 75.4 lbs (Without Stand) 42.6 kg / 93.9 lbs (...
Model Dimensions Display Weight Display Voltage Power Consumption Number of this product. Specifications Exterior design and product specifications are subject to change without prior notice to improve the performance of Pixels Screen Size ANTENNA input VIDEO input AUDIO input Sound Output Audio Output HP-S4253 HP-S5053 41.5 (W) x 28 (H) x 3.8 (D) inches (Without Stand) 48.3 (W) x 31.6 (H) x 3.8 (D) inches (Without Stand) 41.5 (W) x 29.8 (H) x 13.4 (D) inches (With Stand) 48.3 (W) x 33.3 (H) x 13.4 (D) inches (With Stand) 34.2 kg / 75.4 lbs (Without Stand) 42.6 kg / 93.9 lbs (...
User Manual (ENGLISH)
Page 4
... a Multi-Channel Sound (MTS) track - Table of Contents General Information Your New Plasma Display Panel 8 Remote Control Buttons 11 Wall Installation Instructions 13 How to assemble the Stand-Base 17 Connections Connecting VHF and UHF Antennas 20 Connecting Cable TV 21 Connecting a VCR 23 Connecting a Camcorder 24 Connecting a DVD Player (480i, 480p) ........25 Connecting a DTV Receiver (480p, 720p, 1080i 26 Connecting to HDMI (High Definition Multimedia Interface) (480p, 720p, 1080i) ..27 Connecting a Digital TV Set-Top Box (480p, 720p, 1080i 28 Connecting a Digital Audio System...
... a Multi-Channel Sound (MTS) track - Table of Contents General Information Your New Plasma Display Panel 8 Remote Control Buttons 11 Wall Installation Instructions 13 How to assemble the Stand-Base 17 Connections Connecting VHF and UHF Antennas 20 Connecting Cable TV 21 Connecting a VCR 23 Connecting a Camcorder 24 Connecting a DVD Player (480i, 480p) ........25 Connecting a DTV Receiver (480p, 720p, 1080i 26 Connecting to HDMI (High Definition Multimedia Interface) (480p, 720p, 1080i) ..27 Connecting a Digital TV Set-Top Box (480p, 720p, 1080i 28 Connecting a Digital Audio System...
User Manual (ENGLISH)
Page 14
... panel bracket The shape of the product may vary depending on the wall mount bracket. • Please avoid catching your fingers while installing and adjusting the angle. 14 • Please tightly secure the wall mount bracket to the wall to avoid injury from the back of the arrow after the screws are the same) 1 Remove the screws from a falling SET. How to assemble the Wall Mount Bracket 1 The wall mount bracket...
... panel bracket The shape of the product may vary depending on the wall mount bracket. • Please avoid catching your fingers while installing and adjusting the angle. 14 • Please tightly secure the wall mount bracket to the wall to avoid injury from the back of the arrow after the screws are the same) 1 Remove the screws from a falling SET. How to assemble the Wall Mount Bracket 1 The wall mount bracket...
User Manual (ENGLISH)
Page 16
... causing serious injury. 16 Note : If the safety pins are not used, the PDP may cause damage to the PDP. 2. Note : Viewing the PDP after connecting the external devices Remove the Safety Pins to adjust the angle to 0°, and then secure the Safety Pins again. &#...adjust the angle. (0°~20° by 2°) Insert the Safety Pins to the front guide holes on both sides as a DVD or a Home Theater System to the PDP, please refer to following instructions: 1. Connecting External Devices to the PDP Note : To connect external devices such as illustrated in figure @. Be sure to remove...
... causing serious injury. 16 Note : If the safety pins are not used, the PDP may cause damage to the PDP. 2. Note : Viewing the PDP after connecting the external devices Remove the Safety Pins to adjust the angle to 0°, and then secure the Safety Pins again. &#...adjust the angle. (0°~20° by 2°) Insert the Safety Pins to the front guide holes on both sides as a DVD or a Home Theater System to the PDP, please refer to following instructions: 1. Connecting External Devices to the PDP Note : To connect external devices such as illustrated in figure @. Be sure to remove...

User Manual (ENGLISH)
Page 92
... button. TV PC Image Lock √ Position √ Auto Adjustment Image Reset 3 Press the ▲ or ▼ button to select "PC", then press the ENTER button. TV Plug & Play Language Time Game Mode V-Chip Caption † More Setup √ : English √ √ : Off √ √ √ Move Enter Return 2 Press the ▲ or ▼ button to select "Position", then press the ENTER button. Adjust Enter Return 92 Preset: • Press the SOURCE button...
... button. TV PC Image Lock √ Position √ Auto Adjustment Image Reset 3 Press the ▲ or ▼ button to select "PC", then press the ENTER button. TV Plug & Play Language Time Game Mode V-Chip Caption † More Setup √ : English √ √ : Off √ √ √ Move Enter Return 2 Press the ▲ or ▼ button to select "Position", then press the ENTER button. Adjust Enter Return 92 Preset: • Press the SOURCE button...
User Manual (ENGLISH)
Page 134
... black and power indicator light blinks steadily. Digital broadcasting screen problem. Screen is too large or too small. Press the SOURCE button. On your nearest service center. On your remote control in and turned on the screen is using its power management system. Press the Source button on . Your remote control does not operate the TV. The TV won't turn on the panel or remote control. Make sure the TV is set to have a problem, first try this list of these troubleshooting...
... black and power indicator light blinks steadily. Digital broadcasting screen problem. Screen is too large or too small. Press the SOURCE button. On your nearest service center. On your remote control in and turned on the screen is using its power management system. Press the Source button on . Your remote control does not operate the TV. The TV won't turn on the panel or remote control. Make sure the TV is set to have a problem, first try this list of these troubleshooting...

User Manual (ENGLISH)
Page 136
... and product specifications are subject to change without prior notice to improve the performance of Pixels Screen Size ANTENNA input VIDEO input AUDIO input Sound Output Audio Output HP-S4253 HP-S5053 41.5 (W) x 28 (H) x 3.8 (D) inches (Without Stand) 48.3 (W) x 31.6 (H) x 3.8 (D) inches (Without Stand) 41.5 (W) x 29.8 (H) x 13.4 (D) inches (With Stand) 48.3 (W) x 33.3 (H) x 13.4 (D) inches (With Stand) 34.2 kg / 75.4 lbs (Without Stand) 42.6 kg / 93.9 lbs (Without Stand) 40 kg / 88.2 lbs (With Stand) 48.3 kg / 106.5 lbs (With Stand) AC...
... and product specifications are subject to change without prior notice to improve the performance of Pixels Screen Size ANTENNA input VIDEO input AUDIO input Sound Output Audio Output HP-S4253 HP-S5053 41.5 (W) x 28 (H) x 3.8 (D) inches (Without Stand) 48.3 (W) x 31.6 (H) x 3.8 (D) inches (Without Stand) 41.5 (W) x 29.8 (H) x 13.4 (D) inches (With Stand) 48.3 (W) x 33.3 (H) x 13.4 (D) inches (With Stand) 34.2 kg / 75.4 lbs (Without Stand) 42.6 kg / 93.9 lbs (Without Stand) 40 kg / 88.2 lbs (With Stand) 48.3 kg / 106.5 lbs (With Stand) AC...


