User Manual Ver.1.0 (English)
Page 3
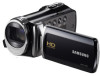
... that they exit from the type of antenna-discharge unit, connection to grounding electrodes and requirements for ventilation to qualified service personnel. Do not defeat the safety purpose of the polarized plug. 19 POWER-CORD PROTECTION: Power-supply cords should be operated only from the unit. 20 OUTDOOR ANTENNA GROUNDING: CAMCORDER, be sure the antenna or cable system is damaged, liquid...
... that they exit from the type of antenna-discharge unit, connection to grounding electrodes and requirements for ventilation to qualified service personnel. Do not defeat the safety purpose of the polarized plug. 19 POWER-CORD PROTECTION: Power-supply cords should be operated only from the unit. 20 OUTDOOR ANTENNA GROUNDING: CAMCORDER, be sure the antenna or cable system is damaged, liquid...
User Manual Ver.1.0 (English)
Page 7
... 'photo' and 'still image' are used without their respective holders. Before using other digital/analog media or devices is intended for damages due to the software installation and USB connection guide. • Copyrights: Please note that you copy it again to a PC. Protect your important recorded data by the the Microsoft Corporation in the United States and/or other camcorder on the storage media in this camcorder using this camcorder •...
... 'photo' and 'still image' are used without their respective holders. Before using other digital/analog media or devices is intended for damages due to the software installation and USB connection guide. • Copyrights: Please note that you copy it again to a PC. Protect your important recorded data by the the Microsoft Corporation in the United States and/or other camcorder on the storage media in this camcorder using this camcorder •...
User Manual Ver.1.0 (English)
Page 12
... CONTROLS 14 IDENTIFIYING THE SCREEN DISPLAYS 16 Getting started 19 INSERTING/EJECTING THE BATTERY 19 CHARGING THE BATTERY 20 CHECKING THE BATTERY STATE 21 Basic operation of the camcorder 24 TURNING YOUR CAMCORDER ON/OFF 24 SWITCHING TO THE POWER SAVING MODE 24 SETTING THE DATE/TIME FOR THE FIRST TIME 25 SETTING THE OPERATION MODES 26 SWITCHING THE INFORMATION DISPLAY MODE 26 USING THE SHORTCUT MENU (OK GUIDE 27 SELECTING THE LANGUAGES 29 Getting ready to start recording 30 INSERTING AND EJECTING A MEMORY CARD...
... CONTROLS 14 IDENTIFIYING THE SCREEN DISPLAYS 16 Getting started 19 INSERTING/EJECTING THE BATTERY 19 CHARGING THE BATTERY 20 CHECKING THE BATTERY STATE 21 Basic operation of the camcorder 24 TURNING YOUR CAMCORDER ON/OFF 24 SWITCHING TO THE POWER SAVING MODE 24 SETTING THE DATE/TIME FOR THE FIRST TIME 25 SETTING THE OPERATION MODES 26 SWITCHING THE INFORMATION DISPLAY MODE 26 USING THE SHORTCUT MENU (OK GUIDE 27 SELECTING THE LANGUAGES 29 Getting ready to start recording 30 INSERTING AND EJECTING A MEMORY CARD...
User Manual Ver.1.0 (English)
Page 13
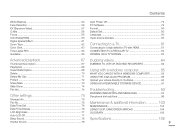
... settings 75 Storage Info 75 File No 75 Date/Time Set 76 Date/Time Display 76 LCD Brightness 77 Auto LCD Off 77 Beep Sound 78 Shutter Sound 78 Auto Power Off 79 PC Software 79 Format 80 Default Set 80 Language 80 Open source licenses 80 Connecting to a TV 81 Connecting to a high definition TV with HDMI 81 CONNECTING TO A REGULAR TV 82 VIEWING ON A TV SCREEN 83 Dubbing videos 84 DUBBING TO VCR OR DVD/HDD RECORDERS 84 Using with a windows...
... settings 75 Storage Info 75 File No 75 Date/Time Set 76 Date/Time Display 76 LCD Brightness 77 Auto LCD Off 77 Beep Sound 78 Shutter Sound 78 Auto Power Off 79 PC Software 79 Format 80 Default Set 80 Language 80 Open source licenses 80 Connecting to a TV 81 Connecting to a high definition TV with HDMI 81 CONNECTING TO A REGULAR TV 82 VIEWING ON A TV SCREEN 83 Dubbing videos 84 DUBBING TO VCR OR DVD/HDD RECORDERS 84 Using with a windows...
User Manual Ver.1.0 (English)
Page 14
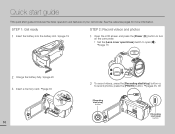
... 2: Record videos and photos 1 Open the LCD screen and press the [Power ( )] button to turn on the camcorder. • Set the [Lens cover open/close] switch to open ( ). page 15 2 Charge the battery fully. page 20 3 Insert a memory card. page 30 CARD CARD 10 2 To record videos, press the [Recording start/stop] button or, to record photos, press the [PHOTO] button. pages 35, 38 [Recording start/stop ] button Quick start guide This quick start /stop ] button [Recording start guide introduces the basic operation and features of your camcorder.
... 2: Record videos and photos 1 Open the LCD screen and press the [Power ( )] button to turn on the camcorder. • Set the [Lens cover open/close] switch to open ( ). page 15 2 Charge the battery fully. page 20 3 Insert a memory card. page 30 CARD CARD 10 2 To record videos, press the [Recording start/stop] button or, to record photos, press the [PHOTO] button. pages 35, 38 [Recording start/stop ] button Quick start guide This quick start /stop ] button [Recording start guide introduces the basic operation and features of your camcorder.
User Manual Ver.1.0 (English)
Page 20
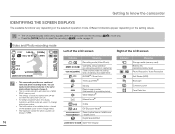
...] / Recording mode (Video/Photo) Operating status (standby/ recording/pause/photo capturing) Time counter (video recording time, remaining recordable time) iSCENE / Smart Auto Time Lapse REC 9999 My Clip Photo image counter (total number of recordable photos is based on the available space on the storage media. • The maximum number the photo counter can easily record videos or photos in the recording ( • Press the [MODE] button to know the camcorder IDENTIFIYING THE SCREEN DISPLAYS The available functions vary depending on a 16GB SDHC memory card. • The settings of...
...] / Recording mode (Video/Photo) Operating status (standby/ recording/pause/photo capturing) Time counter (video recording time, remaining recordable time) iSCENE / Smart Auto Time Lapse REC 9999 My Clip Photo image counter (total number of recordable photos is based on the available space on the storage media. • The maximum number the photo counter can easily record videos or photos in the recording ( • Press the [MODE] button to know the camcorder IDENTIFIYING THE SCREEN DISPLAYS The available functions vary depending on a 16GB SDHC memory card. • The settings of...
User Manual Ver.1.0 (English)
Page 21
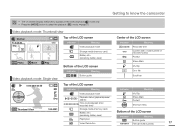
... Recorded time Current video / total number of recorded videos Protect Share Mark My Clip Error file Scroll bar 0:00:00/0:00:55 Top of the LCD screen Indicator Meaning Indicator Meaning Video playback mode / / / Playback status (playback/pause/ search) 0:00:00/0:00:55 Time code (elapsed recorded time) time / My Clip Share Mark Protect Shortcut menu Thumbnail View 100-0001 Storage media (memory card) Battery info Bottom of the LCD screen (remaining battery level) Indicator Meaning PlayOption Video Resolution Button guide 100-0001 File name (file number...
... Recorded time Current video / total number of recorded videos Protect Share Mark My Clip Error file Scroll bar 0:00:00/0:00:55 Top of the LCD screen Indicator Meaning Indicator Meaning Video playback mode / / / Playback status (playback/pause/ search) 0:00:00/0:00:55 Time code (elapsed recorded time) time / My Clip Share Mark Protect Shortcut menu Thumbnail View 100-0001 Storage media (memory card) Battery info Bottom of the LCD screen (remaining battery level) Indicator Meaning PlayOption Video Resolution Button guide 100-0001 File name (file number...

User Manual Ver.1.0 (English)
Page 28
... time, we recommend you plan to the last operation mode used. While recording, playing back, or displaying a slide show. - Basic operation of the camcorder TURNING YOUR CAMCORDER ON/OFF 1 Open the LCD screen and press the [Power ( )] button to turn on . SWITCHING TO THE POWER SAVING MODE If you to open ( ). 2 To turn off in the power saving mode. However, if Auto Power Off: 5 Min is closed After 20 minutes LCD screen Power( ) button The camcorder operates the self-diagnosis function when powered on the camcorder. • Set...
... time, we recommend you plan to the last operation mode used. While recording, playing back, or displaying a slide show. - Basic operation of the camcorder TURNING YOUR CAMCORDER ON/OFF 1 Open the LCD screen and press the [Power ( )] button to turn on . SWITCHING TO THE POWER SAVING MODE If you to open ( ). 2 To turn off in the power saving mode. However, if Auto Power Off: 5 Min is closed After 20 minutes LCD screen Power( ) button The camcorder operates the self-diagnosis function when powered on the camcorder. • Set...

User Manual Ver.1.0 (English)
Page 31
... SMART AUTO mode. • The example above shows how to set EV in STBY STBY mode. • The shortcut menu (OK guide) appears. [220Min] 9999 Basic operation of the camcorder 2 Press the [Control (Left)] button to STBY select EV function. • Press the [Control (Left/Right)] button to adjust the exposure while viewing the image on the LCD screen. Pressing the [Control (OK)] button will display the shortcut menu of frequently used functions on...
... SMART AUTO mode. • The example above shows how to set EV in STBY STBY mode. • The shortcut menu (OK guide) appears. [220Min] 9999 Basic operation of the camcorder 2 Press the [Control (Left)] button to STBY select EV function. • Press the [Control (Left/Right)] button to adjust the exposure while viewing the image on the LCD screen. Pressing the [Control (OK)] button will display the shortcut menu of frequently used functions on...

User Manual Ver.1.0 (English)
Page 33
...)] button. 3 Press the [Control (Up/Down)] button to exit the menu. • The OSD language appears in the selected language. • Language options may be changed without prior notice. • The selected language remains even if you remove the battery. • The date and time format may change depending on the language you selected. Basic operation of the camcorder 29 STBY Settings Format Default Set Language Exit STBY Settings Format Default Set Language Exit [220Min] [220Min] English...
...)] button. 3 Press the [Control (Up/Down)] button to exit the menu. • The OSD language appears in the selected language. • Language options may be changed without prior notice. • The selected language remains even if you remove the battery. • The date and time format may change depending on the language you selected. Basic operation of the camcorder 29 STBY Settings Format Default Set Language Exit STBY Settings Format Default Set Language Exit [220Min] [220Min] English...
User Manual Ver.1.0 (English)
Page 40
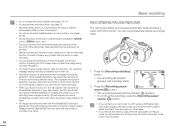
...; Eject the battery when you have finished recording to prevent unnecessary battery power consumption. • For various functions available when you record videos, see a message saying recording is disabled due to the pause. • If you remove the memory card when the camcorder is any of the LCD screen in the menu options. You will see pages 52~66. • During recording, some button operations are unavailable. ([MODE] button, [MENU] button, etc.) • Sound is recorded from recording these images...
...; Eject the battery when you have finished recording to prevent unnecessary battery power consumption. • For various functions available when you record videos, see a message saying recording is disabled due to the pause. • If you remove the memory card when the camcorder is any of the LCD screen in the menu options. You will see pages 52~66. • During recording, some button operations are unavailable. ([MODE] button, [MENU] button, etc.) • Sound is recorded from recording these images...

User Manual Ver.1.0 (English)
Page 47
The video has a file format that is not supported by the camcorder. • The internal speaker automatically turns off the camcorder or eject the memory card during playback, see page 44. 43 PLAYING BACK VIDEOS You can preview recorded videos in a thumbnail view, find your desired video quickly, and play back directly. • Insert a memory card. page 30 • Open the LCD screen and press the [Power ( )] button to turn on the camcorder. • This function works only in the following cases...
The video has a file format that is not supported by the camcorder. • The internal speaker automatically turns off the camcorder or eject the memory card during playback, see page 44. 43 PLAYING BACK VIDEOS You can preview recorded videos in a thumbnail view, find your desired video quickly, and play back directly. • Insert a memory card. page 30 • Open the LCD screen and press the [Power ( )] button to turn on the camcorder. • This function works only in the following cases...

User Manual Ver.1.0 (English)
Page 67
... [MENU] button to 30 photos continuously. On-screen display - • The number of recordable photos depends on the photo's resolution and the memory space available. • If an error occurs (Card full, etc.) during continuous shot, the recording stops and an error message appears. 63 While you more photo-taking opportunities when recording moving subjects. Cont. Select the recording ( button. page 26 ) mode by pressing the [MODE] 1 Press the [MENU] button [Control (Left...
... [MENU] button to 30 photos continuously. On-screen display - • The number of recordable photos depends on the photo's resolution and the memory space available. • If an error occurs (Card full, etc.) during continuous shot, the recording stops and an error message appears. 63 While you more photo-taking opportunities when recording moving subjects. Cont. Select the recording ( button. page 26 ) mode by pressing the [MODE] 1 Press the [MENU] button [Control (Left...

User Manual Ver.1.0 (English)
Page 69
... the storage media becomes full during time lapse recording, the camcorder saves recording up to stop ] button if you switch the information display mode to the minimum display mode. 65 This is useful for recording Recording interval Advanced recording Timeline The Time Lapse Recording function records image frames at a predefined interval over the total recording time to standby mode. Time Lapse Recording is normal operation. Example of Time Lapse Recording Total time for filming the following subjects: - The maximum video file size is under...
... the storage media becomes full during time lapse recording, the camcorder saves recording up to stop ] button if you switch the information display mode to the minimum display mode. 65 This is useful for recording Recording interval Advanced recording Timeline The Time Lapse Recording function records image frames at a predefined interval over the total recording time to standby mode. Time Lapse Recording is normal operation. Example of Time Lapse Recording Total time for filming the following subjects: - The maximum video file size is under...

User Manual Ver.1.0 (English)
Page 79
... the LCD screen as the camcorder's system files occupy a part of the capacity. Use File No. Resets the file number to recorded files in sequence even if you set File No. The camcorder assigns file numbers to 0001. Date/Time Set Exit [220Min] : 2 Select the desired submenu item with the [Control (Up/Down)] button, and then press the [Control (OK)] button. 3 To exit the menu, press the [MENU] button. When you have inserted a different memory card, formatted the card, or deleted all files. Date/Time Set...
... the LCD screen as the camcorder's system files occupy a part of the capacity. Use File No. Resets the file number to recorded files in sequence even if you set File No. The camcorder assigns file numbers to 0001. Date/Time Set Exit [220Min] : 2 Select the desired submenu item with the [Control (Up/Down)] button, and then press the [Control (OK)] button. 3 To exit the menu, press the [MENU] button. When you have inserted a different memory card, formatted the card, or deleted all files. Date/Time Set...
User Manual Ver.1.0 (English)
Page 81
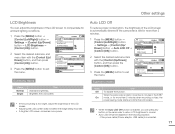
... LCD screen. • Adjusting the LCD screen does not affect the image being recorded. • A brighter LCD screen consumes more than 5 minutes when recording a video, the power saving mode starts and dims the LCD screen. • When the Auto LCD Off function is enabled, you can adjust the brightness of the LCD screen is automatically dimmed if the camcorder is idle for ambient lighting conditions. 1 Press the [MENU] button [Control (Left/Right)] button Settings [Control (Up/Down)] button...
... LCD screen. • Adjusting the LCD screen does not affect the image being recorded. • A brighter LCD screen consumes more than 5 minutes when recording a video, the power saving mode starts and dims the LCD screen. • When the Auto LCD Off function is enabled, you can adjust the brightness of the LCD screen is automatically dimmed if the camcorder is idle for ambient lighting conditions. 1 Press the [MENU] button [Control (Left/Right)] button Settings [Control (Up/Down)] button...

User Manual Ver.1.0 (English)
Page 83
... paused), or playing back a photo slide show. • To operate the camcorder again, press the [Power ( )] button. If the power cable (Power adaptor, USB cable) is idle for 5 minutes without an operation. STBY Settings Auto Power Off PC Software Format Exit [220Min] : : STBY Settings Auto Power Off PC Software Format Exit [220Min] Off On Items Off 5 Min Use To disable the function. The PC Software is compatible with the [Control (Up/Down)] button, and then press the [Control (OK)] button. 3 Press the [MENU] button...
... paused), or playing back a photo slide show. • To operate the camcorder again, press the [Power ( )] button. If the power cable (Power adaptor, USB cable) is idle for 5 minutes without an operation. STBY Settings Auto Power Off PC Software Format Exit [220Min] : : STBY Settings Auto Power Off PC Software Format Exit [220Min] Off On Items Off 5 Min Use To disable the function. The PC Software is compatible with the [Control (Up/Down)] button, and then press the [Control (OK)] button. 3 Press the [MENU] button...

User Manual Ver.1.0 (English)
Page 101
... not supported on a Windows XP computer, card. Your TV or computer cannot display photos and videos that the external device is compatible with the international standard. Displays Symptom Unknown indicator appears on your camcorder. page 80 Image cannot be corrupted. • The file format is not supported by another device. download and update the exFAT file system driver from the Microsoft website. Storage media Symptom Explanation/Solution Memory card functions are stored on the LCD screen...
... not supported on a Windows XP computer, card. Your TV or computer cannot display photos and videos that the external device is compatible with the international standard. Displays Symptom Unknown indicator appears on your camcorder. page 80 Image cannot be corrupted. • The file format is not supported by another device. download and update the exFAT file system driver from the Microsoft website. Storage media Symptom Explanation/Solution Memory card functions are stored on the LCD screen...

User Manual Ver.1.0 (English)
Page 104
... to set the video playback mode. • Image files recorded on other devices may not play back. Playback on another camcorder may not appear at their actual size. right, White color- Adjust the focus manually. page 58 • The lens is interrupted unexpectedly. The Skip or Search function does not work properly. left) • The Audio/Video cable jack or micro HDMI cable jack is not an error. Photos stored on again. • Check if the power...
... to set the video playback mode. • Image files recorded on other devices may not play back. Playback on another camcorder may not appear at their actual size. right, White color- Adjust the focus manually. page 58 • The lens is interrupted unexpectedly. The Skip or Search function does not work properly. left) • The Audio/Video cable jack or micro HDMI cable jack is not an error. Photos stored on again. • Check if the power...

User Manual Ver.1.0 (English)
Page 110
Specifications Model name HMX-F90/HMX-F91/HMX-F900/HMX-F910/HMX-F920 Video signal NTSC Picture compression format H.264/AVC Audio compression format AAC (Advanced Audio Coding) System Image device Effective pixels 1/3.2" CMOS Approx. 920,000 pixels Total pixels Approx. 5 Mega pixels Lens 1.8 to 4.9, 52x (Optical), 70x (Intelli), 130x (Digital) Electronic zoom lens Focal length 2.1mm~109.2mm LCD screen Size/dot number LCD screen method 2.7 inches wide, 230k TFT active matrix system Composite video out 1.0V (p_p...
Specifications Model name HMX-F90/HMX-F91/HMX-F900/HMX-F910/HMX-F920 Video signal NTSC Picture compression format H.264/AVC Audio compression format AAC (Advanced Audio Coding) System Image device Effective pixels 1/3.2" CMOS Approx. 920,000 pixels Total pixels Approx. 5 Mega pixels Lens 1.8 to 4.9, 52x (Optical), 70x (Intelli), 130x (Digital) Electronic zoom lens Focal length 2.1mm~109.2mm LCD screen Size/dot number LCD screen method 2.7 inches wide, 230k TFT active matrix system Composite video out 1.0V (p_p...


