User Manual (ENGLISH)
Page 2
... • Do not use the TV where contact with any unauthorized changes or modifications to this TV is designed with the TV. REFER ALL SERVICING TO QUALIFIED SERVICE PERSONNEL. Your new Samsung projection TV represents the latest in its class. A falling TV can make the unit and cart ...unsteady and more likely to replace your TV. This symbol indicates high...
... • Do not use the TV where contact with any unauthorized changes or modifications to this TV is designed with the TV. REFER ALL SERVICING TO QUALIFIED SERVICE PERSONNEL. Your new Samsung projection TV represents the latest in its class. A falling TV can make the unit and cart ...unsteady and more likely to replace your TV. This symbol indicates high...
User Manual (ENGLISH)
Page 3
...convenience receptacles, and the point where they exit from the unit. • Unplug the TV from touching the power lines or circuits. The party responsible for product compliance: SAMSUNG ELECTRONICS CO., LTD America QA Lab of any service or repairs to this monitor is available... Notice This Class B digital apparatus meets all servicing to service the TV yourself. This television receiver provides display of television closed captioning in additional damage to the unit. • Upon completion of Samsung 3351 Michelson Drive, Suite #290, Irvine, CA92612 USA Warning User must...
...convenience receptacles, and the point where they exit from the unit. • Unplug the TV from touching the power lines or circuits. The party responsible for product compliance: SAMSUNG ELECTRONICS CO., LTD America QA Lab of any service or repairs to this monitor is available... Notice This Class B digital apparatus meets all servicing to service the TV yourself. This television receiver provides display of television closed captioning in additional damage to the unit. • Upon completion of Samsung 3351 Michelson Drive, Suite #290, Irvine, CA92612 USA Warning User must...
User Manual (ENGLISH)
Page 4
Table of Contents Your New Wide TV 10 Replacing the Lamp 10 List of Features ...12 Checking Parts...12 Side Panel Buttons 13 Side Panel Jacks 13 Front Panel LED Indicators 14 Rear Panel Jacks 15 Remote Control ...16 Installing Batteries in the Remote Control 17 Connections ...20... engine) 57 Digital Noise Reduction 58 Setting the Blue Screen Mode 59 Changing the Screen Size 60 Special Audio Options 61 MTS Settings: Choosing a Soundtrack 61 Virtual Dolby 62 BBE ...63 Auto Volume 64 Setting The On/Off Melody 65 Viewing Closed Caption Information 66 Viewing Picture...
Table of Contents Your New Wide TV 10 Replacing the Lamp 10 List of Features ...12 Checking Parts...12 Side Panel Buttons 13 Side Panel Jacks 13 Front Panel LED Indicators 14 Rear Panel Jacks 15 Remote Control ...16 Installing Batteries in the Remote Control 17 Connections ...20... engine) 57 Digital Noise Reduction 58 Setting the Blue Screen Mode 59 Changing the Screen Size 60 Special Audio Options 61 MTS Settings: Choosing a Soundtrack 61 Virtual Dolby 62 BBE ...63 Auto Volume 64 Setting The On/Off Melody 65 Viewing Closed Caption Information 66 Viewing Picture...

User Manual (ENGLISH)
Page 5
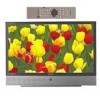
SAMSUNG Your New Wide TV
SAMSUNG Your New Wide TV
User Manual (ENGLISH)
Page 6
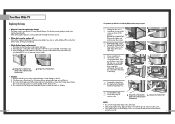
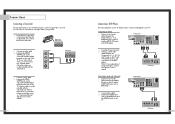
...as it will be connected to the body of the TV. After checking the code number for 30 minutes before lamp replacement 1. HLN467W1/HLN567W1 • Caution 1. Replace with the correct code numbered lamp to avoid damage to a Samsung Service center. ... After replacing the lamp, the ... lamp cover with your bare hands nor insert any foreign object inside the cover as shown in a projection TV has a limited lifespan. The lamp must be replaced periodically. Your New Wide TV Replacing the Lamp • Why do I need to replace the lamp? HLN437W1/HLN507W1 ... For the...
...as it will be connected to the body of the TV. After checking the code number for 30 minutes before lamp replacement 1. HLN467W1/HLN567W1 • Caution 1. Replace with the correct code numbered lamp to avoid damage to a Samsung Service center. ... After replacing the lamp, the ... lamp cover with your bare hands nor insert any foreign object inside the cover as shown in a projection TV has a limited lifespan. The lamp must be replaced periodically. Your New Wide TV Replacing the Lamp • Why do I need to replace the lamp? HLN437W1/HLN507W1 ... For the...
User Manual (ENGLISH)
Page 7
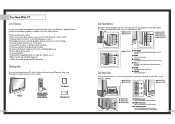
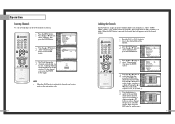
Television Remote Control (BP59-00048A)/ AAA Batteries (4301-000121) This Manual Warranty Card 12 Side Panel Buttons The buttons on the side panel control your TV's basic features, including the on -screen menu. ¨ VOL +, - If any time you choose • Adjustable picture and sound settings and ...MENU Press to see the on-screen menu. ˇ ▼ CH ▲ Press to change ) a particular item. Ø POWER Press to turn the TV on and off . In addition, it has these special features: • Easy-to-operate remote control • Easy-to-use the remote control. œ ...
Television Remote Control (BP59-00048A)/ AAA Batteries (4301-000121) This Manual Warranty Card 12 Side Panel Buttons The buttons on the side panel control your TV's basic features, including the on -screen menu. ¨ VOL +, - If any time you choose • Adjustable picture and sound settings and ...MENU Press to see the on-screen menu. ˇ ▼ CH ▲ Press to change ) a particular item. Ø POWER Press to turn the TV on and off . In addition, it has these special features: • Easy-to-operate remote control • Easy-to-use the remote control. œ ...
User Manual (ENGLISH)
Page 8
... set is not operating normally. Lamp may not appear immediately. • The TV has a fan to keep the inside the set is available only in about 25 seconds. You'll occasionally hear it working. 14 Rear Panel Jacks Use the rear panel jacks to an external source, such as a VCR. Use ANT-A and... temperature is connected to the audio-output jacks on your PC or set of component video input jacks on the rear panel of your TV. Check if the ventilation hole on the rear of video input jacks and three set top box. ∏ DVI (Digital Video Interface) jack Receives the digital signals from...
... set is not operating normally. Lamp may not appear immediately. • The TV has a fan to keep the inside the set is available only in about 25 seconds. You'll occasionally hear it working. 14 Rear Panel Jacks Use the rear panel jacks to an external source, such as a VCR. Use ANT-A and... temperature is connected to the audio-output jacks on your PC or set of component video input jacks on the rear panel of your TV. Check if the ventilation hole on the rear of video input jacks and three set top box. ∏ DVI (Digital Video Interface) jack Receives the digital signals from...
User Manual (ENGLISH)
Page 9
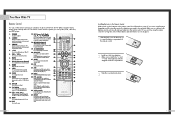
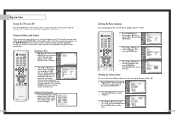
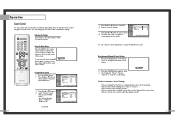
... 100 on the main screen with the signal in the PIP window. When using the on the TV screen. 16. POWER Turns the TV on -screen menu. 9. P.MODE Adjust the TV picture by the Samsung remote control (i.e., TV, VCR, Cable, or DVD). 12. STILL Press to the previous channel. 13. PRE-CH ...one of the preset factory settings (or select your personal, customized picture settings.) 4. +100 Press to match the "+" and "-" ends of the available video sources (i.e., TV, STB, VCR, DVD, DTV, PC). 14. VOL -, VOL + Press to resume normal video. 10. FAV.CH (Favorite Channel) Press to a distance of the...
... 100 on the main screen with the signal in the PIP window. When using the on the TV screen. 16. POWER Turns the TV on -screen menu. 9. P.MODE Adjust the TV picture by the Samsung remote control (i.e., TV, VCR, Cable, or DVD). 12. STILL Press to the previous channel. 13. PRE-CH ...one of the preset factory settings (or select your personal, customized picture settings.) 4. +100 Press to match the "+" and "-" ends of the available video sources (i.e., TV, STB, VCR, DVD, DTV, PC). 14. VOL -, VOL + Press to resume normal video. 10. FAV.CH (Favorite Channel) Press to a distance of the...

User Manual (ENGLISH)
Page 11
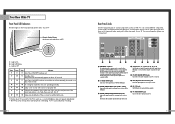
Antennas with 75-ohm Round Leads If your TV. Connections Connecting VHF and UHF Antennas If you do not have two separate antennas for ... 1 Plug the antenna lead into the ANT-A terminal on the back panel of the TV. it is an antenna with 300-ohm Flat Twin Leads If your TV (one VHF and one UHF), you can buy at an electronics store. 1 Connect both... antenna leads to tighten the screws. 2 Plug the adapter into the ANT-A terminal on the back panel of the TV. 21 Antennas with 75-ohm round leads. 20 Separate VHF and UHF Antennas If you have a cable system, you will ...
Antennas with 75-ohm Round Leads If your TV. Connections Connecting VHF and UHF Antennas If you do not have two separate antennas for ... 1 Plug the antenna lead into the ANT-A terminal on the back panel of the TV. it is an antenna with 300-ohm Flat Twin Leads If your TV (one VHF and one UHF), you can buy at an electronics store. 1 Connect both... antenna leads to tighten the screws. 2 Plug the adapter into the ANT-A terminal on the back panel of the TV. 21 Antennas with 75-ohm round leads. 20 Separate VHF and UHF Antennas If you have a cable system, you will ...

User Manual (ENGLISH)
Page 12
...Cable Box that Descrambles All Channels 1 Find the cable that is connected to ANT-A so that descrambles some or all channels. From Cable TV Rear Panel Caution: If you can not program using the remote control, such as programming your favorite channels and blocking channels. Do not connect ..., and you have a mono VCR, connect L/Mono to watch videotapes. You will need to record one audio cable. Connections Connecting Cable TV and VCR You can not program using the remote control, such as programming your favorite channels and blocking channels. 23 From Cable Note: ...
...Cable Box that Descrambles All Channels 1 Find the cable that is connected to ANT-A so that descrambles some or all channels. From Cable TV Rear Panel Caution: If you can not program using the remote control, such as programming your favorite channels and blocking channels. Do not connect ..., and you have a mono VCR, connect L/Mono to watch videotapes. You will need to record one audio cable. Connections Connecting Cable TV and VCR You can not program using the remote control, such as programming your favorite channels and blocking channels. 23 From Cable Note: ...
User Manual (ENGLISH)
Page 13
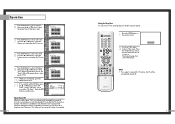
... VIDEO OUT jack on the DVD player and the VIDEO IN jack on the TV. TV Rear Panel Incoming Cable or Antenna 2 To enable Component video viewing, connect video cables between the Component (1, 2 or 3) AUDIO IN jacks on the TV and the AUDIO OUT jacks on the DVD player. Connecting to Y,PB,PR... a set of audio cables between the AUDIO OUTPUT jack on the camcorder and the AUDIO terminals on the side of Component video, see your TV. TV Rear Panel Incoming Cable or Antenna DVD Player 2 Connect video cables between the VIDEO OUTPUT jack on the camcorder and the VIDEO terminal on the side...
... VIDEO OUT jack on the DVD player and the VIDEO IN jack on the TV. TV Rear Panel Incoming Cable or Antenna 2 To enable Component video viewing, connect video cables between the Component (1, 2 or 3) AUDIO IN jacks on the TV and the AUDIO OUT jacks on the DVD player. Connecting to Y,PB,PR... a set of audio cables between the AUDIO OUTPUT jack on the camcorder and the AUDIO terminals on the side of Component video, see your TV. TV Rear Panel Incoming Cable or Antenna DVD Player 2 Connect video cables between the VIDEO OUTPUT jack on the camcorder and the VIDEO terminal on the side...

User Manual (ENGLISH)
Page 14
.... 2 Connect video cables between the PC IN jack on the TV and the R.G.B OUT jack on the Set Top Box. TV Rear Panel Incoming Cable or Antenna DTV Set Top Box 27 TV Rear Panel 2 Connect video cables between the DVI IN jack on the TV and the DVI OUT jack on the Set Top Box... the AUDIO OUT jacks on the Set Top Box. Incoming Cable or Antenna DTV Set Top Box TV Rear Panel 2 Connect video cables between the Component (1, 2 or 3) Y, PB and PR inputs on the TV and Y, PB and PR (or Y, CB, CR) outputs on the Set Top Box. Connecting to R,G,B 1 Connect a set of Component...
.... 2 Connect video cables between the PC IN jack on the TV and the R.G.B OUT jack on the Set Top Box. TV Rear Panel Incoming Cable or Antenna DTV Set Top Box 27 TV Rear Panel 2 Connect video cables between the DVI IN jack on the TV and the DVI OUT jack on the Set Top Box... the AUDIO OUT jacks on the Set Top Box. Incoming Cable or Antenna DTV Set Top Box TV Rear Panel 2 Connect video cables between the Component (1, 2 or 3) Y, PB and PR inputs on the TV and Y, PB and PR (or Y, CB, CR) outputs on the Set Top Box. Connecting to R,G,B 1 Connect a set of Component...
User Manual (ENGLISH)
Page 16
...PIP √ Move Enter Return On-screen menus disappear from the screen automatically after about two minutes, or you to control the settings of your TV. Mono Picture Sound Dolby MTS Dynamic Standard Off Mono - - : - - Note that audio on the remote control. or † button to... √ 3 Press the ... Viewing the Menus and Displays The on-screen menu system allows you can being working before screen video. The TV will display the channel, current time, and the audio signal you are listening to select "Language", then press the ENTER button. 3 Press the...
...PIP √ Move Enter Return On-screen menus disappear from the screen automatically after about two minutes, or you to control the settings of your TV. Mono Picture Sound Dolby MTS Dynamic Standard Off Mono - - : - - Note that audio on the remote control. or † button to... √ 3 Press the ... Viewing the Menus and Displays The on-screen menu system allows you can being working before screen video. The TV will display the channel, current time, and the audio signal you are listening to select "Language", then press the ENTER button. 3 Press the...
User Manual (ENGLISH)
Page 17
...Program HRC Favorite Channel IRC Channel Label Fine Tune Add/Delete ▼ More Move Enter Return Return 32 Storing Channels in Progress... The TV will begin memorizing all of the available stations. Air 35 Stop Return Move Enter Exit Adding and Erasing Channels 1 Press the MENU button...available. or † button to select the type of cable system you connected cable, press the ... If you have, contact your TV is connected to Start Start Return Move Enter Exit Auto Program Channel Memory in Memory Automatically 1 First, select the broadcast source as ...
...Program HRC Favorite Channel IRC Channel Label Fine Tune Add/Delete ▼ More Move Enter Return Return 32 Storing Channels in Progress... The TV will begin memorizing all of the available stations. Air 35 Stop Return Move Enter Exit Adding and Erasing Channels 1 Press the MENU button...available. or † button to select the type of cable system you connected cable, press the ... If you have, contact your TV is connected to Start Start Return Move Enter Exit Auto Program Channel Memory in Memory Automatically 1 First, select the broadcast source as ...
User Manual (ENGLISH)
Page 18
...339; or √ button. The favorite channels are selected in order, up or down, depending on the remote control, the TV displays only the favorite channels you previously stored, allowing you to select "Favorite Channel", then press the ENTER button. Operation Changing ... NOTE Input Picture Sound Channel Setup Favorite Channel AIR 2 AIR 3 AIR 4 Return Select All AIR 5 AIR 6 Clear All AIR 7 - - - - The TV changes to change channels on the remote control. AIR 8 - - - - ▼ Move Enter Return • Only memorized channels can change channels. You will...
...339; or √ button. The favorite channels are selected in order, up or down, depending on the remote control, the TV displays only the favorite channels you previously stored, allowing you to select "Favorite Channel", then press the ENTER button. Operation Changing ... NOTE Input Picture Sound Channel Setup Favorite Channel AIR 2 AIR 3 AIR 4 Return Select All AIR 5 AIR 6 Clear All AIR 7 - - - - The TV changes to change channels on the remote control. AIR 8 - - - - ▼ Move Enter Return • Only memorized channels can change channels. You will...
User Manual (ENGLISH)
Page 19
Input Picture Channel ▲ More Channel Scan LNA : Off Sound Channel Setup Move Enter √ √ Return 3 The TV will be selected. Channel Scan Air 3 Air 4 Return Return NOTE • When the ANT-B mode is selected, the channel scan function works on the main ...
Input Picture Channel ▲ More Channel Scan LNA : Off Sound Channel Setup Move Enter √ √ Return 3 The TV will be selected. Channel Scan Air 3 Air 4 Return Return NOTE • When the ANT-B mode is selected, the channel scan function works on the main ...

User Manual (ENGLISH)
Page 20
...9650; Contrast 100 the item, using the on the remote control to change the contrast, brightness, tint, color, and sharpness settings of the TV. Press the ... Input Picture Sound Channel Setup Picture Picture Mode : Dynamic √ Custom Picture √ Color Tone : Normal √ Film...8730; PIP √ Move Enter Return 2 Press the ... Dynamic Guide to Automatic Picture Settings • Choose Standard to set the TV to operate at top performance according to your guide. Customizing the Picture 1 Press the MENU button. When you can continue to make ...
...9650; Contrast 100 the item, using the on the remote control to change the contrast, brightness, tint, color, and sharpness settings of the TV. Press the ... Input Picture Sound Channel Setup Picture Picture Mode : Dynamic √ Custom Picture √ Color Tone : Normal √ Film...8730; PIP √ Move Enter Return 2 Press the ... Dynamic Guide to Automatic Picture Settings • Choose Standard to set the TV to operate at top performance according to your guide. Customizing the Picture 1 Press the MENU button. When you can continue to make ...
User Manual (ENGLISH)
Page 21
... the ENTER button. or † button to silence the volume. Using the Mute Button Press the MUTE button on the remote control to change the TV's bass, treble, and balance settings. Using the on screen gauge as your guide. Input Picture Sound Channel Setup Sound Sound Mode : Standard √ Custom Sound... raise or lower the value of the item, using the on -screen menus, you can control and customize the sound levels and settings of the TV with the VOL - Operation Sound Control You can change the automatic sound setting. 2 Press the S.MODE button again to raise the volume or VOL...
... the ENTER button. or † button to silence the volume. Using the Mute Button Press the MUTE button on the remote control to change the TV's bass, treble, and balance settings. Using the on screen gauge as your guide. Input Picture Sound Channel Setup Sound Sound Mode : Standard √ Custom Sound... raise or lower the value of the item, using the on -screen menus, you can control and customize the sound levels and settings of the TV with the VOL - Operation Sound Control You can change the automatic sound setting. 2 Press the S.MODE button again to raise the volume or VOL...
User Manual (ENGLISH)
Page 22
...8224; button to select the correct hour. or † button to select "Setup", then press the ENTER button. or † button to turn the TV on or off automatically at specific times that will appear on screen when you choose. Press the ... Clock Input Picture Sound Channel Set the current...CH Min am/pm ▲ 30 am Setup Move Enter Return 4 Press the √ button to select the correct minute. Operation Setting the Clock This TV has a built-in clock that you press the INFO button on the remote control. or † button to select "Min", then press the ... Clock...
...8224; button to select the correct hour. or † button to select "Setup", then press the ENTER button. or † button to turn the TV on or off automatically at specific times that will appear on screen when you choose. Press the ... Clock Input Picture Sound Channel Set the current...CH Min am/pm ▲ 30 am Setup Move Enter Return 4 Press the √ button to select the correct minute. Operation Setting the Clock This TV has a built-in clock that you press the INFO button on the remote control. or † button to select "Min", then press the ... Clock...
User Manual (ENGLISH)
Page 23
... will prevent a leakage accident or overheating, caused by timer. or † button to select "CH", then press the ... This function is turned on by your TV left on . Input Picture Sound Channel Setup On Timer Set On Timer Hour Min am/pm 6 30 am CH Vol Activation ▲ 6 10 Yes ▼... Timer". or † button to exit the menu. When On/Off timers are away on . Set the "Off Timer" just as you want when the TV turns on holiday, for a long time due to automatically turn off . 45 Input Picture Sound Channel Setup On Timer Set On Timer Hour Min am...
... will prevent a leakage accident or overheating, caused by timer. or † button to select "CH", then press the ... This function is turned on by your TV left on . Input Picture Sound Channel Setup On Timer Set On Timer Hour Min am/pm 6 30 am CH Vol Activation ▲ 6 10 Yes ▼... Timer". or † button to exit the menu. When On/Off timers are away on . Set the "Off Timer" just as you want when the TV turns on holiday, for a long time due to automatically turn off . 45 Input Picture Sound Channel Setup On Timer Set On Timer Hour Min am...


