User Manual (ENGLISH)
Page 2
...without approval of fire, electrical shock, and other similar surface. This plug will provide convenient, dependable service and enjoyment for choosing Samsung! THERE ARE NO USER SERVICEABLE PARTS INSIDE. This symbol alerts you are not sure of the type of these openings with ... not fit, contact an electrician to come. REFER ALL SERVICING TO QUALIFIED SERVICE PERSONNEL. Your new Samsung projection TV represents the latest in mind when installing, using your TV. • Keep the safety and operating instructions for proper grounding and, in particular, specifies that ...
...without approval of fire, electrical shock, and other similar surface. This plug will provide convenient, dependable service and enjoyment for choosing Samsung! THERE ARE NO USER SERVICEABLE PARTS INSIDE. This symbol alerts you are not sure of the type of these openings with ... not fit, contact an electrician to come. REFER ALL SERVICING TO QUALIFIED SERVICE PERSONNEL. Your new Samsung projection TV represents the latest in mind when installing, using your TV. • Keep the safety and operating instructions for proper grounding and, in particular, specifies that ...
User Manual (ENGLISH)
Page 3
...damaged - The party responsible for compliance could void the user's authority to Part 15 of the FCC Rules. Provided with part 15 of Samsung 3351 Michelson Drive, Suite #290, Irvine, CA92612 USA Warning User must accept any service or repairs to this equipment does cause harmful ...to perform safety checks to determine that the TV is no guarantee that they won't be determined by one or more of television closed captioning in a particular installation . This booklet was prepared by the party responsible for product compliance: SAMSUNG ELECTRONICS CO., LTD America QA Lab of the...
...damaged - The party responsible for compliance could void the user's authority to Part 15 of the FCC Rules. Provided with part 15 of Samsung 3351 Michelson Drive, Suite #290, Irvine, CA92612 USA Warning User must accept any service or repairs to this equipment does cause harmful ...to perform safety checks to determine that the TV is no guarantee that they won't be determined by one or more of television closed captioning in a particular installation . This booklet was prepared by the party responsible for product compliance: SAMSUNG ELECTRONICS CO., LTD America QA Lab of the...
User Manual (ENGLISH)
Page 4
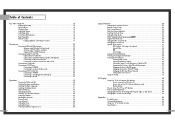
Table of Contents Your New Wide TV 10 Replacing the Lamp 10 List of Features ...12 Checking Parts...12 Side Panel Buttons 13 Side Panel Jacks 13 Front Panel LED Indicators 14 Rear Panel Jacks 15 Remote Control ...16 Installing Batteries in the Remote Control 17 Connections ...20 ...Favorite Channels 35 Scanning Channels 36 Labeling the Channels 37 Picture Control ...38 Sound Control ...40 Setting the Clock 42 Setting the Timers 43 Viewing an External Signal Source 46 6 Special Features 50 Setting Up Your Remote Control 50 Remote Control Codes 53 Fine Tuning Channels 54 ...
Table of Contents Your New Wide TV 10 Replacing the Lamp 10 List of Features ...12 Checking Parts...12 Side Panel Buttons 13 Side Panel Jacks 13 Front Panel LED Indicators 14 Rear Panel Jacks 15 Remote Control ...16 Installing Batteries in the Remote Control 17 Connections ...20 ...Favorite Channels 35 Scanning Channels 36 Labeling the Channels 37 Picture Control ...38 Sound Control ...40 Setting the Clock 42 Setting the Timers 43 Viewing an External Signal Source 46 6 Special Features 50 Setting Up Your Remote Control 50 Remote Control Codes 53 Fine Tuning Channels 54 ...

User Manual (ENGLISH)
Page 5
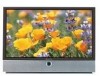
SAMSUNG Your New Wide TV
SAMSUNG Your New Wide TV
User Manual (ENGLISH)
Page 6
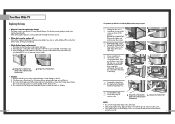
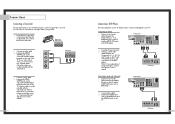
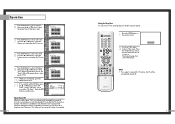
...old lamp near flammable objects or within the reach of children. 10 • For replacement, you purchased the TV or to a Samsung Service center. ... When the screws have been completely unfastened, they will activate the protective circuit). 11 HLN467W1/... Lamp. There are flashing. • Check before replacing the lamp as it will be hot. 3. Your New Wide TV Replacing the Lamp • Why do I need to replace the lamp? HLN467W1/HLN567W1 • Caution 1. Replace with ...on if the lamp cover is not correctly closed (as shown in a projection TV has a limited lifespan.
...old lamp near flammable objects or within the reach of children. 10 • For replacement, you purchased the TV or to a Samsung Service center. ... When the screws have been completely unfastened, they will activate the protective circuit). 11 HLN467W1/... Lamp. There are flashing. • Check before replacing the lamp as it will be hot. 3. Your New Wide TV Replacing the Lamp • Why do I need to replace the lamp? HLN467W1/HLN567W1 • Caution 1. Replace with ...on if the lamp cover is not correctly closed (as shown in a projection TV has a limited lifespan.
User Manual (ENGLISH)
Page 7
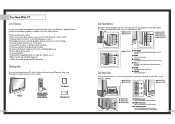
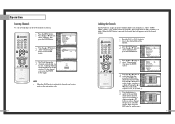
...it has these special features: • Easy-to-operate remote control • Easy-to-use on-screen menu system you have unpacked your TV, check to turn the TV on -screen menu system. Use the side panel jacks to connect a component that you can access from the side panel or remote control... Picture-in conjunction.) 13 It is used in -Picture capability that lets you watch two channels at any piece is missing or broken, call your TV's basic features, including the on and off. If any time you choose • Adjustable picture and sound settings and the ability to memorize your ...
...it has these special features: • Easy-to-operate remote control • Easy-to-use on-screen menu system you have unpacked your TV, check to turn the TV on -screen menu system. Use the side panel jacks to connect a component that you can access from the side panel or remote control... Picture-in conjunction.) 13 It is used in -Picture capability that lets you watch two channels at any piece is missing or broken, call your TV's basic features, including the on and off. If any time you choose • Adjustable picture and sound settings and the ability to memorize your ...
User Manual (ENGLISH)
Page 8
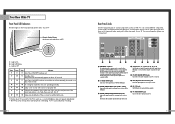
... lamp from VHF/UHF antennas or your PC or set is not operating normally. Lamp cover on rear of the set top box. ∏ DVI (Digital Video Interface) jack Receives the digital signals from the TV to the audio-output jacks on your cable system. Check if the ventilation hole on the... three set is not properly shut. Note: Monitor Out is connected to keep the inside the set of component video input jacks on the rear panel of your TV. The PIP channel can connect different components such as a VCR or DVD players. ¨ VIDEO/AUDIO MONITOR OUTPUT jacks Sends a video signal from...
... lamp from VHF/UHF antennas or your PC or set is not operating normally. Lamp cover on rear of the set top box. ∏ DVI (Digital Video Interface) jack Receives the digital signals from the TV to the audio-output jacks on your cable system. Check if the ventilation hole on the... three set is not properly shut. Note: Monitor Out is connected to keep the inside the set of component video input jacks on the rear panel of your TV. The PIP channel can connect different components such as a VCR or DVD players. ¨ VIDEO/AUDIO MONITOR OUTPUT jacks Sends a video signal from...
User Manual (ENGLISH)
Page 9
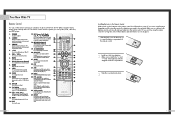
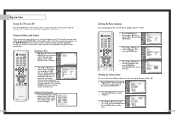
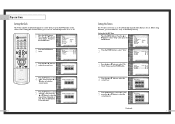
... DNIe Activates DNIe (Digital Natural Image engine). 25. Press to mute the TV sound. 7. Your New Wide TV Remote Control You can also operate your favorite channels. 8. P.MODE Adjust the TV picture by the Samsung remote control (i.e., TV, VCR, Cable, or DVD). 12. MUTE Press to make the PIP... window larger or smaller. Exchanges the video signal that it directly at the TV. RESET If your remote control is currently displayed on TV. 5. Make sure you...
... DNIe Activates DNIe (Digital Natural Image engine). 25. Press to mute the TV sound. 7. Your New Wide TV Remote Control You can also operate your favorite channels. 8. P.MODE Adjust the TV picture by the Samsung remote control (i.e., TV, VCR, Cable, or DVD). 12. MUTE Press to make the PIP... window larger or smaller. Exchanges the video signal that it directly at the TV. RESET If your remote control is currently displayed on TV. 5. Make sure you...

User Manual (ENGLISH)
Page 11
...Leads If your antenna looks like this: it is an antenna with 300-ohm Flat Twin Leads If your TV. Antennas with 75-ohm round leads. 20 Separate VHF and UHF Antennas If you have a cable system... looks like this: 1 Plug the antenna lead into the ANT-A terminal on the back panel of the TV. 21 it has 300-ohm flat twin leads. 1 Place the wires from the twin leads under the screws on... the back panel of the TV. This requires a combiner attachment, which you will need to connect an antenna to tighten the screws. 2...
...Leads If your antenna looks like this: it is an antenna with 300-ohm Flat Twin Leads If your TV. Antennas with 75-ohm round leads. 20 Separate VHF and UHF Antennas If you have a cable system... looks like this: 1 Plug the antenna lead into the ANT-A terminal on the back panel of the TV. 21 it has 300-ohm flat twin leads. 1 Place the wires from the twin leads under the screws on... the back panel of the TV. This requires a combiner attachment, which you will need to connect an antenna to tighten the screws. 2...

User Manual (ENGLISH)
Page 12
... is connected to the ANTENNA OUT terminal on the cable converter box. From Cable TV Rear Panel Caution: If you want to ANT-A so that you can not program using... blocking channels. 23 This terminal might be added between the cable and ANT-A. You should keep your TV selected to ANT-A so that you can not program using only one channel while watching another channel,...that Descrambles All Channels 1 Find the cable that descrambles some or all channels. You should keep your TV selected to connect cable, and you to use a converter box with a cable box that is vacant...
... is connected to the ANTENNA OUT terminal on the cable converter box. From Cable TV Rear Panel Caution: If you want to ANT-A so that you can not program using... blocking channels. 23 This terminal might be added between the cable and ANT-A. You should keep your TV selected to ANT-A so that you can not program using only one channel while watching another channel,...that Descrambles All Channels 1 Find the cable that descrambles some or all channels. You should keep your TV selected to connect cable, and you to use a converter box with a cable box that is vacant...
User Manual (ENGLISH)
Page 13
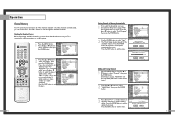
... connect two separate cables. (The audio cables are usually found on the side or back of the TV. You can use your TV. TV Side Panel Camcorder 24 Connecting a DVD Player The rear panel jacks on your TV make it easy to connect a DVD player to your camcorder to view tapes without using a VCR. 1 ...: For an explanation of audio cables between the VIDEO OUT jack on the DVD player and the VIDEO IN jack on the DVD player. TV Rear Panel Incoming Cable or Antenna 2 To enable Component video viewing, connect video cables between the AUDIO OUTPUT jack on the camcorder and the AUDIO terminals...
... connect two separate cables. (The audio cables are usually found on the side or back of the TV. You can use your TV. TV Side Panel Camcorder 24 Connecting a DVD Player The rear panel jacks on your TV make it easy to connect a DVD player to your camcorder to view tapes without using a VCR. 1 ...: For an explanation of audio cables between the VIDEO OUT jack on the DVD player and the VIDEO IN jack on the DVD player. TV Rear Panel Incoming Cable or Antenna 2 To enable Component video viewing, connect video cables between the AUDIO OUTPUT jack on the camcorder and the AUDIO terminals...

User Manual (ENGLISH)
Page 14
... a set of audio cables between the PC/DVI AUDIO IN jacks on the TV and the AUDIO OUT jacks on the Set Top Box. TV Rear Panel 2 Connect video cables between the Component (1, 2 or 3) Y, PB and PR inputs on the TV and Y, PB and PR (or Y, CB, CR) outputs on the Set Top Box.... Incoming Cable or Antenna DTV Set Top Box TV Rear Panel 2 Connect video cables between the DVI IN jack on the TV and the DVI OUT jack on the Set Top Box. Connections Connecting a DTV Set Top Box Connecting to Y,PB,PR...
... a set of audio cables between the PC/DVI AUDIO IN jacks on the TV and the AUDIO OUT jacks on the Set Top Box. TV Rear Panel 2 Connect video cables between the Component (1, 2 or 3) Y, PB and PR inputs on the TV and Y, PB and PR (or Y, CB, CR) outputs on the Set Top Box.... Incoming Cable or Antenna DTV Set Top Box TV Rear Panel 2 Connect video cables between the DVI IN jack on the TV and the DVI OUT jack on the Set Top Box. Connections Connecting a DTV Set Top Box Connecting to Y,PB,PR...
User Manual (ENGLISH)
Page 16
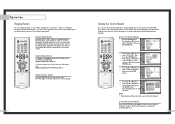
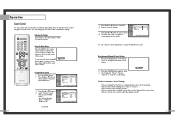
...side panel to select "Channel", Input Channel Antenna Air/CATV : A : Air √ √ then press the ENTER button. Once the on your TV. Input Picture Sound Channel Setup Picture Picture Mode : Dynamic √ Custom Picture √ Color Tone : Normal √ Film Mode : Off √...Sound Channel Favorite Channel Channel Label Fine Tune Add/Delete Press the EXIT button to select menu items and make some adjustments using the TV's side panel buttons. The Input menu is selected. Displaying Status Information 1 Press the INFO button on the screen. or †...
...side panel to select "Channel", Input Channel Antenna Air/CATV : A : Air √ √ then press the ENTER button. Once the on your TV. Input Picture Sound Channel Setup Picture Picture Mode : Dynamic √ Custom Picture √ Color Tone : Normal √ Film Mode : Off √...Sound Channel Favorite Channel Channel Label Fine Tune Add/Delete Press the EXIT button to select menu items and make some adjustments using the TV's side panel buttons. The Input menu is selected. Displaying Status Information 1 Press the INFO button on the screen. or †...
User Manual (ENGLISH)
Page 17
... More Move Enter Return Auto Program Memorize Channels Press ENTER Button to interrupt the memorization process. Air 12 Add&Del. Operation Channel Memory Your TV can use the CH and CH buttons to scan through the available channels. or † button to access Add/Delete: Just press the... add or delete the channel. Press the EXIT button to Add The Channel Add Return CH Change Move Exit 33 If you have, contact your TV is connected to an antenna, leave "Air" displayed. Input Picture Sound Channel Setup Channel Antenna : A Air/CATV : Air Auto Program Favorite...
... More Move Enter Return Auto Program Memorize Channels Press ENTER Button to interrupt the memorization process. Air 12 Add&Del. Operation Channel Memory Your TV can use the CH and CH buttons to scan through the available channels. or † button to access Add/Delete: Just press the... add or delete the channel. Press the EXIT button to Add The Channel Add Return CH Change Move Exit 33 If you have, contact your TV is connected to an antenna, leave "Air" displayed. Input Picture Sound Channel Setup Channel Antenna : A Air/CATV : Air Auto Program Favorite...
User Manual (ENGLISH)
Page 18
..., or by direct selection using the number buttons. Using the Previous Channel Press the PRE-CH button on the remote control, the TV displays only the favorite channels you previously stored, allowing you to another. Input Picture Sound Channel Setup Channel Antenna : A Air/CATV...Return Select All AIR 5 AIR 6 Clear All AIR 7 - - - - AIR 8 - - - - ▼ Move Enter Return • Only memorized channels can be set as TV and CATV). Operation Changing Channels You can change channels on which button you press. You can use the number buttons to tune to any channel...
..., or by direct selection using the number buttons. Using the Previous Channel Press the PRE-CH button on the remote control, the TV displays only the favorite channels you previously stored, allowing you to another. Input Picture Sound Channel Setup Channel Antenna : A Air/CATV...Return Select All AIR 5 AIR 6 Clear All AIR 7 - - - - AIR 8 - - - - ▼ Move Enter Return • Only memorized channels can be set as TV and CATV). Operation Changing Channels You can change channels on which button you press. You can use the number buttons to tune to any channel...
User Manual (ENGLISH)
Page 19
... Clear Adjust Return Return 37 Press the ... Input Picture Channel ▲ More Channel Scan LNA : Off Sound Channel Setup Move Enter √ √ Return 3 The TV will be selected. Scanning channels will be labeled. 2 Press the MENU button. To stop channel scan, press the ENTER button again. or † button to...
... Clear Adjust Return Return 37 Press the ... Input Picture Channel ▲ More Channel Scan LNA : Off Sound Channel Setup Move Enter √ √ Return 3 The TV will be selected. Scanning channels will be labeled. 2 Press the MENU button. To stop channel scan, press the ENTER button again. or † button to...

User Manual (ENGLISH)
Page 20
... to exit. You can change . Dynamic Guide to Automatic Picture Settings • Choose Standard to set the TV to operate at top performance according to your TV's specifications. • Choose Dynamic for viewing the TV during the day or when there is bright light in PC, DVI or 480p-Component or higher modes.... Operation Picture Control Using the remote, you can continue to make adjustments, or press the EXIT button to raise or lower the value of the TV. You will return.
... to exit. You can change . Dynamic Guide to Automatic Picture Settings • Choose Standard to set the TV to operate at top performance according to your TV's specifications. • Choose Dynamic for viewing the TV during the day or when there is bright light in PC, DVI or 480p-Component or higher modes.... Operation Picture Control Using the remote, you can continue to make adjustments, or press the EXIT button to raise or lower the value of the TV. You will return.
User Manual (ENGLISH)
Page 21
... Bass 50 Treble 50 Picture Balance L/R 50 Sound Channel Setup Move Enter Return You can control and customize the sound levels and settings of the TV with the VOL - Using Automatic(Standard) Sound Settings 1 Press the S.MODE button on the remote control to silence the volume. You will appear in the... watching a show that is mostly dialogue, like a news show. • Choose Custom if you can change . 4 Press the œ or √ button to change the TV's bass, treble, and balance settings.
... Bass 50 Treble 50 Picture Balance L/R 50 Sound Channel Setup Move Enter Return You can control and customize the sound levels and settings of the TV with the VOL - Using Automatic(Standard) Sound Settings 1 Press the S.MODE button on the remote control to silence the volume. You will appear in the... watching a show that is mostly dialogue, like a news show. • Choose Custom if you can change . 4 Press the œ or √ button to change the TV's bass, treble, and balance settings.
User Manual (ENGLISH)
Page 22
...am/pm 0 am √ Off √ Off √ Off √ Channel Setup Move Enter Return 3 Press the ... Operation Setting the Clock This TV has a built-in clock that you choose. Press the ... or † button to select "Setup", then press the ENTER button. am Vol Activation 03...the current date and time Hour ▲ 10 ▼ Min am/pm 00 am ▼ Vol Activation 03 10 No Setup Move Enter Return Continued... 43 Input Picture Sound Channel Setup Setup Time √ V-Chip √ Closed Caption √ Language : English √ Melody : On √ Blue ...
...am/pm 0 am √ Off √ Off √ Off √ Channel Setup Move Enter Return 3 Press the ... Operation Setting the Clock This TV has a built-in clock that you choose. Press the ... or † button to select "Setup", then press the ENTER button. am Vol Activation 03...the current date and time Hour ▲ 10 ▼ Min am/pm 00 am ▼ Vol Activation 03 10 No Setup Move Enter Return Continued... 43 Input Picture Sound Channel Setup Setup Time √ V-Chip √ Closed Caption √ Language : English √ Melody : On √ Blue ...
User Manual (ENGLISH)
Page 23
... the time interval for example). 44 Setting the Sleep Timer You can set the timer "On", your TV to stay on. Input Picture Sound Channel Setup On Timer Set On Timer Hour Min am/pm 6...prevent a leakage accident or overheating, caused by timer. NOTE • If no signal is turned on by your TV left on . or † button to select "Activation", then press the ... Press the EXIT button to select...Off Timer" just as you are finished, press the MENU button twice. 11 If you want when the TV turns on for a long time due to select "CH", then press the ... Input Picture Sound Channel...
... the time interval for example). 44 Setting the Sleep Timer You can set the timer "On", your TV to stay on. Input Picture Sound Channel Setup On Timer Set On Timer Hour Min am/pm 6...prevent a leakage accident or overheating, caused by timer. NOTE • If no signal is turned on by your TV left on . or † button to select "Activation", then press the ... Press the EXIT button to select...Off Timer" just as you are finished, press the MENU button twice. 11 If you want when the TV turns on for a long time due to select "CH", then press the ... Input Picture Sound Channel...


