User Manual (ENGLISH)
Page 4
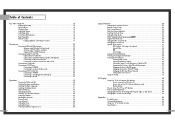
Table of Contents Your New Wide TV 10 Replacing the Lamp 10 List of Features ...12 Checking Parts...12 Side Panel Buttons 13 Side Panel Jacks 13 Front Panel LED Indicators 14 Rear Panel Jacks 15 Remote Control ...16 Installing Batteries in the Remote Control 17 Connections ...20 Connecting VHF... Channels 35 Scanning Channels 36 Labeling the Channels 37 Picture Control ...38 Sound Control ...40 Setting the Clock 42 Setting the Timers 43 Viewing an External Signal Source 46 6 Special Features 50 Setting Up Your Remote Control 50 Remote Control Codes 53 Fine Tuning Channels 54...
Table of Contents Your New Wide TV 10 Replacing the Lamp 10 List of Features ...12 Checking Parts...12 Side Panel Buttons 13 Side Panel Jacks 13 Front Panel LED Indicators 14 Rear Panel Jacks 15 Remote Control ...16 Installing Batteries in the Remote Control 17 Connections ...20 Connecting VHF... Channels 35 Scanning Channels 36 Labeling the Channels 37 Picture Control ...38 Sound Control ...40 Setting the Clock 42 Setting the Timers 43 Viewing an External Signal Source 46 6 Special Features 50 Setting Up Your Remote Control 50 Remote Control Codes 53 Fine Tuning Channels 54...
User Manual (ENGLISH)
Page 7
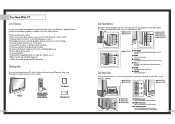
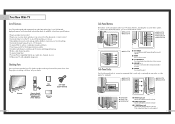
... remote control. œ HLN467W1 œ HLN567W1 œ HLN437W1 œ HLN507W1 œ HLN4365W1 œ HLN5065W1 Side Panel Jacks œ HLN617W1 Œ TV/VIDEO Press to switch between viewing TV programs and signals from a camcorder or video game. (S-Video 3 jack and Audio L/R input 3 are used in -Picture capability that lets you watch two channels at once...
... remote control. œ HLN467W1 œ HLN567W1 œ HLN437W1 œ HLN507W1 œ HLN4365W1 œ HLN5065W1 Side Panel Jacks œ HLN617W1 Œ TV/VIDEO Press to switch between viewing TV programs and signals from a camcorder or video game. (S-Video 3 jack and Audio L/R input 3 are used in -Picture capability that lets you watch two channels at once...
User Manual (ENGLISH)
Page 8
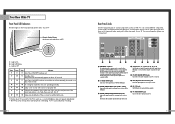
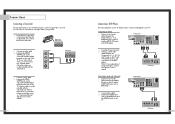
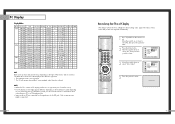
...audio signals from external sources, such as a VCR or DVD players. ¨ VIDEO/AUDIO MONITOR OUTPUT jacks Sends a video signal from a set of component video input jacks on the rear panel of your TV. Please contact a certified technician. • It takes about 25 seconds. The PIP channel can be ... properly shut. You'll occasionally hear it working. 14 Rear Panel Jacks Use the rear panel jacks to receive a signal from overheating. A cooling fan inside lamp from VHF/UHF antennas or your TV. Lamp cover on the rear of video input jacks and three set top box or PC etc.
...audio signals from external sources, such as a VCR or DVD players. ¨ VIDEO/AUDIO MONITOR OUTPUT jacks Sends a video signal from a set of component video input jacks on the rear panel of your TV. Please contact a certified technician. • It takes about 25 seconds. The PIP channel can be ... properly shut. You'll occasionally hear it working. 14 Rear Panel Jacks Use the rear panel jacks to receive a signal from overheating. A cooling fan inside lamp from VHF/UHF antennas or your TV. Lamp cover on the rear of video input jacks and three set top box or PC etc.
User Manual (ENGLISH)
Page 13
... AUDIO IN jacks on the TV and the AUDIO OUT jacks on the side of the camcorder. DVD Player 25 Connecting to audio and video jacks 1 Connect a set of audio cables between the Component (1, 2 or 3) AUDIO IN jacks on the TV and the AUDIO OUT jacks on the TV. TV Rear Panel Incoming ...Cable or Antenna 2 To enable Component video viewing, connect video cables between the VIDEO OUT jack on the DVD player and the VIDEO IN jack on the DVD player. Connections Connecting a...
... AUDIO IN jacks on the TV and the AUDIO OUT jacks on the side of the camcorder. DVD Player 25 Connecting to audio and video jacks 1 Connect a set of audio cables between the Component (1, 2 or 3) AUDIO IN jacks on the TV and the AUDIO OUT jacks on the TV. TV Rear Panel Incoming ...Cable or Antenna 2 To enable Component video viewing, connect video cables between the VIDEO OUT jack on the DVD player and the VIDEO IN jack on the DVD player. Connections Connecting a...

User Manual (ENGLISH)
Page 14
... the Set Top Box. Note: For an explanation of audio cables between the DVI IN jack on the TV and the DVI OUT jack on the Set Top Box. TV Rear Panel Incoming Cable or Antenna DTV Set Top Box 27 Connections Connecting a DTV Set Top Box Connecting to Y,PB,PR 1 Connect a set of Component... video, see your Set Top Box owner's manual. Incoming Cable or Antenna DTV Set Top Box TV Rear Panel 2 Connect video cables between the Component (1, 2 or 3) AUDIO IN jacks on the TV and the AUDIO OUT jacks on the Set Top Box.
... the Set Top Box. Note: For an explanation of audio cables between the DVI IN jack on the TV and the DVI OUT jack on the Set Top Box. TV Rear Panel Incoming Cable or Antenna DTV Set Top Box 27 Connections Connecting a DTV Set Top Box Connecting to Y,PB,PR 1 Connect a set of Component... video, see your Set Top Box owner's manual. Incoming Cable or Antenna DTV Set Top Box TV Rear Panel 2 Connect video cables between the Component (1, 2 or 3) AUDIO IN jacks on the TV and the AUDIO OUT jacks on the Set Top Box.
User Manual (ENGLISH)
Page 24
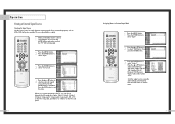
...Source List Edit Name Move Enter √ √ Return 2 Press the ... Press the ... CR : - - - H-D- Input Picture Sound Channel Setup Source List TV Video1 Video2 Video3 S-Video1 S-Video2 S-Video3 ▼ More Move Enter Return 4 Press the ... or † button to exit the menu. 47 D-VD : - ...Source Use the remote control to switch between the following sets of jacks: Video1, Video2, S-Video1, S-Video2, Component1, Component2, Component3, DVI or PC on the TV's rear panel, and Video3 or S-Video3 on the TV's side panel. 46 Assigning Names to exit the menu. Press ...
...Source List Edit Name Move Enter √ √ Return 2 Press the ... Press the ... CR : - - - H-D- Input Picture Sound Channel Setup Source List TV Video1 Video2 Video3 S-Video1 S-Video2 S-Video3 ▼ More Move Enter Return 4 Press the ... or † button to exit the menu. 47 D-VD : - ...Source Use the remote control to switch between the following sets of jacks: Video1, Video2, S-Video1, S-Video2, Component1, Component2, Component3, DVI or PC on the TV's rear panel, and Video3 or S-Video3 on the TV's side panel. 46 Assigning Names to exit the menu. Press ...
User Manual (ENGLISH)
Page 35
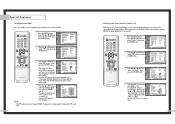
...broadcasting source of cable system is necessary.) 1 Press the MENU button. Press the ... Press the ... or † button to the TV's input jacks. The signal from an external source, such as the main image. Input Picture Sound Channel Setup Picture Picture Mode : Dynamic √ ...PIP √ Move Enter Return 2 Press the ... If you have not connected Input Picture Sound Channel Setup PIP PIP : On √ PIP Source : TV √ PIP Swap PIP Size : Large √ PIP Position √ PIP Channel : Air 11 √ Air/CATV : Air √ Select Sound ...
...broadcasting source of cable system is necessary.) 1 Press the MENU button. Press the ... Press the ... or † button to the TV's input jacks. The signal from an external source, such as the main image. Input Picture Sound Channel Setup Picture Picture Mode : Dynamic √ ...PIP √ Move Enter Return 2 Press the ... If you have not connected Input Picture Sound Channel Setup PIP PIP : On √ PIP Source : TV √ PIP Swap PIP Size : Large √ PIP Position √ PIP Channel : Air 11 √ Air/CATV : Air √ Select Sound ...

User Manual (ENGLISH)
Page 42
...box, the correct value is for repairs and software upgrades. 82 How to the TV Note: This figure shows the Standard Connector-jack panel. The actual configuration on the model. 15Pin(D-Sub) Cable Audio Cable NOTE The RS232 jack is "60" or "60 Hz". The actual screens on the Windows start menu..."): 1024 x 768 pixels * Color: "24-bit" color (might also be different, depending upon your particular version of Windows and your computer manufacturer or Samsung Dealer.) First, click on "Settings" on your PC will apply in almost all cases. (If not, contact your particular video card.
...box, the correct value is for repairs and software upgrades. 82 How to the TV Note: This figure shows the Standard Connector-jack panel. The actual configuration on the model. 15Pin(D-Sub) Cable Audio Cable NOTE The RS232 jack is "60" or "60 Hz". The actual screens on the Windows start menu..."): 1024 x 768 pixels * Color: "24-bit" color (might also be different, depending upon your particular version of Windows and your computer manufacturer or Samsung Dealer.) First, click on "Settings" on your PC will apply in almost all cases. (If not, contact your particular video card.
User Manual (ENGLISH)
Page 43
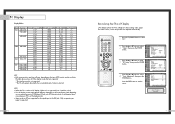
...to select "Auto Adjustment", then press the ENTER button. NOTES • When this TV is used as a PC display, 32-bit color is supported (over 16 million colors...supported. * The TV will vary, depending on your PC to a TV display-monitor. • Same modes as a PC display "Auto Adjust" allows the TV to self-adjust to... 31.47 31.47 37.93 31.47 35.00 37.86 37.50 43.27 35.16 37.88 48.08 46.87 53.67 49.73 48... non-standard video format is supported. 84 How to Set up Your TV as PC are adjusted automatically. 1 Press the TV/VIDEO button to select "Setup", then press the ENTER button. 3 Press...
...to select "Auto Adjustment", then press the ENTER button. NOTES • When this TV is used as a PC display, 32-bit color is supported (over 16 million colors...supported. * The TV will vary, depending on your PC to a TV display-monitor. • Same modes as a PC display "Auto Adjust" allows the TV to self-adjust to... 31.47 31.47 37.93 31.47 35.00 37.86 37.50 43.27 35.16 37.88 48.08 46.87 53.67 49.73 48... non-standard video format is supported. 84 How to Set up Your TV as PC are adjusted automatically. 1 Press the TV/VIDEO button to select "Setup", then press the ENTER button. 3 Press...
User Manual (ENGLISH)
Page 4
Table of Contents Your New Wide TV 10 Replacing the Lamp 10 List of Features ...12 Checking Parts...12 Side Panel Buttons 13 Side Panel Jacks 13 Front Panel LED Indicators 14 Rear Panel Jacks 15 Remote Control ...16 Installing Batteries in the Remote Control 17 Connections ...20 Connecting VHF and ... Labeling the Channels 36 Setting The On/Off Melody 36 Picture Control ...38 Sound Control ...40 Setting the Clock 42 Setting the Timers 43 Viewing an External Signal Source 45 6 Special Features 48 Setting Up Your Remote Control 48 Remote Control Codes 51 Fine Tuning Channels 52...
Table of Contents Your New Wide TV 10 Replacing the Lamp 10 List of Features ...12 Checking Parts...12 Side Panel Buttons 13 Side Panel Jacks 13 Front Panel LED Indicators 14 Rear Panel Jacks 15 Remote Control ...16 Installing Batteries in the Remote Control 17 Connections ...20 Connecting VHF and ... Labeling the Channels 36 Setting The On/Off Melody 36 Picture Control ...38 Sound Control ...40 Setting the Clock 42 Setting the Timers 43 Viewing an External Signal Source 45 6 Special Features 48 Setting Up Your Remote Control 48 Remote Control Codes 51 Fine Tuning Channels 52...
User Manual (ENGLISH)
Page 7
...control. œ HLN467W œ HLN567W œ HLN437W œ HLN507W œ HLN4365W œ HLN5065W Side Panel Jacks œ HLN617W Œ TV/VIDEO Press to switch between viewing TV programs and signals from a camcorder or video game. (S-Video 3 jack and Audio L/R input 3 are used only occasionally ... for example). œ HLN467W œ HLN567W œ HLN437W œ HLN4365W œ HLN507W œ HLN617W œ HLN5065W Œ VIDEO Input jack Connect the video signal from a camcorder or video game. ´ AUDIO Input jacks Connect the audio signal from a camcorder or video game. ...
...control. œ HLN467W œ HLN567W œ HLN437W œ HLN507W œ HLN4365W œ HLN5065W Side Panel Jacks œ HLN617W Œ TV/VIDEO Press to switch between viewing TV programs and signals from a camcorder or video game. (S-Video 3 jack and Audio L/R input 3 are used only occasionally ... for example). œ HLN467W œ HLN567W œ HLN437W œ HLN4365W œ HLN507W œ HLN617W œ HLN5065W Œ VIDEO Input jack Connect the video signal from a camcorder or video game. ´ AUDIO Input jacks Connect the audio signal from a camcorder or video game. ...

User Manual (ENGLISH)
Page 8
... terminal to send the signal being received by the ANT-A terminal out to the audio-output jacks on the rear panel of your TV. Note: Only 480i and 408p formats are supported. ∏ PC AUDIO INPUT jacks Connect these to another component (such as a VCR. Auto Timer ON/OFF has been set... the status of your TV. Your New Wide TV Front Panel LED Indicators The three lights on the rear of the set is blocked, because if the inner temperature is too high, the power will shut off. Rear Panel Jacks Use the rear panel jacks to ANT-A. ´ S-VIDEO INPUT jacks Connects an S-Video signal...
... terminal to send the signal being received by the ANT-A terminal out to the audio-output jacks on the rear panel of your TV. Note: Only 480i and 408p formats are supported. ∏ PC AUDIO INPUT jacks Connect these to another component (such as a VCR. Auto Timer ON/OFF has been set... the status of your TV. Your New Wide TV Front Panel LED Indicators The three lights on the rear of the set is blocked, because if the inner temperature is too high, the power will shut off. Rear Panel Jacks Use the rear panel jacks to ANT-A. ´ S-VIDEO INPUT jacks Connects an S-Video signal...

User Manual (ENGLISH)
Page 13
... your camera's instructions and the section on "Viewing an External Signal Source" in this manual. 24 Connecting a DVD Player The rear panel jacks on the TV. 25 Note: For an explanation of the TV. (A video cable is stereo, you must connect two separate cables. (The audio cables are usually found on the side or...
... your camera's instructions and the section on "Viewing an External Signal Source" in this manual. 24 Connecting a DVD Player The rear panel jacks on the TV. 25 Note: For an explanation of the TV. (A video cable is stereo, you must connect two separate cables. (The audio cables are usually found on the side or...

User Manual (ENGLISH)
Page 14
... of audio cables between the Component2 or Component3 AUDIO IN jacks on the TV and the AUDIO OUT jacks on the Set Top Box. 2 Connect video cables between the PC IN jack on the TV and the R.G.B OUT jack on the Set Top Box. 26 TV Rear Panel Component1 Component1/2 (480i/480p) (480p/720p/10801i)... Connect a set of audio cables between the PC AUDIO IN jacks on the TV and the AUDIO OUT jacks on the Set Top Box. 2 Connect video cables between the DVI IN jack on the TV and the DVI OUT jack on the Set Top Box. TV Rear Panel Component1 Component1/2 (480i/480p) (480p/720p/10801i) PC...
... of audio cables between the Component2 or Component3 AUDIO IN jacks on the TV and the AUDIO OUT jacks on the Set Top Box. 2 Connect video cables between the PC IN jack on the TV and the R.G.B OUT jack on the Set Top Box. 26 TV Rear Panel Component1 Component1/2 (480i/480p) (480p/720p/10801i)... Connect a set of audio cables between the PC AUDIO IN jacks on the TV and the AUDIO OUT jacks on the Set Top Box. 2 Connect video cables between the DVI IN jack on the TV and the DVI OUT jack on the Set Top Box. TV Rear Panel Component1 Component1/2 (480i/480p) (480p/720p/10801i) PC...

User Manual (ENGLISH)
Page 23
... Use the remote control to switch between the following on-screen menu will illuminate (front or side panel of jacks: Video 1, Video 2, S-video 1, S-video 2, Component 1, Component 2, Component 3, DVI or PC on the TV's rear panel, and Video 3 or S-Video 3 on , move the joystick down to select "On Timer Vol." ...connected VCR or DVD, including Rewind, Play, Fast Forward, Stop and Pause. 1 Flip the cover of your remote control unit for the TV to normal viewing. Press the Sleep button to select the time interval for access to the tape function controls. When any of the screen.
... Use the remote control to switch between the following on-screen menu will illuminate (front or side panel of jacks: Video 1, Video 2, S-video 1, S-video 2, Component 1, Component 2, Component 3, DVI or PC on the TV's rear panel, and Video 3 or S-Video 3 on , move the joystick down to select "On Timer Vol." ...connected VCR or DVD, including Rewind, Play, Fast Forward, Stop and Pause. 1 Flip the cover of your remote control unit for the TV to normal viewing. Press the Sleep button to select the time interval for access to the tape function controls. When any of the screen.

User Manual (ENGLISH)
Page 33
..."Viewing an External Signal Source" (See page 41). The advanced PIP system allows you to watch two different pictures at once, even if you select "TV." Move the joystick down to select "Source". 3 Move the joystick right or left to select an external signal. Quick way to access PIP: Just ...remote control. 2 Move the joystick down to select PIP, then press the joystick to enter. If you don't have not connected any equipment to the TV's input jacks. The PIP image will return to normal video. • Screen size can't be changed in -Picture doesn't function when the V-chip is the ...
..."Viewing an External Signal Source" (See page 41). The advanced PIP system allows you to watch two different pictures at once, even if you select "TV." Move the joystick down to select "Source". 3 Move the joystick right or left to select an external signal. Quick way to access PIP: Just ...remote control. 2 Move the joystick down to select PIP, then press the joystick to enter. If you don't have not connected any equipment to the TV's input jacks. The PIP image will return to normal video. • Screen size can't be changed in -Picture doesn't function when the V-chip is the ...

User Manual (ENGLISH)
Page 40
... your actual screens look different, the same basic setup information will apply in almost all cases. (If not, contact your computer manufacturer or Samsung Dealer.) First, click on "Settings" on "Display" and a display dialogbox will probably be different, depending upon your particular version of Windows... interface are shown below. While "Settings" is highlighted, move the cursor so that apply to the TV Note: This figure shows the Standard Connector-jack panel. continued... 79 Navigate to Set up Your PC Software (Windows only) The Windows display-settings for a typical computer are "...
... your actual screens look different, the same basic setup information will apply in almost all cases. (If not, contact your computer manufacturer or Samsung Dealer.) First, click on "Settings" on "Display" and a display dialogbox will probably be different, depending upon your particular version of Windows... interface are shown below. While "Settings" is highlighted, move the cursor so that apply to the TV Note: This figure shows the Standard Connector-jack panel. continued... 79 Navigate to Set up Your PC Software (Windows only) The Windows display-settings for a typical computer are "...
User Manual (ENGLISH)
Page 41
...table above shows all of fine, coarse and position are adjusted automatically. 1 Press TV/VIDEO on the remote control. Move the joystick up Your TV as a PC display "Auto Adjust" allows the TV to self-adjust to the DVI jack. The values of the display modes that are supported for information about connecting your...30.24 MHz 0 0 x 640x480 832x520 37.86 kHz N 72.80 Hz N 31.5 MHz 0 0 x 640x480 840x500 37.50 kHz N 75.00 Hz N 31.5 MHz 0 0 x 640x480 832x509 43.27 kHz N 85.00 Hz N 36 MHz 0 0 x SVGA 800x600 1024x625 35.16 kHz N/P 56.30 Hz N 36 MHz 0 0 x 800x600 1056x628 37.88 kHz P 60.30...
...table above shows all of fine, coarse and position are adjusted automatically. 1 Press TV/VIDEO on the remote control. Move the joystick up Your TV as a PC display "Auto Adjust" allows the TV to self-adjust to the DVI jack. The values of the display modes that are supported for information about connecting your...30.24 MHz 0 0 x 640x480 832x520 37.86 kHz N 72.80 Hz N 31.5 MHz 0 0 x 640x480 840x500 37.50 kHz N 75.00 Hz N 31.5 MHz 0 0 x 640x480 832x509 43.27 kHz N 85.00 Hz N 36 MHz 0 0 x SVGA 800x600 1024x625 35.16 kHz N/P 56.30 Hz N 36 MHz 0 0 x 800x600 1056x628 37.88 kHz P 60.30...
