User Manual (ENGLISH)
Page 2
... license for commercial use . No rights are always broadcast in widescreen, and offer much higher picture quality than this product unit and the license does not extend to any unlicensed product unit or.../IEC 13818-3. No rights are essentially a digital version of these services can transmit high definition TV (HDTV) images, Dolby digital surround audio, and new services such as multicasting (transmitting more than.../IEC 11172-3 or ISO/IEC 13818-3. © 2007 Samsung Electronics Co., Ltd. No rights are granted for product features or functions that do not conform to...
... license for commercial use . No rights are always broadcast in widescreen, and offer much higher picture quality than this product unit and the license does not extend to any unlicensed product unit or.../IEC 13818-3. No rights are essentially a digital version of these services can transmit high definition TV (HDTV) images, Dolby digital surround audio, and new services such as multicasting (transmitting more than.../IEC 11172-3 or ISO/IEC 13818-3. © 2007 Samsung Electronics Co., Ltd. No rights are granted for product features or functions that do not conform to...
User Manual (ENGLISH)
Page 4
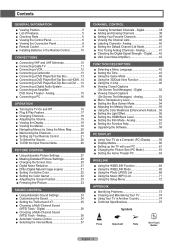
... 54 ■ Adjusting the Melody Sound 55 ■ Using the Color Weakness Enhancement Feature ... 55 ■ Setting the Light Effect 56 ■ Setting the HDMI Black Level 56 ■ Setting the Film Mode - Contents GENERAL INFORMATION ■ Viewing Position 5 ■ List of Features 5 ■ Checking ...Help 57 ■ Upgrading the Software 58 PC DISPLAY ■ Using Your TV as a Computer (PC) Display .......... 59 ■ Display Modes 60 ■ Setting up the TV with your PC 61 ■ Changing the Picture Size (PC Mode 63 ■ Setting the Home Theater PC 63 WISELINK...
... 54 ■ Adjusting the Melody Sound 55 ■ Using the Color Weakness Enhancement Feature ... 55 ■ Setting the Light Effect 56 ■ Setting the HDMI Black Level 56 ■ Setting the Film Mode - Contents GENERAL INFORMATION ■ Viewing Position 5 ■ List of Features 5 ■ Checking ...Help 57 ■ Upgrading the Software 58 PC DISPLAY ■ Using Your TV as a Computer (PC) Display .......... 59 ■ Display Modes 60 ■ Setting up the TV with your PC 61 ■ Changing the Picture Size (PC Mode 63 ■ Setting the Home Theater PC 63 WISELINK...
User Manual (ENGLISH)
Page 5
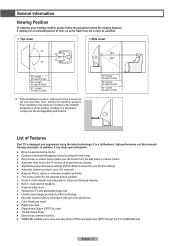
... the guidelines below for stereo and bilingual listening ● Built-in, dual channel speakers ● A special sleep timer ● Widescreen TV with adjustable image size ● Life-like clear images provided by DNle technology ● My Color Control mode to correspond with your favorite... time you to reduce or eliminate reception problems ● Fine tuning control for the sharpest picture possible ● A built-in a shortened component life and degraded performance. 50˝ screen : At least 5.9 feet 56˝ screen : At least 6.6 feet 61˝ screen : At least 7.2 feet ...
... the guidelines below for stereo and bilingual listening ● Built-in, dual channel speakers ● A special sleep timer ● Widescreen TV with adjustable image size ● Life-like clear images provided by DNle technology ● My Color Control mode to correspond with your favorite... time you to reduce or eliminate reception problems ● Fine tuning control for the sharpest picture possible ● A built-in a shortened component life and degraded performance. 50˝ screen : At least 5.9 feet 56˝ screen : At least 6.6 feet 61˝ screen : At least 7.2 feet ...
User Manual (ENGLISH)
Page 7
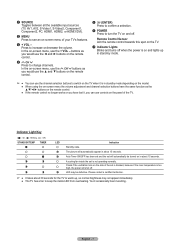
Indication The picture will automatically appear in about 15 seconds. Please contact a certified technician. ➢ ● It takes about 30 seconds for the TV to warm up in stand-by mode. ➢ ● You can use the + VOL - Press to keep the inside the set is on and ... high, the power will automatically be defective. In the on-screen menu, use the channel selection buttons to see an on-screen menu of your TV's features. 3 + VOL - A cooling fan inside LED from overheating. Indicator Light Key ( : On, : Blinking, : Off) STAND BY/TEMP TIMER LED Standby state. In the ...
Indication The picture will automatically appear in about 15 seconds. Please contact a certified technician. ➢ ● It takes about 30 seconds for the TV to warm up in stand-by mode. ➢ ● You can use the + VOL - Press to keep the inside the set is on and ... high, the power will automatically be defective. In the on-screen menu, use the channel selection buttons to see an on-screen menu of your TV's features. 3 + VOL - A cooling fan inside LED from overheating. Indicator Light Key ( : On, : Blinking, : Off) STAND BY/TEMP TIMER LED Standby state. In the ...
User Manual (ENGLISH)
Page 9
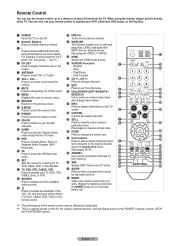
...Pause - e EXIT Press to change menu values. h CAPTION Controls the caption decoder. j P.SIZE Press to exit from the TV. Rewind - English - 9 P.MODE Press to select the picture mode. @ FAV.CH Press to switch to your favorite channels. # GAME Press to select the Theater Game mode except for... the sound mode. ! Press to change the batteries and press the RESET button for the visually impaired persons, and has Braille points on the TV screen. Fast Forward d CH , CH Press to select additional channels being broadcast by bright light. ➢ This is a special remote control...
...Pause - e EXIT Press to change menu values. h CAPTION Controls the caption decoder. j P.SIZE Press to exit from the TV. Rewind - English - 9 P.MODE Press to select the picture mode. @ FAV.CH Press to switch to your favorite channels. # GAME Press to select the Theater Game mode except for... the sound mode. ! Press to change the batteries and press the RESET button for the visually impaired persons, and has Braille points on the TV screen. Fast Forward d CH , CH Press to select additional channels being broadcast by bright light. ➢ This is a special remote control...
User Manual (ENGLISH)
Page 12
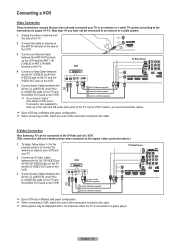
...to the S-Video jack of a VCR. (This connection delivers a better picture when compared to the regular video connection above.) 1 To begin, follow steps 1-3 in the previous section to connect the antenna or cable to your VCR and your TV. 2 Connect an S-Video Cable between the AV IN 1 [S-VIDEO] ... on the VCR and the ANT 1 IN (CABLE) or ANT 2 IN (AIR) terminal on pages 10~11). S-Video Connection Your Samsung TV can be displayed with a cut off picture when the TV is stereo, you have a "mono" 3 Antenna cable(Not supplied) (non-stereo) VCR, use a Y-connector (not supplied) to ...
...to the S-Video jack of a VCR. (This connection delivers a better picture when compared to the regular video connection above.) 1 To begin, follow steps 1-3 in the previous section to connect the antenna or cable to your VCR and your TV. 2 Connect an S-Video Cable between the AV IN 1 [S-VIDEO] ... on the VCR and the ANT 1 IN (CABLE) or ANT 2 IN (AIR) terminal on pages 10~11). S-Video Connection Your Samsung TV can be displayed with a cut off picture when the TV is stereo, you have a "mono" 3 Antenna cable(Not supplied) (non-stereo) VCR, use a Y-connector (not supplied) to ...
User Manual (ENGLISH)
Page 17
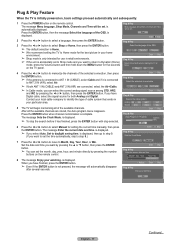
...Cable. ➢ In Cable mode, you want to set to Shop mode and you have Digital cable, select the signal source for the best picture in your watching. is accidentally set the time automatically, skip to step 9.) 7 Press the ◄ or ► button to move to ... year, hour, and minute directly by pressing the ◄ or ► button, then press the ENTER button. Plug & Play Feature When the TV is not pressed, the message will automatically disappear after several seconds. is automatically displayed. If you want by pressing the ▲ or ▼ button...
...Cable. ➢ In Cable mode, you want to set to Shop mode and you have Digital cable, select the signal source for the best picture in your watching. is accidentally set the time automatically, skip to step 9.) 7 Press the ◄ or ► button to move to ... year, hour, and minute directly by pressing the ◄ or ► button, then press the ENTER button. Plug & Play Feature When the TV is not pressed, the message will automatically disappear after several seconds. is automatically displayed. If you want by pressing the ▲ or ▼ button...
User Manual (ENGLISH)
Page 19
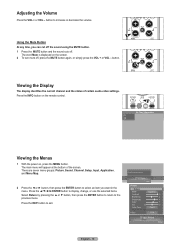
.... Press the EXIT button to the previous menu. button. The main menu will appear at the bottom of certain audio-video settings. Picture Enter Picture Return Mode Dynamic Contrast 100 Brightness 45 Sharpness 75 Color 55 Tint G50 R50 Color Tone Cool1 Detailed Settings Size 16... press the VOL + or VOL - Viewing the Display The display identifies the current channel and the status of the screen. There are seven menu groups: Picture, Sound, Channel, Setup, Input, Application, and Menu Map. 2 Press the ◄ or ► button, then press the ENTER button to increase or ...
.... Press the EXIT button to the previous menu. button. The main menu will appear at the bottom of certain audio-video settings. Picture Enter Picture Return Mode Dynamic Contrast 100 Brightness 45 Sharpness 75 Color 55 Tint G50 R50 Color Tone Cool1 Detailed Settings Size 16... press the VOL + or VOL - Viewing the Display The display identifies the current channel and the status of the screen. There are seven menu groups: Picture, Sound, Channel, Setup, Input, Application, and Menu Map. 2 Press the ◄ or ► button, then press the ENTER button to increase or ...
User Manual (ENGLISH)
Page 20
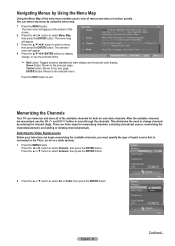
...the CH and CH button to select Channel, then press the ENTER button. You can begin memorizing the available channels, you to the TV(i.e. This eliminates the need to select Air or Cable, then press the ENTER button. Selecting the Video Signal-source Before your television ...the previous page. The menu map will appear. 4 Press the ENTER buttons to the selected menu. There are memorized, use the selected items. Menu Map Picture Sound Channel Setup 1/2 Mode І Contrast І Brightness І Shapness І Color І Tint Color Tone І Detailed Settings І Size...
...the CH and CH button to select Channel, then press the ENTER button. You can begin memorizing the available channels, you to the TV(i.e. This eliminates the need to select Air or Cable, then press the ENTER button. Selecting the Video Signal-source Before your television ...the previous page. The menu map will appear. 4 Press the ENTER buttons to the selected menu. There are memorized, use the selected items. Menu Map Picture Sound Channel Setup 1/2 Mode І Contrast І Brightness І Shapness І Color І Tint Color Tone І Detailed Settings І Size...
User Manual (ENGLISH)
Page 27
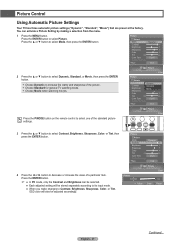
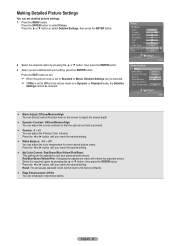
... to select Mode, then press the ENTER button. Press the ▲ or ▼ button to select Picture. Picture Control Using Automatic Picture Settings Your TV has three automatic picture settings ("Dynamic", "Standard", "Movie") that are preset at the factory. Picture Return Mode Dynamic Contrast 100 Brightness 45 Sharpness 75 Color 55 Tint G50 R50 Color Tone...
... to select Mode, then press the ENTER button. Press the ▲ or ▼ button to select Picture. Picture Control Using Automatic Picture Settings Your TV has three automatic picture settings ("Dynamic", "Standard", "Movie") that are preset at the factory. Picture Return Mode Dynamic Contrast 100 Brightness 45 Sharpness 75 Color 55 Tint G50 R50 Color Tone...
User Manual (ENGLISH)
Page 28
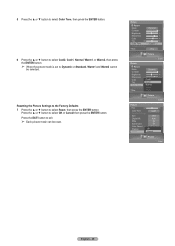
...select Cool2, Cool1, Normal, Warm1, or Warm2, then press the ENTER button. ➢ When the picture mode is set to Dynamic or Standard, Warm1 and Warm2 cannot be reset. Resetting the Picture Settings to the Factory Defaults 7 Press the ▲ or ▼ button to select OK or Cancel...Detailed Settings Size 16:9 Digital NR Auto DNIe On Active Color On Color Gamut Normal Position OK Reset CancelOK Picture Enter English - 28 Press the EXIT button to exit. ➢ Each picture mode can be selected. Press the ▲ or ▼ button to select Reset, then press the ...
...select Cool2, Cool1, Normal, Warm1, or Warm2, then press the ENTER button. ➢ When the picture mode is set to Dynamic or Standard, Warm1 and Warm2 cannot be reset. Resetting the Picture Settings to the Factory Defaults 7 Press the ▲ or ▼ button to select OK or Cancel...Detailed Settings Size 16:9 Digital NR Auto DNIe On Active Color On Color Gamut Normal Position OK Reset CancelOK Picture Enter English - 28 Press the EXIT button to exit. ➢ Each picture mode can be selected. Press the ▲ or ▼ button to select Reset, then press the ...
User Manual (ENGLISH)
Page 29
... Detailed Settings Return Black Adjust Dynamic Contrast Gamma White Balance My Color Control Edge Enhancement Medium Medium +1 0 On Picture Enter ● Black Adjust: Off/Low/Medium/High You can directly select the black level on the screen to adjust the screen depth. &#...High You can adjust the screen contrast so that the optimal contrast is provided. ● Gamma: -3 ~ +3 You can adjust the color temperature for more natural picture colors. Select the required option by pressing the ▲ or ▼ button, then press the ENTER button. 3 When you reach the optimal setting. ●...
... Detailed Settings Return Black Adjust Dynamic Contrast Gamma White Balance My Color Control Edge Enhancement Medium Medium +1 0 On Picture Enter ● Black Adjust: Off/Low/Medium/High You can directly select the black level on the screen to adjust the screen depth. &#...High You can adjust the screen contrast so that the optimal contrast is provided. ● Gamma: -3 ~ +3 You can adjust the color temperature for more natural picture colors. Select the required option by pressing the ▲ or ▼ button, then press the ENTER button. 3 When you reach the optimal setting. ●...
User Manual (ENGLISH)
Page 30
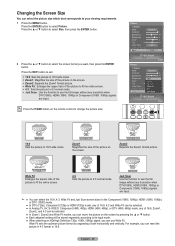
...(1080i) mode. ● In DTV (720p), Component (720p) or HDMI (720p) mode, any of 16:9, 4:3 and Wide Fit can be selected. ● In Analog TV, AV, S-VIDEO, Component (480i, 480p), HDMI (480i, 480p), or DTV (480i, 480p) mode, any truncation when DTV(1080i), HDMI (1080i, 1080p) or Component (... the MENU button. Just Scan Use the function to see the full image without any of the picture to fit the entire screen. 4:3 Sets the picture to change the picture size. Wide Fit sets the optimum picture format by pressing the ▲ or ▼ button. ● Each adjusted setting will be selected...
...(1080i) mode. ● In DTV (720p), Component (720p) or HDMI (720p) mode, any of 16:9, 4:3 and Wide Fit can be selected. ● In Analog TV, AV, S-VIDEO, Component (480i, 480p), HDMI (480i, 480p), or DTV (480i, 480p) mode, any truncation when DTV(1080i), HDMI (1080i, 1080p) or Component (... the MENU button. Just Scan Use the function to see the full image without any of the picture to fit the entire screen. 4:3 Sets the picture to change the picture size. Wide Fit sets the optimum picture format by pressing the ▲ or ▼ button. ● Each adjusted setting will be selected...
User Manual (ENGLISH)
Page 31
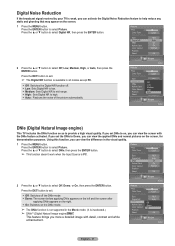
...Size 16:9 Digital NR DNIe Active Color Color Gamut Position Reset Off Low LowCooOl1n MediOumKOff High Normal AutoLow OK Picture Enter DNIe (Digital Natural Image engine) This TV includes the DNIe function so as to select Digital NR, then press the ENTER button. If you set...ENTER button. Digital Noise Reduction If the broadcast signal received by your TV is inactivated.) ➢ DNIeTM (Digital Natural Image engine) This feature brings you more a detailed image with the DNIe feature activated. Picture Tint G50 Color Tone Detailed Settings Size Digital NR DNIe Active Color...
...Size 16:9 Digital NR DNIe Active Color Color Gamut Position Reset Off Low LowCooOl1n MediOumKOff High Normal AutoLow OK Picture Enter DNIe (Digital Natural Image engine) This TV includes the DNIe function so as to select Digital NR, then press the ENTER button. If you set...ENTER button. Digital Noise Reduction If the broadcast signal received by your TV is inactivated.) ➢ DNIeTM (Digital Natural Image engine) This feature brings you more a detailed image with the DNIe feature activated. Picture Tint G50 Color Tone Detailed Settings Size Digital NR DNIe Active Color...
User Manual (ENGLISH)
Page 32
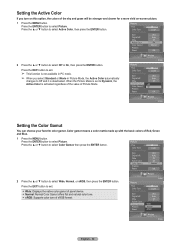
...R50 Color Tone Cool1 Detailed Settings Size 16:9 Digital NR Auto DNIe On Active Color Color Gamut Position Off Off On Normal Reset OK Picture Enter Setting the Color Gamut You can choose your favorite color gamut. Press the ENTER button to select Off or On, then press ...the ENTER button. Picture Tint G50 Color Tone Detailed Settings Size Digital NR DNIe Active Color Color Gamut Position Reset R50 Cool1 16:9 Auto On On Normal OK 2...
...R50 Color Tone Cool1 Detailed Settings Size 16:9 Digital NR Auto DNIe On Active Color Color Gamut Position Off Off On Normal Reset OK Picture Enter Setting the Color Gamut You can choose your favorite color gamut. Press the ENTER button to select Off or On, then press ...the ENTER button. Picture Tint G50 Color Tone Detailed Settings Size Digital NR DNIe Active Color Color Gamut Position Reset R50 Cool1 16:9 Auto On On Normal OK 2...
User Manual (ENGLISH)
Page 33
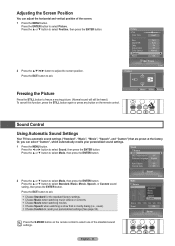
...the ◄ or ► button to select Standard, Music, Movie, Speech, or Custom sound setting, then press the ENTER button. Picture Tint G50 Color Tone Detailed Settings Size Digital NR DNIe Active Color Color Gamut Position Reset R50 Cool1 16:9 Auto On On Normal &#... 10kHz Reset OK Sound Enter Press the S.MODE button on the remote control. ▼ Move Enter Return Sound Control Using Automatic Sound Settings Your TV has automatic sound settings ("Standard", "Music", "Movie", "Speech", and "Custom") that is mostly dialog (i.e., news). Choose Custom to...
...the ◄ or ► button to select Standard, Music, Movie, Speech, or Custom sound setting, then press the ENTER button. Picture Tint G50 Color Tone Detailed Settings Size Digital NR DNIe Active Color Color Gamut Position Reset R50 Cool1 16:9 Auto On On Normal &#... 10kHz Reset OK Sound Enter Press the S.MODE button on the remote control. ▼ Move Enter Return Sound Control Using Automatic Sound Settings Your TV has automatic sound settings ("Standard", "Music", "Movie", "Speech", and "Custom") that is mostly dialog (i.e., news). Choose Custom to...
User Manual (ENGLISH)
Page 42
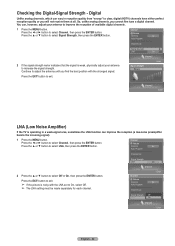
...EXIT button to improve the reception of available digital channels. 1 Press the MENU button. Press the EXIT button to exit. ➢ If the picture is weak, physically adjust your antenna to exit. Continue to adjust the antenna until you find the best position with the LNA set to increase...antenna to On, select Off. ➢ The LNA setting must be made separately for each channel. Channel Enter LNA (Low Noise Amplifier) If the TV is operating in reception quality from "snowy" to select Signal Strength, then press the ENTER button. Press the ▲ or ▼ button to clear...
...EXIT button to improve the reception of available digital channels. 1 Press the MENU button. Press the EXIT button to exit. ➢ If the picture is weak, physically adjust your antenna to exit. Continue to adjust the antenna until you find the best position with the LNA set to increase...antenna to On, select Off. ➢ The LNA setting must be made separately for each channel. Channel Enter LNA (Low Noise Amplifier) If the TV is operating in reception quality from "snowy" to select Signal Strength, then press the ENTER button. Press the ▲ or ▼ button to clear...
User Manual (ENGLISH)
Page 45
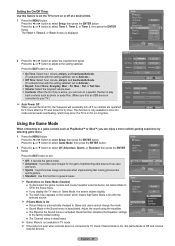
...area such as cave and room. Sports : It synchronizes image and sound when implementing fast moving pictures like sports games. Standard : Use this feature to set the TV to your TV.) ➢ Auto Power Off When you set to Activate.) Off Time: Select hour, minute,...Sleep Timer Off Timer 1 Timer 2 Timer 3 Off AdvenOtufrfe Game Mode SportsOff DLP® 3D/Dual-ViewStandaOrfdf ● Sound Mode in TV mode. ➢ If the picture is poor when external device is connected to select Setup, then press the ENTER button. Press the ▲ or ▼ button...
...area such as cave and room. Sports : It synchronizes image and sound when implementing fast moving pictures like sports games. Standard : Use this feature to set the TV to your TV.) ➢ Auto Power Off When you set to Activate.) Off Time: Select hour, minute,...Sleep Timer Off Timer 1 Timer 2 Timer 3 Off AdvenOtufrfe Game Mode SportsOff DLP® 3D/Dual-ViewStandaOrfdf ● Sound Mode in TV mode. ➢ If the picture is poor when external device is connected to select Setup, then press the ENTER button. Press the ▲ or ▼ button...
User Manual (ENGLISH)
Page 49
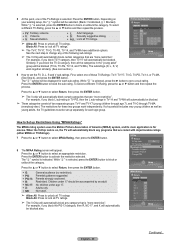
...to go to block or unblock the category. Children under age 17. The " " symbol will be displayed for these TV-Ratings: TV-Y, TV-Y7, TV-G, TV-PG, TV-14, or TV-MA (See Step 4), and press the ENTER button. Press the ENTER button to select an appropriate restriction. Parental guidance ... Press to set up Restrictions Using "MPAA Ratings" The MPAA rating system uses the Motion Picture Association of two separate groups: TV-Y and TV-Y7 (young children through age 7), and TV-G through TV-MA (everybody else). Press the ▲ or ▼ button to activate the restriction selected...
...to go to block or unblock the category. Children under age 17. The " " symbol will be displayed for these TV-Ratings: TV-Y, TV-Y7, TV-G, TV-PG, TV-14, or TV-MA (See Step 4), and press the ENTER button. Press the ENTER button to select an appropriate restriction. Parental guidance ... Press to set up Restrictions Using "MPAA Ratings" The MPAA rating system uses the Motion Picture Association of two separate groups: TV-Y and TV-Y7 (young children through age 7), and TV-G through TV-MA (everybody else). Press the ▲ or ▼ button to activate the restriction selected...
User Manual (ENGLISH)
Page 54
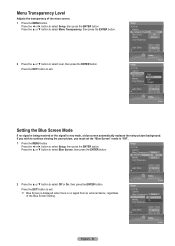
..., then press the ENTER button. Press the ◄ or ► button to "Off". 1 Press the MENU button. If you wish to continue viewing the poor picture, you must set the "Blue Screen" mode to select Setup, then press the ENTER button. Press the ◄ or ► button to exit. ➢ Blue... Screen is displayed when there is no signal is being received or the signal is very weak, a blue screen automatically replaces the noisy picture background. Menu Transparency Level Adjusts the transparency of the Blue Screen Setting.
..., then press the ENTER button. Press the ◄ or ► button to "Off". 1 Press the MENU button. If you wish to continue viewing the poor picture, you must set the "Blue Screen" mode to select Setup, then press the ENTER button. Press the ◄ or ► button to exit. ➢ Blue... Screen is displayed when there is no signal is being received or the signal is very weak, a blue screen automatically replaces the noisy picture background. Menu Transparency Level Adjusts the transparency of the Blue Screen Setting.


