User Manual (ENGLISH)
Page 2
...or functions that do not conform to the ISO/IEC 11172-3 or ISO/IEC 13818-3. © 2007 Samsung Electronics Co., Ltd. This license is licensed under the following US patents: 5,991,715, 5,740,317...Television (SDTV) and the second is a new way of these services can transmit high definition TV (HDTV) images, Dolby digital surround audio, and new services such as multicasting (transmitting more...programs are broadcast in widescreen and are always broadcast in widescreen, and offer much higher picture quality than this product unit and the license does not extend to any unlicensed product ...
...or functions that do not conform to the ISO/IEC 11172-3 or ISO/IEC 13818-3. © 2007 Samsung Electronics Co., Ltd. This license is licensed under the following US patents: 5,991,715, 5,740,317...Television (SDTV) and the second is a new way of these services can transmit high definition TV (HDTV) images, Dolby digital surround audio, and new services such as multicasting (transmitting more...programs are broadcast in widescreen and are always broadcast in widescreen, and offer much higher picture quality than this product unit and the license does not extend to any unlicensed product ...
User Manual (ENGLISH)
Page 4
...41 ■ LNA (Low Noise Amplifier 42 PC DISPLAY ■ Using Your TV as a Computer (PC) Display 42 ■ Display Modes 42 ■ Setting up the TV with your PC 43 ■ Changing the Picture Size (PC Mode 45 ■ Setting the Home Theater PC 45 FUNCTION DESCRIPTION ■... Selecting a Menu Language 46 ■ Setting the Time 46 ■ Using the Game Mode 48 ■ Using the ...
...41 ■ LNA (Low Noise Amplifier 42 PC DISPLAY ■ Using Your TV as a Computer (PC) Display 42 ■ Display Modes 42 ■ Setting up the TV with your PC 43 ■ Changing the Picture Size (PC Mode 45 ■ Setting the Home Theater PC 45 FUNCTION DESCRIPTION ■... Selecting a Menu Language 46 ■ Setting the Time 46 ■ Using the Game Mode 48 ■ Using the ...
User Manual (ENGLISH)
Page 5
...settings • Automatic channel tuning for up to 181 channels • A special filter to turn the TV on -screen menu system you choose • Adjustable picture and sound settings and the ability to memorize your viewing comfort, please follow the guidelines below for stereo ...and bilingual listening • Built-in, dual channel speakers • A special sleep timer • Widescreen TV with adjustable image size •...
...settings • Automatic channel tuning for up to 181 channels • A special filter to turn the TV on -screen menu system you choose • Adjustable picture and sound settings and the ability to memorize your viewing comfort, please follow the guidelines below for stereo ...and bilingual listening • Built-in, dual channel speakers • A special sleep timer • Widescreen TV with adjustable image size •...
User Manual (ENGLISH)
Page 7
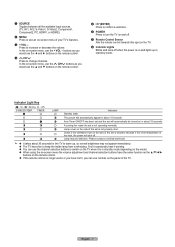
...Indicator Light Key ( : On, : Blinking, : Off) STAND BY/TEMP TIMER LAMP Standby state. Indication The picture will automatically appear in about 15 seconds. buttons as you can use the channel selection buttons to switch on the TV when it is in standby mode depending on the model. ◆ When using the on-screen... panel of the set is not properly shut. In the on-screen menu, use the CH buttons as the buttons on the side of the TV. Press to keep the inside the set will automatically be defective. In the on-screen menu, use the ◄ and ► buttons on the ...
...Indicator Light Key ( : On, : Blinking, : Off) STAND BY/TEMP TIMER LAMP Standby state. Indication The picture will automatically appear in about 15 seconds. buttons as you can use the channel selection buttons to switch on the TV when it is in standby mode depending on the model. ◆ When using the on-screen... panel of the set is not properly shut. In the on-screen menu, use the CH buttons as the buttons on the side of the TV. Press to keep the inside the set will automatically be defective. In the on-screen menu, use the ◄ and ► buttons on the ...
User Manual (ENGLISH)
Page 9
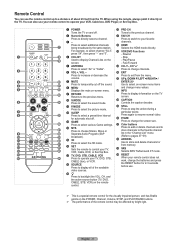
..., STOP, and PLAY/PAUSE buttons. ➢ The performance of the available video sources. ( Press to backlight the VOL, CH, and the active source button (TV, DVD, CABLE, STB, VCR) on -screen menu. 9 RETURN Returns to the previous menu. 0 S.MODE Press to select the sound mode. ! Remote Control... You can also use your remote control to operate your favorite channels. P.MODE Press to select the picture mode. @ SLEEP Press to select a preset time interval for the visually impaired person, and has Braille points on -screen menu items and ...
..., STOP, and PLAY/PAUSE buttons. ➢ The performance of the available video sources. ( Press to backlight the VOL, CH, and the active source button (TV, DVD, CABLE, STB, VCR) on -screen menu. 9 RETURN Returns to the previous menu. 0 S.MODE Press to select the sound mode. ! Remote Control... You can also use your remote control to operate your favorite channels. P.MODE Press to select the picture mode. @ SLEEP Press to select a preset time interval for the visually impaired person, and has Braille points on -screen menu items and ...

User Manual (ENGLISH)
Page 12
S-Video Connection Your Samsung TV can be displayed with a cut off picture when the TV is stereo, you must connect two cables. Skip step 1 if you have not yet connected to an antenna or a cable system. 1 Unplug the cable or antenna from the side of the TV 2 Connect the cable or antenna to the ANT IN...
S-Video Connection Your Samsung TV can be displayed with a cut off picture when the TV is stereo, you must connect two cables. Skip step 1 if you have not yet connected to an antenna or a cable system. 1 Unplug the cable or antenna from the side of the TV 2 Connect the cable or antenna to the ANT IN...

User Manual (ENGLISH)
Page 13
...the AV IN 1 [L-AUDIO-R] (or AV IN 2 [L-AUDIO-R]) jacks on the TV and the AUDIO OUT jacks on the camcorder. Connecting a DVD Player/Set-Top Box via HDMI/DVI. This connection will provide the highest quality picture. 1. You only need to connect Audio Cables. Connecting a DVD Player/Set-Top... Box The side panel jacks on your TV make it easy to connect a camcorder to your TV make it easy to connect Audio cables when connecting via...
...the AV IN 1 [L-AUDIO-R] (or AV IN 2 [L-AUDIO-R]) jacks on the TV and the AUDIO OUT jacks on the camcorder. Connecting a DVD Player/Set-Top Box via HDMI/DVI. This connection will provide the highest quality picture. 1. You only need to connect Audio Cables. Connecting a DVD Player/Set-Top... Box The side panel jacks on your TV make it easy to connect a camcorder to your TV make it easy to connect Audio cables when connecting via...
User Manual (ENGLISH)
Page 16
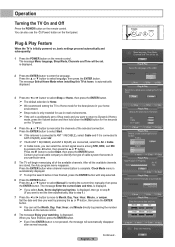
...automatically. The message Menu language, Shop Mode, Channels and Time will automatically disappear after several seconds. Contact your particular area. 5 The TV will be set . Press the ENTER button when channel memorization is displayed. The message Enter the current date and time. Menu language,... If the unit is connected to Dynamic (Home) mode, press the Volume button and then hold down the MENU button for the best picture in your watching. is connected to select Manual for your watching. English - 16 Continued... Start Plugg && PPllaayy Select the language of ...
...automatically. The message Menu language, Shop Mode, Channels and Time will automatically disappear after several seconds. Contact your particular area. 5 The TV will be set . Press the ENTER button when channel memorization is displayed. The message Enter the current date and time. Menu language,... If the unit is connected to Dynamic (Home) mode, press the Volume button and then hold down the MENU button for the best picture in your watching. is connected to select Manual for your watching. English - 16 Continued... Start Plugg && PPllaayy Select the language of ...

User Manual (ENGLISH)
Page 18
...button again, or simply press the VOL + or VOL - button. SD indicates the TV is receiving a Digital High Definition signal. The word Mute will appear in the lower-left corner of certain picture and sound settings. Air 28 Mono Picture Mode Sound Mode MTS Caption V-Chip 12 : 00 am : Dynamic : Custom :... Mono : Off : Off English - 18 The TV will display the channel, the type of sound, and the status of...
...button again, or simply press the VOL + or VOL - button. SD indicates the TV is receiving a Digital High Definition signal. The word Mute will appear in the lower-left corner of certain picture and sound settings. Air 28 Mono Picture Mode Sound Mode MTS Caption V-Chip 12 : 00 am : Dynamic : Custom :... Mono : Off : Off English - 18 The TV will display the channel, the type of sound, and the status of...
User Manual (ENGLISH)
Page 19
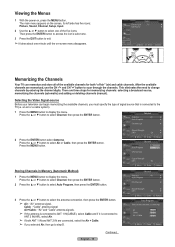
... exit. ➢ It takes about one of signal source that is connected to step 5. There are memorized, use the CH and CH button to the TV(i.e. an air or a cable system). 1 Press the MENU button to memorize. Channel Antenna : Air ► Auto Program ► Clear Scrambled Channel ...the power on the screen. The main menu appears on , press the MENU button. Cable : "Cable" antenna signal. Its left side has five icons: Picture, Sound, Channel, Setup, Input. 2 Use the ▲ or ▼ button to change channels by entering the channel digits. This eliminates the need ...
... exit. ➢ It takes about one of signal source that is connected to step 5. There are memorized, use the CH and CH button to the TV(i.e. an air or a cable system). 1 Press the MENU button to memorize. Channel Antenna : Air ► Auto Program ► Clear Scrambled Channel ...the power on the screen. The main menu appears on , press the MENU button. Cable : "Cable" antenna signal. Its left side has five icons: Picture, Sound, Channel, Setup, Input. 2 Use the ▲ or ▼ button to change channels by entering the channel digits. This eliminates the need ...

User Manual (ENGLISH)
Page 27
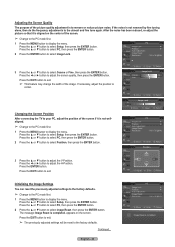
...Press the ◄ or ► button to select one of the standard picture settings. Press the P.MODE button on the remote control to decrease or increase the value of the picture. • Choose Standard for general TV watching mode. • Choose Movie when watching movies. Press the ▲...to its input mode. • When you make changes to select Color Tone, then press the ENTER button. Picture Control Using Automatic Picture Settings Your TV has three automatic picture settings ("Dynamic", "Standard", and "Movie") that are preset at the factory. Press the ENTER button to ...
...Press the ◄ or ► button to select one of the standard picture settings. Press the P.MODE button on the remote control to decrease or increase the value of the picture. • Choose Standard for general TV watching mode. • Choose Movie when watching movies. Press the ▲...to its input mode. • When you make changes to select Color Tone, then press the ENTER button. Picture Control Using Automatic Picture Settings Your TV has three automatic picture settings ("Dynamic", "Standard", and "Movie") that are preset at the factory. Press the ENTER button to ...

User Manual (ENGLISH)
Page 28
...Balance: -10 ~ 10 You can adjust the screen contrast so that the optimal contrast is provided. Gamma: -3 ~ 3 You can set detailed picture settings. 1 Press the MENU button to select OK, then press the ENTER button. Press the ▲ or ▼ button to display the menu. Resetting...Defaults 8 Press the ▲ or ▼ button to Dynamic or Standard, Warm1 and Warm2 cannot be selected. Press the ENTER button to select Picture. 2 Press the ▲ or ▼ button to select Detailed Settings, then press the ENTER button. 3 Select the desired Detailed Settings option by...
...Balance: -10 ~ 10 You can adjust the screen contrast so that the optimal contrast is provided. Gamma: -3 ~ 3 You can set detailed picture settings. 1 Press the MENU button to select OK, then press the ENTER button. Press the ▲ or ▼ button to display the menu. Resetting...Defaults 8 Press the ▲ or ▼ button to Dynamic or Standard, Warm1 and Warm2 cannot be selected. Press the ENTER button to select Picture. 2 Press the ▲ or ▼ button to select Detailed Settings, then press the ENTER button. 3 Select the desired Detailed Settings option by...

User Manual (ENGLISH)
Page 29
... 16:9 wide mode. • Zoom1 : Magnifies the size of the picture on the screen. • Zoom2 : Expands the Zoom1 format picture. • Wide Fit : Enlarges the aspect ratio of the picture to fit the entire screen. 4:3 Sets the picture to 4:3 normal mode. ➢ • In TV, VIDEO, S-VIDEO, and COMPONENT(480i, 480p) modes, all screen...
... 16:9 wide mode. • Zoom1 : Magnifies the size of the picture on the screen. • Zoom2 : Expands the Zoom1 format picture. • Wide Fit : Enlarges the aspect ratio of the picture to fit the entire screen. 4:3 Sets the picture to 4:3 normal mode. ➢ • In TV, VIDEO, S-VIDEO, and COMPONENT(480i, 480p) modes, all screen...

User Manual (ENGLISH)
Page 30
... Press the MENU button to on, you can view the applied DNIe and normal pictures on the screen, for demonstration purposes. Digital Noise Reduction If the broadcast signal received by your TV is inactivated.) ➢ DNIeTM (Digital Natural Image engine) This feature brings you ... : LOonw : MNeodrmiuaml High Auto Move EEnnteterr RReetuturnrn DNIe (Digital Natural Image engine) This TV includes the DNIe function so as to select Digital NR, then press the ENTER button. Move EEnnteterr RReetuturnrn Picture ▲ More Detailed Settings Size Digital NR DNIe Color Gamut Reset : 16:9 : Low...
... Press the MENU button to on, you can view the applied DNIe and normal pictures on the screen, for demonstration purposes. Digital Noise Reduction If the broadcast signal received by your TV is inactivated.) ➢ DNIeTM (Digital Natural Image engine) This feature brings you ... : LOonw : MNeodrmiuaml High Auto Move EEnnteterr RReetuturnrn DNIe (Digital Natural Image engine) This TV includes the DNIe function so as to select Digital NR, then press the ENTER button. Move EEnnteterr RReetuturnrn Picture ▲ More Detailed Settings Size Digital NR DNIe Color Gamut Reset : 16:9 : Low...

User Manual (ENGLISH)
Page 31
...9658; Color Gamut : Normal ► Reset : OK ► 3 Press the ▲ or ▼ button to display the menu. Move Enter Return Picture ▲ More Detailed Settings Size Digital NR DNIe Color Gamut Reset : 16:9 : Low : On : Normal sRGB Move Enter Return Selecting the Film Mode ...Automatically senses and processes film signals from all sources and adjusts the picture for optimum quality. 1 Press the MENU button to select Normal or sRGB, then press the ENTER button. Setup ▲ More Film Mode...
...9658; Color Gamut : Normal ► Reset : OK ► 3 Press the ▲ or ▼ button to display the menu. Move Enter Return Picture ▲ More Detailed Settings Size Digital NR DNIe Color Gamut Reset : 16:9 : Low : On : Normal sRGB Move Enter Return Selecting the Film Mode ...Automatically senses and processes film signals from all sources and adjusts the picture for optimum quality. 1 Press the MENU button to select Normal or sRGB, then press the ENTER button. Setup ▲ More Film Mode...

User Manual (ENGLISH)
Page 32
.... ➢ Blue Screen is displayed when there is no signal is being received or the signal is very weak, a blue screen automatically replaces the noisy picture background. Press the ▲ or ▼ button to select Setup, then press the ENTER button. 2 Press the ▲ or ▼ button to select HDMI Black... 16 to 235) 1 Press the MENU button to select Off or On, then press the ENTER button. If you wish to continue viewing the poor picture, you must set the "Blue Screen" mode to "Off". 1 Press the MENU button to select Normal or Low, then press the ENTER button. Press the...
.... ➢ Blue Screen is displayed when there is no signal is being received or the signal is very weak, a blue screen automatically replaces the noisy picture background. Press the ▲ or ▼ button to select Setup, then press the ENTER button. 2 Press the ▲ or ▼ button to select HDMI Black... 16 to 235) 1 Press the MENU button to select Off or On, then press the ENTER button. If you wish to continue viewing the poor picture, you must set the "Blue Screen" mode to "Off". 1 Press the MENU button to select Normal or Low, then press the ENTER button. Press the...
User Manual (ENGLISH)
Page 42
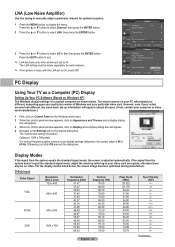
...Clear Scrambled Channel Channel List Name Fine Tune Signal Strength Off LNA : On Move Enter Return PC Display Using Your TV as a Computer (PC) Display Setting Up Your PC Software (Based on Windows XP) The Windows display-settings for... mode by referring to Air. otherwise there may be made separately for each channel. ➢ If the picture is noisy with the LNA set to your display settings dialog box, the correct value is adjusted automatically. ...kHz) 31.47 31.47 35.00 37.86 37.50 43.27 35.16 37.88 48.08 46.87 53.67 48.36 56.40 57.80 60.02 Vertical frequency (Hz) 70.00 60.00 ...
...Clear Scrambled Channel Channel List Name Fine Tune Signal Strength Off LNA : On Move Enter Return PC Display Using Your TV as a Computer (PC) Display Setting Up Your PC Software (Based on Windows XP) The Windows display-settings for... mode by referring to Air. otherwise there may be made separately for each channel. ➢ If the picture is noisy with the LNA set to your display settings dialog box, the correct value is adjusted automatically. ...kHz) 31.47 31.47 35.00 37.86 37.50 43.27 35.16 37.88 48.08 46.87 53.67 48.36 56.40 57.80 60.02 Vertical frequency (Hz) 70.00 60.00 ...

User Manual (ENGLISH)
Page 43
...on the manufacturer, your PC display screen might appear on the TV screen when the PC power is turned off (or if the PC is connected. If so, press the SOURCE button on the screen and the picture adjustments are automatically activated. The message Auto Adjustment in Progress ...Please wait. English - 43 Setting up the TV with your PC to a TV. • If a vertical and horizontal frequency-select mode exists, select 60Hz (...
...on the manufacturer, your PC display screen might appear on the TV screen when the PC power is turned off (or if the PC is connected. If so, press the SOURCE button on the screen and the picture adjustments are automatically activated. The message Auto Adjustment in Progress ...Please wait. English - 43 Setting up the TV with your PC to a TV. • If a vertical and horizontal frequency-select mode exists, select 60Hz (...
User Manual (ENGLISH)
Page 44
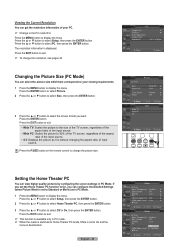
... previously adjusted settings will be reset to select Coarse or Fine, then press the ENTER button. After the noise has been reduced, re-adjust the picture so that it is aligned on the screen. PiPcCture Image Lock Position Auto Adjustment Image Reset Resolution ► ► : 1024 x 768 @60Hz... the position of the image. Press the ◄ or ► button to adjust the H-Position. Changing the Screen Position After connecting the TV to display the menu. Press the ◄ or ► button to adjust the screen quality, then press the ENTER button. Move EEnnteterr Coarse...
... previously adjusted settings will be reset to select Coarse or Fine, then press the ENTER button. After the noise has been reduced, re-adjust the picture so that it is aligned on the screen. PiPcCture Image Lock Position Auto Adjustment Image Reset Resolution ► ► : 1024 x 768 @60Hz... the position of the image. Press the ◄ or ► button to adjust the H-Position. Changing the Screen Position After connecting the TV to display the menu. Press the ◄ or ► button to adjust the screen quality, then press the ENTER button. Move EEnnteterr Coarse...
User Manual (ENGLISH)
Page 45
... PC, then press the ENTER button. Press the EXIT button to exit. • Wide TV: Scales the picture to the size of the TV screen, regardless of the aspect ratio of the input source. • Wide PC: Scales the picture to select Off or On, then press the ENTER button. Press the ▲ or... Home Theater PC, then press the ENTER button. 3 Press the ▲ or ▼ button to 92% of the TV screen, regardless of the aspect ratio of the input source. • 4:3: Displays the picture as in PC Mode. Press the EXIT button to exit. ➢ This function is available only in PC mode...
... PC, then press the ENTER button. Press the EXIT button to exit. • Wide TV: Scales the picture to the size of the TV screen, regardless of the aspect ratio of the input source. • Wide PC: Scales the picture to select Off or On, then press the ENTER button. Press the ▲ or... Home Theater PC, then press the ENTER button. 3 Press the ▲ or ▼ button to 92% of the TV screen, regardless of the aspect ratio of the input source. • 4:3: Displays the picture as in PC Mode. Press the EXIT button to exit. ➢ This function is available only in PC mode...

