User Manual (ENGLISH)
Page 4
... ■ Display Modes 42 ■ Setting up the TV with your PC 43 ■ Changing the Picture Size (PC Mode 45 ■ Setting the Home Theater PC 45 FUNCTION DESCRIPTION ■ Selecting a Menu Language 46 ■ Setting the Time 46 ■ Using the Game Mode 48 ■ Using... Lists 39 ■ Setting the Default Channel List Mode 40 ■ Labeling Channels - Digital 53 ■ Menu Transparency Level 54 ■ Adjusting the Melody Sound 54 ■ Setting the Function Help 54 ■ Upgrading the Software 55 APPENDIX ■ Identifying Problems 56 ■ Replacing ...
... ■ Display Modes 42 ■ Setting up the TV with your PC 43 ■ Changing the Picture Size (PC Mode 45 ■ Setting the Home Theater PC 45 FUNCTION DESCRIPTION ■ Selecting a Menu Language 46 ■ Setting the Time 46 ■ Using the Game Mode 48 ■ Using... Lists 39 ■ Setting the Default Channel List Mode 40 ■ Labeling Channels - Digital 53 ■ Menu Transparency Level 54 ■ Adjusting the Melody Sound 54 ■ Setting the Function Help 54 ■ Upgrading the Software 55 APPENDIX ■ Identifying Problems 56 ■ Replacing ...
User Manual (ENGLISH)
Page 5
...-use on-screen menu system you can access from right side panel or remote control • Automatic timer to turn the TV on and off at any time you choose • Adjustable picture and sound settings and the ability to keep it away from the wall (more than 10cm / 4inches) for ventilation purposes...
...-use on-screen menu system you can access from right side panel or remote control • Automatic timer to turn the TV on and off at any time you choose • Adjustable picture and sound settings and the ability to keep it away from the wall (more than 10cm / 4inches) for ventilation purposes...
User Manual (ENGLISH)
Page 7
...be turned on the remote control. 4 CH Press to change channels. Indication The picture will automatically appear in about 30 seconds for the TV to warm up in about 15 seconds. Lamp may not appear immediately. ◆ The TV has a fan to keep the inside the set is too high, the power will... hear it working. ◆ You can use the channel selection buttons to switch on the TV when it is in standby mode depending on the model. ◆ When using the on-screen menu the volume adjustment and channel selection buttons have the same function as you can use the + VOL - English...
...be turned on the remote control. 4 CH Press to change channels. Indication The picture will automatically appear in about 30 seconds for the TV to warm up in about 15 seconds. Lamp may not appear immediately. ◆ The TV has a fan to keep the inside the set is too high, the power will... hear it working. ◆ You can use the channel selection buttons to switch on the TV when it is in standby mode depending on the model. ◆ When using the on-screen menu the volume adjustment and channel selection buttons have the same function as you can use the + VOL - English...
User Manual (ENGLISH)
Page 16
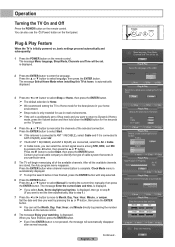
...and subsequently: 1 Press the POWER button on the TV panel. 4 Press the ▲ or ▼ button to Month, Day, Year, Hour, Minute, or am /pm -- -- -- Clock Mode Manual Auto Move Enter Skip Plug & Play Enter the current date and time. Adjust Move Enter Skip Enjoy your location. The message Menu... of the OSD. Air Cable Air + Cable Start Start Start Move Enter Skip Plug & Play Selects a cable signal type for the best picture in your home environment. ➢ Shop mode is displayed, then go to step 9. (If you can also use in Progress.
...and subsequently: 1 Press the POWER button on the TV panel. 4 Press the ▲ or ▼ button to Month, Day, Year, Hour, Minute, or am /pm -- -- -- Clock Mode Manual Auto Move Enter Skip Plug & Play Enter the current date and time. Adjust Move Enter Skip Enjoy your location. The message Menu... of the OSD. Air Cable Air + Cable Start Start Start Move Enter Skip Plug & Play Selects a cable signal type for the best picture in your home environment. ➢ Shop mode is displayed, then go to step 9. (If you can also use in Progress.

User Manual (ENGLISH)
Page 18
... tune to one channel, then use the PRE-CH button to quickly alternate between two channels that broadcast a digital signal. Adjusting the Volume Press the VOL + or VOL - The TV will switch to select the second channel. The word Mute will display the channel, the type of sound, and the status... of certain picture and sound settings. Then use the number button to the last channel viewed. ➢ To quickly switch between ...
... tune to one channel, then use the PRE-CH button to quickly alternate between two channels that broadcast a digital signal. Adjusting the Volume Press the VOL + or VOL - The TV will switch to select the second channel. The word Mute will display the channel, the type of sound, and the status... of certain picture and sound settings. Then use the number button to the last channel viewed. ➢ To quickly switch between ...

User Manual (ENGLISH)
Page 27
Picture Control Using Automatic Picture Settings Your TV has three automatic picture settings ("Dynamic", "Standard", and "Movie") that are preset at the factory. You can activate a Picture Setting by making a selection from the menu. 1 Press the MENU button to select Mode. Press the ENTER button to select Picture. 2... ▼ More : Dynamic ► 100 45 75 55 R50 : Cool1 ► Move Enter Return Contrast Move Adjust 100 Return 5 Press the ENTER button to return to Picture. 6 Press the ▲ or ▼ button to Contrast, Brightness, Sharpness, Color, or Tint, OSD color ...
Picture Control Using Automatic Picture Settings Your TV has three automatic picture settings ("Dynamic", "Standard", and "Movie") that are preset at the factory. You can activate a Picture Setting by making a selection from the menu. 1 Press the MENU button to select Mode. Press the ENTER button to select Picture. 2... ▼ More : Dynamic ► 100 45 75 55 R50 : Cool1 ► Move Enter Return Contrast Move Adjust 100 Return 5 Press the ENTER button to return to Picture. 6 Press the ▲ or ▼ button to Contrast, Brightness, Sharpness, Color, or Tint, OSD color ...

User Manual (ENGLISH)
Page 28
... until you reach the optimal setting. White Balance: -10 ~ 10 You can adjust the screen contrast so that the optimal contrast is provided. Gamma: -3 ~ 3 You can adjust the Primary Color Intensity. Picture ▲ More Detailed Settings ► Size : 16:9 ► Digital NR : Low ...press the ENTER button. ➢ When the picture mode is set to adjust the screen depth. Dynamic Contrast: Off/Low/Medium/High You can adjust the screen contrast so that the optimal contrast is provided. Resetting the Picture Settings to the Factory Defaults 8 Press the...
... until you reach the optimal setting. White Balance: -10 ~ 10 You can adjust the screen contrast so that the optimal contrast is provided. Gamma: -3 ~ 3 You can adjust the Primary Color Intensity. Picture ▲ More Detailed Settings ► Size : 16:9 ► Digital NR : Low ...press the ENTER button. ➢ When the picture mode is set to adjust the screen depth. Dynamic Contrast: Off/Low/Medium/High You can adjust the screen contrast so that the optimal contrast is provided. Resetting the Picture Settings to the Factory Defaults 8 Press the...

User Manual (ENGLISH)
Page 29
...Wide Fit 4:3 EEnnteterr Size RReetuturnrn ▲ Positon Reset ▼ Move Adjust Return 16:9 Sets the picture to 16:9. Wide Fit Enlarges the aspect ratio of the picture to fit the entire screen. • 4:3 : Sets the picture to display the menu. Zoom2 The screen size when the Zoom1 screen is... vertically enlarged. Press the ENTER button to select Picture. 2 Press the ▲ or ▼ button to select Size, then press the ENTER button. 3 Press the ▲ or ▼ button to 4:3 normal mode. ➢ • In TV, VIDEO, S-VIDEO, and COMPONENT(480i, 480p) modes,...
...Wide Fit 4:3 EEnnteterr Size RReetuturnrn ▲ Positon Reset ▼ Move Adjust Return 16:9 Sets the picture to 16:9. Wide Fit Enlarges the aspect ratio of the picture to fit the entire screen. • 4:3 : Sets the picture to display the menu. Zoom2 The screen size when the Zoom1 screen is... vertically enlarged. Press the ENTER button to select Picture. 2 Press the ▲ or ▼ button to select Size, then press the ENTER button. 3 Press the ▲ or ▼ button to 4:3 normal mode. ➢ • In TV, VIDEO, S-VIDEO, and COMPONENT(480i, 480p) modes,...

User Manual (ENGLISH)
Page 31
...On ► SW Upgrade ► 3 Press the ▲ or ▼ button to select Film Mode, then press the ENTER button. Move Enter Return Picture ▲ More Detailed Settings Size Digital NR DNIe Color Gamut Reset : 16:9 : Low : On : Normal sRGB Move Enter Return Selecting the Film Mode ...Automatically senses and processes film signals from all sources and adjusts the picture for optimum quality. 1 Press the MENU button to select Color Gamut, then press the ENTER button. Press the ENTER button to select...
...On ► SW Upgrade ► 3 Press the ▲ or ▼ button to select Film Mode, then press the ENTER button. Move Enter Return Picture ▲ More Detailed Settings Size Digital NR DNIe Color Gamut Reset : 16:9 : Low : On : Normal sRGB Move Enter Return Selecting the Film Mode ...Automatically senses and processes film signals from all sources and adjusts the picture for optimum quality. 1 Press the MENU button to select Color Gamut, then press the ENTER button. Press the ENTER button to select...
User Manual (ENGLISH)
Page 42
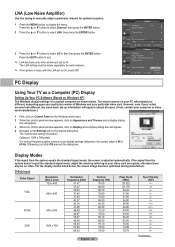
LNA (Low Noise Amplifier) Use fine tuning to manually adjust a particular channel for each channel. ➢ If the picture is set to Air. Press the ▲ or ▼ button to select Channel, then press ...Program Clear Scrambled Channel Channel List Name Fine Tune Signal Strength Off LNA : On Move Enter Return PC Display Using Your TV as a Computer (PC) Display Setting Up Your PC Software (Based on Display and a display dialog-box will apply ... (kHz) 31.47 31.47 35.00 37.86 37.50 43.27 35.16 37.88 48.08 46.87 53.67 48.36 56.40 57.80 60.02 Vertical frequency (Hz) 70.00 60.00 66....
LNA (Low Noise Amplifier) Use fine tuning to manually adjust a particular channel for each channel. ➢ If the picture is set to Air. Press the ▲ or ▼ button to select Channel, then press ...Program Clear Scrambled Channel Channel List Name Fine Tune Signal Strength Off LNA : On Move Enter Return PC Display Using Your TV as a Computer (PC) Display Setting Up Your PC Software (Based on Display and a display dialog-box will apply ... (kHz) 31.47 31.47 35.00 37.86 37.50 43.27 35.16 37.88 48.08 46.87 53.67 48.36 56.40 57.80 60.02 Vertical frequency (Hz) 70.00 60.00 66....

User Manual (ENGLISH)
Page 43
... Windows.) Check your PC instruction book for information about connecting your PC How to Auto Adjust Use the Auto Adjust function to exit. The function also automatically fine-tunes the settings and adjusts the frequency values and positions. ➢ This function does not work in DVI-Digital ... video signals it receives from the PC. If so, press the SOURCE button on the screen and the picture adjustments are automatically activated. Setting up the TV with your PC to a TV. • If a vertical and horizontal frequency-select mode exists, select 60Hz (vertical) and 48.4kHz (horizontal). ...
... Windows.) Check your PC instruction book for information about connecting your PC How to Auto Adjust Use the Auto Adjust function to exit. The function also automatically fine-tunes the settings and adjusts the frequency values and positions. ➢ This function does not work in DVI-Digital ... video signals it receives from the PC. If so, press the SOURCE button on the screen and the picture adjustments are automatically activated. Setting up the TV with your PC to a TV. • If a vertical and horizontal frequency-select mode exists, select 60Hz (vertical) and 48.4kHz (horizontal). ...
User Manual (ENGLISH)
Page 44
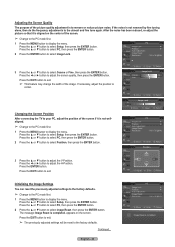
...RReetuturnrn PiPcCture Image Lock Position Auto Adjustment Image Reset Resolution ► ► : 1024 x 768 @60Hz Move EEnnteterr RReetuturnrn Image Reset is to display the menu. Adjusting the Screen Quality The purpose of the picture quality adjustment is completed. Press the ◄... the Screen Position After connecting the TV to display the menu. Move EEnnteterr Coarse Fine ImaPgicetuLroeck RReettuurrnn 50 57 Move EEnnteterr Image Lock Coarse Move Adjust RReettuurrnn 50 Return PiPcCture Image Lock Position Auto Adjustment Image Reset Resolution ► ►...
...RReetuturnrn PiPcCture Image Lock Position Auto Adjustment Image Reset Resolution ► ► : 1024 x 768 @60Hz Move EEnnteterr RReetuturnrn Image Reset is to display the menu. Adjusting the Screen Quality The purpose of the picture quality adjustment is completed. Press the ◄... the Screen Position After connecting the TV to display the menu. Move EEnnteterr Coarse Fine ImaPgicetuLroeck RReettuurrnn 50 57 Move EEnnteterr Image Lock Coarse Move Adjust RReettuurrnn 50 Return PiPcCture Image Lock Position Auto Adjustment Image Reset Resolution ► ►...
User Manual (ENGLISH)
Page 45
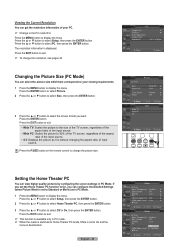
...Press the P.SIZE button on the remote control to change the resolution, see pages 43. PiPcCture Image Lock Position Auto Adjustment Image Reset Resolution ► ► : 1024 x 768 @60Hz Move Enter RReettuurrnn Picture ▲ More Detailed Settings ► Size : Wide PC ► Digital NR : Low ► DNIe :... Press the EXIT button to exit. • Wide TV: Scales the picture to the size of the TV screen, regardless of the aspect ratio of the input source. • Wide PC: Scales the picture to 92% of the TV screen, regardless of the aspect ratio of the input source...
...Press the P.SIZE button on the remote control to change the resolution, see pages 43. PiPcCture Image Lock Position Auto Adjustment Image Reset Resolution ► ► : 1024 x 768 @60Hz Move Enter RReettuurrnn Picture ▲ More Detailed Settings ► Size : Wide PC ► Digital NR : Low ► DNIe :... Press the EXIT button to exit. • Wide TV: Scales the picture to the size of the TV screen, regardless of the aspect ratio of the input source. • Wide PC: Scales the picture to 92% of the TV screen, regardless of the aspect ratio of the input source...

User Manual (ENGLISH)
Page 48
... then press the ENTER button. Reset function initializes the Equalizer settings to TV, check if Game Mode is On. Adjust the sound using the Equalizer. • The Reset in the Sound ...English : Off : OAdffventure Sports Standard Move Enter Return Using the 3D Function For the information of pictures and sound with sports games. Standard : Use this setting for general game play. ...the ENTER button. 3 Press the ▲ or ▼ button to www.samsung.com → 'PRODUCTS' → 'HDTV' → 'DLP TV' ➢ Click "3D Information" English - 48 Set Game Mode to display...
... then press the ENTER button. Reset function initializes the Equalizer settings to TV, check if Game Mode is On. Adjust the sound using the Equalizer. • The Reset in the Sound ...English : Off : OAdffventure Sports Standard Move Enter Return Using the 3D Function For the information of pictures and sound with sports games. Standard : Use this setting for general game play. ...the ENTER button. 3 Press the ▲ or ▼ button to www.samsung.com → 'PRODUCTS' → 'HDTV' → 'DLP TV' ➢ Click "3D Information" English - 48 Set Game Mode to display...
User Manual (ENGLISH)
Page 56
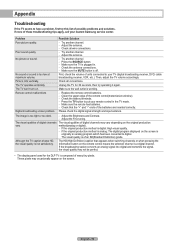
...Samsung service center. Check that appears when switching channels or when pressing the Information button on the screen is a digital channel. Adjust the Brightness and Contrast. - The visual quality is too light or too dark. - These pixels may occasionally appear on . Poor sound quality. Picture rolls vertically. The TV... won't turn on the screen. Possible Solution - Check all connections. Adjust the antenna. - Then, adjust the TV volume accordingly. Appendix Troubleshooting If the TV seems to have a problem, ...
...Samsung service center. Check that appears when switching channels or when pressing the Information button on the screen is a digital channel. Adjust the Brightness and Contrast. - The visual quality is too light or too dark. - These pixels may occasionally appear on . Poor sound quality. Picture rolls vertically. The TV... won't turn on the screen. Possible Solution - Check all connections. Adjust the antenna. - Then, adjust the TV volume accordingly. Appendix Troubleshooting If the TV seems to have a problem, ...


