User Manual (ENGLISH)
Page 4
...9632; Identifying Problems 56 ■ Replacing the Lamp 57 ■ Cleaning and Maintaining Your TV 58 ■ Using Your TV in the Remote Control 10 CONNECTIONS ■ Connecting VHF and UHF Antennas 10 ■ Connecting Cable TV 11 ■ Connecting a VCR 12 ■ Connecting a Camcorder 13 ■ Connecting...Display Modes 42 ■ Setting up the TV with your PC 43 ■ Changing the Picture Size (PC Mode 45 ■ Setting the Home Theater PC 45 FUNCTION DESCRIPTION ■ Selecting a Menu Language 46 ■ Setting the Time 46 ■ Using the Game Mode 48 ■...
...9632; Identifying Problems 56 ■ Replacing the Lamp 57 ■ Cleaning and Maintaining Your TV 58 ■ Using Your TV in the Remote Control 10 CONNECTIONS ■ Connecting VHF and UHF Antennas 10 ■ Connecting Cable TV 11 ■ Connecting a VCR 12 ■ Connecting a Camcorder 13 ■ Connecting...Display Modes 42 ■ Setting up the TV with your PC 43 ■ Changing the Picture Size (PC Mode 45 ■ Setting the Home Theater PC 45 FUNCTION DESCRIPTION ■ Selecting a Menu Language 46 ■ Setting the Time 46 ■ Using the Game Mode 48 ■...
User Manual (ENGLISH)
Page 5
...When installing the product, make sure to keep it has these special features: • Easy-to-operate remote control • Easy-to reduce or eliminate reception problems • Fine tuning control for the sharpest picture possible • A built-in multi-channel sound decoder for stereo and bilingual listening ...8226; Built-in a shortened component life and degraded performance. In addition, it away from right side panel or remote control • Automatic timer to turn the TV on and off at any time you choose • Adjustable picture and sound settings and the ability to memorize ...
...When installing the product, make sure to keep it has these special features: • Easy-to-operate remote control • Easy-to reduce or eliminate reception problems • Fine tuning control for the sharpest picture possible • A built-in multi-channel sound decoder for stereo and bilingual listening ...8226; Built-in a shortened component life and degraded performance. In addition, it away from right side panel or remote control • Automatic timer to turn the TV on and off at any time you choose • Adjustable picture and sound settings and the ability to memorize ...

User Manual (ENGLISH)
Page 6
English - 6 Continued... To use the more advanced features, you must use the remote control. ➢ The product color and shape may vary depending on -screen menu. Checking Parts Owner's Instructions Remote Control (BP59-00124)/ AAA Batteries Warranty Card/ Registration Card/ Safety Guide Manual/ Quick Guide Manual ...8226; Use authorized lamps only. The company cannot guarantee the quality of the Panel The buttons on the lower-right panel control your TV's basic features, including the on the model. D-Sub Cable PC Audio Cable HDMI Cable HDMI/DVI Cable Optical Cable 1Stereo...
English - 6 Continued... To use the more advanced features, you must use the remote control. ➢ The product color and shape may vary depending on -screen menu. Checking Parts Owner's Instructions Remote Control (BP59-00124)/ AAA Batteries Warranty Card/ Registration Card/ Safety Guide Manual/ Quick Guide Manual ...8226; Use authorized lamps only. The company cannot guarantee the quality of the Panel The buttons on the lower-right panel control your TV's basic features, including the on the model. D-Sub Cable PC Audio Cable HDMI Cable HDMI/DVI Cable Optical Cable 1Stereo...
User Manual (ENGLISH)
Page 7
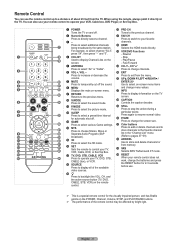
.... buttons as you would use the ▲ and ▼ buttons on the remote control. 5 (ENTER) Press to confirm a selection. 6 POWER Press to turn the TV on and off. 7 Remote Control Sensor Aim the remote control towards this spot on and lights up , so normal brightness may be turned on... the remote control. 4 CH Press to change channels. Indicator Light Key ( : On, : Blinking, : Off) STAND ...
.... buttons as you would use the ▲ and ▼ buttons on the remote control. 5 (ENTER) Press to confirm a selection. 6 POWER Press to turn the TV on and off. 7 Remote Control Sensor Aim the remote control towards this spot on and lights up , so normal brightness may be turned on... the remote control. 4 CH Press to change channels. Indicator Light Key ( : On, : Blinking, : Off) STAND ...
User Manual (ENGLISH)
Page 9
... l ADD/DEL Use to store and delete channels to/ from the menu. You can use your remote control to operate your VCR, Cable box, DVD Player, or Set-Top Box. 1 POWER Turns the TV on -screen menu items and change the screen size. m SRS Selects SRS TruSurround XT mode. Press... ( Press to backlight the VOL, CH, and the active source button (TV, DVD, CABLE, STB, VCR) on the screen. 5 ANTENNA Press to resume normal video. Remote Control You can also use the remote control up to a distance of about 23 feet from the TV. For example, to select channel "54-3", press "54", then press ...
... l ADD/DEL Use to store and delete channels to/ from the menu. You can use your remote control to operate your VCR, Cable box, DVD Player, or Set-Top Box. 1 POWER Turns the TV on -screen menu items and change the screen size. m SRS Selects SRS TruSurround XT mode. Press... ( Press to backlight the VOL, CH, and the active source button (TV, DVD, CABLE, STB, VCR) on the screen. 5 ANTENNA Press to resume normal video. Remote Control You can also use the remote control up to a distance of about 23 feet from the TV. For example, to select channel "54-3", press "54", then press ...

User Manual (ENGLISH)
Page 10
... and store them in a cool and dry place if you must combine the two antenna signals before connecting the antennas to the TV. Installing Batteries in the Remote Control 1 Lift the cover at most electronics shops). 1 Connect both antenna leads to the combiner. 2 Plug the combiner into the ANT...300 Ω Flat Twin Leads" below . 1 Place the wires from the TV. (Assuming typical TV usage, the batteries last for your TV (one VHF and one year.) ➢ If the remote control doesn't work, check the following 1. The remote control can be using an off-air antenna (such as a roof antenna or ...
... and store them in a cool and dry place if you must combine the two antenna signals before connecting the antennas to the TV. Installing Batteries in the Remote Control 1 Lift the cover at most electronics shops). 1 Connect both antenna leads to the combiner. 2 Plug the combiner into the ANT...300 Ω Flat Twin Leads" below . 1 Place the wires from the TV. (Assuming typical TV usage, the batteries last for your TV (one VHF and one year.) ➢ If the remote control doesn't work, check the following 1. The remote control can be using an off-air antenna (such as a roof antenna or ...
User Manual (ENGLISH)
Page 16
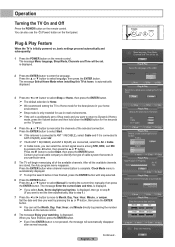
...the ENTER button. ➢ The default selection is only intended for five seconds on the remote control. 8 The message Enjoy your home environment. ➢ Shop mode is Home. ➢ We recommend setting the TV to daylight saving time. English - 16 Continued... Language English Español Franç...press the Volume button and then hold down the MENU button for use the (Power) button on the remote control. is displayed. ➢ If you want by pressing the number buttons on the TV panel. 4 Press the ▲ or ▼ button to enter the language. The message Enter ...
...the ENTER button. ➢ The default selection is only intended for five seconds on the remote control. 8 The message Enjoy your home environment. ➢ Shop mode is Home. ➢ We recommend setting the TV to daylight saving time. English - 16 Continued... Language English Español Franç...press the Volume button and then hold down the MENU button for use the (Power) button on the remote control. is displayed. ➢ If you want by pressing the number buttons on the TV panel. 4 Press the ▲ or ▼ button to enter the language. The message Enter ...

User Manual (ENGLISH)
Page 18
... button is receiving a Standard Definition signal. ➢ For quick channel change, press the number buttons, then press the ENTER button. The TV will switch to the last channel viewed. ➢ To quickly switch between two channels that are far apart, tune to one channel, then...Off : Off English - 18 SD indicates the TV is used to quickly alternate between them. For example, for Channel 7-1, press 7, then -, and then 1. ➢ HD indicates the TV is receiving a Digital High Definition signal. Press the INFO button on the remote control. Press the INFO button once more or wait ...
... button is receiving a Standard Definition signal. ➢ For quick channel change, press the number buttons, then press the ENTER button. The TV will switch to the last channel viewed. ➢ To quickly switch between two channels that are far apart, tune to one channel, then...Off : Off English - 18 SD indicates the TV is used to quickly alternate between them. For example, for Channel 7-1, press 7, then -, and then 1. ➢ HD indicates the TV is receiving a Digital High Definition signal. Press the INFO button on the remote control. Press the INFO button once more or wait ...

User Manual (ENGLISH)
Page 20
... ➢ STD, HRC, and IRC identify various types of cable TV systems. Contact your local cable company to identify the type of cable system that channel directly by using the number buttons on the remote control. ➢ • All available DTV and analog channels are automatically... stored in order to memorize channels. message will be connected to an antenna/cable in memory. • It takes approximately 3 to 10 minutes to receive digital TV signals. When pressing...
... ➢ STD, HRC, and IRC identify various types of cable TV systems. Contact your local cable company to identify the type of cable system that channel directly by using the number buttons on the remote control. ➢ • All available DTV and analog channels are automatically... stored in order to memorize channels. message will be connected to an antenna/cable in memory. • It takes approximately 3 to 10 minutes to receive digital TV signals. When pressing...

User Manual (ENGLISH)
Page 21
... brand of VCR. If your VCR does not turn on the remote control allows you to Operate Your Cable Box 1 Turn off your VCR. 2 Press the VCR button on your TV's remote control. 3 Press the SET button on your TV's remote control. 4 Using the number buttons on your remote control, enter three digits of the VCR code listed on after...
... brand of VCR. If your VCR does not turn on the remote control allows you to Operate Your Cable Box 1 Turn off your VCR. 2 Press the VCR button on your TV's remote control. 3 Press the SET button on your TV's remote control. 4 Using the number buttons on your remote control, enter three digits of the VCR code listed on after...

User Manual (ENGLISH)
Page 22
...of this manual for your brand of DVD. Setting Up the Remote to Operate Your DVD 1 Turn off your STB. 2 Press the STB button on your TV's remote control. 3 Press the SET button on your TV's remote control. 4 Using the number buttons on your remote control, enter three digits of the STB code listed on page ...even if the first digit is a "0". (If more than one code is listed, try each code, 000 through 141. Note on Using Remote Control Modes: STB When your TV's volume. English - 22 Make sure you enter three digits of STB. If your STB does not turn on after set up , repeat...
...of this manual for your brand of DVD. Setting Up the Remote to Operate Your DVD 1 Turn off your STB. 2 Press the STB button on your TV's remote control. 3 Press the SET button on your TV's remote control. 4 Using the number buttons on your remote control, enter three digits of the STB code listed on page ...even if the first digit is a "0". (If more than one code is listed, try each code, 000 through 141. Note on Using Remote Control Modes: STB When your TV's volume. English - 22 Make sure you enter three digits of STB. If your STB does not turn on after set up , repeat...

User Manual (ENGLISH)
Page 26
... button to the TV. Use to select the input source of jacks: TV, AV1, AV2, S-Video1, S-Video2, Component1, Component2, PC, HDMI1, or HDMI2 on the TV's side panel. ➢ HDMI1 or HDMI2 input can only be selected when the external device is turned on the remote control to exit. Input... Source List Edit Name : TV ► ► 2 Press the ▲ or ▼ button to select AV1, AV2, S-Video1, S-Video2, Component1, Component2, PC, HDMI1, or HDMI2 ...
... button to the TV. Use to select the input source of jacks: TV, AV1, AV2, S-Video1, S-Video2, Component1, Component2, PC, HDMI1, or HDMI2 on the TV's side panel. ➢ HDMI1 or HDMI2 input can only be selected when the external device is turned on the remote control to exit. Input... Source List Edit Name : TV ► ► 2 Press the ▲ or ▼ button to select AV1, AV2, S-Video1, S-Video2, Component1, Component2, PC, HDMI1, or HDMI2 ...

User Manual (ENGLISH)
Page 27
... or Tint, then press the ENTER button. 4 Press the ◄ or ► button to select Mode. Press the P.MODE button on the remote control to select Color Tone, then press the ENTER button. Picture Mode Contrast Brightness Sharpness Color Tint G50 Color Tone ▼ More : Dynamic ►...ENTER button to return to Picture. 6 Press the ▲ or ▼ button to select one of the picture. • Choose Standard for general TV watching mode. • Choose Movie when watching movies. Press the ENTER button. ➢ • Sharpness doesn't operate in PC mode. • ...
... or Tint, then press the ENTER button. 4 Press the ◄ or ► button to select Mode. Press the P.MODE button on the remote control to select Color Tone, then press the ENTER button. Picture Mode Contrast Brightness Sharpness Color Tint G50 Color Tone ▼ More : Dynamic ►...ENTER button to return to Picture. 6 Press the ▲ or ▼ button to select one of the picture. • Choose Standard for general TV watching mode. • Choose Movie when watching movies. Press the ENTER button. ➢ • Sharpness doesn't operate in PC mode. • ...

User Manual (ENGLISH)
Page 29
.... • Wide Fit : Enlarges the aspect ratio of the picture to fit the entire screen. 4:3 Sets the picture to 4:3 normal mode. ➢ • In TV, VIDEO, S-VIDEO, and COMPONENT(480i, 480p) modes, all screen modes can be selected. (16:9 ➞ Zoom1 ➞ Zoom2 ➞ 4:3) • In COMPONENT... mode, 16:9, 4:3, Zoom1, and Zoom2 can be selected. • In Zoom1, Zoom2 and Wide Fit modes, you can move the picture on the remote control to change the picture size. English - 29 Wide Fit Enlarges the aspect ratio of the picture to fit the entire screen. • 4:3 : Sets ...
.... • Wide Fit : Enlarges the aspect ratio of the picture to fit the entire screen. 4:3 Sets the picture to 4:3 normal mode. ➢ • In TV, VIDEO, S-VIDEO, and COMPONENT(480i, 480p) modes, all screen modes can be selected. (16:9 ➞ Zoom1 ➞ Zoom2 ➞ 4:3) • In COMPONENT... mode, 16:9, 4:3, Zoom1, and Zoom2 can be selected. • In Zoom1, Zoom2 and Wide Fit modes, you can move the picture on the remote control to change the picture size. English - 29 Wide Fit Enlarges the aspect ratio of the picture to fit the entire screen. • 4:3 : Sets ...

User Manual (ENGLISH)
Page 32
... EEnntteerr RReetuturrnn ▲ ▲ ▲ ▲ Setting the HDMI Black Level Use this function, press the STILL button again or press any button on the remote control. Press the EXIT button to exit. • Normal : The screen gets brighter. • Low: The screen gets darker. ➢ This function is very weak, a blue...
... EEnntteerr RReetuturrnn ▲ ▲ ▲ ▲ Setting the HDMI Black Level Use this function, press the STILL button again or press any button on the remote control. Press the EXIT button to exit. • Normal : The screen gets brighter. • Low: The screen gets darker. ➢ This function is very weak, a blue...

User Manual (ENGLISH)
Page 33
...; If you can be set to On. (Refer to page 48) 1 Press the MENU button to display the menu. Sound Control Using Automatic Sound Settings Your TV has automatic sound settings ("Standard", "Music", "Movie", "Speech", and "Custom") that is automatically switched to the Custom mode. ... MOfofvie Multi-Track Options Speech Auto Volume : COuffstom Internal Mute : Off Reset Move Enter Return Press the S.MODE button on the remote control to select one of the particular frequency, then press the ENTER button. Customizing the Sound The sound settings can select "Custom", which...
...; If you can be set to On. (Refer to page 48) 1 Press the MENU button to display the menu. Sound Control Using Automatic Sound Settings Your TV has automatic sound settings ("Standard", "Music", "Movie", "Speech", and "Custom") that is automatically switched to the Custom mode. ... MOfofvie Multi-Track Options Speech Auto Volume : COuffstom Internal Mute : Off Reset Move Enter Return Press the S.MODE button on the remote control to select one of the particular frequency, then press the ENTER button. Customizing the Sound The sound settings can select "Custom", which...

User Manual (ENGLISH)
Page 34
... is capable of simultaneous transmission of many audio tracks (for example, simultaneous translations of playing 5.1 multichannel content over two speakers. Digital The digital-TV broadcast system is incorporated under license from the actual languages being broadcast. Press the ▲ or ▼ button to select Sound, then press...XT : OOffff Multi-Track Options On Auto Volume : Off Internal Mute : Off Reset Move Enter Return Press the SRS button on the remote control to display the menu. Press the ▲ or ▼ button to select On or Off. Press the MTS button on the...
... is capable of simultaneous transmission of many audio tracks (for example, simultaneous translations of playing 5.1 multichannel content over two speakers. Digital The digital-TV broadcast system is incorporated under license from the actual languages being broadcast. Press the ▲ or ▼ button to select Sound, then press...XT : OOffff Multi-Track Options On Auto Volume : Off Internal Mute : Off Reset Move Enter Return Press the SRS button on the remote control to display the menu. Press the ▲ or ▼ button to select On or Off. Press the MTS button on the...

User Manual (ENGLISH)
Page 35
...-Track Options Preferred Language Multi-Track Sound : English : MStoenreoo Stereo SAP Move Enter Return Automatic Volume Control Reduces the difference in stereo. • Choose SAP to listen to display the menu. Analog Depending on the remote control to select Mono, Stereo, or SAP. Press the ▲ or ▼ button to select Sound, then...
...-Track Options Preferred Language Multi-Track Sound : English : MStoenreoo Stereo SAP Move Enter Return Automatic Volume Control Reduces the difference in stereo. • Choose SAP to listen to display the menu. Analog Depending on the remote control to select Mono, Stereo, or SAP. Press the ▲ or ▼ button to select Sound, then...

User Manual (ENGLISH)
Page 38
Press the ▲ or ▼ button to select Delete, then press the ENTER button to be shown on the remote control. Press the CH and CH button to select the channel to delete the channel. Channel List /Added DTV Air 7 - 1 DTV Air 2-1 Air 4 Air 6 DTV Air 7-1 ...
Press the ▲ or ▼ button to select Delete, then press the ENTER button to be shown on the remote control. Press the CH and CH button to select the channel to delete the channel. Channel List /Added DTV Air 7 - 1 DTV Air 2-1 Air 4 Air 6 DTV Air 7-1 ...

User Manual (ENGLISH)
Page 39
...-2 DTV Air 12-3 Air 28 ▼ List Mode Add All Delete All Enter Return Viewing the Channel Lists You can be shown on the remote control. The " " symbol will be highlighted and the channel will be set as favorite channels. ➢ All favorite channels will be set up,... select Favorite, then press the ENTER button. To toggle between your all channels, add channels, or favorite channels, use the red (P.MODE) button on the remote control. • Red (P.MODE) button: Press repeatedly to select All, Added, or Favorite. • Yellow (STILL) button: Press to delete all channels,...
...-2 DTV Air 12-3 Air 28 ▼ List Mode Add All Delete All Enter Return Viewing the Channel Lists You can be shown on the remote control. The " " symbol will be highlighted and the channel will be set as favorite channels. ➢ All favorite channels will be set up,... select Favorite, then press the ENTER button. To toggle between your all channels, add channels, or favorite channels, use the red (P.MODE) button on the remote control. • Red (P.MODE) button: Press repeatedly to select All, Added, or Favorite. • Yellow (STILL) button: Press to delete all channels,...


