
Open Source Guide (ENGLISH)
Page 2
To apply these terms (or, alternatively, under the terms of warranty; How to Apply These Terms to Your New Libraries If you develop a new library, and you want it to be of the greatest possible use to where the full notice is safest to attach them to the start of each file should have at least the "copyright" line and a pointer to the public, we recommend making it free software that everyone can do so by permitting redistribution under these terms, attach the following notices to most effectively convey the exclusion of the ordinary General Public License). You can redistribute...
To apply these terms (or, alternatively, under the terms of warranty; How to Apply These Terms to Your New Libraries If you develop a new library, and you want it to be of the greatest possible use to where the full notice is safest to attach them to the start of each file should have at least the "copyright" line and a pointer to the public, we recommend making it free software that everyone can do so by permitting redistribution under these terms, attach the following notices to most effectively convey the exclusion of the ordinary General Public License). You can redistribute...
User Manual (ENGLISH)
Page 2
... programs are essentially a digital version of Dolby digital audio formats from Dolby Surround 2.0 to Dolby Digital 5.1 surround, using your TV set. Other countries The product unit accompanying this license for licensed contents. No rights are granted for commercial use of this product unit... 11172-3 or ISO/IEC 13818-3. No rights are granted under certain intellectual property rights of these services can transmit high definition TV (HDTV) images, Dolby digital surround audio, and new services such as multicasting (transmitting more than this product unit. U.S.A ...
... programs are essentially a digital version of Dolby digital audio formats from Dolby Surround 2.0 to Dolby Digital 5.1 surround, using your TV set. Other countries The product unit accompanying this license for licensed contents. No rights are granted for commercial use of this product unit... 11172-3 or ISO/IEC 13818-3. No rights are granted under certain intellectual property rights of these services can transmit high definition TV (HDTV) images, Dolby digital surround audio, and new services such as multicasting (transmitting more than this product unit. U.S.A ...
User Manual (ENGLISH)
Page 3
... and will still need is a big advantage for your location is currently incompatible with many existing TV antennas. The same holds true for DTV broadcasts. Is the antenna I connect my DTV set -top receivers. Once the DTV signal level exceeds a certain threshold at the same quality it... DTV broadcasts are not covered by browsing selected Internet web sites such as analog TV and works well with broadcast DTV set -top receiver to use for existing TV reception good enough for broadcast. Cable TV systems use indoor antennas to watch OTA DTV and HDTV programs. They're free...
... and will still need is a big advantage for your location is currently incompatible with many existing TV antennas. The same holds true for DTV broadcasts. Is the antenna I connect my DTV set -top receivers. Once the DTV signal level exceeds a certain threshold at the same quality it... DTV broadcasts are not covered by browsing selected Internet web sites such as analog TV and works well with broadcast DTV set -top receiver to use for existing TV reception good enough for broadcast. Cable TV systems use indoor antennas to watch OTA DTV and HDTV programs. They're free...
User Manual (ENGLISH)
Page 4
...Right side buttons 10 Side Panel Jacks 10 Front Panel LED Indicators 11 Rear Panel Jacks ...12 Remote Control...13 Connections 16 Connecting VHF and UHF Antennas 16 Antennas with 75-ohm Round Leads 16 Connecting Cable TV 17 Cable without a Cable Box 17 Cable with a Cable Box that... Channels 33 Customizing Your Remote Control 34 Remote Control Codes 38 Setting the Clock...41 Setting the On/Off Timer 43 Setting the Sleep Timer 44 Viewing an External Signal Source 45 Assigning Names to External Input Mode 46 Channel Control 48 Selecting Your Favorite Channels 48 Viewing the Channel...
...Right side buttons 10 Side Panel Jacks 10 Front Panel LED Indicators 11 Rear Panel Jacks ...12 Remote Control...13 Connections 16 Connecting VHF and UHF Antennas 16 Antennas with 75-ohm Round Leads 16 Connecting Cable TV 17 Cable without a Cable Box 17 Cable with a Cable Box that... Channels 33 Customizing Your Remote Control 34 Remote Control Codes 38 Setting the Clock...41 Setting the On/Off Timer 43 Setting the Sleep Timer 44 Viewing an External Signal Source 45 Assigning Names to External Input Mode 46 Channel Control 48 Selecting Your Favorite Channels 48 Viewing the Channel...

User Manual (ENGLISH)
Page 5
...) Display (How to Connect Your PC to the TV) .........104 Adjusting the Picture Quality 107 Changing the Picture Position 108 Adjusting the Picture Quality and Position Automatically 109 Changing the Picture Size (PC Mode 110 Viewing the Current Resolution 111 Initializing the Picture Settings 112 WISELINK 114 Using the WISELINK Function 114...
...) Display (How to Connect Your PC to the TV) .........104 Adjusting the Picture Quality 107 Changing the Picture Position 108 Adjusting the Picture Quality and Position Automatically 109 Changing the Picture Size (PC Mode 110 Viewing the Current Resolution 111 Initializing the Picture Settings 112 WISELINK 114 Using the WISELINK Function 114...
User Manual (ENGLISH)
Page 9
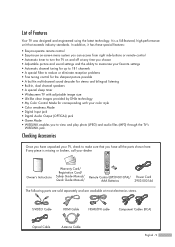
... you have unpacked your TV, check to turn the TV on -screen menu system you can access from right side buttons or remote control • Automatic timer to make sure that exceeds industry standards. If any time you choose • Adjustable picture and sound settings and the ability to ...memorize your favorite settings • Automatic ...
... you have unpacked your TV, check to turn the TV on -screen menu system you can access from right side buttons or remote control • Automatic timer to make sure that exceeds industry standards. If any time you choose • Adjustable picture and sound settings and the ability to ...memorize your favorite settings • Automatic ...
User Manual (ENGLISH)
Page 11
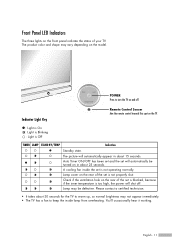
...cooling fan inside lamp from overheating. Check if the ventilation hole on the rear of the set is too high, the power will automatically be defective. Please contact a certified technician. • It takes about 30 seconds for the TV to warm up, so normal brightness may vary depending on the model....15 seconds. English - 11 Lamp cover on the rear of your TV. The product color and shape may not appear immediately. • The TV has a fan to turn the TV on and off . Auto Timer ON/OFF has been set and the set is Off TIMER LAMP STAND BY/TEMP Indication Standby ...
...cooling fan inside lamp from overheating. Check if the ventilation hole on the rear of the set is too high, the power will automatically be defective. Please contact a certified technician. • It takes about 30 seconds for the TV to warm up, so normal brightness may vary depending on the model....15 seconds. English - 11 Lamp cover on the rear of your TV. The product color and shape may not appear immediately. • The TV has a fan to turn the TV on and off . Auto Timer ON/OFF has been set and the set is Off TIMER LAMP STAND BY/TEMP Indication Standby ...
User Manual (ENGLISH)
Page 12
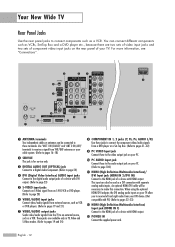
English - 12 These jacks are two sets of video input jacks and two sets of component video input jacks on the rear panel of a device with HDMI output. When using the optional HDMI/DVI adapter, the DVI analog audio inputs on your TV allow you to receive left and right audio from your DVI...Interface) Input jack (HDMI IN 1) Connect to the HDMI jack of your TV. Your New Wide TV Rear Panel Jacks Use the rear panel jacks to connect components such as VCRs, Set-Top Box and a DVD player etc., because there are available only in TV, Video and S-Video modes. (Refer to pages 19 and 24) " ...
English - 12 These jacks are two sets of video input jacks and two sets of component video input jacks on the rear panel of a device with HDMI output. When using the optional HDMI/DVI adapter, the DVI analog audio inputs on your TV allow you to receive left and right audio from your DVI...Interface) Input jack (HDMI IN 1) Connect to the HDMI jack of your TV. Your New Wide TV Rear Panel Jacks Use the rear panel jacks to connect components such as VCRs, Set-Top Box and a DVD player etc., because there are available only in TV, Video and S-Video modes. (Refer to pages 19 and 24) " ...
User Manual (ENGLISH)
Page 13
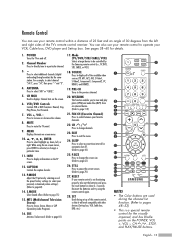
...item. 11. MTS (Multichannel Television Stereo) Press to the previous channel. 20. SOURCE Press to display all of the preset factory settings (or select your personal, customized picture settings.) (Refer to page 60) 14. MENU Displays the main on and off . (Refer to page 44) 25. P.MODE Adjust.... 12. Channel Number Press to directly tune to page 75) 15. Press to select additional channels (digital and analog) being broadcast by the Samsung remote control (i.e., TV, DVD, STB, CABLE, or VCR). 18. MUTE Press to select "AIR" or "CABLE". 5. SLEEP Press to select a preset time interval...
...item. 11. MTS (Multichannel Television Stereo) Press to the previous channel. 20. SOURCE Press to display all of the preset factory settings (or select your personal, customized picture settings.) (Refer to page 60) 14. MENU Displays the main on and off . (Refer to page 44) 25. P.MODE Adjust.... 12. Channel Number Press to directly tune to page 75) 15. Press to select additional channels (digital and analog) being broadcast by the Samsung remote control (i.e., TV, DVD, STB, CABLE, or VCR). 18. MUTE Press to select "AIR" or "CABLE". 5. SLEEP Press to select a preset time interval...
User Manual (ENGLISH)
Page 18
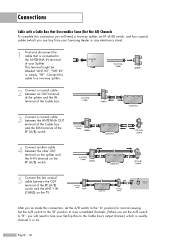
...need to tune your Set-Top Box to the Cable box's output channel, which is connected to the ANTENNA IN terminal of the RF (A/B) switch and the ANT 1 IN (CABLE) on the RF (A/B) switch. 5 Connect the last coaxial cable between the OUT terminal of your Samsung dealer or any ...between the other OUT terminal on the splitter and the A-IN terminal on the TV. Connections Cable with a Cable Box that is usually channel 3 or 4.) English - 18 Set the A/B switch to the "B" position to view scrambled channels. (When you set the A/B switch to "B", you 've made this cable to the "A" position...
...need to tune your Set-Top Box to the Cable box's output channel, which is connected to the ANTENNA IN terminal of the RF (A/B) switch and the ANT 1 IN (CABLE) on the RF (A/B) switch. 5 Connect the last coaxial cable between the OUT terminal of your Samsung dealer or any ...between the other OUT terminal on the splitter and the A-IN terminal on the TV. Connections Cable with a Cable Box that is usually channel 3 or 4.) English - 18 Set the A/B switch to the "B" position to view scrambled channels. (When you set the A/B switch to "B", you 've made this cable to the "A" position...
User Manual (ENGLISH)
Page 19
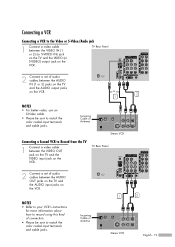
...color coded input terminals and cable jacks. Incoming Cable or Antenna 1 Stereo VCR 2 2 English - 19 TV Rear Panel 2 Connect a set of audio cables between the AUDIO IN (1 or 2) jacks on the TV and the AUDIO output jacks on the VCR. Incoming Cable or Antenna Stereo VCR Connecting a Second VCR to... Record from the TV 1 Connect a video cable between the VIDEO OUT jack on the TV and the VIDEO input jack on the VCR. TV Rear Panel 2 Connect a set of audio cables between the AUDIO OUT jacks on the TV and the AUDIO input jacks on the VCR. ...
...color coded input terminals and cable jacks. Incoming Cable or Antenna 1 Stereo VCR 2 2 English - 19 TV Rear Panel 2 Connect a set of audio cables between the AUDIO IN (1 or 2) jacks on the TV and the AUDIO output jacks on the VCR. Incoming Cable or Antenna Stereo VCR Connecting a Second VCR to... Record from the TV 1 Connect a video cable between the VIDEO OUT jack on the TV and the VIDEO input jack on the VCR. TV Rear Panel 2 Connect a set of audio cables between the AUDIO OUT jacks on the TV and the AUDIO input jacks on the VCR. ...
User Manual (ENGLISH)
Page 20
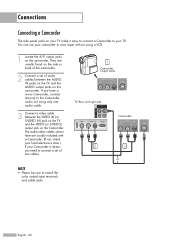
...store.) If your Camcorder is stereo, you have a mono Camcorder, connect L(mono) to match the color coded input terminals and cable jacks. 1 Camcorder Output Jacks TV Rear and right side Camcorder 2 3 or English - 20 NOTE • Please be sure to the Camcorder audio out using a VCR. 1 Locate the A/V output ... camcorder. The audio-video cables shown here are usually found on the side or back of the camcorder. 2 Connect a set of audio cables between the VIDEO IN (or S-VIDEO IN) jack on the TV and the VIDEO (or S-VIDEO) output jack on the Camcorder. If you need to connect...
...store.) If your Camcorder is stereo, you have a mono Camcorder, connect L(mono) to match the color coded input terminals and cable jacks. 1 Camcorder Output Jacks TV Rear and right side Camcorder 2 3 or English - 20 NOTE • Please be sure to the Camcorder audio out using a VCR. 1 Locate the A/V output ... camcorder. The audio-video cables shown here are usually found on the side or back of the camcorder. 2 Connect a set of audio cables between the VIDEO IN (or S-VIDEO IN) jack on the TV and the VIDEO (or S-VIDEO) output jack on the Camcorder. If you need to connect...
User Manual (ENGLISH)
Page 21
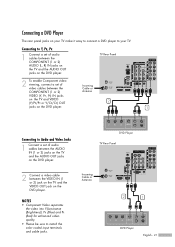
...the VIDEO IN (1 or 2) jack on the TV and the VIDEO OUT jack on the DVD player. TV Rear Panel 2 To enable Component video viewing, connect a set of video cables between the COMPONENT (1 or 2) Incoming Cable or Antenna VIDEO (Y, PB, PR) IN jacks on the TV and VIDEO (Y/PB/PR or Y/CB/CR) ... for enhanced video quality. • Please be sure to Y, PB, PR 1 Connect a set of audio cables between the AUDIO IN (1 or 2) jacks on the TV and the AUDIO OUT jacks on the DVD player. Connecting a DVD Player The rear panel jacks on the DVD player. Connecting to match the color coded input...
...the VIDEO IN (1 or 2) jack on the TV and the VIDEO OUT jack on the DVD player. TV Rear Panel 2 To enable Component video viewing, connect a set of video cables between the COMPONENT (1 or 2) Incoming Cable or Antenna VIDEO (Y, PB, PR) IN jacks on the TV and VIDEO (Y/PB/PR or Y/CB/CR) ... for enhanced video quality. • Please be sure to Y, PB, PR 1 Connect a set of audio cables between the AUDIO IN (1 or 2) jacks on the TV and the AUDIO OUT jacks on the DVD player. Connecting a DVD Player The rear panel jacks on the DVD player. Connecting to match the color coded input...
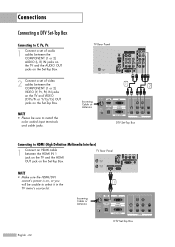
User Manual (ENGLISH)
Page 22
... Y/CB/CR) OUT jacks on , or you will be sure to select it in the 1 TV menu's source list. TV Rear Panel NOTE • Make sure the HDMI/DVI source's power is on the Set-Top Box. NOTE • Please be unable to match the color coded input terminals and cable jacks.... TV Rear Panel Incoming Cable or Antenna 1 2 DTV Set-Top Box Connecting to Y, PB, PR 1 Connect a set of audio cables between the COMPONENT (1 or 2) AUDIO (L, R) IN jacks on the TV and the AUDIO OUT jacks on the Set-Top Box. 2 Connect a set of video cables between the HDMI IN...
... Y/CB/CR) OUT jacks on , or you will be sure to select it in the 1 TV menu's source list. TV Rear Panel NOTE • Make sure the HDMI/DVI source's power is on the Set-Top Box. NOTE • Please be unable to match the color coded input terminals and cable jacks.... TV Rear Panel Incoming Cable or Antenna 1 2 DTV Set-Top Box Connecting to Y, PB, PR 1 Connect a set of audio cables between the COMPONENT (1 or 2) AUDIO (L, R) IN jacks on the TV and the AUDIO OUT jacks on the Set-Top Box. 2 Connect a set of video cables between the HDMI IN...
User Manual (ENGLISH)
Page 23
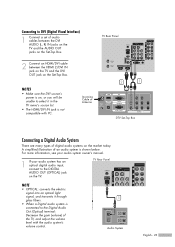
...(L, R) IN jacks on the TV and the AUDIO OUT jacks on the TV. For more information, see your audio system owner's manual. 1 If your audio system has an optical digital audio input, connect to the DIGITAL AUDIO OUT (OPTICAL) jack on the Set-Top Box. TV Rear Panel NOTE • OPTICAL: ...converts the electric signal into an optical light signal, and transmits it in the TV menu's source list. • The HDMI/DVI IN jack is shown below. Incoming...
...(L, R) IN jacks on the TV and the AUDIO OUT jacks on the TV. For more information, see your audio system owner's manual. 1 If your audio system has an optical digital audio input, connect to the DIGITAL AUDIO OUT (OPTICAL) jack on the Set-Top Box. TV Rear Panel NOTE • OPTICAL: ...converts the electric signal into an optical light signal, and transmits it in the TV menu's source list. • The HDMI/DVI IN jack is shown below. Incoming...
User Manual (ENGLISH)
Page 24
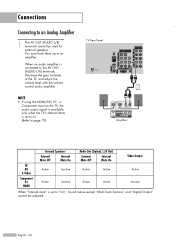
When an audio amplifier is set to on. (Refer to page 79) TV Rear Panel 1 Amplifier RF AV S-Video Component PC HDMI Internal Speakers Internal Mute Off Internal Mute On Active Inactive Active Inactive Audio Out (Optical, L/R Out) Internal .... NOTE • If using the HDMI/DVI, PC, or Component input on the TV, the audio output signal is available only when the TV's Internal Mute is set to the AV OUT (AUDIO L/R) terminals: Decrease the gain (volume) of the TV, and adjust the volume level with the volume control audio amplifier. You must...
When an audio amplifier is set to on. (Refer to page 79) TV Rear Panel 1 Amplifier RF AV S-Video Component PC HDMI Internal Speakers Internal Mute Off Internal Mute On Active Inactive Active Inactive Audio Out (Optical, L/R Out) Internal .... NOTE • If using the HDMI/DVI, PC, or Component input on the TV, the audio output signal is available only when the TV's Internal Mute is set to the AV OUT (AUDIO L/R) terminals: Decrease the gain (volume) of the TV, and adjust the volume level with the volume control audio amplifier. You must...
User Manual (ENGLISH)
Page 26
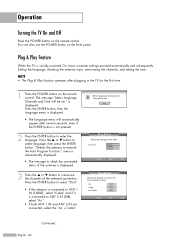
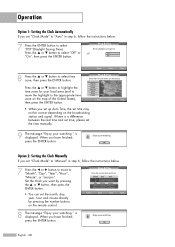
...NOTE • The Plug & Play function operates after several seconds, even if the ENTER button is displayed. • The Language menu will be set . Press the ENTER button to select "Start". • If the antenna is connected to enter the language. Language English Español Franç... language, checking the antenna input, memorizing the channels, and setting the time. You can also use the POWER button on the remote control. Plug & Play Feature When the TV is displayed. 3 Press the ... Press the ENTER button, then the Language menu is not pressed. 2 Press the ENTER button ...
...NOTE • The Plug & Play function operates after several seconds, even if the ENTER button is displayed. • The Language menu will be set . Press the ENTER button to select "Start". • If the antenna is connected to enter the language. Language English Español Franç... language, checking the antenna input, memorizing the channels, and setting the time. You can also use the POWER button on the remote control. Plug & Play Feature When the TV is displayed. 3 Press the ... Press the ENTER button, then the Language menu is not pressed. 2 Press the ENTER button ...
User Manual (ENGLISH)
Page 27
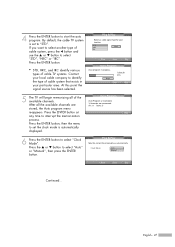
...the ENTER button to "STD". Air : 9 Cable : 5 stored, the Auto program menu reappears. English - 27 By default, the cable TV system is set the clock mode is incomplete. 14 channels are Auto Program Auto Program is automatically displayed. 6 Press the ENTER button to interrupt the memorization process... the ENTER button at Skip any time to select "Clock Mode". Press the ENTER button, then the menu to set to start the auto program. Plug & Play Sets the current time manually or automatically. Plug & Play Selects a cable signal type for your local cable company to select...
...the ENTER button to "STD". Air : 9 Cable : 5 stored, the Auto program menu reappears. English - 27 By default, the cable TV system is set the clock mode is incomplete. 14 channels are Auto Program Auto Program is automatically displayed. 6 Press the ENTER button to interrupt the memorization process... the ENTER button at Skip any time to select "Clock Mode". Press the ENTER button, then the menu to set to start the auto program. Plug & Play Sets the current time manually or automatically. Plug & Play Selects a cable signal type for your local cable company to select...
User Manual (ENGLISH)
Page 28
... hour and minute directly by pressing the ... Month ▲ -- ▼ Hour -- i Enjoy your watching." is a difference between the real time and set time, please set the time manually. 9 The message "Enjoy your watching." i Enjoy your local area (and to move to "Month", "Day", "Year", "Hour", "... the time zone for your watching. is displayed. Press the ... or † button to daylight saving time. Plug & Play Set to select "Off" or "On", then press the ENTER button. Newfoundland Atlantic Eastern Central Mountain Pacific Alaska Hawaii Move Enter Skip •...
... hour and minute directly by pressing the ... Month ▲ -- ▼ Hour -- i Enjoy your watching." is a difference between the real time and set time, please set the time manually. 9 The message "Enjoy your watching." i Enjoy your local area (and to move to "Month", "Day", "Year", "Hour", "... the time zone for your watching. is displayed. Press the ... or † button to daylight saving time. Plug & Play Set to select "Off" or "On", then press the ENTER button. Newfoundland Atlantic Eastern Central Mountain Pacific Alaska Hawaii Move Enter Skip •...

User Manual (ENGLISH)
Page 29
...Control √ Film Mode : Off √ Move Enter Return 3 Press the EXIT button to select an item you to control the settings of certain picture and sound settings and the current time. Press the œ, √ or ENTER button to display, change, or use the ENTER buttons on your... TV. The main menu is displayed. Viewing the Display Press the INFO button on the remote control. The information displayed varies ...
...Control √ Film Mode : Off √ Move Enter Return 3 Press the EXIT button to select an item you to control the settings of certain picture and sound settings and the current time. Press the œ, √ or ENTER button to display, change, or use the ENTER buttons on your... TV. The main menu is displayed. Viewing the Display Press the INFO button on the remote control. The information displayed varies ...


