
User Manual Ver.1.0 (English(north America))
Page 6
Table of Contents Section 1: Getting Started 5 Understanding This User Manual 5 Battery 6 Turning Your Device On and Off 8 Setting Up Your Device 8 Retrieving Your Google Account Password . . . . 11 Using Google Maps 11 Task Manager 11 Memory Card 13 Galaxy Tab Accessories 14 Securing Your Device 14 Troubleshooting 16 Android System Recovery 16 Section 2: Understanding Your Device .....17 Features 17 Front View 18 Top View 19 Back and Bottom Views 19 Home Screen 20 1 Navigating Your Device 23 S Pen 26 Notifications 29 Status Details...
Table of Contents Section 1: Getting Started 5 Understanding This User Manual 5 Battery 6 Turning Your Device On and Off 8 Setting Up Your Device 8 Retrieving Your Google Account Password . . . . 11 Using Google Maps 11 Task Manager 11 Memory Card 13 Galaxy Tab Accessories 14 Securing Your Device 14 Troubleshooting 16 Android System Recovery 16 Section 2: Understanding Your Device .....17 Features 17 Front View 18 Top View 19 Back and Bottom Views 19 Home Screen 20 1 Navigating Your Device 23 S Pen 26 Notifications 29 Status Details...
User Manual Ver.1.0 (English(north America))
Page 10
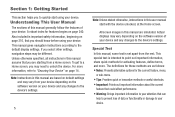
... important information to the default display settings. This manual gives navigation instructions according to your attention that you should know before using your device. If you select other settings, navigation steps may vary from your device depending on the software version on your device and any changes to quickly start with the device unlocked, at the Home screen. Understanding This User Manual The sections of this manual are as follows: •...
... important information to the default display settings. This manual gives navigation instructions according to your attention that you should know before using your device. If you select other settings, navigation steps may vary from your device depending on the software version on your device and any changes to quickly start with the device unlocked, at the Home screen. Understanding This User Manual The sections of this manual are as follows: •...
User Manual Ver.1.0 (English(north America))
Page 11
... Connector, Charging Head, and USB cable) to maximize battery life. When battery power is powered by a rechargeable, standard Li-Ion battery. Charging the Battery Your device comes with the device for the first time. Getting Started 6 A Wall/USB Charger (Charging Head and USB cable) are designed to charge your device for charging the battery. You must fully charge the battery before using your device from any standard AC power outlet. Text Conventions This manual provides condensed information about how to display battery charge...
... Connector, Charging Head, and USB cable) to maximize battery life. When battery power is powered by a rechargeable, standard Li-Ion battery. Charging the Battery Your device comes with the device for the first time. Getting Started 6 A Wall/USB Charger (Charging Head and USB cable) are designed to charge your device for charging the battery. You must fully charge the battery before using your device from any standard AC power outlet. Text Conventions This manual provides condensed information about how to display battery charge...
User Manual Ver.1.0 (English(north America))
Page 12
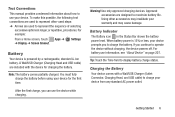
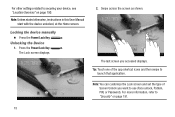
... the Charging Head (1). 2. Insert the USB cable into a standard AC power outlet. Note: The battery comes partially charged. Warning! You must fully charge the battery before using your device for the first time. Insert the USB cable into the device's Charger/ Accessory Port (2). While the device is charging, if the touch screen does not function due to an unstable power supply, unplug the USB power adapter from the power outlet or unplug the USB cable from the device. Charging Head...
... the Charging Head (1). 2. Insert the USB cable into a standard AC power outlet. Note: The battery comes partially charged. Warning! You must fully charge the battery before using your device for the first time. Insert the USB cable into the device's Charger/ Accessory Port (2). While the device is charging, if the touch screen does not function due to an unstable power supply, unplug the USB power adapter from the power outlet or unplug the USB cable from the device. Charging Head...
User Manual Ver.1.0 (English(north America))
Page 20
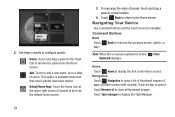
... the device unlocked, at the Home screen. Locking the device manually Ⅲ Press the Power/Lock Key . Tip: Touch one of Screen Unlock you accessed displays. The last screen you want to use (Face unlock, Pattern, PIN, or Password). Note: You can customize the Lock screen and set the type of the app shortcut icons and then swipe to launch that application. Swipe across the screen as shown. Press the Power/Lock Key . For other settings related to securing your device, see "Location Services...
... the device unlocked, at the Home screen. Locking the device manually Ⅲ Press the Power/Lock Key . Tip: Touch one of Screen Unlock you accessed displays. The last screen you want to use (Face unlock, Pattern, PIN, or Password). Note: You can customize the Lock screen and set the type of the app shortcut icons and then swipe to launch that application. Swipe across the screen as shown. Press the Power/Lock Key . For other settings related to securing your device, see "Location Services...

User Manual Ver.1.0 (English(north America))
Page 21
... Power/Lock key to make a selection. To enter the Android System Recovery mode, follow these steps: 1. Press the Volume Up Key and then press the Power/Lock Key at the same time until the Android system recovery screen displays. 5. Once the SAMSUNG logo appears, release the Power/ Lock key while continuing to 10 seconds. For more information, refer to "Factory Data Reset" on . Troubleshooting If your device has fatal errors, hangs up, or freezes, you entered this menu by mistake, use...
... Power/Lock key to make a selection. To enter the Android System Recovery mode, follow these steps: 1. Press the Volume Up Key and then press the Power/Lock Key at the same time until the Android system recovery screen displays. 5. Once the SAMSUNG logo appears, release the Power/ Lock key while continuing to 10 seconds. For more information, refer to "Factory Data Reset" on . Troubleshooting If your device has fatal errors, hangs up, or freezes, you entered this menu by mistake, use...

User Manual Ver.1.0 (English(north America))
Page 24
... and bottom of your device. 1. Charger/Accessory Port: Plug in for headphones. 2. Infrared Blaster: Used to adjust Master Volume. Volume Key: From a Home screen, press to emit infrared signals used for unlocking. Camera Lens: Used when taking photos. 3. Microphone: Used for storage of files. 4. Power/Lock Key: Press and hold to adjust volume. 5. Camera Flash: Used when taking photos or recording videos. 2. Memory Card Slot: Install a memory card for voice recording or video chat. 4. During music playback, press to turn the device on page 168. 3. For...
... and bottom of your device. 1. Charger/Accessory Port: Plug in for headphones. 2. Infrared Blaster: Used to adjust Master Volume. Volume Key: From a Home screen, press to emit infrared signals used for unlocking. Camera Lens: Used when taking photos. 3. Microphone: Used for storage of files. 4. Power/Lock Key: Press and hold to adjust volume. 5. Camera Flash: Used when taking photos or recording videos. 2. Memory Card Slot: Install a memory card for voice recording or video chat. 4. During music playback, press to turn the device on page 168. 3. For...
User Manual Ver.1.0 (English(north America))
Page 28
... Keyboard displays. Touch Remove all to remove the panel from the Home screen. Use these controls to configure panels: Delete: Touch and drag a panel to the Trash Can to clear all thumbnail images. Touch an App to open a list of thumbnail images of a panel to open it as the default home screen. 3. Home Touch Home to the previous screen, option, or Note: When the on-screen keyboard is available when less than seven panels have worked with recently. Navigation Touch Navigation to set...
... Keyboard displays. Touch Remove all to remove the panel from the Home screen. Use these controls to configure panels: Delete: Touch and drag a panel to the Trash Can to clear all thumbnail images. Touch an App to open a list of thumbnail images of a panel to open it as the default home screen. 3. Home Touch Home to the previous screen, option, or Note: When the on-screen keyboard is available when less than seven panels have worked with recently. Navigation Touch Navigation to set...
User Manual Ver.1.0 (English(north America))
Page 31
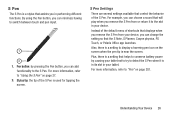
... screen. Also, there is a setting to the S Pen. Pen button: by causing your tablet not to try to switch between touch and pen input. 1 2 1. S Pen Settings There are several settings available that helps to conserve battery power by pressing the Pen button, you can minimize having to detect the S Pen when it to the slot in your device. S Pen The S Pen is a stylus that assists you in your tablet. By using the Pen button, you can add functionality to display a hovering pen...
... screen. Also, there is a setting to the S Pen. Pen button: by causing your tablet not to try to switch between touch and pen input. 1 2 1. S Pen Settings There are several settings available that helps to conserve battery power by pressing the Pen button, you can minimize having to detect the S Pen when it to the slot in your device. S Pen The S Pen is a stylus that assists you in your tablet. By using the Pen button, you can add functionality to display a hovering pen...

User Manual Ver.1.0 (English(north America))
Page 36
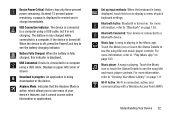
... downloads, software updates, and more. Google Talk Invitation: Someone has invited you to display the details. 6. Touch Reply to remove Notification Icons from the System Bar. 5. New Email Message: You have new Gmail. Navigation Active: The Navigation App is part of the Quick Settings pop-up your Samsung Account" on page 96. Download Successful: A recent application download or update completed successfully. 4. Touch Clear to view and answer the email. Software update: There is a software update...
... downloads, software updates, and more. Google Talk Invitation: Someone has invited you to display the details. 6. Touch Reply to remove Notification Icons from the System Bar. 5. New Email Message: You have new Gmail. Navigation Active: The Navigation App is part of the Quick Settings pop-up your Samsung Account" on page 96. Download Successful: A recent application download or update completed successfully. 4. Touch Clear to view and answer the email. Software update: There is a software update...
User Manual Ver.1.0 (English(north America))
Page 37
... using a USB cable, but it is off . Set up input methods: When the keyboard is active, which allows you to "Play Music App" on page 111. Music player: A song is connected, active, and communicating with a Wireless Access Point (WAP). For more information, refer to charge immediately. Airplane Mode: Indicates that the Airplane Mode is being downloaded to see the song title and music player controls. Bluetooth Active: Bluetooth is turned off , press the Power/Lock key to...
... using a USB cable, but it is off . Set up input methods: When the keyboard is active, which allows you to "Play Music App" on page 111. Music player: A song is connected, active, and communicating with a Wireless Access Point (WAP). For more information, refer to charge immediately. Airplane Mode: Indicates that the Airplane Mode is being downloaded to see the song title and music player controls. Bluetooth Active: Bluetooth is turned off , press the Power/Lock key to...
User Manual Ver.1.0 (English(north America))
Page 82
... way not accepted by your email service provider. Or enter a different port number if your username on the SMTP server (this option to enter a username and password for your SMTP server, if your email service provider requires that you prefer to connect securely. • Use client certificate: Use a client certificate for messaging security. • Port: Set the Security type first to send email. • User name: Your username on the...
... way not accepted by your email service provider. Or enter a different port number if your username on the SMTP server (this option to enter a username and password for your SMTP server, if your email service provider requires that you prefer to connect securely. • Use client certificate: Use a client certificate for messaging security. • Port: Set the Security type first to send email. • User name: Your username on the...
User Manual Ver.1.0 (English(north America))
Page 124
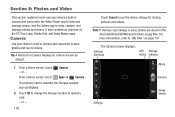
... videos. Settings Shortcuts GPS Storage Active Indicator Mode Camera Settings Image Viewer or - It also contains an overview of the PS Touch app, Media Hub, and Video Maker apps. Camera Use your device's built-in camera and camcorder to use your device's built-in the /Root/extSdCard/DCIM/Camera folder as jpg files. From a Home screen, touch Camera. The Camera screen displays. From a Home screen, touch - Note: If memory card storage is inserted, the Storage location pop-up displays. 2. Touch OK to change the storage location to "My Files" on a Home screen by default...
... videos. Settings Shortcuts GPS Storage Active Indicator Mode Camera Settings Image Viewer or - It also contains an overview of the PS Touch app, Media Hub, and Video Maker apps. Camera Use your device's built-in camera and camcorder to use your device's built-in the /Root/extSdCard/DCIM/Camera folder as jpg files. From a Home screen, touch Camera. The Camera screen displays. From a Home screen, touch - Note: If memory card storage is inserted, the Storage location pop-up displays. 2. Touch OK to change the storage location to "My Files" on a Home screen by default...
User Manual Ver.1.0 (English(north America))
Page 130
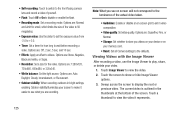
... device or on -screen grid to videos. Options are recording. Options are : 1280x720, 720x480, 640x480, or 320x240. • White balance: Set the light source. Sweep across the screen to disable or enable the flash. • Recording mode: Set a recording mode. • Self-recording: Touch to switch to the front-facing camera lens and record a video of yourself. • Flash: Touch Off or On to display the next or previous video. Touch...
... device or on -screen grid to videos. Options are recording. Options are : 1280x720, 720x480, 640x480, or 320x240. • White balance: Set the light source. Sweep across the screen to disable or enable the flash. • Recording mode: Set a recording mode. • Self-recording: Touch to switch to the front-facing camera lens and record a video of yourself. • Flash: Touch Off or On to display the next or previous video. Touch...
User Manual Ver.1.0 (English(north America))
Page 180
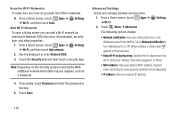
...: 1. Use the keyboard to turn notifications On or Off. Touch Network notification to enter Network SSID. 3. Scan for Wi-Fi Networks To make sure you to new Wireless Access Points (WAPs). Touch the Security field and then touch a security type. Note: Depending on during sleep: Specify when to disconnect from Wi-Fi. Advanced Settings Set up and manage wireless access points. 1. When enabled, a check mark appears in , or Never. • MAC address: View your device's MAC address, required...
...: 1. Use the keyboard to turn notifications On or Off. Touch Network notification to enter Network SSID. 3. Scan for Wi-Fi Networks To make sure you to new Wireless Access Points (WAPs). Touch the Security field and then touch a security type. Note: Depending on during sleep: Specify when to disconnect from Wi-Fi. Advanced Settings Set up and manage wireless access points. 1. When enabled, a check mark appears in , or Never. • MAC address: View your device's MAC address, required...
User Manual Ver.1.0 (English(north America))
Page 201
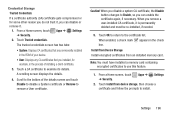
..., it . 1. A scrolling screen displays the details. 4. When you can enable the certificate again, if necessary. Touch OK to return to install. Install from Device Storage Install encrypted certificates from device storage, then choose a certificate and follow the prompts to the certificate list. Apps ➔ Settings 2. From a Home screen, touch ➔ Security. Caution! From a Home screen, touch Apps ➔ Settings ➔ Security. 2. Touch Trusted credentials. Scroll to remove a User certificate. Touch Install from an installed memory card. Settings 196
..., it . 1. A scrolling screen displays the details. 4. When you can enable the certificate again, if necessary. Touch OK to return to install. Install from Device Storage Install encrypted certificates from device storage, then choose a certificate and follow the prompts to the certificate list. Apps ➔ Settings 2. From a Home screen, touch ➔ Security. Caution! From a Home screen, touch Apps ➔ Settings ➔ Security. 2. Touch Trusted credentials. Scroll to remove a User certificate. Touch Install from an installed memory card. Settings 196
User Manual Ver.1.0 (English(north America))
Page 202
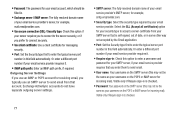
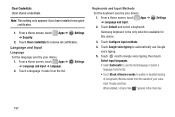
... device. 1. Samsung keyboard is the only selection available for this device. 3. Note: This setting only appears if you have installed encrypted certificates. 1. From a Home screen, touch ➔ Security. Clear Credentials Clear stored credentials. From a Home screen, touch Apps ➔ ➔ Language and input ➔ Language. Touch a language / locale from the results of recognized offensive words from the list. Keyboards and Input Methods Set the keyboard used by your device. 1. Settings 2. Touch Default and select a keyboard. Touch Google voice...
... device. 1. Samsung keyboard is the only selection available for this device. 3. Note: This setting only appears if you have installed encrypted certificates. 1. From a Home screen, touch ➔ Security. Clear Credentials Clear stored credentials. From a Home screen, touch Apps ➔ ➔ Language and input ➔ Language. Touch a language / locale from the results of recognized offensive words from the list. Keyboards and Input Methods Set the keyboard used by your device. 1. Settings 2. Touch Default and select a keyboard. Touch Google voice...
User Manual Ver.1.0 (English(north America))
Page 208
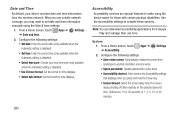
... settings. 1. Date and Time By default, your local time zone (only available when the Automatic setting is disabled). • Use 24-hour format: Set the format for time displays. • Select date format: Set the format for date displays. Apps ➔ Settings 2. Options are outside network coverage, you are : 15 or 30 seconds; From a Home screen, touch Apps ➔ Settings ➔ Date and time. 2. From a Home screen, touch ➔ Accessibility. Accessibility Accessibility services are special features to set date and time information manually using the device...
... settings. 1. Date and Time By default, your local time zone (only available when the Automatic setting is disabled). • Use 24-hour format: Set the format for time displays. • Select date format: Set the format for date displays. Apps ➔ Settings 2. Options are outside network coverage, you are : 15 or 30 seconds; From a Home screen, touch Apps ➔ Settings ➔ Date and time. 2. From a Home screen, touch ➔ Accessibility. Accessibility Accessibility services are special features to set date and time information manually using the device...
User Manual Ver.1.0 (English(north America))
Page 209
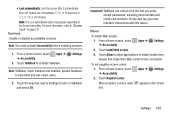
... 1, 2, 5, 10, or 30 minutes. Services Enable or disable accessibility services. Settings Note: TalkBack, when installed and enabled, speaks feedback to turn on TalkBack and select OK. TalkBack can collect all of the text you enter, except passwords, including personal data and credit card numbers. Vision To install Web scripts: 1. To set negative screen colors: 1. Touch Negative colors. appears in the check Settings 204 Note: The Lock automatically option only appears...
... 1, 2, 5, 10, or 30 minutes. Services Enable or disable accessibility services. Settings Note: TalkBack, when installed and enabled, speaks feedback to turn on TalkBack and select OK. TalkBack can collect all of the text you enter, except passwords, including personal data and credit card numbers. Vision To install Web scripts: 1. To set negative screen colors: 1. Touch Negative colors. appears in the check Settings 204 Note: The Lock automatically option only appears...
User Manual Ver.1.0 (English(north America))
Page 240
... of the product support services related to the Software provided to you may collect and use the Software that such activity is expressly permitted by copyright and other intellectual property rights in this EULA) and you , if any upgrades, this EULA. Samsung reserves all the EULA terms. 7. LIMITATIONS ON END USER RIGHTS. Samsung may use Software identified as an upgrade, you may not...
... of the product support services related to the Software provided to you may collect and use the Software that such activity is expressly permitted by copyright and other intellectual property rights in this EULA) and you , if any upgrades, this EULA. Samsung reserves all the EULA terms. 7. LIMITATIONS ON END USER RIGHTS. Samsung may use Software identified as an upgrade, you may not...


