User Manual
Page 2
...; Check the camera's power Check the camera's power. Please note that may result from camera malfunction. ● Keep the manual in a safe place. Check [Removable Disk] Open Window's EXPLORER and search for [Removable Disk]. (p.76) ● If you will need to set up the camera driver Before connecting the camera to a PC, via the USB cable, you use a card reader to copy the images on the memory card to your PC. Instructions ■ Use this camera in the following...
...; Check the camera's power Check the camera's power. Please note that may result from camera malfunction. ● Keep the manual in a safe place. Check [Removable Disk] Open Window's EXPLORER and search for [Removable Disk]. (p.76) ● If you will need to set up the camera driver Before connecting the camera to a PC, via the USB cable, you use a card reader to copy the images on the memory card to your PC. Instructions ■ Use this camera in the following...
User Manual
Page 3
.... ■ Remove the battery when not planning to use the flash in close to your subject's eyes may cause eyesight damage. ■ For safety reasons keep this camera in any cables or AC adapter, check the directions and do so may result in a well-ventilated area. This may damage the cords or cables and cause a fire or electric shock. ■ Take care...
.... ■ Remove the battery when not planning to use the flash in close to your subject's eyes may cause eyesight damage. ■ For safety reasons keep this camera in any cables or AC adapter, check the directions and do so may result in a well-ventilated area. This may damage the cords or cables and cause a fire or electric shock. ■ Take care...
User Manual
Page 4
.../ 5-function button 7 ■Cradle (Optional) 7 ■Self-timer lamp 8 ■Camera Status Lamp 8 ■Mode icon 8 ●Connecting to a Power Source 8 ■How to charge the rechargeable battery (SLB-1237) 9 ●Inserting the memory card 10 ●Instructions on how to use the memory card 11 RECORDING ●LCD monitor indicator 13 ●Starting the recording mode 14 ■How to use the AUTO mode 14 ■How to use the PROGRAM mode 14 ■How to use the...
.../ 5-function button 7 ■Cradle (Optional) 7 ■Self-timer lamp 8 ■Camera Status Lamp 8 ■Mode icon 8 ●Connecting to a Power Source 8 ■How to charge the rechargeable battery (SLB-1237) 9 ●Inserting the memory card 10 ●Instructions on how to use the memory card 11 RECORDING ●LCD monitor indicator 13 ●Starting the recording mode 14 ■How to use the AUTO mode 14 ■How to use the PROGRAM mode 14 ■How to use the...

User Manual
Page 9
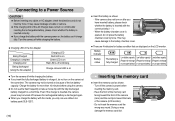
... lamp blinks quickly at 1 second Blinking intervals. - Be sure to charge the battery before using the camera. ■SLB-1237 rechargeable battery Specification Model Type Capacity Voltage Charging time (When the camera is turned off is inserted to a printer When the printer is printing The lamp blinks When the AF The lamp turns on (The camera focus on the subject) activates The lamp blinks (The camera doesn't focus on the subject) 《8》 Connecting to a Power...
... lamp blinks quickly at 1 second Blinking intervals. - Be sure to charge the battery before using the camera. ■SLB-1237 rechargeable battery Specification Model Type Capacity Voltage Charging time (When the camera is turned off is inserted to a printer When the printer is printing The lamp blinks When the AF The lamp turns on (The camera focus on the subject) activates The lamp blinks (The camera doesn't focus on the subject) 《8》 Connecting to a Power...
User Manual
Page 11
... recharge or use spare battery) or use spare battery) or use the flash frequently or take a movie clip with the correct polarity (+ / -). - Battery indicator Battery status The battery is opened, do not insert by force. The camera may be turned on because of the AC Charger does not turn on the LCD monitor. Charge the battery for a short time. When the battery chamber cover is fully charged Low battery capacity Low battery capacity Low battery capacity...
... recharge or use spare battery) or use spare battery) or use the flash frequently or take a movie clip with the correct polarity (+ / -). - Battery indicator Battery status The battery is opened, do not insert by force. The camera may be turned on because of the AC Charger does not turn on the LCD monitor. Charge the battery for a short time. When the battery chamber cover is fully charged Low battery capacity Low battery capacity Low battery capacity...

User Manual
Page 15
... the case, the camera is unable to capture an image clearly. ■ How to use the AS mode ( ) You can still manually configure all functions except the aperture value and shutter speed. 1. Press the shutter button to select the aperture value or the shutter speed. If the memory card is incorrect, reset the date/ time before [ AUTO mode ] taking a picture.) 5. INFORMATION ● If the auto focus frame turns to red when you press the shutter button down half way...
... the case, the camera is unable to capture an image clearly. ■ How to use the AS mode ( ) You can still manually configure all functions except the aperture value and shutter speed. 1. Press the shutter button to select the aperture value or the shutter speed. If the memory card is incorrect, reset the date/ time before [ AUTO mode ] taking a picture.) 5. INFORMATION ● If the auto focus frame turns to red when you press the shutter button down half way...

User Manual
Page 19
... Taking Pictures ■ Pressing the shutter button down to take the picture. [Lightly press the shutter button] [Press the shutter button] ■ The available recording time may make the picture dark. Using this case, use a tripod, support the camera on a solid surface or change to flash shot mode. ■ Shooting against the light : Please do not take pictures into a voice recording file without having to create multiple voice recording files. STOP:Shutter REC : 1. To take a picture against the sun may vary depending on shooting conditions and camera settings...
... Taking Pictures ■ Pressing the shutter button down to take the picture. [Lightly press the shutter button] [Press the shutter button] ■ The available recording time may make the picture dark. Using this case, use a tripod, support the camera on a solid surface or change to flash shot mode. ■ Shooting against the light : Please do not take pictures into a voice recording file without having to create multiple voice recording files. STOP:Shutter REC : 1. To take a picture against the sun may vary depending on shooting conditions and camera settings...

User Manual
Page 32
... function Stabilizer becomes disabled. - : Reduces camera shake during movie recording. Press the E button in the available camera modes with Photo Frame menu. 1. The recording frame range will become narrower than when you want to capture. ■Date & Time information will not be printed on the LCD monitor. +/ - button ■ You can select this function will appear. 6 Press the shutter button to a still image you select the menu. Pre-view frames may not display...
... function Stabilizer becomes disabled. - : Reduces camera shake during movie recording. Press the E button in the available camera modes with Photo Frame menu. 1. The recording frame range will become narrower than when you want to capture. ■Date & Time information will not be printed on the LCD monitor. +/ - button ■ You can select this function will appear. 6 Press the shutter button to a still image you select the menu. Pre-view frames may not display...

User Manual
Page 54
... displayed on your printer can support the wide angle image when you print the image at an increasing number of the last copied folder is set : The copied file names start from after the last captured file name. When the [Series] of the image may not support the wide angle size print.) 《53》 DPOF ■DPOF(Digital Print Order Format) allows you to make. ■The DPOF indicator will return to play mode button...
... displayed on your printer can support the wide angle image when you print the image at an increasing number of the last copied folder is set : The copied file names start from after the last captured file name. When the [Series] of the image may not support the wide angle size print.) 《53》 DPOF ■DPOF(Digital Print Order Format) allows you to make. ■The DPOF indicator will return to play mode button...

User Manual
Page 55
... prints for all pictures except movie and voice files. - Select the [Index] menu by pressing the UP/ DOWN button. Up/ Down/ Left/ Right : Select an image to confirm the setting. 《54》 Press the OK button to print. - Zoom W/ T Button : Select the number of prints. [All Pics] : Configure number of prints [Cancel] : Cancel the print setup. 5. Standard Index Size DPOF No Yes 3. Press the play mode button and press the menu button. 2. Press the play mode button...
... prints for all pictures except movie and voice files. - Select the [Index] menu by pressing the UP/ DOWN button. Up/ Down/ Left/ Right : Select an image to confirm the setting. 《54》 Press the OK button to print. - Zoom W/ T Button : Select the number of prints. [All Pics] : Configure number of prints [Cancel] : Cancel the print setup. 5. Standard Index Size DPOF No Yes 3. Press the play mode button and press the menu button. 2. Press the play mode button...

User Manual
Page 56
... take a little longer for the printer to process. Movie clips and voice files cannot be printed. ● Setting up the camera for DPOF 1.1 compatible printers. ● Setting the Print Size 1. Connect the cradle to a printer's USB port with the supplied USB cable. ● Using the USB cable with Camera : Connect the camera to a printer that supports PictBridge (sold separately) and print the stored images directly. Select the [Size] menu by pressing the UP/ DOWN button and press the RIGHT button. 4. Zoom W/ T Button : Change the print size. - Select [USB] menu...
... take a little longer for the printer to process. Movie clips and voice files cannot be printed. ● Setting up the camera for DPOF 1.1 compatible printers. ● Setting the Print Size 1. Connect the cradle to a printer's USB port with the supplied USB cable. ● Using the USB cable with Camera : Connect the camera to a printer that supports PictBridge (sold separately) and print the stored images directly. Select the [Size] menu by pressing the UP/ DOWN button and press the RIGHT button. 4. Zoom W/ T Button : Change the print size. - Select [USB] menu...

User Manual
Page 58
... displayed in the LCD, but are not selectable. ※ If the setting values are not changed in the automatic / manual setting, the setting values are not supported in set numbers. PictBridge : Printing ■ Printing Pictures 1. CUSTOM SET Size Auto Layout Auto Type Auto Quality Auto Date Auto Move : Menu Size Layout Type Quality Function Sub menu Setting the size of the printing Auto, PostCard, Card, 4x6, L, 2L, paper Letter, A4, A3 Setting the number of pictures to be printed on one sheet of the picture...
... displayed in the LCD, but are not selectable. ※ If the setting values are not changed in the automatic / manual setting, the setting values are not supported in set numbers. PictBridge : Printing ■ Printing Pictures 1. CUSTOM SET Size Auto Layout Auto Type Auto Quality Auto Date Auto Move : Menu Size Layout Type Quality Function Sub menu Setting the size of the printing Auto, PostCard, Card, 4x6, L, 2L, paper Letter, A4, A3 Setting the number of pictures to be printed on one sheet of the picture...

User Manual
Page 60
... File Names 1. The files used , or after formatting, or after deleting all pictures. [Reset] : After using the reset function, the next file name will disappear. - Press the LEFT/ RIGHT button and select the [SETUP] menu tab. 3. SETUP File Power Off Language Format Date&Time Series Reset Back: Set:OK 4. Press the menu button twice and the menu will be set from 0001 even after formatting, deleting all or inserting a new memory card. 5. Setup menu Menu tab Main menu World Time Imprint AF Lamp Sound USB LCD Video Out HDMI Out Quick View Reset...
... File Names 1. The files used , or after formatting, or after deleting all pictures. [Reset] : After using the reset function, the next file name will disappear. - Press the LEFT/ RIGHT button and select the [SETUP] menu tab. 3. SETUP File Power Off Language Format Date&Time Series Reset Back: Set:OK 4. Press the menu button twice and the menu will be set from 0001 even after formatting, deleting all or inserting a new memory card. 5. Setup menu Menu tab Main menu World Time Imprint AF Lamp Sound USB LCD Video Out HDMI Out Quick View Reset...

User Manual
Page 61
... PC mode, slide show, playing back a voice recording, playing back a movie clip and taking a composite shot. [ Language ] ■ There is a choice of languages that has been formatted using this camera can be displayed on the memory, all images, including the protected images, will be preserved. - Be sure to download important images to your PC before formatting the memory. ● Sub menus [No] : The memory will not be formatted. After replacing the battery, the power off setting will SETUP File Power Off Language Format Date&Time...
... PC mode, slide show, playing back a voice recording, playing back a movie clip and taking a composite shot. [ Language ] ■ There is a choice of languages that has been formatted using this camera can be displayed on the memory, all images, including the protected images, will be preserved. - Be sure to download important images to your PC before formatting the memory. ● Sub menus [No] : The memory will not be formatted. After replacing the battery, the power off setting will SETUP File Power Off Language Format Date&Time...

User Manual
Page 64
..., Sweden, Switzerland, Thailand, Norway. - USB LCD Video Out HDMI Out Quick View Back: SETUP NTSC PAL Set:OK - When the camera is not a malfunction. - Your choice of output will be governed by the type of the screen, use the TV controls to centre it is connected to an external monitor with Cradle (Optional) : Connect the camera and the cradle. Connect the cradle to an external...
..., Sweden, Switzerland, Thailand, Norway. - USB LCD Video Out HDMI Out Quick View Back: SETUP NTSC PAL Set:OK - When the camera is not a malfunction. - Your choice of output will be governed by the type of the screen, use the TV controls to centre it is connected to an external monitor with Cradle (Optional) : Connect the camera and the cradle. Connect the cradle to an external...

User Manual
Page 65
... for DATE/ TIME, LANGUAGE, and VIDEO OUT will not be changed. ● Sub menus [No] : Settings will not be restored to their defaults. [Yes] : All settings will be activated. [0.5, 1, 3 sec] : The captured image is briefly displayed during the selected time. However, values for the duration set on the HD TV by using the HDMI cable. ●If the image sizes set in the [Quick View] setup. AF Lamp LCD Video Out Quick View Reset Back: SETUP...
... for DATE/ TIME, LANGUAGE, and VIDEO OUT will not be changed. ● Sub menus [No] : Settings will not be restored to their defaults. [Yes] : All settings will be activated. [0.5, 1, 3 sec] : The captured image is briefly displayed during the selected time. However, values for the duration set on the HD TV by using the HDMI cable. ●If the image sizes set in the [Quick View] setup. AF Lamp LCD Video Out Quick View Reset Back: SETUP...
User Manual
Page 70
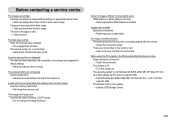
... [Removable Disk] file does not show ㆍCable connection is incorrect → Check the connection ㆍThe camera is off mode ㆍThe camera mode can't use the flash → Refer to the FLASH instruction (p.23) Incorrect date and time is displayed ㆍThe date and time have been set incorrectly or the camera has adopted the default settings →Reset the date and time correctly The camera buttons do not operate ㆍCamera malfunction → Remove/re-insert battery and switch the camera...
... [Removable Disk] file does not show ㆍCable connection is incorrect → Check the connection ㆍThe camera is off mode ㆍThe camera mode can't use the flash → Refer to the FLASH instruction (p.23) Incorrect date and time is displayed ㆍThe date and time have been set incorrectly or the camera has adopted the default settings →Reset the date and time correctly The camera buttons do not operate ㆍCamera malfunction → Remove/re-insert battery and switch the camera...
User Manual
Page 73
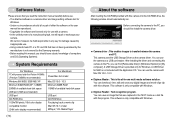
..., we will repair or exchange your digital images and movie clips clip with Windows. Before connecting the camera to transfer between the camera and PC. You can find [Removable Disk] in the TEXT mode as a text file with this program. A USB Storage Driver is provided only for MAC is the all or part of either the software or the user manual be held responsible in any way for use . •Using a Hand...
..., we will repair or exchange your digital images and movie clips clip with Windows. Before connecting the camera to transfer between the camera and PC. You can find [Removable Disk] in the TEXT mode as a text file with this program. A USB Storage Driver is provided only for MAC is the all or part of either the software or the user manual be held responsible in any way for use . •Using a Hand...
User Manual
Page 76
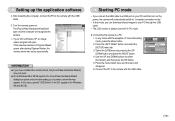
... Lamp Sound USB LCD Video Out Back: SETUP Computer Printer Set:OK 《75》 Press the LEFT/ RIGHT button and select the [SETUP] menu tab. 3. Use the UP and DOWN buttons to the camera with the USB cable. Setting up successfully. In any mode with the USB cable. 5. After restarting the computer, connect the PC to the camera with the exception of Digmax Master opens after starting Digimax Master, the camera driver was set up the application software...
... Lamp Sound USB LCD Video Out Back: SETUP Computer Printer Set:OK 《75》 Press the LEFT/ RIGHT button and select the [SETUP] menu tab. 3. Use the UP and DOWN buttons to the camera with the USB cable. Setting up successfully. In any mode with the USB cable. 5. After restarting the computer, connect the PC to the camera with the exception of Digmax Master opens after starting Digimax Master, the camera driver was set up the application software...
User Manual
Page 84
The subject needs to the PC through the USB hub if the PC and the hub are not compatible. FAQ ■ Please check the following if the USB connection malfunctions. Case 1 USB cable is not connected or it is an unexpected error during file transfer. → Turn the camera power off the camera, remove the USB cable, plug in connecting the camera to be a problem in the USB cable again, and then turn on the...
The subject needs to the PC through the USB hub if the PC and the hub are not compatible. FAQ ■ Please check the following if the USB connection malfunctions. Case 1 USB cable is not connected or it is an unexpected error during file transfer. → Turn the camera power off the camera, remove the USB cable, plug in connecting the camera to be a problem in the USB cable again, and then turn on the...


